WARNING: THIS INSTALLATION METHOD IS DEPRECATED and will not work for Open edX versions released after December 20, 2021. The Maple release and all future releases are installed using Tutor, a Docker-based application.
Summary
This installation method only works for Open edX releases Lilac and older. It was originally based upon Ned Batchelder’s “Native Open edX Ubuntu 16.04 64 bit Installation” method but I’ve occasionally updated the steps to account for changes due to subsequent named releases of the platform. This article is currently updated for the Lilac release of Open edX running on Ubuntu 20.04 LTS. The first time I installed an instance of Open edX, in many ways I felt like I was on the outside looking in. The project documentation that exists is very good, but, it assumes an extensive knowledge base that, at the time, I lacked. This article attempts to fill in some of the gaps in that knowledge base, and hopefully, make the Open edX platform more accessible.
This is a fully automated script to stand up a single-server full-stack production-ready instance of Open edX running on an Amazon Web Services (AWS) EC2 (Elastic Compute Cloud — aka virtual server). The script installs the following Open edX modules:
It also installs all required subsystems and all optional modules. It installs everything on the single server instance in which you initiated the script. That is, this script does not provision nor assume any additional AWS resources.
Once this script is completed you’ll find the complete application software code base in /edx/ and a list of the automatically-generated strong passwords at /home/ubuntu/my-passwords.yml. You should keep the passwords file in your home directory because downstream devops procedures need this file and expect to find it in this location. Additionally, you should make an offline copy of the passwords file. Do not change the file ownership, nor group, nor permissions of the passwords file.
The Open edX platform leverages a plethora of technologies, and this tends to be a formidable stumbling block for all of us, initially at least. For what it’s worth, I know a lot about a few of Open edX’s technologies, and almost nothing about everything else. Unlike the official documentation, this page attempts to assume as little as possible. Hopefully it helps. Good luck!
Build Procedure
Need it now?
Get your Open edX installation working same day.
I. Create a new AWS EC2 instance
You should create a fresh server instance per the instructions / screen shots that follow. Some advice:
- Do not attempt to install Open edX on an existing machine. It probably won’t work. Worse, you’ll probably destroy the existing server.
- Do not attempt to install Open edX on a version of Linux other than Ubuntu 20.04. It won’t work.
- Do not attempt to use a cloud service provider other than AWS. It might work, but, you’ll be flying solo in terms of documentation.
- Keep in mind that the Open edX documentation’s “minimum hardware requirements” are exactly that: the bare minimum that is technically feasible. You need more robust gear for a production deployment.
Following is a down-and-dirty set of screen shots to walk you through the key server attributes in terms of size, security and so on. If you’re unfamiliar with Amazon Web Services then you can start your journey here: https://aws.amazon.com/getting-started/.
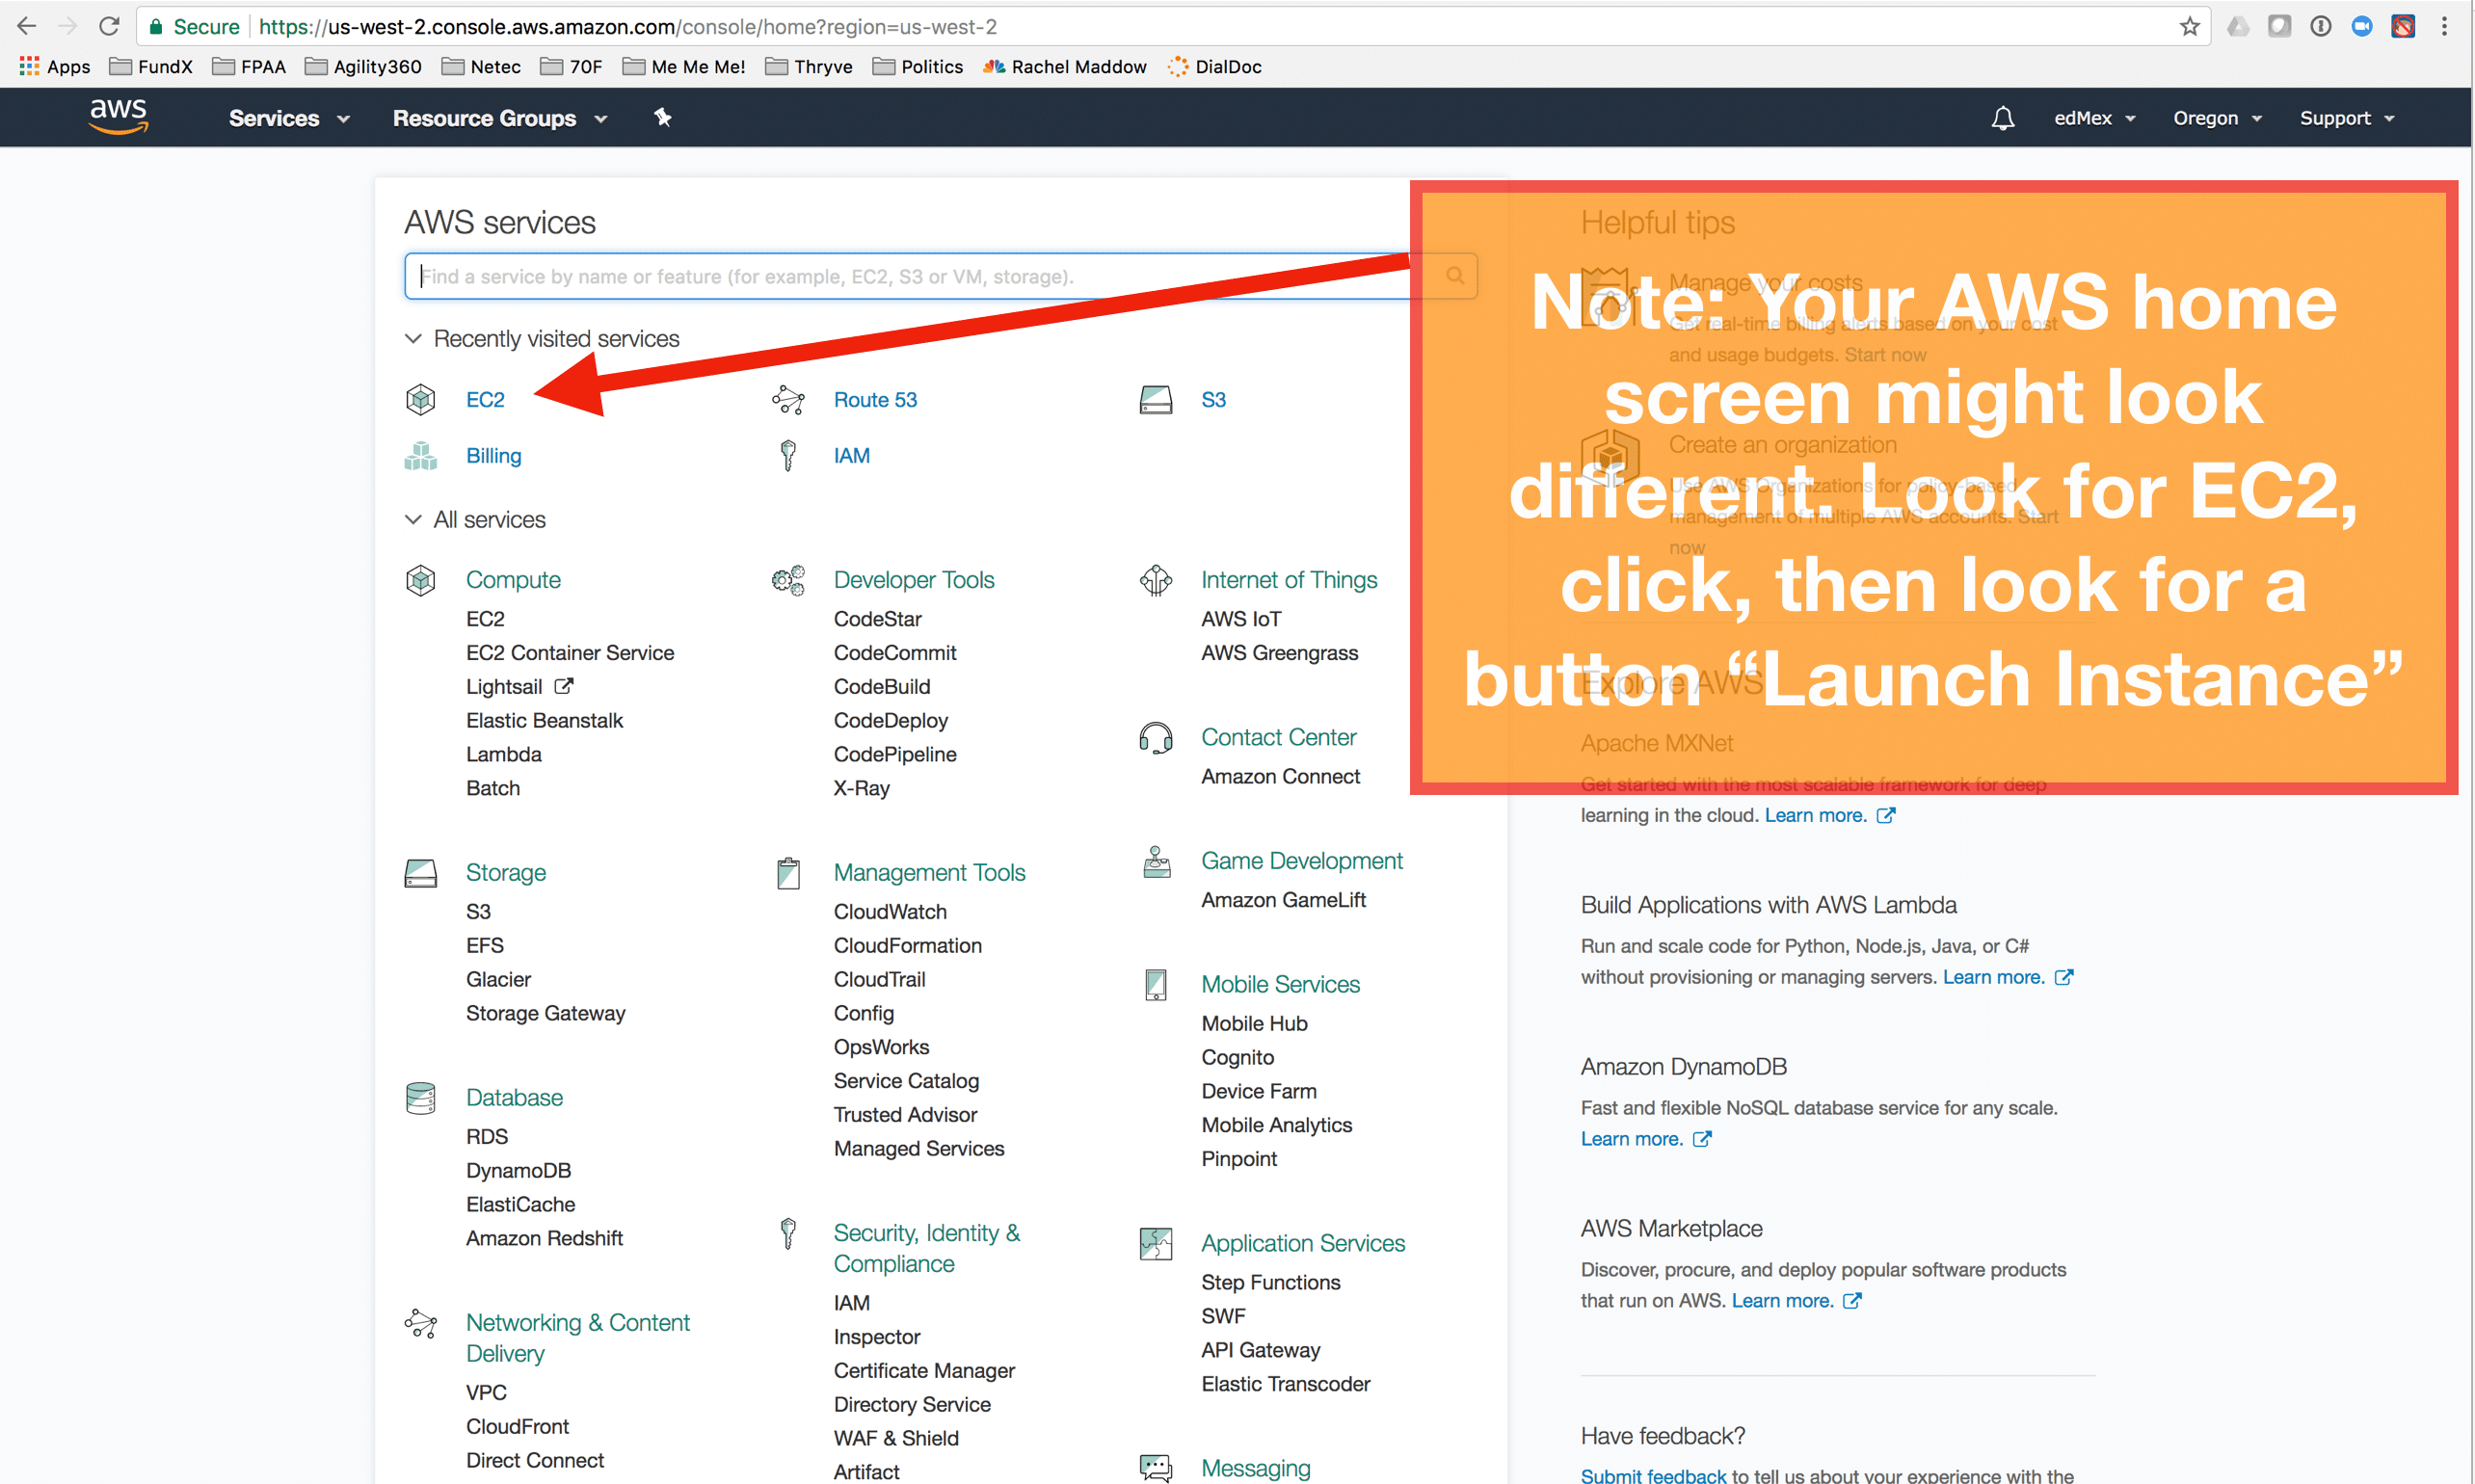
Login to your AWS Account. Navigate to the EC2 console. Look for an action button that reads “Launch Instance”
Step 1: Choose AMI
AWS provides you with a pick list of several common server operating systems. Technically speaking, each of these options is an AMI (Amazon Machine Image) that AWS internally maintains and makes available to their customers. For you, this means that you’re able to spin up an Ubuntu server in a few seconds, without needing to worry about where the operating system repo might be located and so on.

Step 2: Server Sizing
AWS EC2 Server Sizing: After prolonged experimentation I have gravitated to AWS EC2 T2.Large servers as my virtual server configuration of choice. Generalizing, this provides 2 cpu’s and 8gb of memory, which is sufficient resource for a small production implementation. As of February 2021 AWS charges $0.0928 per Hour ($67 USD per month) for a t2.large server. You can dramatically reduce the cost of the server by purchasing a one-year contract for the server instance, in which case the cost reduces to $42 USD per month. I launch these with 100gb of drive space, which thus far has been far more than sufficient for my needs. Bear in mind that my recommendation is almost exactly double that provided in the official edX documentation. My view on this is that it’s already challenging enough to get this platform up and running without adding unnecessary challenge by under-sizing your equipment.
Very generally speaking, this server config should handle a couple hundred concurrent learners. Look at the bottom of this page for links to downstream repos that are part of a simple horizontal scaling strategy for small (but not tiny) institutions.

Note: AWS only charges for time that your instance is running. You can stop the server from the AWS EC2 console at any time, which is logically identical to powering down a physical server.
Step 3: Instance Details
The default values provided in this screen are what you want. Later on it would be a great idea to revisit these settings to get a better understanding of your infrastructure-level configuration options.

Step 4: Add Storage
AWS instances by default come with 8gb of “hard drive” storage. However, you can modify this. You’ll need at least 50gb of storage for Open edX plus normal amounts of data. I suggest doubling that amount, to 100gb. I have not seen that this impacts the cost of the server in any meaningful way.

Step 5: Add Tags
Tags are a way to identify AWS resources inside your account. This is only important if you have many resources (for example, many server instances) in existence in your AWS account. Otherwise you can skip this step.

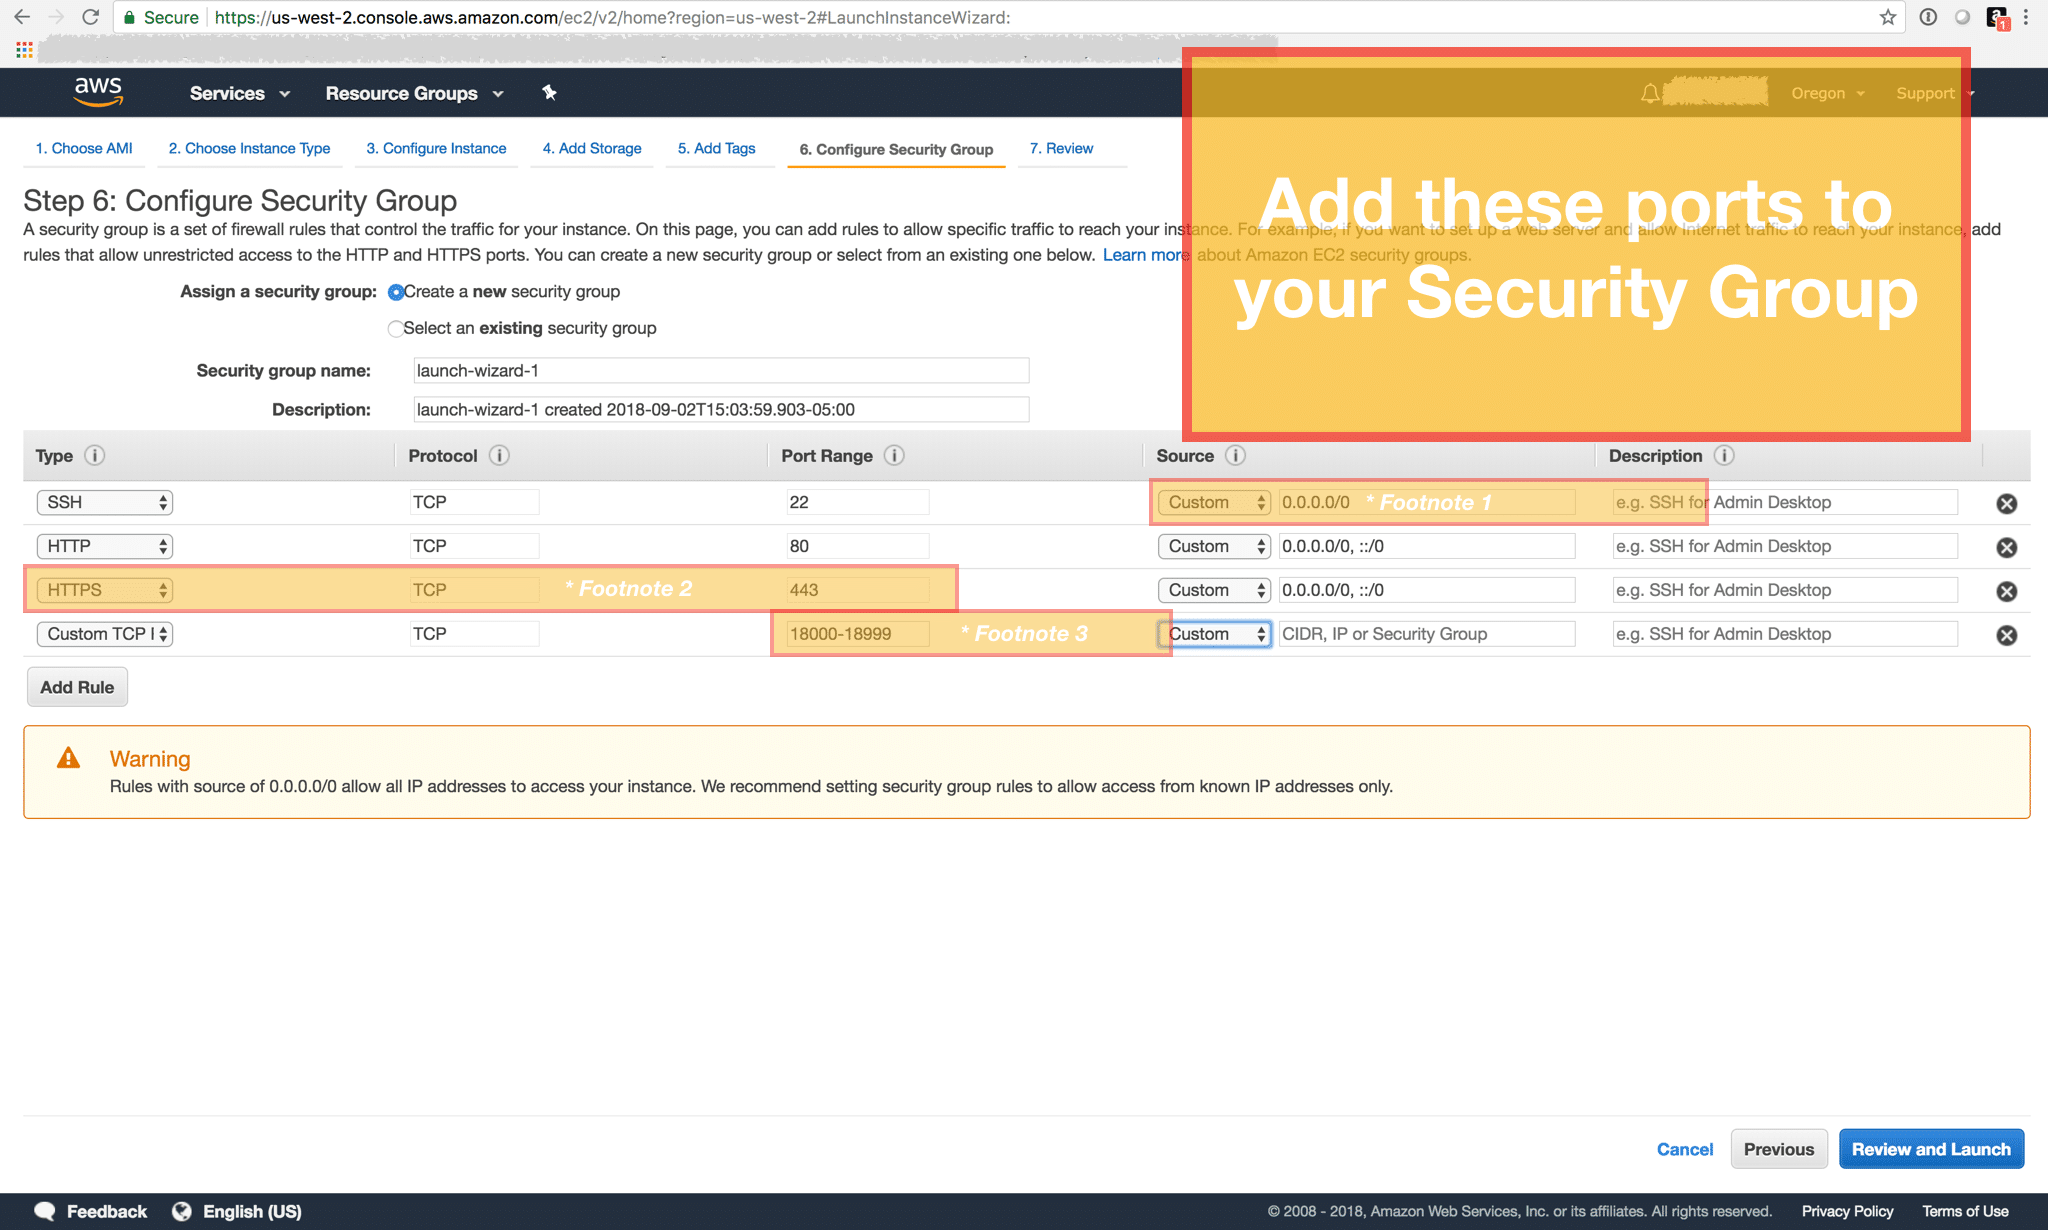
Step 6: Security Profile
This is important. You manage server port settings separately from the server itself. Generalizing, you create a port security profile, and then assign this profile to your EC2 instance. Open edX uses many ports as part of the standard installation. Note that this script installs ALL modules, and you therefore need to open many ports. Open edX default http addressing uses port numbers rather than subdomains or url paths/routes. The ports in the screen shot that follows correspond with the following Open edX modules.
| Module | Port |
|---|---|
| LMS | 80 |
| CMS | 18010 |
| Certs | 18090 |
| Discovery | 18381 |
| Ecommerce | 18130 |
| edx-release | 8099 |
| Forum | 18080 |
| Xqueue | 18040 |
Some of these urls lead to a landing page, others do not.
footnotes:
- SSH Source: This is an optional parameter that you can provide to limit the IP addresses that can attempt to connect to your EC2 instance using SSH. By default this parameter is set to 0.0.0.0/0, which allows ANY IP address to attempt to connect. You can improve the security of your server by limiting this to IP ranges for you and your team.
- HTTPS: this is an optional port. You should open this port if you are planning to setup HTTPS protocol with SSL/TLS encryption.
- This opens all of the ports from 18000 to 18999. This is the port range used by Open edX applications, subsystems, and API’s.
Step 7: Review Instance Prior to Launch

Step 8: Setup an SSH key pair
You’ll use a terminal emulator via SSH to connect to your server. If you’re unfamiliar with how to connect to a linux server then you can start your journey here: http://docs.aws.amazon.com/AWSEC2/latest/UserGuide/putty.html. Note that you will run this script as well as execute nearly all Open edX admin utilities from a linux command line. So, if you’re new to this then you should bite the bullet and do some online self-study on using linux terminal emulators and SSH.

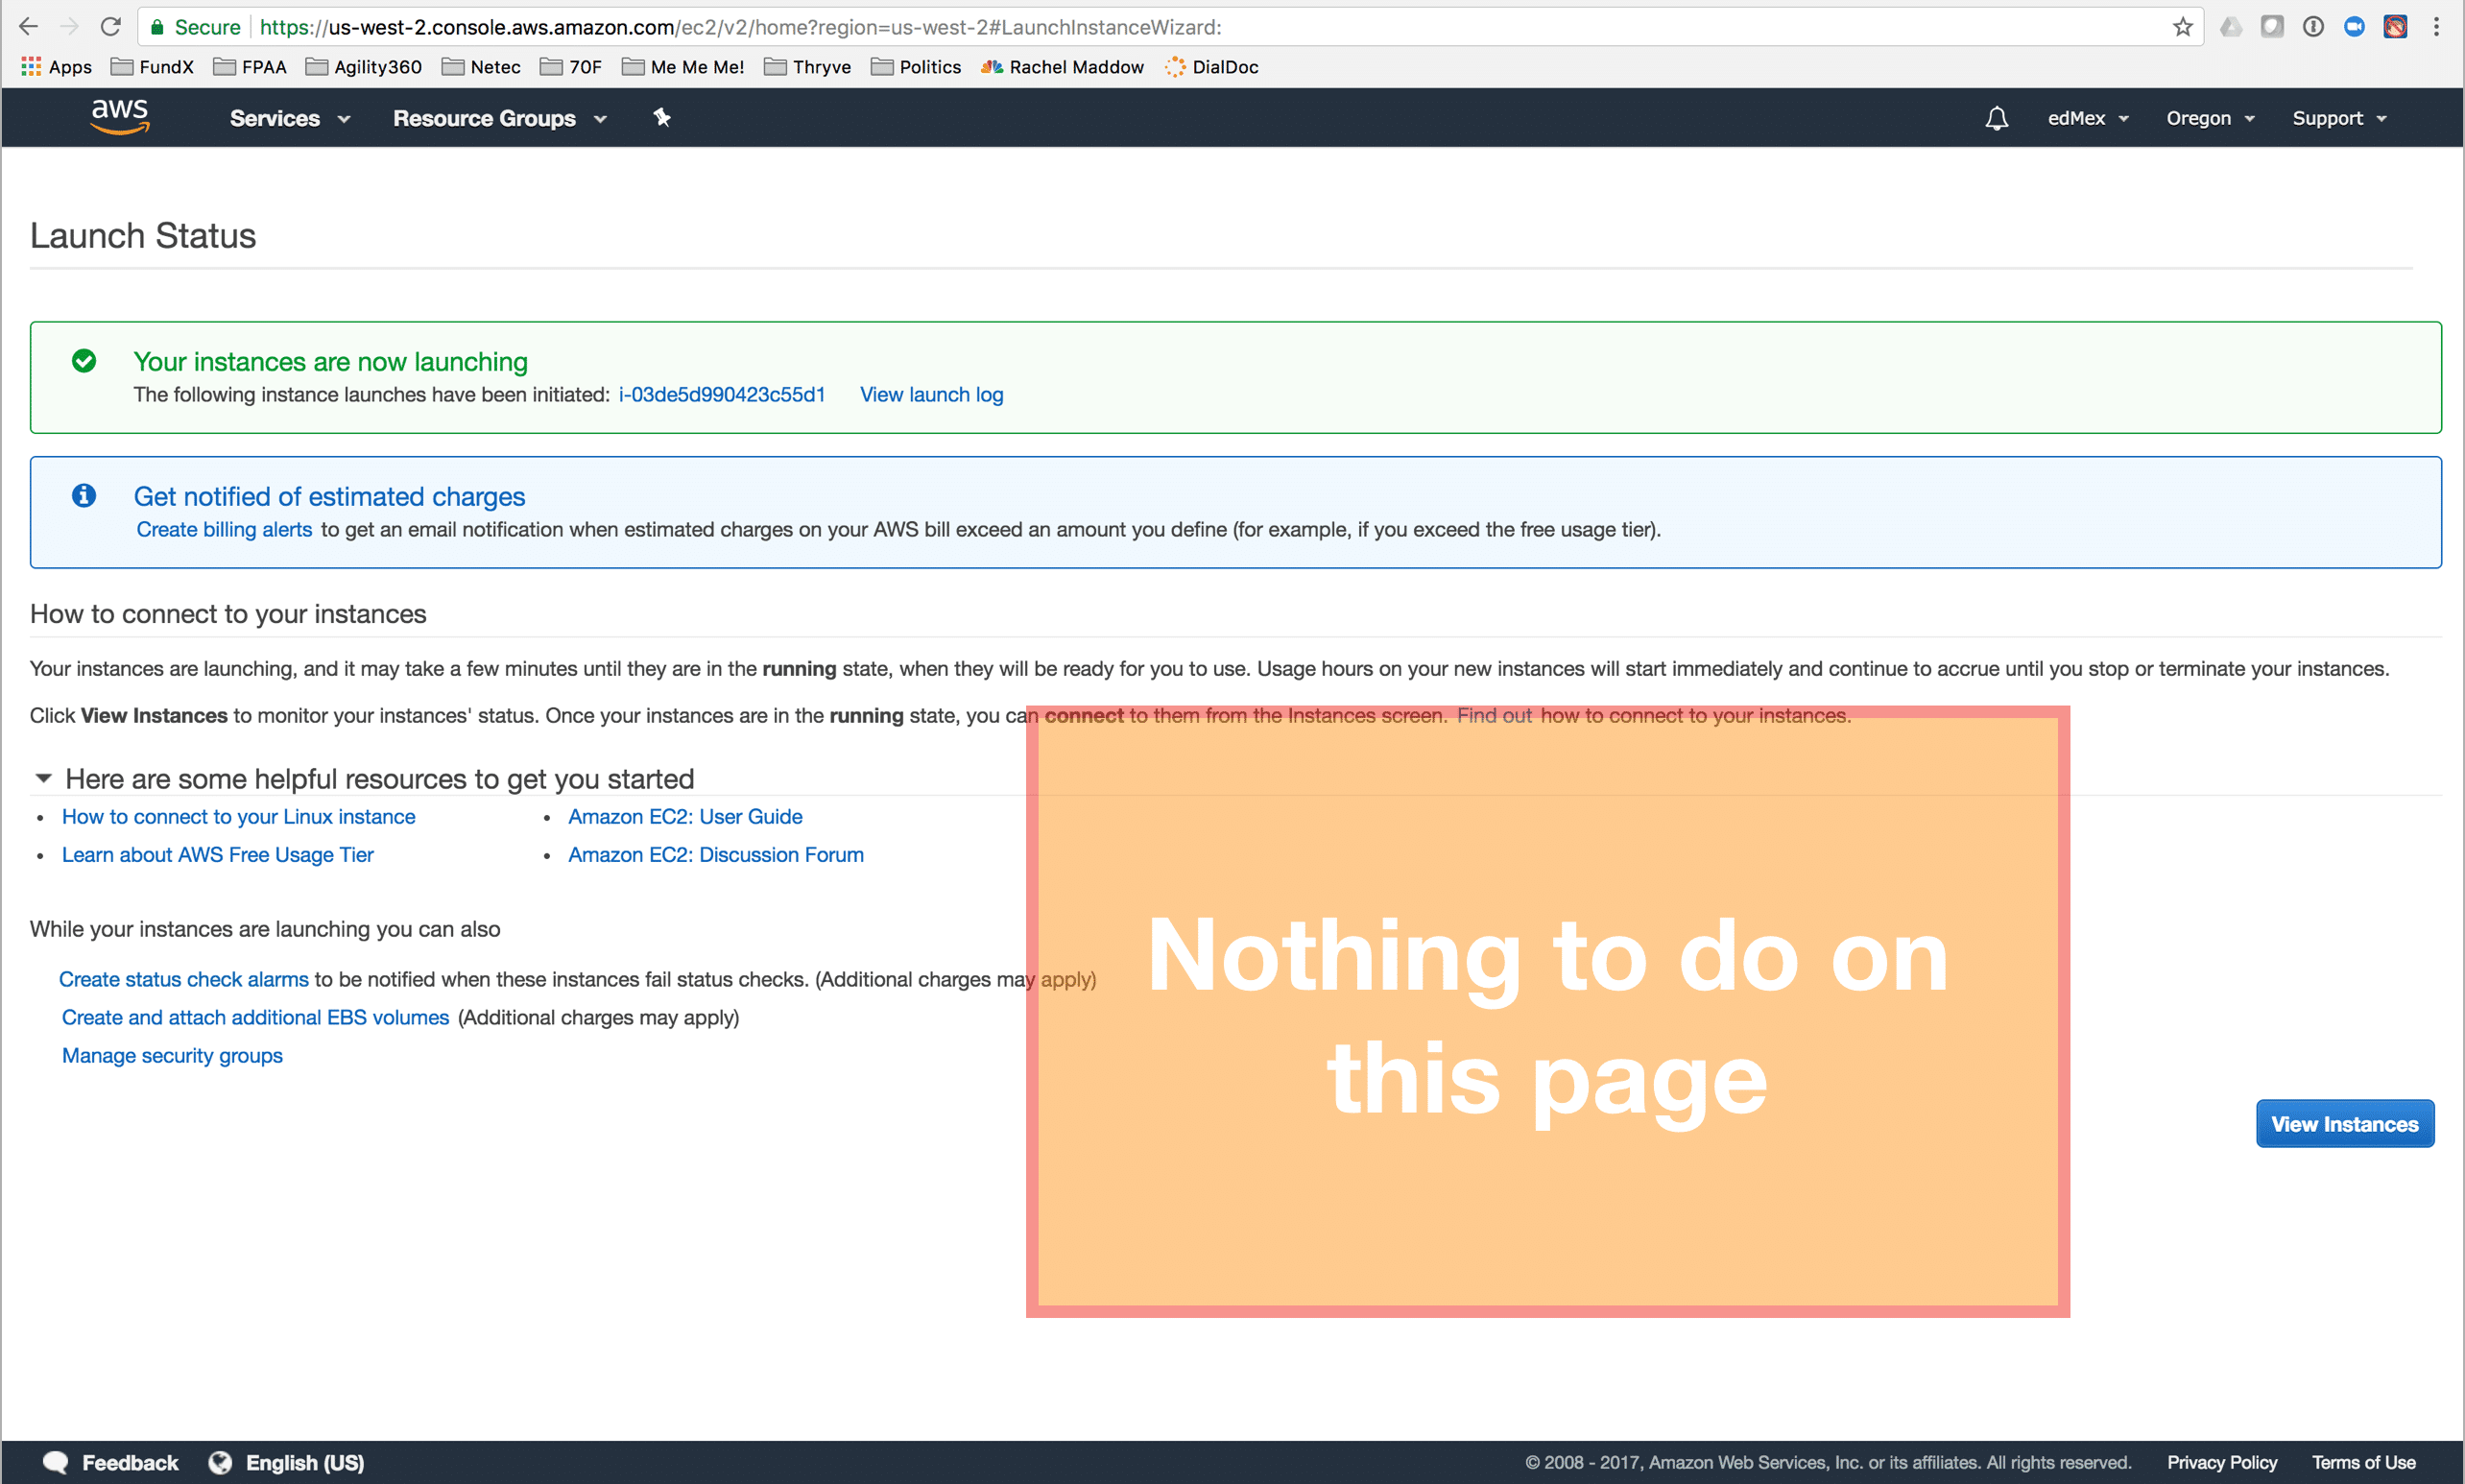
Step 9: Launch Status
Click the blue “View Instances” button at the bottom-right of this screen.
Step 10: EC2 Instance Console
If this is your very first EC2 instance then you’ll see a single row on this screen that shows the vital signs of your new Linux virtual server. It will take a few minutes for the server to instantiate itself and come online. When the server is ready the “Instance State” field will read “Running” and the icon color will change from yellow to green.

You are now finished with the AWS management console. Hereon you will interact with your EC2 instance using a terminal window over SSH.
II. Execute the script
Prepare the server:
# locale-gen sets the character set for terminal output.
# Fresh installations of Ubuntu do not have a locale yet, and this will cause
# the Open edX installer scripts to fail, so we'll  set it now.
# For any input prompts that follow, you can select the default value.
sudo locale-gen en_US en_US.UTF-8
# With the locale set, we'll reconfigure the Ubuntu packages
# to use whatever character set you selected.
sudo dpkg-reconfigure locales
sudo dpkg --configure -a

# Update Ubuntu 20.04
sudo apt-get update -y
sudo apt-get upgrade -y
sudo reboot
Then, after your server comes back, create a config.yml file. This is required by the Open edX installer scripts beginning with the Ironwood release.
cd ~

# The Ironwood release and newer versions require a file named "config.yml"
# that you'll need to create and save in your home folder.
# We'll use a terminal editor named vim for this.
vim config.yml

# To put vim into edit mode, type "i"

# add the following two lines, replacing the text "courses.example.com" with
# your fully-qualified domain name or server IP address.
# note: Keep the quotes.
EDXAPP_LMS_BASE: "courses.example.com"

# note that the Open edX software by default assumes that you will use the same
# domain name for both EDXAPP_LMS_BASE and EDXAPP_CMS_BASE. If you choose to assign
# a different domain for the CMS then some additional configuration will be required
# for NGINX, user sign-in, CSRF and CORS.
EDXAPP_CMS_BASE: "courses.example.com"

# To exit edit mode type the escape key
# To save the file (ie "write") and quit vim, type ":wq" :wq
And finally, download and run the Open edX native build script. This script will install Ironwood.master by default, but you can edit the file and change this to any version you want.
sudo wget https://raw.githubusercontent.com/lpm0073/edx.scripts/master/edx.platform-install.sh
sudo chmod 755 edx.platform-install.sh

nohup ./edx.platform-install.sh &
# I've had trouble getting the nohup version of this command to work on Ubuntu 20.04.
# You can alternatively use this command
# ./edx.platform-install.sh
You can read more about the nohub directive here: https://en.wikipedia.org/wiki/Nohup. As relates to this usage, the combination of the nohup directive along with the ampersand at the end of the line will cause the script to launch on a new thread. That is, it will not execute on the thread that is managing your terminal connection. Thus, when you logout of the server (or if the connection is inadvertently broken) then the script will continue to run until completion.
I suggest using up to three additional terminal windows to monitor progress of the script.
- the linux
topcommand is similar to Windows and OSX’s “System Activities” or “System Monitor” windows. The server cpu usage will remain steady at around 50% cumulative usage while the script is running. - the command
sudo /edx/bin/supervisorctl statuswill print the Open edX processes that are currently running. You’ll see this list grow as the script progresses - using
lsto explore the children folders of /edx/ will at a minimum be informative.
Editorial Note: I am a Linux neophyte at best, and I hope your newfound knowledge of such fact brings you hope.
III. Verify that the script worked
Once the script is complete you should be able to open the landing pages for both the LMS and the CMS. See below for additional information about the many port assignments and URL oddities of Open edX. More immediately, the landing pages for the LMS and CMS should look like the following:


Also, using the following admin command line script, you can view which Open edX modules are currently running:
sudo /edx/bin/supervisorctl status
If the installation was successful then you should see the following: 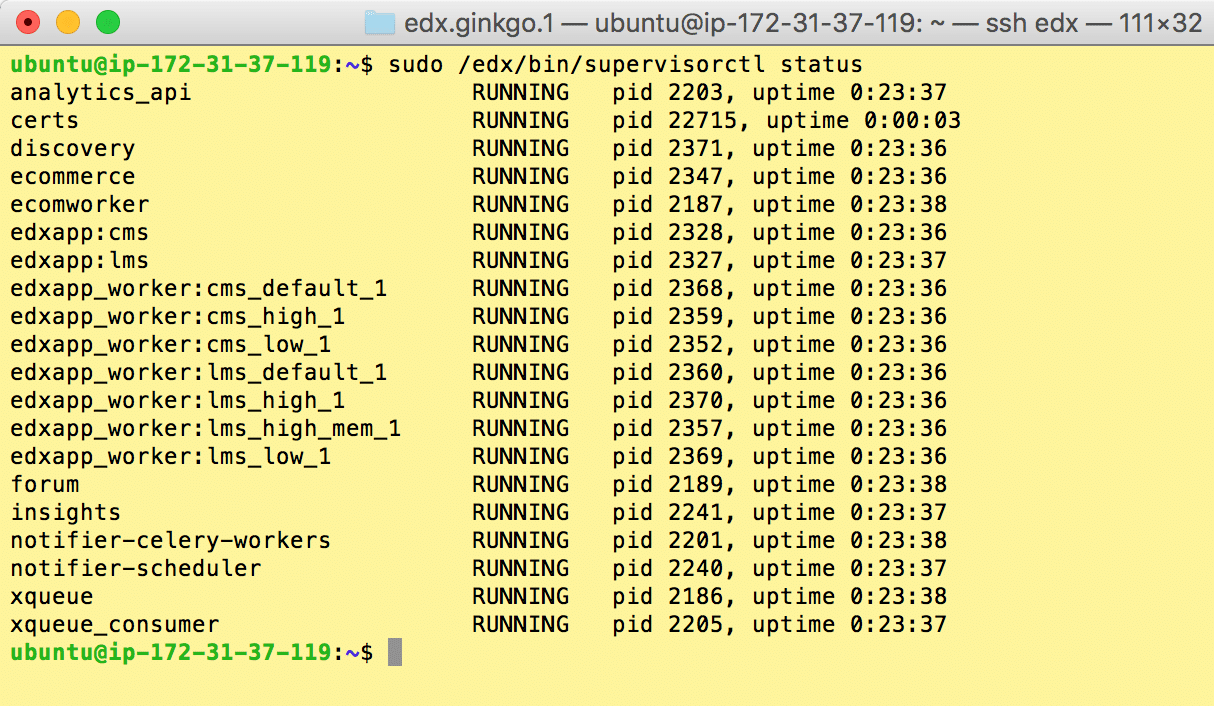
IV. Create an admin account
You can save yourself a lot of future busy work by creating a root / admin account in this instance, prior to creating your AMI. Following are the commands to create a new superuser from the terminal command line:
# create the admin account
sudo -H -u edxapp bash
source /edx/app/edxapp/edxapp_env
cd /edx/app/edxapp/edx-platform
python manage.py lms --settings production createsuperuser

# Optional: add the ubuntu user to a couple of the Open edX Linux groups. This will greatly simplify working with Open edX system files.
sudo usermod -a -G www-data ubuntu
sudo usermod -a -G edxapp ubuntu
V. Create an AWS AMI
Read more here to learn about what an AMI (Amazon Machine Image) is, and how it is used: http://docs.aws.amazon.com/elasticbeanstalk/latest/dg/using-features.customenv.html
Meanwhile, here’s a screen shot short cut that at least points you in the right direction of where to go and what to do.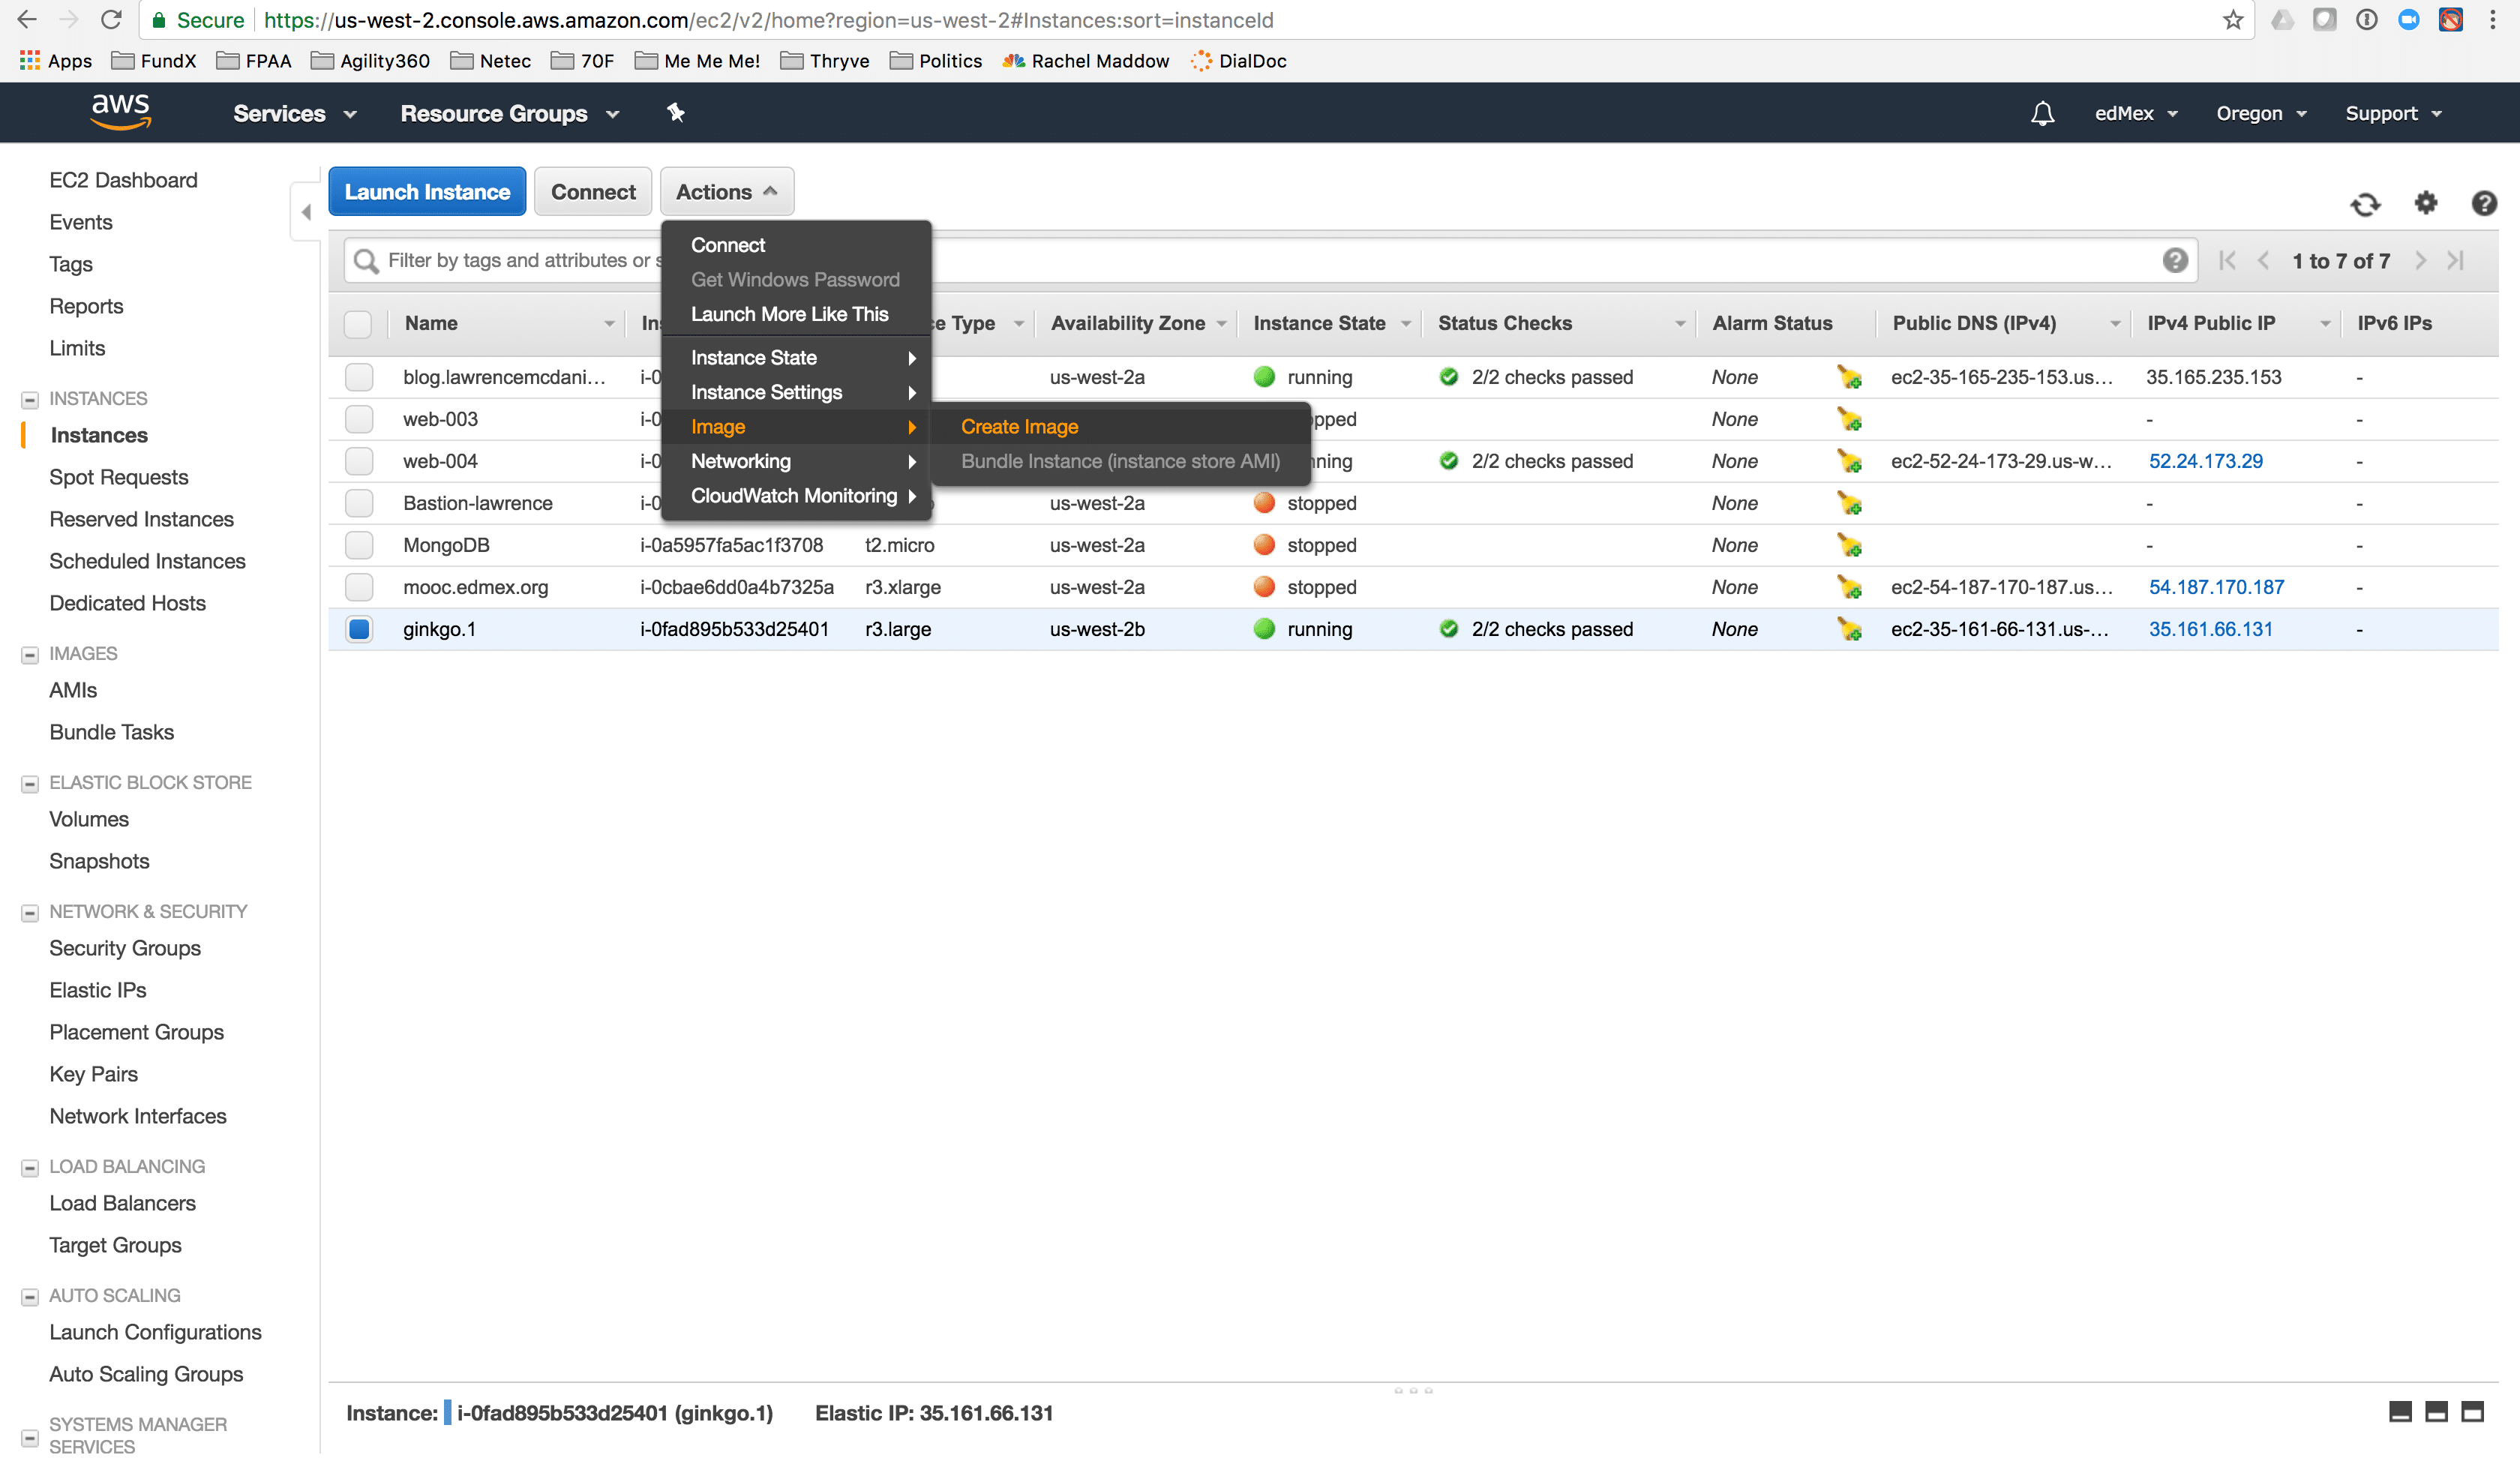
It will take around 15 minutes for the AWS Image to render. Once the process has completed, and only after the process has completed, you can terminate the original EC2 instance from the EC2 instance console.
VI. Configure Your LMS & Studio Applications
The native installation program creates two yml files located in /edx/etc/ which contain the most important Django application parameters for your Open edX platform including for example, the name of your platform and the domain name. The files are a huge improvement to the json files that were used in previous versions.
Some basic configuration guidelines
- There are nine configuration files for the entire platform, but the two MAIN files are lms.yml and studio.yml. These are located in /edx/etc
- Avoid editing the passwords values in any the yml files. These files contain dozens of passwords that the Open edX platform created during the native installation procedure. Other than setting the password for your SMTP email account, there is virtually no reason for you to edit either of these files. A copy of the original password values exists in the file ~/my-passwords.yml.
- Any changes to any of these files take effect after restarting the platform. The following command line instructions will restart your platform
# These are the commands for restarting the LMS and CMS beginning with Gingko
/edx/bin/supervisorctl restart lms
/edx/bin/supervisorctl restart cms
# If you're running a previous version of Open edX then use this command instead
#/edx/bin/supervisorctl restart edxapp:

/edx/bin/supervisorctl restart edxapp_worker:
Following are examples configuration files (in the older JSON format) for a hypothetical MOOC named Surf School
VII. Deploy to Production
Bear in mind that there are additional steps that you still need to take in order to prepare your environment for a production deployment. Following will get you started on the most common additional platform requirements for most types of institutions and organizations.
| Requirement | Description |
|---|---|
| Setup custom theming | In order to customize the appearance of your Open edX installation you’ll need to setup “Custom Theming”. For example, you’ll want place your organization’s logo and name on the page headers, and you might also want to make modifications to basic style information such font family, primary and secondary colors, styling of hyperlinks and so on. |
| Change The Open edX Logo | The first thing you’ll probably want to do with your new Open edX instance is replace the platform’s default double-circle logo with your organization’s logo. This blog post provides step-by-instructions on how to do this the right way. |
| Enabling optional features | Many commonly required features are not enabled by default. My article, “Open edX Configuration Tutorial” provides step-by-step instructions on tailoring the features for your platform. You might also want to read my technical article on best practices for managing your configuration files, “Open edX Configuration Management Tutorial“. |
| Setup automated daily backup | It is important that you maintain remote backups of your production data. This post explains where your data stored, and how to setup an automated back that store your data in an AWS S3 bucket. |
| Setup SMTP email | A production implementation of Open edX depends extensively on good email communication from your Open edX server to your learners and teaching staff. However, Open edX does not ship with an SMTP-compliant email server, and thus, you need to provide this yourself. Many organizations use a free Gmail account for to satisfy this requirement. This blog post explains how to set this up. |
| Setup SSL encryption | Providing a secure browsing environment for your learners is a great way to make your Open edX experience as professional as possible. This blog post provides step-by-step details on how to setup HTTPS protocol with standard SSL/TLS encryption using a free certificate from LetsEncrypt |
| Setup Google Analytics | One of the quickest and easiest ways to begin to gather good analytics data about your production platform is to link a free Google Analytics account to your site. This blog post provides instructions on how to do this. |
| Installing Xblocks | Xblocks extend the functionality of Open edX, particularly with regard to courseware. As of this publication date there are more than a hundred community-supported XBlocks available to download for free. This blog post explain more about XBlocks and how to install one. |
| Adding custom pages | Many institutions want to add additional static pages such as, “About”, “Contact”, “Privacy Policy”, “Terms of Use” and so on. This blog post show you how to create and name a static page in Open edX. |
| Install Notes & Annotations | Notes & Annotations enables your learners to create inline annotations and comments within the text of your courses. It also providers your learners with a single console where they can view all of their notes. This is a very popular enhancement that most institutions require. |
| Setup Ecommerce | If you plan to charge money for your courses then you should consider using Open edX’s Ecommerce module. This module provides native Ecommerce integration along with payment gateways to popular US-style forms of payment such as PayPal, Visa, MasterCard and Amex. |
Additional Resources
Open edX Github Repositories
This installation script will download exactly two repositories:
- The Open edX platform: https://github.com/edx/edx-platform
- the official installation scripts: https://github.com/edx/configuration edX uses github tags with both of these repositories to point to named releases. You’ll find the various named releases and their various github tag names here: https://openedx.atlassian.net/wiki/spaces/DOC/pages/11108700/Open+edX+Releases
Note that https://github.com/edx is the official repository organization for Open edX software. Also note that there are a gazillion repos in this organization. Peruse, download and experiment with these at your own peril. And at any rate, keep in mind that the only two repos you need in order to stand up your instance are the two listed above — the names and purposes of which i assume will never change in future.
The script installs a multitude of subsystems, including:
| pip | prettytable | RabbitMQ |
| ansible | awscli | python-simple-hipchat |
| PyYAML | requests | MongoDB |
| Jinja2 | datadog | docopt |
| MarkupSafe | networkx | MySQL |
| boto | pathlib2 | wsgiref |
| ecdsa | boto3 | Nginx |
| paramiko | pymongo | MySQL-python |
| pycrypto | Elastic Search | memcached |
And others
Important edX Platform Folders
The complete platform creates a labyrinth of folders within /edx. However, a short list of these are of particular interest, and are worth the time it takes to explore in order know each’s contents.
| /edx/app | application software files for all edx modules |
| /edx/app/edx_ansible/edx_ansible/playbooks | all Ansible playbooks. You’ll learn a lot about how Ansible works simply by learning more about its folder structure |
| /edx/app/edx_ansible | location to store server-vars.yml (further described in downstream repos) |
| /edx/app/edxapp/edx-platform/themes | app theme home folder. Exploring these folders will help to crystalize how Open edX’s theming architecture works |
| /edx/bin | “home” folder for all pip, ansible and bash admin utilities |
| /edx/etc | configuration files for all edx modules |
| /edx/var | all data (app, logs, etcetera) |
New Features
Open edX’s Hawthorn release is a major platform upgrade that includes many feature improvements and new features. appsembler wrote an excellent blog post not only describing many of the new features in detail, but also explaining how to enable these features.
| Learner progress tracking and Completion API | Course Reviews |
| Adaptive video streaming | Ecommerce “package” bulk discounting |
| VEDA – video encoding and delivery automation | Ecommerce group purchases |
| Responsive mobile design | Proctored exams |
| Improved course authoring capabilities | Flexible content gating |
| Improved Files and Uploads page | Automatic course completion certificate delivery |
| Override learner scores for individual problems | Translated course completion certificates |
| Improved Open Response Assessment (ORA) | Transferable student records |
| Enable Weekly highlights email delivery | Program “About” pages improvements |
| Student data privacy and GDPR features | Expanded Single Sign-on (SSO) support |
| Improved learning profiles | Data via Email, SFTP, API |
| Improved discussion forum features |
Words of Advice
The installation scripts are based nearly entirely on Ansible playbooks and bash scripts. In both cases the Open edX devops team pushes the envelope on what these technologies can do. As impressive as this is from a technology professional’s perspective, it’s daunting to wrap your head around what this code does at ground level. I leave you with a few suggestions:
- Build your pristine AMI from the master branch. Using the master branch will ensure that your installation picks up recent bug fixes and security patches. This also ensures that your installation’s code base is consistent with online documentation and community blog posts like this one.
- Review the scripts before executing. This install script calls four bash scripts written by Ned. To avoid future brain damage, invest the time necessary to get acquainted with what his scripts do.
- Avoid modifying the code base. I understand that this is the beauty of open source programming, but, a) it’s not necessary, and b) this platform is a beast: you’re inviting misery upon yourself if you tinker.
- Kubernetes. If you intend to create your own Open edX environment, for your institution’s purposes, then it’s unlikely that Kubernetes will figure into your devops strategy. However, here’s a great starting point in the event that you want to dig deeper into the topic: https://www.appsembler.com/blog/open-edx-at-scale-using-kubernetes/. Keep in mind that Kubernetes are experimental with Open edX.
While the playbooks are challenging to read and understand, I can vouch that they all work as intended; at least, during the initial installation. Future admin activities to fire-up, shut-down, upgrade, and downgrade the various subsystems also depend on the use of these playbooks. So, do not attempt to circumvent using these or you will regret it.
I hope you found this helpful. Contributors are welcome. My contact information is on my web site. Please help me improve this article by leaving a comment below. Thank you!


Thank you for this. A couple things that might help others:
1. I didn’t try using nohup, but the install script ran fine under screen
2. The script is fairly verbose in the logs when it’s running but it gets quiet on the console after a while. tail -f logs/install-nnnnnnn.log is useful for keeping an eye on it
3. My first run of the script failed due to one of the repos not being signed. sudo apt-key adv –keyserver hkp://keyserver.ubuntu.com:80 –recv XXXXXXXX to fix that
yes, but it’s a bit complicated for a couple of reasons. first, you’ll need to locate the github repository that contains the code (it likely will not be edx-platform). you’ll also benefit from some insight into edX’s strategic direction for the code in the repository, as you’re customizations can lead to breaking changes by future commits to the repository (ie future named releases).
Hi
is it possible to customization open edx native using react js fornt end
Hi Lawrence,
Thanks for the instructions. I was able to create the Admin user :-), much appreciated.
thanks for pointing that out James. Yes, confirming that the syntax in the article was outdated. I’ve updated it for Koa.
Hi Lawrence,
Thanks for this guide.
I installed the koa.master release and can not create an admin user using the (IV. Create an admin account information) above.
I did some research and found that starting this release, the location for the python command was moved and changed from the example in this article. (see https://openedx.atlassian.net/wiki/spaces/COMM/pages/1398113104/Koa)
I also had to modify the location of the manage.py as well and the location I deduced was (/edx/app/edxapp/edx-platform/)
I also tried to reference the file with a path to lms specifically but got an error saying {{ usage: manage.py [-h] {lms,cms} . }}
I used the command on the line below but it failed with {{ ModuleNotFoundError: No module named ‘lms.envs.aws’ }}
sudo -u www-data /edx/app/edxapp/venvs/edxapp/bin/python /edx/app/edxapp/edx-platform/manage.py lms –settings aws createsuperuser
Any additional assistance you could provide will be most appreciated.
Thanks again for the excellent Article
James
Hi Lawrence,
thanks for interesting blog, i followed all your steps but i am not able to find /edx/app/edxapp this directory all i have inside /edx/app/edx_ansible
Can you guide to solve his issue?
Regards
Sachin
hi Georgios, yes, reinstalling is basically the same as upgrading, and there are some details that differ from a clean installation. you can review this article for more information: https://blog.lawrencemcdaniel.com/upgrading-open-edx/. also, you can look at the log file located in /edx/var/log/lms/edx.log for better diagnostics on the 500 error that you. good luck!
Lawrence Hi,
I followed your steps in November 2017 and I managed to successfully install an open edx instance on AWS.
I tried to reinstall a new instance now, executing the same steps, but every time I access the Edx Demonstration course, or I course I create, an error message appears mentioning “There has been a 500 error on the Your Platform Name Here servers”. Everything seems to be working but I cannot access the courses through the LMS.
Have you ever heard about this issue?
Keep up the good work.
Hey Lawrence, I went through your Open-edX talk it was very helpful for me.
looking to hear you more about the topics:
1. Create Common Cluster from AMI (coming soon)
2. Create RabbitMQ and Celery workers cluster (coming soon)
3. Create MySQL on RDS and migrate (coming soon)
4. Create MongoDB on EC2 and migrate
Please let me know once you you will done with above topics.
Thanks