Learn how to install an Open edX XBlock code extension with this detailed step-by-step how-to guide. This step-by-step guide works for any XBlock. Let’s get started!
Summary
XBlock is the extensibility framework for Open edX. That is, it’s a framework that allows the open source software development community to extend and enhance edX to meet future needs. If you’re familiar with the content management system WordPress then, architecturally speaking, XBlocks are nearly identical to plugins. ExtensionEngine wrote this great blog article on XBlocks. However, a big difference between WordPress plugins and XBlocks is that installing them is a murky process. In this blog post I set out clarify and simplify the exact steps that are required to install any XBlock.
For this tutorial we’ll install a really cool XBlock named In-Video Quiz which, as the name implies, will abruptly pause a video to present the student with a problem. This XBlock was written by the Open edX programming team at Stanford University and is freely available on GitHub (https://github.com/Stanford-Online/xblock-in-video-quiz). Like many XBlocks that I’ve installed, the functionality works great, but the documentation is sparse. So, the In-Video Quiz is a great example for this blog post.
Before moving on I’ll point out a couple of things that might weigh on your installation choices. First, you can install XCode packages anywhere in your Ubuntu server. References to the code are bound during the automated installation process. But having said that, I would recommend that you NOT install XCode packages anywhere inside of the /edx subdirectory simply because doing this can complicate future platform software upgrades. That is, if you install you XBlock packages anywhere inside the /edx subdirectory, it might get overwritten during a future upgrade of any part of the Open edX platform.
Assumptions
- Your Open edX instance is running from an AWS account
- Your AWS EC2 instance is running on an Ubuntu 16.04 LTS server built from the Amazon Linux AMI
- You have SSH access to your EC2 instance and sudo capability
- You are generally familiar with GitHub packages (you’ve at least heard of them)
- Your Open edX instance is substantially based on the guidelines published here: Native Open edX Ubuntu 16.04 64 bit Installation
1. Clone The GitHub Repository of the XBlock Package
Like Open edX itself, XBlocks are written in Python, and while I’m not a Python programmer myself, I will say that I’ve observed that the Python programming community tends to have a preferred way to do everything; and that includes for example, how Python programs should be installed. That being the case, a lot of Python programs (or all of them?) are stored as raw source code which one downloads in packages from repository platforms like GitHub to be compiled on the server using a variety of Python-specific installations tools. In the case of Open edX the preferred route seems to be a command line utility named pip (Python Installation Program). I’m a Python neophyte, just so you know. But regardless, pip is pretty awesome, and pretty stupid-proof.
All of this matters because XBlocks are written in Python and, as it happens, thanks in no small measure to the peculiarities of the Python community, there’s one single method of installation that works for all XBlocks. First, we need to clone the GitHub repository where our In-Video Quiz is stored. I can almost always find the GitHub repository by using Google. Once you find the repository, GitHub provides a 1-click way to copy the exact http URI of the repository, which we’ll use on the command line of our Ubuntu instance. Refer to the following screen shot for the location of the 1-click copy method:
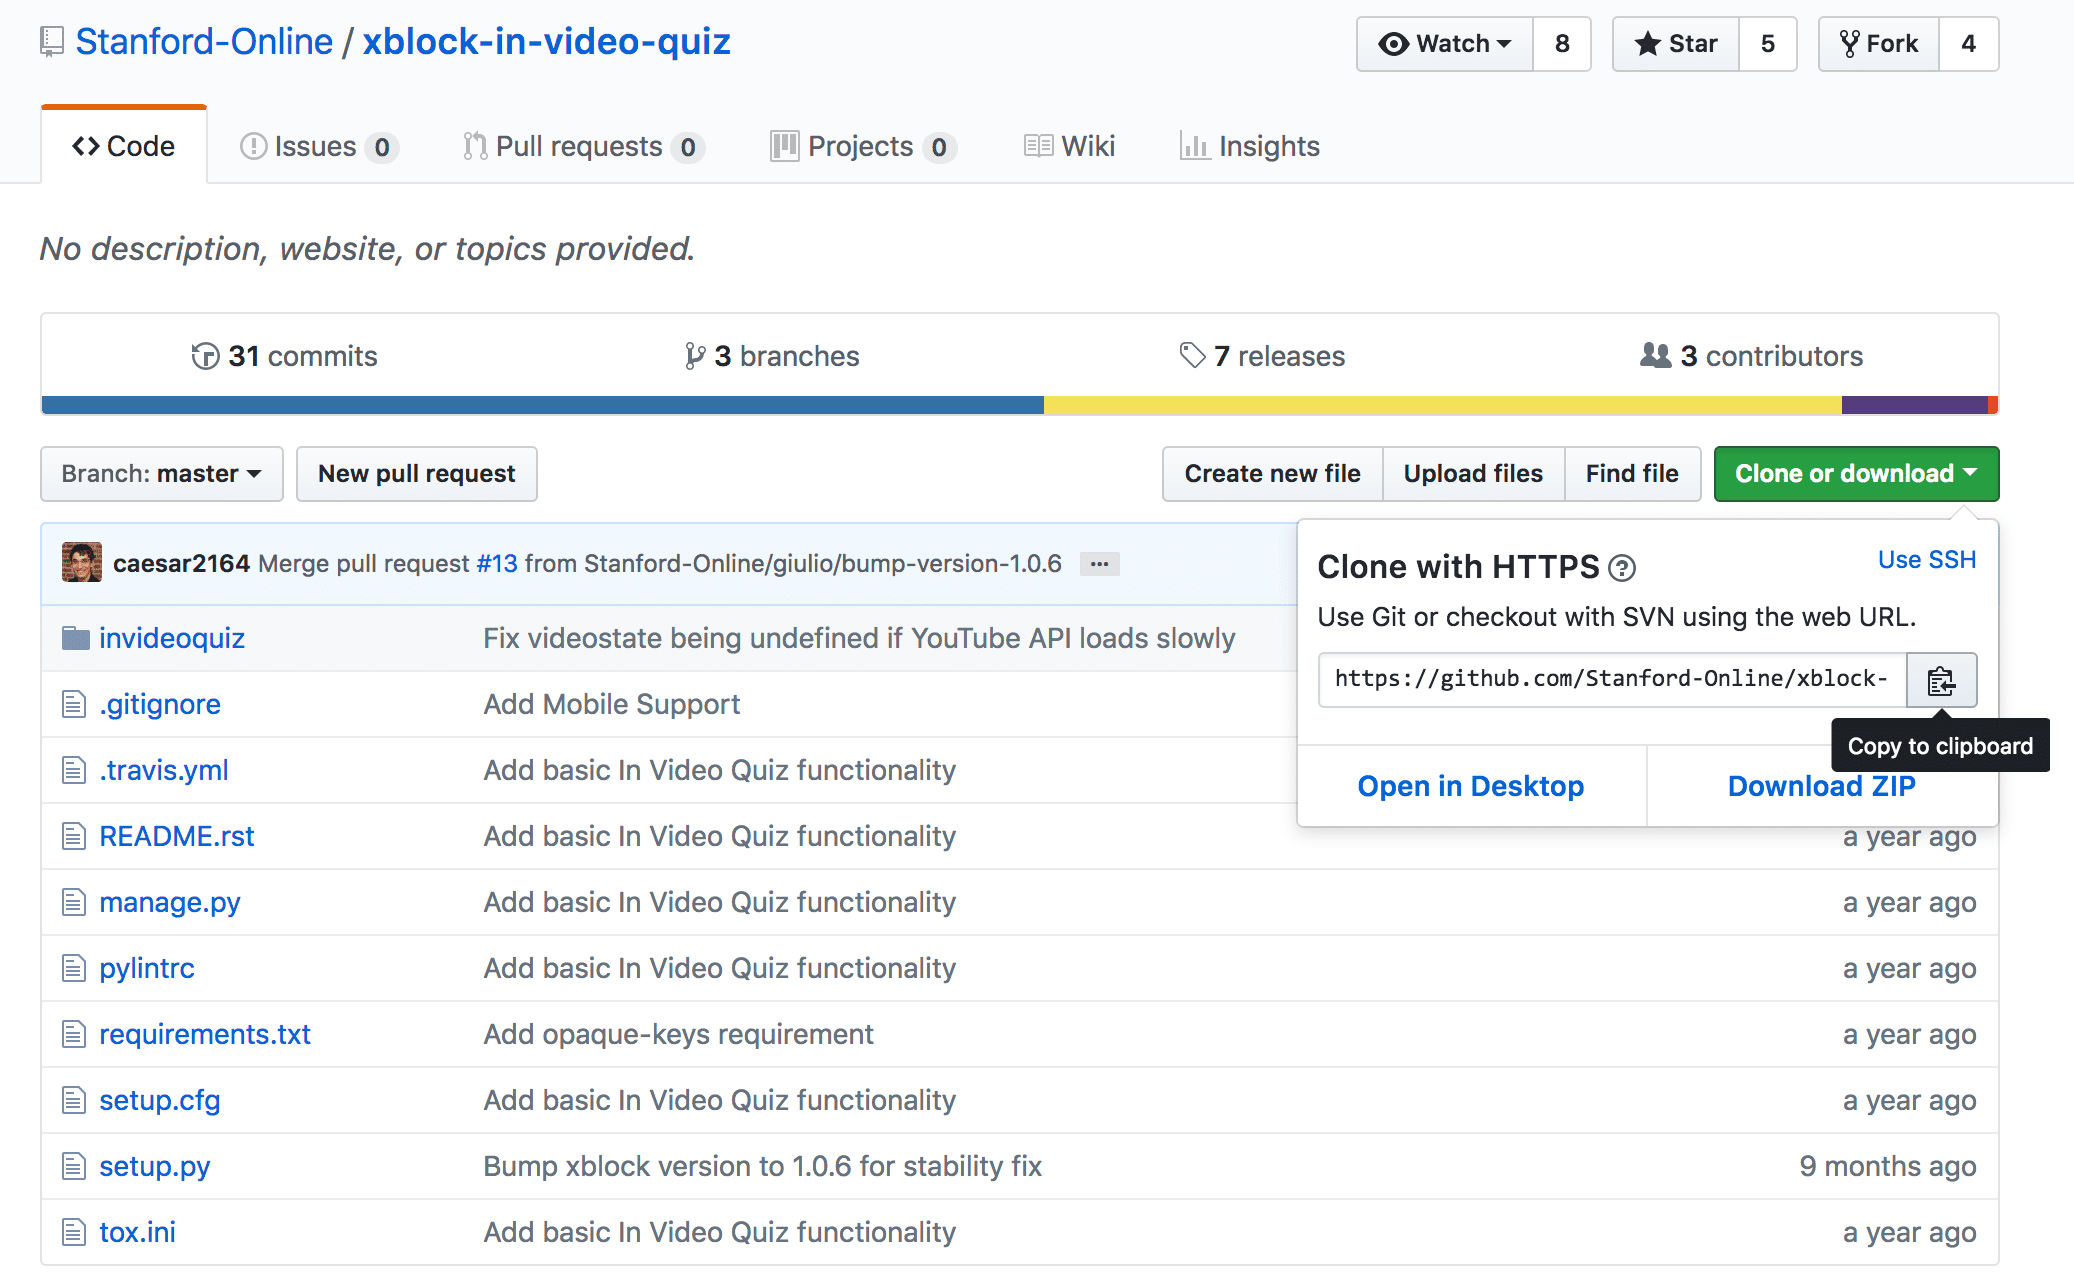
Afterwards, paste the URI of the repository onto the command line so that you have a command line that looks like the following:
$ cd ~
$ git clone https://github.com/Stanford-Online/xblock-in-video-quiz.git
2. Change Ownership of the Repository directory in Ubuntu
Cloning the GitHub repository simply means copying all of the files (and whatever else might be in the repository like say, images, mp3s, etc) to your Ubuntu file system.
I clone repositories into the Ubuntu home folder /home/ubuntu/ where I also store any and all other Open edX configuration files and scripts. However, feel free to clone the repository to whatever location in your file system you prefer as this (within reason) has no bearing on the installation process.

Once you’ve cloned the repository you’ll also need to change the folder ownership and group to edxapp. This is because we’ll install the code using the edxapp user, and if the source code itself doesn’t reside in a folder that’s owned by this user then the pip installation program will potentially complain.
$ sudo chown -R edxapp xblock-in-video-quiz
$ sudo chgrp -R edxapp xblock-in-video-quiz
3. Run the pip Installation Program
This is where the magic happens. We’re going to use pip (Python Installation Program) to install our XBlock. Python programmers are a thorough bunch. They not only think about their code’s functionality, but also the code dependencies of their code, and even the version compatibility. Ultimately, pip does all of this for us. Therefore, the specifics on how to run pip might seem underwhelming, but here it is:
unrecognized requirement ... is XXX a path?, then consider changing the local installation location of your Xblock files.# To install the xblock:
sudo -H -u edxapp bash
source /edx/app/edxapp/edxapp_env
/edx/bin/pip.edxapp install /home/ubuntu/xblock-in-video-quiz
# To uninstall the xblock (in the event of problems):
/edx/bin/pip.edxapp list #then look for the registered name of the Xblock.
#In this example the Xblock name is, "invideo-quiz (0.x.x)"
/edx/bin/pip.edxapp uninstall THE-REGISTERED-NAME-OF-THE-XBLOCK-TO-UNINSTALL
We now find ourselves in one of those, “the proof is left to the reader” moments. :/
4. Manually Compile Assets
It’s virtually assured that your XBlock will not yet work, even if the pip installation package reported that it installed successfully. That is because farther up the technology stack of Open edX there is more work to do that resides far beyond the purview of pip. Namely, we need to manually compile the Open edX assets. I’ll probably write a blog post about what this means since the need do this seems to arise so often. For now however, just do the following:
$ sudo -H -u edxapp bash
$ source /edx/app/edxapp/edxapp_env
$ cd /edx/app/edxapp/edx-platform
$ paver update_assets cms --settings=aws
$ paver update_assets lms --settings=aws
If this is your first time to manually compile assets that be aware that the process will take around 10 minutes to complete, and meanwhile, your Open edX platform will be offline to your teachers and students.
5. Restart the LMS and CMS
Any time you manually compile assets, you’ll also need to restart the LMS and CMS. The command lines to do this are as follows:
$ sudo /edx/bin/supervisorctl restart edxapp:
$ sudo /edx/bin/supervisorctl restart edxapp_worker:
This process takes around five minutes to complete. Meanwhile your teachers and students will not have access. Note that you can use the Linux command line “top” to view the progress of the restart process.
$ top
I confess that this is not particularly scientific, but, the following three screen shots demonstrate how to monitor and detect the precise state of your Open edX platform. Importantly, using “top” will enable you to know whether your Open edX platform is available to your users.
Shutting Down

Restarting

Running Normally

6. Enable The XBlock In Your Course
Adding your XBlock to a course involves four steps, three of which are standard with the latter two steps varying slightly depending on design choices made by the XBlock programmer. All of these steps are performed from within the Course Management Studio Application.
- Select the course which you want to install the XBlock. You need to have edit rights for the course.
- Choose “Configuration / Advanced Configuration” from the Course Studio menu bar

- Scroll to near the bottom of the next screen until you find “XBlocks”. You include the XBlock in your course by adding it’s technical name to a JSON array in this field. JSON arrays take the form
['Item1', 'Item2', 'Item3']. The square brackets are required. The technical name of the XBlock is often described in the Readme page in its GitHub repository. If not, you might need to ask the XBlock author. Don’t forget to save! After completing this step the XBlock should become visible in the Course’s tool palettes.
- Return to your course content and choose either “Advanced” or “Problem” from the “Add new Component” button bar at the bottom of the window. The Xblock will appear in either (or perhaps both) depending on how the programmer designed it.

- Specifics on configuring an instance of the XBlock will vary. However, XBlocks commonly refer to other course objects (aka course elements, aka course building blocks). You might see data fields in your XBlock referring to an “ID” value of object X in your course. The illustration below shows how to locate, and importantly, how to correctly these ID values to your XBlock.


I hope you found this helpful. Please help me improve this article by leaving a comment below. Thank you!


Thank you very much for this article. I am using Junper version. I am unable to locate video id and assessment id. Will you pls guide me? Any help is appreciated
tnx that was the point
check the LMS log /edx/var/log/lms/edx.log, and look for any messages from the in-video quiz xblock. there are some required parameters related to captioning and language that might be missing, and if so then you’ll see errors messages to this effect in the log.
Hi Lawrence, thank you for your really helpful articles,
i have installed in video quiz xblock as you mentioned and everything was good but it’s not working should i install some other xblocks like the list of advanced modules of yours? e.g. videoannotation or the problem is something else?
Hi
I built a first xblock in github repo https://github.com/MajidHeydari/xblock_development.git
Do you think my xblock is structure true?and can you tell me that Why it gives error؟
Thanks
Hi Lawrance,
I am trying to use an existing Scorm package into Opn edX. I do not want to use and Xblock but rather upload the course as individual sections and sub sections so that it can be scaled further within Open edX. Do you have any recommendations on the best way to to that?
Hi Lawrence,
I followed the steps mentioned and all went well but when i try to enable the xblock component it does not work, is there any sequence that we need to follow like first add the video component then multiple choice quiz and finally in the end xblock component ?
I have tried this with the ids extracted as mentioned in your example but it’s not working.
Would appreciate any feedback on this. Thanks
hi chris. there are three items of interest in this output.
1. you probably need to execute your installation as the Ubuntu user edxapp. to do that you need to precede your install command with the following:
sudo -H -u edxapp bash << EOF source /edx/app/edxapp/edxapp_env cd /edx/app/edxapp/edx-platform 2. the output "Could not find a version that satisfies the requirement xblock-video" means that there are dependency version conflicts between the versions of various pip packages listed as requirements for your xblock-video packages versus those of the same name that are already installed on your open edx installation. to resolve this you can generate a list of pip packages installed on open edx with the following commands: sudo -H -u edxapp bash source /edx/app/edxapp/edxapp_env cd /edx/app/edxapp/edx-platform pip list Look for packages includes in the requirements.txt file of xblock-video, note their versions, and look for any of these that are already installed in your open edx platform. you can fork the xblock and edit the requirements.txt file to try to match up the versions between the two. it's tedious, but it works. 3. "You are using pip version 9.0.3, however version 19.0.2 is available." -- as per strong recommendations from the team at edX, you should NEVER do any incremental upgrades on your platform.
Hi Lawrence,
I tried to install xblock-video from appsembler github:
https://github.com/appsembler/xblock-video.git
WHen executing this command:
/edx/bin/pip.edxapp install xblock-video
It gave me error message as below:
Collecting xblock-video
Could not find a version that satisfies the requirement xblock-video (from versions: )
No matching distribution found for xblock-video
You are using pip version 9.0.3, however version 19.0.2 is available.
You should consider upgrading via the ‘pip install –upgrade pip’ command.
How can I solve that error? Thanks
my guess is that’s it an unintended consequence of some of the incremental updates that have been made recently.
I noticed your October Update:
> Note: Beginning with the Hawthorn release some of the Open edX installations that I support will only allow me to store Xblock executable files inside of /edx/app/edxapp/edx-platform/.
I was wondering why this is, or is this something that would be dependent on the xblock. Since this is in the edx-platform codebase, wouldn’t this be considered bad practice?
Hi Jim, the command to uninstall is: sudo -u edxapp /edx/bin/pip.edxapp uninstall
xblock-name is usually not the folder name of the xblock. To get the real xblock-name, try to install the xblock again, you will see something like:
Requirement already satisfied: six in /edx/app/edxapp/venvs/edxapp/lib/python2.7/site-packages (from XBlock->invideoquiz-xblock==0.2)
In this case, xblock-name is invideoquiz-xblock. Now you can uninstall it.
you have to manually compile assets when: a) you alter a media file (like an image), b.) you edit SASS files, c.) you alter or add Javascript, d.) you add/modify CSS files.
Also, when working the dev iterations, do you have any thoughts as to when you have to ‘manually compile assets’? It takes forever. Thx again!
Thanks, Lawrence. Do you have a process for updating an xBlock? I’ve repeated your steps but the original xBlock isnt replaced. I’ve also tried changing your ‘install’ to ‘uninstall’ and while it runs without errors it doesnt actually do anything.