Fork this Github repo, hack up the examples, and have your OpenAI application in production in around an hour with this serverless solution based on AWS API Gateway + Lambda and the OpenAI Python library.
Summary
If you’re simply looking for a working Python code sample that illustrates how everything snaps together then follow this link — https://github.com/FullStackWithLawrence/aws-openai/terraform/python/openai_text/openai_text.py — noting that the main handler is named handler(event, context) and thanks for stopping by, and good luck with next steps in your project! Otherwise, read on.
This repo is as close as you can get to a 1-click solution for a production-ready REST API created with API Gateway and leveraging the OpenAI Python Library via a Lambda function using the following design pattern.

It implements each of the 30 example applications from the official OpenAI API Documentation using a powerful modularized Terraform approach that only requires around a dozen lines of code per application. It includes hooks to OpenAI’s full suite of AI models, including GPT-3.5, GPT-4, DALL·E, Whisper, Embeddings, and Moderation, so it should be able to do whatever you want.
With minimal effort you can fork this repo and either duplicate or refactor the code blocks in apigateway_endpoints.tf to create your own amazing solution.
The repo provides detailed “getting started” guides for setting up aws-cli, terraform, and getting an openai api key, so I won’t repeat any of that here. Moreover, since I’m sharing a working codebase with you, details of which you can and should review yourself, I’ll keep this article high level, focusing mostly on the gist of how the Python code samples you’ll find in OpenAI’s Example Applications become a URL endpoint in this solution.
An example OpenAI application
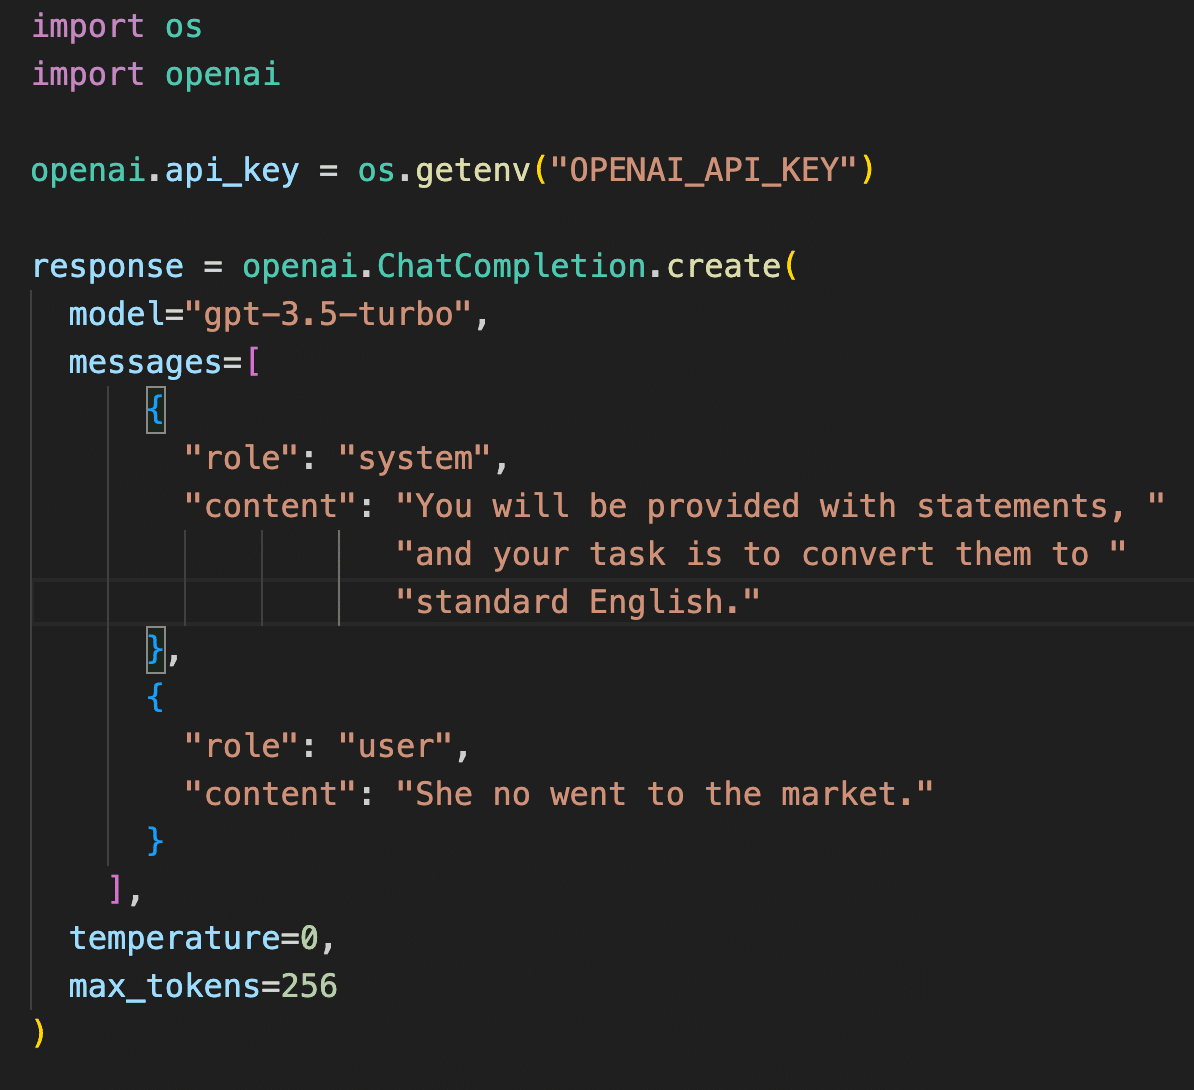
An OpenAI application is based fundamentally on natural language instructions combined with a short list of API parameters that aim to assist you in making your solution cost-effective, and also to try to minimize the possibility of your solution generating “hallucinations”. Note this simple “Grammar Correction” example that comes directly from OpenAI’s official documentation.
Here’s the Terraform source code from this repo for the same OpenAI application:

And after having deployed the solution this is how you would invoke the endpoint, along with the OpenAI API http response that the endpoint would return.

The design objective of this repository is to use DRY IAC code to implement this example application, plus 29 other example applications from the OpenAI official documentation, in a serverless, production-ready REST API that simplifies the request in each case to just the user’s text input.
There are some ancillary project objectives as well:
- Keep track of the myriad resources that one must create inside an AWS account in order to deploy a solution of this natures: IAM, API Gateway, Lambda, Route53, Certificate Manager, etcetera; especially resources that cost money.
- Effectively manage resource dependencies. The basic conundrum is, “If I modify X AWS resource, then what else do I need to update in order to re-deploy this solution”?
- Create and maintain good logs for both the API access as well as the Lambda execution
- Effectively manage security so that a.) the solution works, and b.) I don’t accidentally give away the keys to the castle.
- Manage the entire solution as a single semantically-versioned code repository
That might be everything that you need to know. What follows is simply a bit of qualitative commentary on matters that influenced my design decisions. Good luck with next steps on your project! If this repo helped you then please consider recommending it others and starring it in Github.
I. Homogenous Endpoints
Every URL endpoint in this project follows the same design pattern. This is important because each URL endpoint is implemented with four resources (the four white boxes in the diagram below), and so in total that’s 120 resources which need to be created: 30 applications X 4 resources = 120 resources. Note that trying to do this just for one endpoint is tedious and prone to error, so the Terraform module is especially helpful with this.

The customized behavior of each endpoint is facilitated with an API Gateway request mapping template that merges the OpenAI API application definition with the user text input passed in via the JSON body of the http request object.

II. Modularized OpenAI Applications
Modularity of OpenAI applications is far and away the greatest strength of this codebase. Without exaggeration, in a matter of a couple of minutes you can code and deploy a new OpenAI application to production, even on a platform running at scale. That’s amazing.
The code pattern in section I above is made repeatable by packaging the associated Terraform scripts into this compact Terraform module, which is then called 30 times; once for each example application.
III. A Single Python Lambda Function
This codebase uses a single, all-in-one Python Lambda function to manage interaction with the OpenAI API. Noting that this is a qualitative design choice, and that there are many viable solutions, I took this approach primarily because getting a Python Lambda to work with API Gateway (using Terraform) is a colossal pain in the neck. While I recognize that it might seem pretty straightforward, the devil is in the details. If you opt to go it alone and create your own bespoke Lambda then these are some things to consider:
- You have to sort out the exact layout of the http request body json object, and importantly, how this is ultimately delivered to Lambda via API Gateway. A number of factors will cause your approach to vary, and so this ultimately is a trial and error process that is both tedious and time consuming.
- You have to get Terraform to correctly package your Python solution, along with api credentials, and all third party Python packages that it imports. And this is both tedious and brittle.
- You need to pass in your OpenAI API key in a manner that a.) works, and b.) is secure. yes: it’s tedious.
- You need to get Terraform to become aware of state changes to non-Terraform resources like for example, your Python module. This often becomes kludgey and tedious.
- IAM permissions, while robust and generally pretty awesome, are tedious and time consuming to get right.
- Getting Cloudwatch logging to work — the first time at least, is surprisingly challenging.
- Lastly and specific to the OpenAI API, after having taken a deep dive on the openai library’s exception handling — and in the interest of keeping this solution DRY — I couldn’t rationalize duplicating the copious volume of code that I’d written to elegantly handle it’s exceptions.
Did I mention tedious? So anyway, long story short: employing a single Lambda for this solution yielded a simpler solution with fewer moving parts, and less pain during the development process. For the avoidance of doubt, the code in this repo takes care of all of this, and, the Python code itself is a case study in good coding techniques; at least, so says the guy who wrote it. 😉
For your convenience, here’s the gist of the Python integration which, pursuant to the 200+ lines of validation code that precede it, is self-obvious.


IV. API Gateway Is Actually Pretty Hard To Implement
The ugly truth is that for real-world use cases, API Gateway is pretty hard to setup. Mind you, I DID get it working to my satisfaction. In this particular case the crux issue is that each integration endpoint needs to merge data that comes from both the http request body as well as string data that is interpolated into the the API Gateway request integration resource via Terraform. This involved becoming intimately familiar with their request mapping template tool that, while a pretty good tool in my opinion, is definitely not intuitive.
Please be mindful that getting the first of these endpoints to work correctly took me around a day and a half. And the the remaining 29 took about an hour. In fairness to the product team at API Gateway, that’s light speed in terms of developer productivity. But be that as it may, I was bruised, bloody and badly needed a proper drink by the time I’d wrapped up this part of the project.
The other pain point with API Gateway regards Terraform, and that is simply that API Gateway, by its nature, requires a LOT of unique resources; more than with any other AWS service which I’ve worked in Terraform to date. Rough guess is that this codebase leverages around say, a dozen Terraform API Gateway resources, which is a lot, and a formidable learning curve.
V. Cloudwatch Considerations
Effective and efficient logging is this project’s second most important capability. The Terraform code in this repo will configure IAM role-based security for you, and so you shouldn’t run into any issues with getting Cloudwatch to work for API Gateway and Lambda. But in the event of any hurdles, I’ve added some sample Cloudwatch output for you that you can use to at least visualize the complete data flows from http request to http response.

Also, a few oddities about Cloudwatch that I find unintuitive:
- There’s a “master” Cloudwatch log role IAM ARN in the API Gateway console that you need to configure in order for Cloudwatch to begin generating log data. This is independent of the configuration that this Terraform code adds, which is specific to the one api that it deploys. I was unable to locate a Terraform resource that would do this for you — apologies! :/

- To generate Cloudwatch log entries in a Python Lambda function, you use the
print()command rather than thelog()command. - It is not necessary to stringify JSON objects when logging to Cloudwatch from a Python Lambda function. In fact, if you do this then the escaped characters will be included in the log output, and your log entries will be difficult to read.
And lastly, for your posterity it’s worth pointing out that on new green shoots projects you face a chicken-and-egg dilemma when getting Cloudwatch setup. Other AWS services that send log posts to Cloudwatch, like API Gateway and Lambda for example, need permissions to do that. And they lack these permissions until you set them yourself. AWS is wise to take this conservative approach with regard to how permissions work; not just with Cloudwatch but for all of their services. But having said that, it’s pretty frustrating when you’re trying to get Cloudwatch setup initially, and there’s no log data to help you trouble shoot why no log data is appearing.
I hope you found this helpful. My YouTube channel might also interest you. Contributors are welcome. My contact information is on my web site. Please help me improve this article by leaving a comment below. Thank you!


Error: creating API Gateway Deployment: BadRequestException: No integration defined for method
│
│ with aws_api_gateway_deployment.openai,
│ on apigateway.tf line 61, in resource “aws_api_gateway_deployment” “openai”:
│ 61: resource “aws_api_gateway_deployment” “openai” {
I was getting below error could you help me on this
Error: updating API Gateway Stage failed: BadRequestException: CloudWatch Logs role ARN must be set in account settings to enable logging
│
│ with aws_api_gateway_method_settings.openai,
│ on apigateway.tf line 117, in resource “aws_api_gateway_method_settings” “openai”:
│ 117: resource “aws_api_gateway_method_settings” “openai” {
Keep an eye on this related repository — https://github.com/FullStackWithLawrence/aws-openai — and also on new videos i’m publishing to the channel, https://www.youtube.com/@FullStackWithLawrence.
While the subject matter of this particular article is not specific to the Open edX application stack, this IS nonetheless a great example use case for where I think the OpenAI API can be especially useful.
One spoiler: in the coming days I’ll be releasing content about how to add a ReactJS front-end chat app integrated to this REST API, into your existing software application stacks.
Dear Lawrence,
It appears amazing. Currently, I am utilizing Open edX as a Learning Management System (LMS), and I am eager to explore ways to enhance its functionality and efficiency with the tools you described in your article.
However, before proceeding further, I would greatly appreciate it if you could elucidate the specific use cases where this integration would be most beneficial. Understanding the practical applications and potential improvements this integration can bring to Open edX LMS will be crucial for me to evaluate its feasibility and relevance to my current system.
I look forward to your guidance on how best to leverage the OpenAI API With AWS Lambda in Open edX LMS.