Learn how to scale your Open edX platform by migrating the MongoDB database service to its own remote Ubuntu server running on AWS EC2.

Summary
If you’re looking for a general overview of how to scale the Open edX platform then you should read this first, “Scaling Open edX“. If you’re planning a completely new Open edX installation in which you are not migrating data and that needs to run at scale, then you might want to take a look at the automated tools included in Cookiecutter Open edX Devops as well as this article on Managing Your Open edX Backend With Terraform.
The Open edX platform persists data across four distinct subsystems: MySQL, MongoDB, the Ubuntu file system, and Memcached. To scale the Open edX platform you first must physically separate the executable program code from the data that is managed by these four subsystems. This article explains how to migrate the MongoDB data. By scaling, I mean migrating Open edX’s local MongoDB service and data to its own independent Ubuntu EC2 instance.
Over the years I’ve experimented with various strategies for migrating Open edX’s MongoDB data. This article describes my preferred approach, which involves using AWS EC2 console tools to clone your existing single-server installation of Open edX, and then to pare the clone down to only the MongoDB system files and data. This approach is simple, fast and reliable. Open edX maintains its course data in MongoDB across multiple logical databases, each of which are accessed by multiple MongoDB system user accounts of varying permissions levels. Some of this is taken care of automatically with MongoDB’s native dump and restore commands, but a lot of it is not. But at any rate, working with a clone of your existing Open edX instance renders the point moot.
Regarding horizontal Vs vertical scaling strategies: note that you probably only need to focus on vertical scaling for MongoDB on Open edX. Even though MongoDB implements a robust sharding model, I’ve found this to be complete overkill for all edX platforms on which I’ve ever worked. You can reasonably begin to scale MongoDB on a remote t2.medium EC2 instance as further described below, increasing the size of the server over time on an as-needed basis.
I. Snapshot Your Open edX Server
1. Create an AMI from your Open edX instance
Follow the instructions in the AWS official documentation to create a clone (aka an “Amazon Machine Image, AMI”) of your existing Open edX instance, “Create an AMI from an Amazon EC2 Instance“. Keep in mind that you’re going to initialize your MongoDB database from this AMI, so you need to ensure that no instructors are modifying course data in Course Management Studio during the time that are migrating your Mongo data. You should conservatively estimate a 4-hour maintenance window for this activity. I generally perform this work during off hours.
II. Create a Remote MongoDB Server
1. Launch a new EC2 instance from the AMI
Launch a new t2.medium EC2 instance from the AMI that you created. I re-use the existing SSH key that i used for the original Open edX EC2 instance. Note that you’d only need a different SSH key if for example, completely different teams manage the Open edX and MongoDB environments.
2. Create a new EC2 Security Group for MongoDB
You should create a separate EC2 Security Group for your new MongoDB EC2 instance, as follows:

This firewall configuration limits remote access of the server to MongoDB, regardless of whatever other services might still be installed and running internally on the server. Note that on the first row, SSH, you should try to limit access to your bastion server, if you use one.
3. Take Note of The Internal IP Address That is Assigned
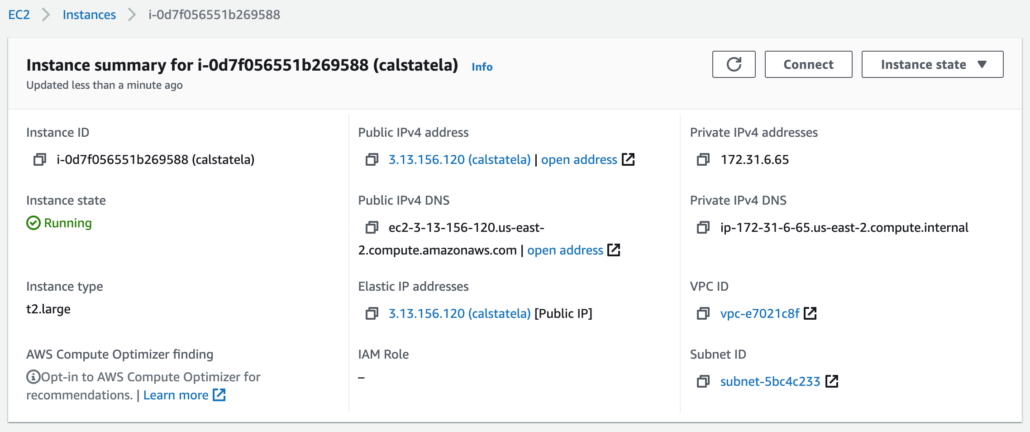
You’ll access your new remote MongoDB server via the internal IP address, which is automatically assigned by AWS when you create the new EC2 instance. Take note of this value, which will be titled, “Private IPv4 addresses”
4. Allow Remote MongoDB Connections
Initially, you will not be able to connect to mongo remotely via the internal IP address because the native installation of Open edX disables remote MongoDB database connections in order to improve security. To allow your Open edX instance to be able to connect to the new MongoDB server remotely via port 27017 you’ll need to enable remote connections by modify the file /etc/mongod.conf on your new remote MongoDB server:
# Modify the 'bindIp' configuration parameter as follows
net:
    bindIp: 127.0.0.1
    port: 27017
# changing the value "127.0.0.1" to "0.0.0.0"
# this changes the allowed hosts from only "localhost" to any IP address.
# Note that for even better security you can use the IP addresses of your
# bastion server and your edxapp EC2 instance (or ELB)
net:
    bindIp 0.0.0.0
    port: 27017
Modifications to /etc/mongod.conf require a restart of the mongod service
sudo service mongod restart
More detailed instructions are available here, “How To Configure Remote Access for MongoDB on Ubuntu 20.04”
At this point you should be able to connect to your new MongoDB remote server from the command line of your Open edX instance by logging in to MongoDB as follows:
# execute this command from the command line of your Open edX instance,
# substituting “172.x.x.x” with the internal IP address of your new MongoDB server.
mongo --port 27017 --host 172.x.x.x -u "admin" -p "the-password-from-my-passwords.yml" --authenticationDatabase "admin"
5. Remove Superfluous services, system files, data
Now you need to shut down and un-install all other services that are currently running on your new remote MongoDB server. This is easier that it may appear because the Open edX file system is very well organized and also because that are fewer major industrial-grade services running on the Open edX instance than may appear.
#-------------------------------------------------------
# execute these commands on your new remote MongoDB server
#-------------------------------------------------------
# remove MySQL from the new remote MongoDB server
sudo service mysql stop
sudo systemctl disable mysql

# remove Nginx from the new remote MongoDB server
sudo service nginx stop
sudo systemctl disable nginx
sudo apt-get purge nginx nginx-common

# remove any LetsEncrypt system files that may exist
sudo apt-get remove certbot python-certbot-nginx
sudo rm -r /etc/letsencrypt


# remove RabbitMQ from the new remote MongoDB server
sudo systemctl stop rabbitmq-server.service
sudo systemctl disable rabbitmq-server.service
sudo rabbitmqctl status
sudo apt-get remove rabbitmq-server
sudo systemctl disable rabbitmq-server
sudo systemctl stop rabbitmq-server

# remove ElasticSearch from the new remote MongoDB server
sudo systemctl stop elasticsearch
sudo systemctl disable elasticsearch.service
sudo apt-get --purge autoremove elasticsearch

# remove Memcached from the new remote MongoDB server
service memcached stop
sudo systemctl disable memcached
sudo apt-get -y remove memcached

# remove all Open edX application source files
sudo rm -r /edx/app
# reboot the server
sudo reboot
III. Reconfigure Open edX to Connect to Your Remote MongoDB Server
To identify which yml files require modification you can use the Linux command, 'grep' to search for the Linux port number corresponding to the service you are scaling. For example, MongoDB is assigned to Linux port number 27017, thus we can execute the the following command to identify all Open edX configuration files that contain MongoDB configuration parameters:
sudo grep -r '27017' /edx/etc/*.yml
We can see that in total there are only two yml files containing MongoDB configuration parameters, and furthermore that both of these yml files contain multiple references to MongoDB, as follows:
/edx/etc/lms.yml:        port: 27017
/edx/etc/lms.yml:        port: 27017
/edx/etc/lms.yml:    port: 27017
/edx/etc/lms.yml:                    port: 27017
/edx/etc/lms.yml:                    port: 27017
/edx/etc/studio.yml:        port: 27017
/edx/etc/studio.yml:        port: 27017
/edx/etc/studio.yml:    port: 27017
/edx/etc/studio.yml:                    port: 27017
/edx/etc/studio.yml:                    port: 27017
For example, the first occurrence of MongoDB configuration for lms.yml looks like the following:
CONTENTSTORE:
    ADDITIONAL_OPTIONS:
    DOC_STORE_CONFIG:
        authsource: ''
        collection: modulestore
        connectTimeoutMS: 2000
        db: edxapp
        host: localhost
        password: JqcOrMzLclAIPCiK6u8UYwcOj55uqxjvsr7
        port: 27017
        read_preference: SECONDARY_PREFERRED
        replicaSet: ''
        socketTimeoutMS: 3000
        ssl: false
        user: edxapp
    ENGINE: xmodule.contentstore.mongo.MongoContentStore
    OPTIONS:
        auth_source: ''
        db: edxapp
        host: localhost
        password: JqcOrMzLclAIPCiK6u8UYwcOj55uqxjvsr7
        port: 27017
        ssl: false
        user: edxapp
To reconfigure the LMS to use a remote MongoDB server we should modify the 'HOST' parameter from 'localhost' to the Internal IP address of the newly-created remote MongoDB server. Note that we MUST address remote servers using internal IP addresses because otherwise our network traffic would leave and re-enter our Virtual Private Cloud which would not only be inefficient from a performance point of view but also insecure.
Note that there is no yml configuration file for the Discussion Forum. This is a third party open source Ruby on Rails application, and the mongoDB configuration is located inside the config file of its virtual environment. The file is located here, /edx/app/forum/forum_env, and contains the following contents:
export RBENV_ROOT="/edx/app/forum/.rbenv"
export GEM_HOME="/edx/app/forum/.gem"
export GEM_PATH="/edx/app/forum/.gem"
export PATH="/edx/app/forum/cs_comments_service/bin:/edx/app/forum/.rbenv/bin:/edx/app/forum/.rbenv/shims:/edx/app/forum/.gem/bin:/usr/local/sbin:/usr/local/bin:/usr/sbin:/usr/bin:/sbin:/bin"
export RACK_ENV="development"
export SINATRA_ENV="development"
export API_KEY="baCXRhSUPER-STRONG-KEY-VALUE-rXBpuK"
export SEARCH_SERVER="http://localhost:9200"
export SEARCH_SERVER_ES7="http://localhost:9200"
export MONGOHQ_URL="mongodb://cs_comments_service:--SUPER-STRONG-PASSWORD--@localhost:27017/cs_comments_service"
export MONGOID_AUTH_MECH=":scram"
export HOME="/edx/app/forum"
export NEW_RELIC_APP_NAME="default_env-default_deployment-forum"
export WORKER_PROCESSES="4"
export DATA_DIR="/edx/var/forum"
export LISTEN_HOST="0.0.0.0"
export LISTEN_PORT="4567"

eval "$(rbenv init -)"
Edit the MONGOHQ_URL parameter of this file, replacing "localhost" with the IP address of your mongoDB server.
Do a full reboot of your Ubuntu server when you finish.
sudo reboot
Ok, that's it for MongoDB.
IV. Test Your Open edX Platform
Testing your platform is easier than it might seem. If you can login to Course Management Studio as an instructor or admin, and you can open a course in edit mode and browse the individual course contents then your migration was successful.
V. Disable the Local MongoDB Service and Data Backup
On the original Open edX we’re only going to shut down the mongod service and prevent it from launching after reboots. We’ll leave the system files and the legacy data in place since these (probably) do not consume significant file system storage space.
# Execute these commands on your Open edX instance.
# terminate the mongod service.
sudo service mongod stop
# prevent mongod from automatically starting after reboot.
sudo systemctl disable mongod
# reboot the server
sudo reboot
If you have a cron job for scheduled data backups then disable this on your Open edX instance via the following command.
cron -e
Run the following command if you’re curious and want to know the exact size of the legacy MongoDB data files that remain on your Open edX instance
sudo du -sh /edx/var/mongo/mongodb/
VI. Reconfigure MongoDB Data Backup
If you followed my blog post, “Open edX Complete Backup Solution“, then the only thing you’ll have to do is edit the bash script edx.backup.sh to remove the MySQL backup. The AWS CLI should work on your new remote MongoDB server, assuming that you’d configured this for remote backups to AWS S3 on your original Open edX platform.


Sir, Can you explain how to configure aws Documentdb for openedx Mongo..
Thank you for the steps Lawrence. We are having issue with the forum as well after moving the mongo database with juniper. All other components are working fine.
The above configuration doesn’t cover the changes needed for discussion service (forum) to work.