Learn how to create a complete backup solution for your Open edX installation. This detailed step-by-step how-to guide covers backing up MySQL and MongoDB, organizing backup data into a single date-stamped tarball zip file, plus how to setup a cron job and how to copy your backups to an AWS S3 storage bucket.

Summary
The official Open edX documentation takes a laissez faire approach to many aspects of administration and support, including for example, how to properly backup and restore course and user data. This article attempts to fill that void. Also, don’t forget to bookmark my post on how to restore your Open edX platform from a backup. Implementing an effective backup solution for Open edX requires proficiency in a number of technologies, which is fine if you’re part of a full IT team at a major university, but can this can otherwise be a real obstacle to competently supporting your Open edX platform.
Open edX stores course data, including media uploads such as images and mp4 video files in MongoDB. To do this, MongoDB’s core functionality is extended with a technology called GridFS that provides an infinitely scalable file system for all course-related data. For student data Open edX takes a more relational approach with MySQL, noting however that the Open edX platform relies on several databases (see right-hand diagram). These are excellent architectural choices and both technologies are best-of-breed and getting better all the time. Nonetheless, having two entirely different persisting strategies under the hood really complicates simple IT management responsibilities like data backups.
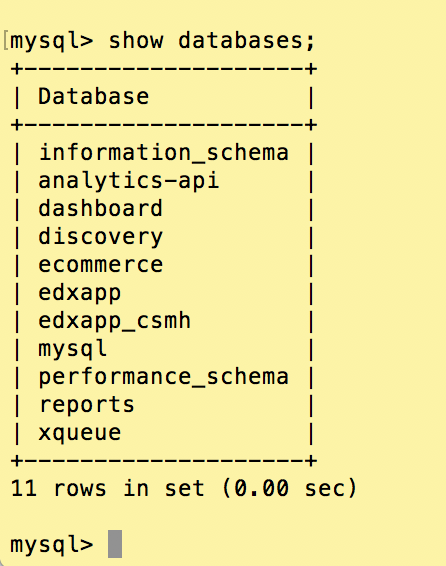
We’re going to setup an automated daily backup procedure that backs up the complete contents of the MongoDB course database (including file/document, media and image uploads) and each individual MySQL database that contains learner user data. We’ll create a Bash script that combines these files into a single date-stamped linux tarball and then pushes this to an AWS S3 bucket for long-term remote storage.
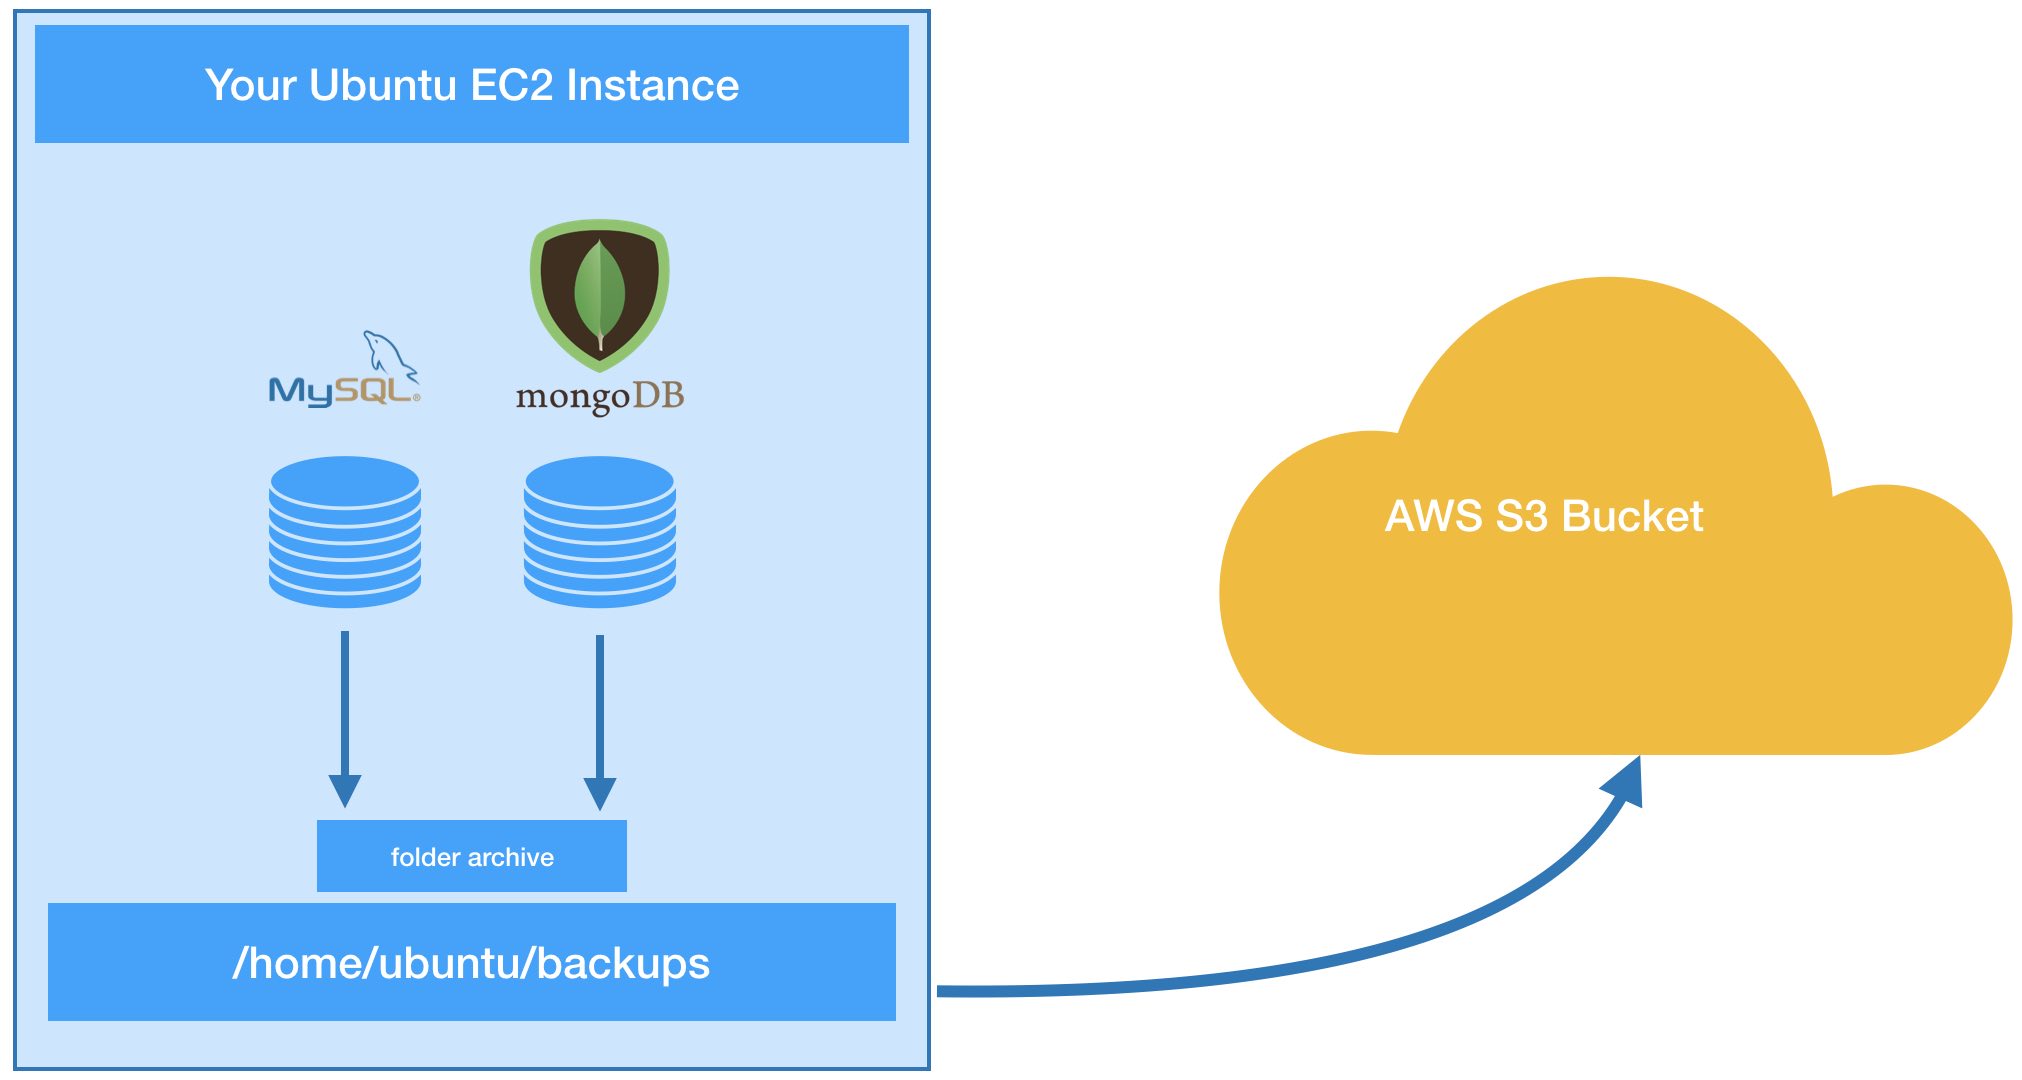
Implementation Steps
Assumptions
- Your Open edX instance is running from an AWS account
- Your AWS EC2 instance is running on an Ubuntu 20.04 LTS server built from the Amazon Linux AMI
- You have SSH access to your EC2 instance and sudo capability
- You have permissions to create AWS IAM users and S3 resources
- Your Open edX instance is substantially based on the guidelines published here: Open edX Step-By-Step Production Installation Guide
1. Create credentials for AWS CLI
AWS provides an integrated security management system called Identity and Access Management (IAM) that we are going to use in combination with AWS’ Command Line Interface (CLI) to give us a way to copy files from our local Ubuntu file system to an S3 bucket in our AWS account. If you’re new to either topic then it behooves you to follow these two links to learn the basics of both topics.
In this step, we’ll create a new IAM user with full access to S3 resources.
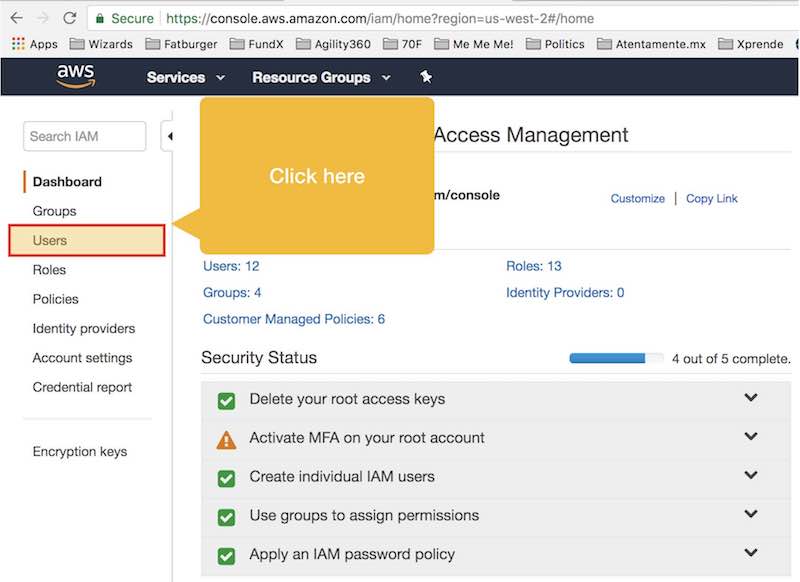
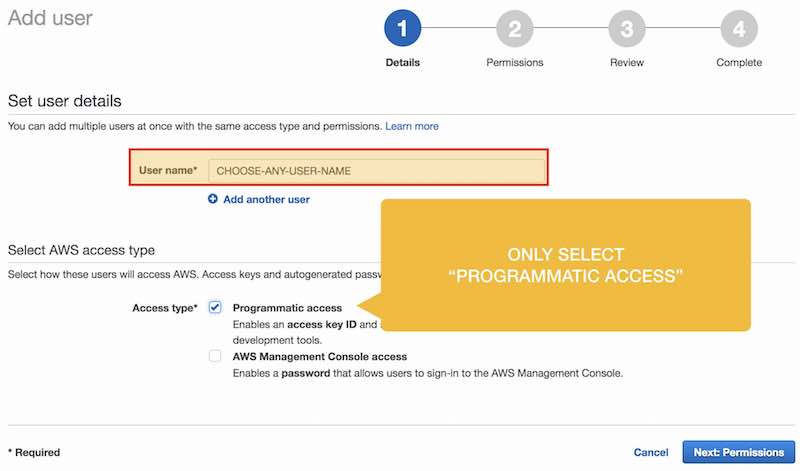
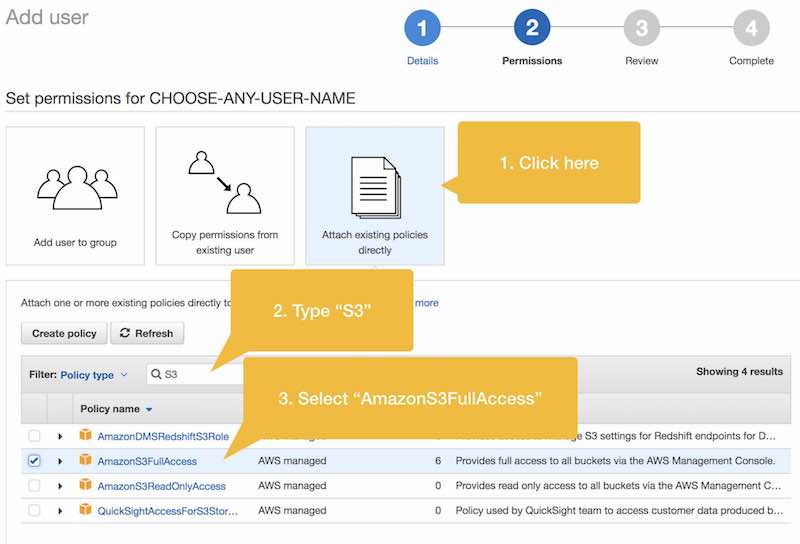
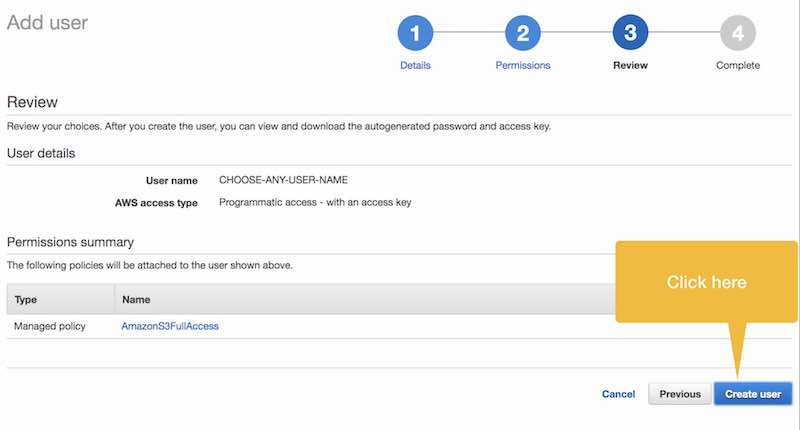
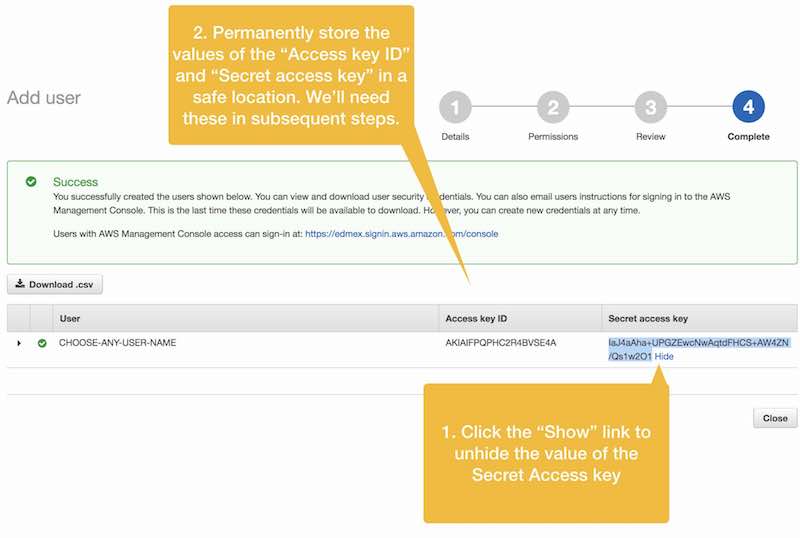
In the next step we’ll permanently store our “Access Key ID” and “Secret key ID” values in the AWS CLI configuration file on our Ubuntu server instance so that we’ll be able to seamlessly make calls to AWS S3 from the command line, and importantly, from a Bash script.
2. Install AWS CLI (Command Line Interface)
Next, lets install AWS’ command line tools. The version of Ubuntu that you should be using has Pip preloaded. We’ll use this to install AWS CLI.
$ pip install awscli --upgrade --user
after installing run the AWS “configure” program to permanently store your IAM user credentials
$ aws configure
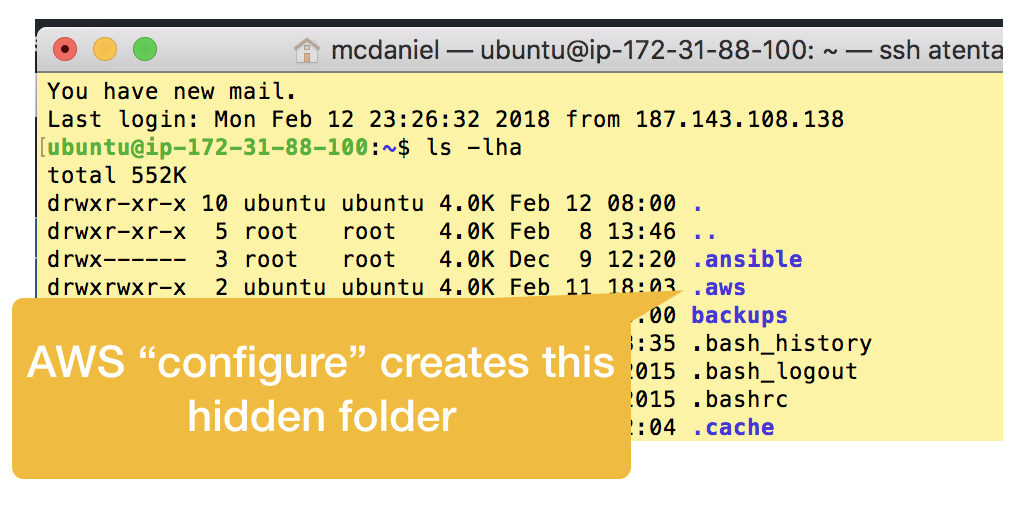
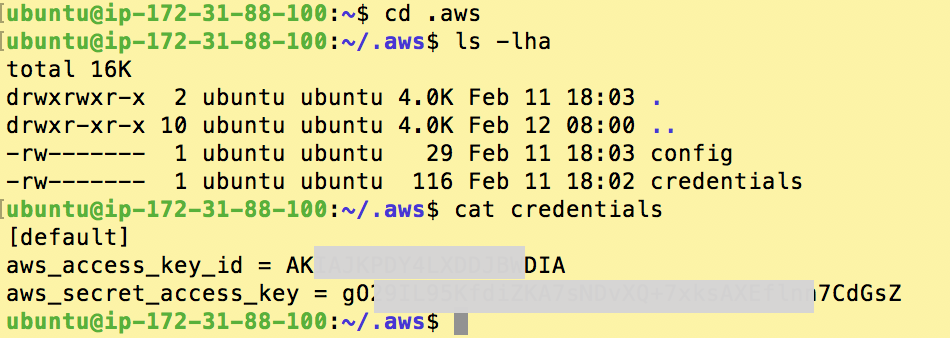
The “configure” program adds a hidden directory to your home folder named .aws that contains a file named “config” and another named “credentials”; both of which you can edit. So just fyi, you can change your configuration values in the future either by re-running aws configure or by editing these two files.
If you need to troubleshoot, or heck, if you just want to know more then you can read AWS’ CLI installation instructions.
3. Create An AWS S3 Bucket
Amazon S3 is object storage built to store and retrieve any amount of data from anywhere – web sites and mobile apps, corporate applications, and data from IoT sensors or devices. It is designed to deliver 99.999999999% durability, and stores data for millions of applications used by market leaders in every industry. We’ll use S3 to archive our backup files. In my view S3 is a very stripped down file system that has been highly optimized for its specific use case.
Creating an S3 bucket is straightforward, and AWS’ step-by-step instructions are very good. There are no special configuration requirements for our use case as a permanent file archive, so feel free to create your bucket however you like. You’ll reference your new S3 bucket in the next step.
4. Test AWS C3 sync command
Let’s do a simple test to ensure that a) AWS CLI is correctly installed and configured and b) your AWS S3 bucket is accessible from the command line. We’ll create a small test file in your home folder, then call the AWS CLI “sync” command to copy it to your bucket.
cd ~
echo "hello world" > test.file
aws s3 sync test.file s3://[THE NAME OF YOUR BUCKET]
If successful then you’ll find a copy of your file inside your AWS S3 bucket. Otherwise, please leave comments describing your particular situation so that I can continue to improve this how-to article.
5. Test connectivity to MySQL
In this step we want to verify that you can connect to your MySQL server from the command line. If you are running an Open edX instance based on my article Open edX Step-By-Step Production Installation Guide then your MySQL server is running on your EC2 instance and is therefore accessible as “localhost”, which incidentally is the default host value.
Beginning with the Koa release the MySQL root password is set, and as of this publication I still have not determined how to find the password value that they have chosen. However, you still have two choices. You can use the ‘admin’ account that the native installer creates, and which has the same permissions as ‘root’, or, you can reset the MySQL root password by following these instructions.
To login using the built-in ‘admin’ user you’ll need to lookup the password value stored in /home/ubuntu/my-passwords.yml. Look for the key value ‘COMMON_MYSQL_ADMIN_PASS’ on or around row 14

The command-line login command is as follows. You’ll be prompted for the password after you hit the return key.
mysql -u admin -p
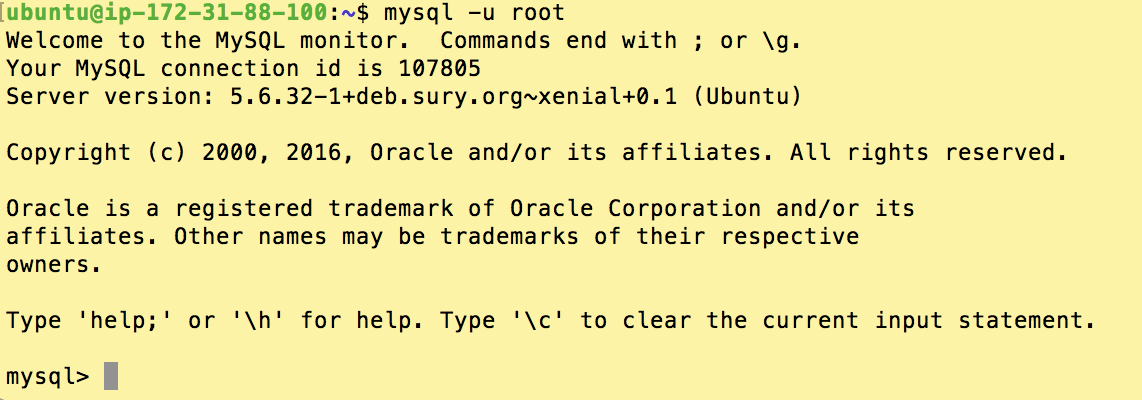
If successful you’ll see a screen substantially like the following. Type ‘exit’ and enter to logout of MySQL. Please leave me a comment if you have trouble logging in so that I can improve this article.
6. Test Connectivity to MongoDB
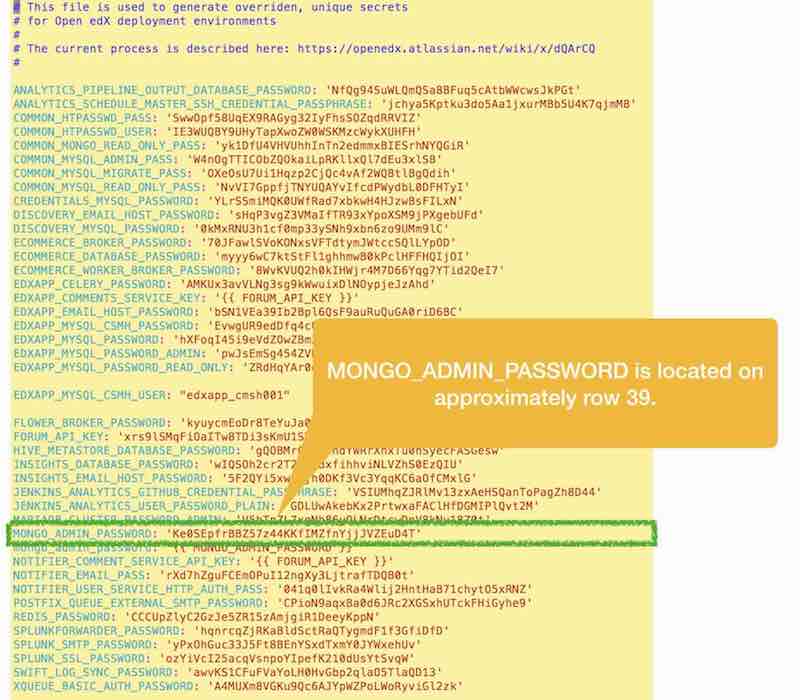
To connect to MongoDB you’ll need your admin password. The third step of the Open edX native build installation script creates a plain text file in your home folder named my-passwords.yml that contains a list of all unique password values that were automagically created for you during the installation. Your MongoDB admin password is located in this file on approximately row 39 and identified as MONGO_ADMIN_PASSWORD.
Next, we’ll create a small Bash script to test whether we can connect to MongoDB, as follows
#!/bin/bash
for db in edxapp cs_comment_service_development; do
    echo "Dumping Mongo db ${db}..."
    mongodump -u admin -p'ADD YOUR PASSWORD HERE' -h localhost --authenticationDatabase admin -d ${db} --out mongo-dump
done
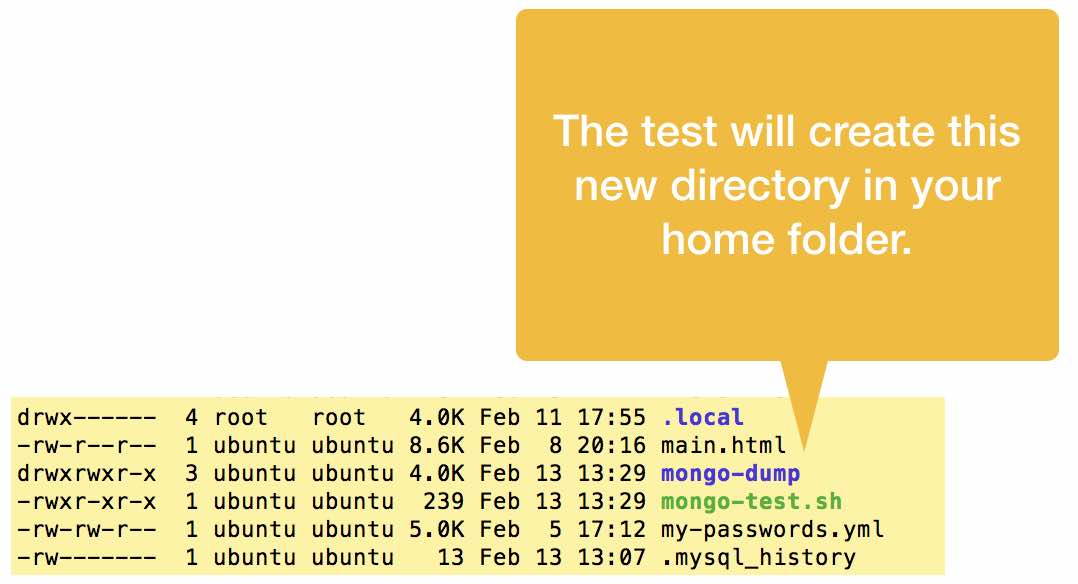
Save this in a file named ~/mongo-test.sh, then run the following commands to execute your test
sudo chmod 755 ~/mongo-test.sh  #This makes the file executable
bash ~/mongo-test.sh   #execute the Bash script
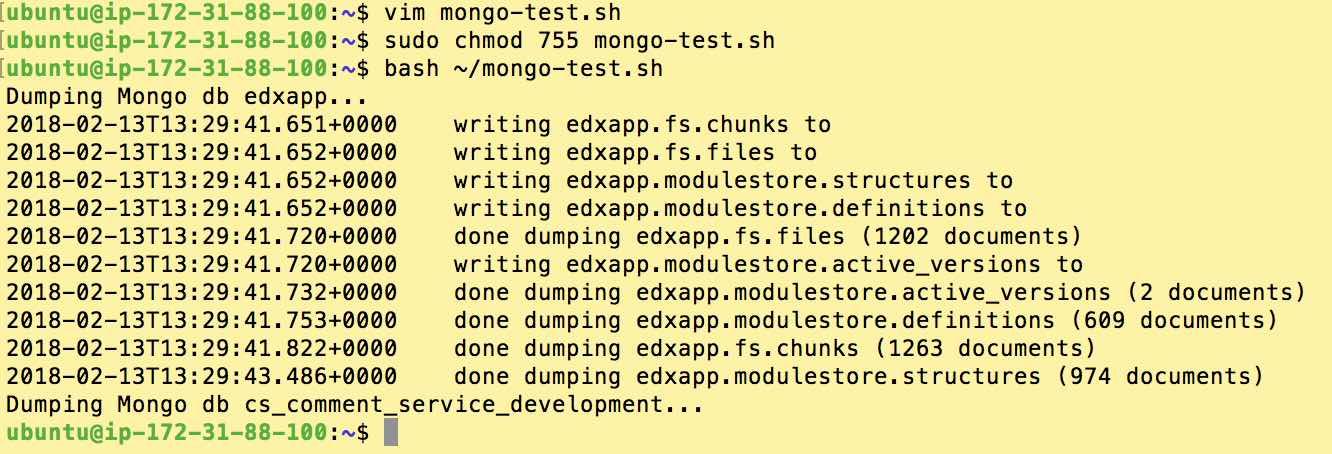
If successful you’ll see output approximately like the following
7. Create Bash script
In this step we’ll bring everything together into a single Bash script that does the following
- Creates a temporary working folder
- Backs up schemas and data for each database that is part of the Open edX platform. Importantly, we want to exclude system database in order to avoid data restore problems
- Backs up MongoDB course data and Discussion Forum data
- Combines both sets of data into a tarball
- Copies the tarball to our AWS S3 bucket
- Prunes our AWS S3 bucket of old backup files
- Cleans up and removes our temporary working folder
The complete script is available here on Github, or if you’re in a hurry just copy/paste the snippet below.
Credit for the substance of this script goes to Net Batchelder.
#!/bin/bash
#---------------------------------------------------------
# written by: lawrence mcdaniel
#             https://lawrencemcdaniel.com
#             https://blog.lawrencemcdaniel.com
#
# date:       feb-2018
# modified:   jan-2021: create separate tarballs for mysql/mongo data
#
# usage:      backup MySQL and MongoDB data stores
#             combine into a single tarball, store in "backups" folders in user directory
#
# reference:  https://github.com/edx/edx-documentation/blob/master/en_us/install_operations/source/platform_releases/ginkgo.rst
#---------------------------------------------------------

#------------------------------ SUPER IMPORTANT!!!!!!!! -- initialize these variables
MYSQL_PWD="COMMON_MYSQL_ADMIN_PASS FROM my-passwords.yml"     #Add your MySQL admin password, if one is set. Otherwise set to a null string
MONGODB_PWD="MONGO_ADMIN_PASSWORD FROM my-passwords.yml"      #Add your MongoDB admin password from your my-passwords.yml file in the ubuntu home folder.

S3_BUCKET="YOUR S3 BUCKET NAME"             # For this script to work you'll first need the following:
                                            # - create an AWS S3 Bucket
                                            # - create an AWS IAM user with programatic access and S3 Full Access privileges
                                            # - install AWS Command Line Tools in your Ubuntu EC2 instance
                                            # run aws configure to add your IAM key and secret token
#------------------------------------------------------------------------------------------------------------------------

BACKUPS_DIRECTORY="/home/ubuntu/backups/"
WORKING_DIRECTORY="/home/ubuntu/backup-tmp/"
NUMBER_OF_BACKUPS_TO_RETAIN="10"            # Note: this only regards local storage (ie on the ubuntu server). All backups are retained in the S3 bucket forever.

# Sanity check: is there an Open edX platform on this server?
if [ ! -d "/edx/app/edxapp/edx-platform/" ]; then
  echo "Didn't find an Open edX platform on this server. Exiting"
  exit
fi


#Check to see if a working folder exists. if not, create it.
if [ ! -d ${WORKING_DIRECTORY} ]; then
    mkdir ${WORKING_DIRECTORY}
    echo "created backup working folder ${WORKING_DIRECTORY}"
fi

#Check to see if anything is currently in the working folder. if so, delete it all.
if [ -f "$WORKING_DIRECTORY/*" ]; then
  sudo rm -r "$WORKING_DIRECTORY/*"
fi

#Check to see if a backups/ folder exists. if not, create it.
if [ ! -d ${BACKUPS_DIRECTORY} ]; then
    mkdir ${BACKUPS_DIRECTORY}
    echo "created backups folder ${BACKUPS_DIRECTORY}"
fi


cd ${WORKING_DIRECTORY}

# Begin Backup MySQL databases
#------------------------------------------------------------------------------------------------------------------------
echo "Backing up MySQL databases"
echo "Reading MySQL database names..."
mysql -uadmin -p"$MYSQL_PWD" -ANe "SELECT schema_name FROM information_schema.schemata WHERE schema_name NOT IN ('mysql','sys','information_schema','performance_schema')" > /tmp/db.txt
DBS="--databases $(cat /tmp/db.txt)"
NOW="$(date +%Y%m%dT%H%M%S)"
SQL_FILE="mysql-data-${NOW}.sql"
echo "Dumping MySQL structures..."
mysqldump -uroot -p"$MYSQL_PWD" --add-drop-database ${DBS} > ${SQL_FILE}
echo "Done backing up MySQL"

#Tarball our mysql backup file
echo "Compressing MySQL backup into a single tarball archive"
tar -czf ${BACKUPS_DIRECTORY}openedx-mysql-${NOW}.tgz ${SQL_FILE}
sudo chown root ${BACKUPS_DIRECTORY}openedx-mysql-${NOW}.tgz
sudo chgrp root ${BACKUPS_DIRECTORY}openedx-mysql-${NOW}.tgz
echo "Created tarball of backup data openedx-mysql-${NOW}.tgz"
# End Backup MySQL databases
#------------------------------------------------------------------------------------------------------------------------


# Begin Backup Mongo
#------------------------------------------------------------------------------------------------------------------------
echo "Backing up MongoDB"
for db in edxapp cs_comment_service_development; do
    echo "Dumping Mongo db ${db}..."
    mongodump -u admin -p"$MONGODB_PWD" -h localhost --authenticationDatabase admin -d ${db} --out mongo-dump-${NOW}
done
echo "Done backing up MongoDB"

#Tarball all of our backup files
echo "Compressing backups into a single tarball archive"
tar -czf ${BACKUPS_DIRECTORY}openedx-mongo-${NOW}.tgz mongo-dump-${NOW}
sudo chown root ${BACKUPS_DIRECTORY}openedx-mongo-${NOW}.tgz
sudo chgrp root ${BACKUPS_DIRECTORY}openedx-mongo-${NOW}.tgz
echo "Created tarball of backup data openedx-mongo-${NOW}.tgz"
# End Backup Mongo
#------------------------------------------------------------------------------------------------------------------------


#Prune the Backups/ folder by eliminating all but the 30 most recent tarball files
echo "Pruning the local backup folder archive"
if [ -d ${BACKUPS_DIRECTORY} ]; then
  cd ${BACKUPS_DIRECTORY}
  ls -1tr | head -n -${NUMBER_OF_BACKUPS_TO_RETAIN} | xargs -d '\n' rm -f --
fi

#Remove the working folder
echo "Cleaning up"
sudo rm -r ${WORKING_DIRECTORY}

echo "Sync backup to AWS S3 backup folder"
/usr/local/bin/aws s3 sync ${BACKUPS_DIRECTORY} s3://${S3_BUCKET}/backups
echo "Done!"
8. Create a Cron job
Lets setup a cron job that executes our new backup script once a day at say, 6:00am GMT.
crontab -e
Then add this row to your cron table
# m h  dom mon dow   command
0 6 * * * sudo ./edx.backup.sh > edx.backup.out
And now you’re set! Your Open edX site is getting completely backed up every day and stored offset in an AWS S3 bucket.




Hi Lawrenece! I was wondering if you had an update solution for a Tutor based install?
Thanks!
take a look at this project: https://github.com/cookiecutter-openedx
Hi Lawrence,
In the mongo db backup the “cs_comment_service_development” should be “cs_comment_service”
Enjoy your day 🙂
Bye
I think it should be *cs_comments_service* 🙂
Hi Lawrence,
Just wondering if the ‘Sync backup to AWS S3 backup folder’ bit is important?. I do not have a AWS S3 bucket account and wanted to upgrade my OpenedX instance. Can I still be able to follow your guide?
hi eva, yes, the backup program will still work without this line. however, the AWS S3 Sync copies your backup files to a remote file storage service, preserving them in the event that something bad happens to your open edx server. AWS S3 is a free and highly reliable service.
Thank you Lawrence, I have changed that bit to backup to a git repository. it works!. I would also like to know why you decided to prune the backups? is it to speed up the backup process or is there any other reason?
the backup files are pruned locally to ensure that the folder doesn’t eventually consume all of your available file system space. however, the backup files are stored permanently on AWS S3. thus, the set of files that remain on the server are strictly there for convenience because you can alternatively download any of your backup files from AWS S3.
Hi Lawrence, thank you very much!
Personally I’m thinking of also adding files like lms.env.json and theming directories to the script.
Could you help me with a question, please?
If an attacker got root access to the server, could they use the backup script or the AWS CLI to delete the backups?
If so, what would be the best way to prevent this? I’m thinking I could change the AWS CLI policies or maybe just backup the backups to something other than a bucket, like Glacier. What do you think?
Thanks again for a great article!
hi Mattijs, yes, they potentially could get access depending on how you configure your S3 bucket. however, you can control access to your S3 storage bucket by using AWS’ IAM (Identity Access Management) service, which you can configure to prevent public access to the bucket. following are detailed instructions on how to do this: https://docs.aws.amazon.com/AmazonS3/latest/dev/walkthrough1.html
@admin:
Thanks a lot for your hard work only a small typo on the script:
it says
#Prune the Backups/ folder by eliminating all but the 30 most recent tarball files
it says 30, but only 15 are kept
this following line should read like this:
ls -1tr | head -n -30 | xargs -d ‘\n’ rm -f —
thank you for pointing that out! now corrected 🙂
Hi Lawrence,
I think sync is for folder and cp is for files. If you want to sync aws s3 sync test.file s3://[THE NAME OF YOUR BUCKET], it failed because test.file is not a folder. I think the correct command would be aws s3 sync /path/to/file/ s3://[bucket-name]. Or if you want to upload with file name, the command would be aws s3 cp /path/to/file/test.file s3://[bucket-name]. Thanks you very much for the article. It helps me alot.
hi Aung, you should sync the folder to S3. this ensures that you are archiving all daily backups for the time window that you specified in the script parameter (30 days by default).
Thanks for your post its helped me a lot.
Hi Lawrence,
“sync” did not work for me so I tried “cp” and it worked. Was there something I did wrong or the command has changed?
Hi eric, interesting. can you please post a screen shot of the error message that you receive?
Hi Lawrence, sync is not working correctly.
It gives the error
warning: Skipping file /home/ubuntu/test.file/. File does not exist.
others have recently posted similar experiences in the GitHub repo for aws-cli: https://github.com/aws/aws-cli/issues/3514. it looks like it might be a bug in the current version. i’d follow their repo for awhile until the issue is resolved.