Tutor for Docker simplifies the process of getting an Open edX installation up and running. If you are installing Open edX for evaluation purposes, or if your installation will support less than say, 1,000 learners, then you should seriously consider using Tutor to install the platform rather than using the traditional production installation methodology otherwise known as the “Native Build”.
Summary
The Tutor installation method that I describe in this article is what i now recommend to my small and mid-sized clients; very nearly my entire client list. There are pros and cons to using Docker as opposed to a native installation, but the pros overwhelmingly outweigh the cons. Tutor is a Docker application written by Régis Behmo, a talented freelance software engineer based in Hautes-Alpes, France. Importantly, an Open edX platform installed with Tutor is substantially the same as an Open edX platform installed using the traditional Ansible scripts. Tutor/Docker regards how the the software is deployed more so than how the software is configured.
Now in its third major release, Tutor provides a Quickstart command line utility that stands up a new Hawthorn version of Open edX platform in less than 10 minutes. I would reasonably anticipate Ironwood becoming available in the very near future, though I have not actually confirmed that with Mr. Behmo. Additionally, Tutor now includes configuration parameters that enable you to horizontally scale your platform by migrating persistent data sources like MySQL and Mongo to remote hosts. This important feature enhancement makes Tutor a compelling long-term solution for small and mid-sized installations.
If you’d rather avoid the do-it-yourself method I describe below then you’ll be relieved to know that Tutor is also commercially available as a pre-built machine image in the Amazon Marketplace.

Platform requirements like SSL encryption, Notes & Annotations and the Discussion Forum are true 1-click feature options in the Tutor Quick Start. This alone is reason enough to compel most small organizations to use this methodology. Adding any of these three common requirements to a native installation is notoriously technical. Thanks to Tutor, that is now ancient history.
The Tutor documentation is very good, and once you get your Open edX platform up and running I encourage you to invest time reading it in order to get a better understanding of Tutor’s extensive configuration capabilities. Meanwhile, this article will hopefully help you jumpstart your Open edX project and make the Open edX platform more accessible.
What’s the difference between Tutor and the “Native Build“? Tutor uses Docker to containerize the many components of an Open edX platform. Subsystems like MySQL, MongoDB, RabbitMQ as well as the Open edX software itself are prepackaged into Docker containers that can each be downloaded and enabled on a standard Linux server in just a few minutes. Tutor manages the installation of around a dozen or so Docker containers. Ultimately, you’ll get the same software and the same functionality, but it’ll be packaged and installed in a different way that makes deploying the platform simpler and faster for most organizations.
Should I use this method or the “Native Build” method? I work on and support a few dozen Open edX installations. If Tutor had been available at the onset of each of these projects then I would have chosen it for all but two of these projects. If you’re unsure then you should choose this approach.
Like its Ansible counterpart, Tutor stands up a single-server full-stack production-ready instance. In this article we’ll use Tutor to stand up an installation of Open edX running on an Amazon Web Services (AWS) EC2 (Elastic Compute Cloud — aka virtual server). The script installs the following Open edX modules:
It also installs all required subsystems and all optional modules. It installs everything on the single server instance in which you initiated the script. That is, this script does not provision nor assume any additional AWS resources.
The Open edX platform leverages a plethora of technologies, and this tends to be a formidable stumbling block for all of us, initially at least. For what it’s worth, I know a lot about a few of Open edX’s technologies, and almost nothing about everything else. Unlike the official documentation, this page attempts to assume as little as possible. Hopefully it helps. Good luck!
Build Procedure
I. Create a new AWS EC2 instance
You should create a fresh server instance per the instructions / screen shots that follow. Some advice:
- Do not attempt to install Open edX on an existing machine. It probably won’t work. Worse, you’ll probably destroy the existing server.
- Do not attempt to install Open edX on a version of Linux other than Ubuntu 16.04. It won’t work.
- Do not attempt to use a cloud service provider other than AWS. It might work, but, you’ll be flying solo in terms of documentation.
- Keep in mind that the Open edX documentation’s “minimum hardware requirements” are exactly that: the bare minimum that is technically feasible. You need more robust gear for a production deployment.
Following is a down-and-dirty set of screen shots to walk you through the key server attributes in terms of size, security and so on. If you’re unfamiliar with Amazon Web Services then you can start your journey here: https://aws.amazon.com/getting-started/.
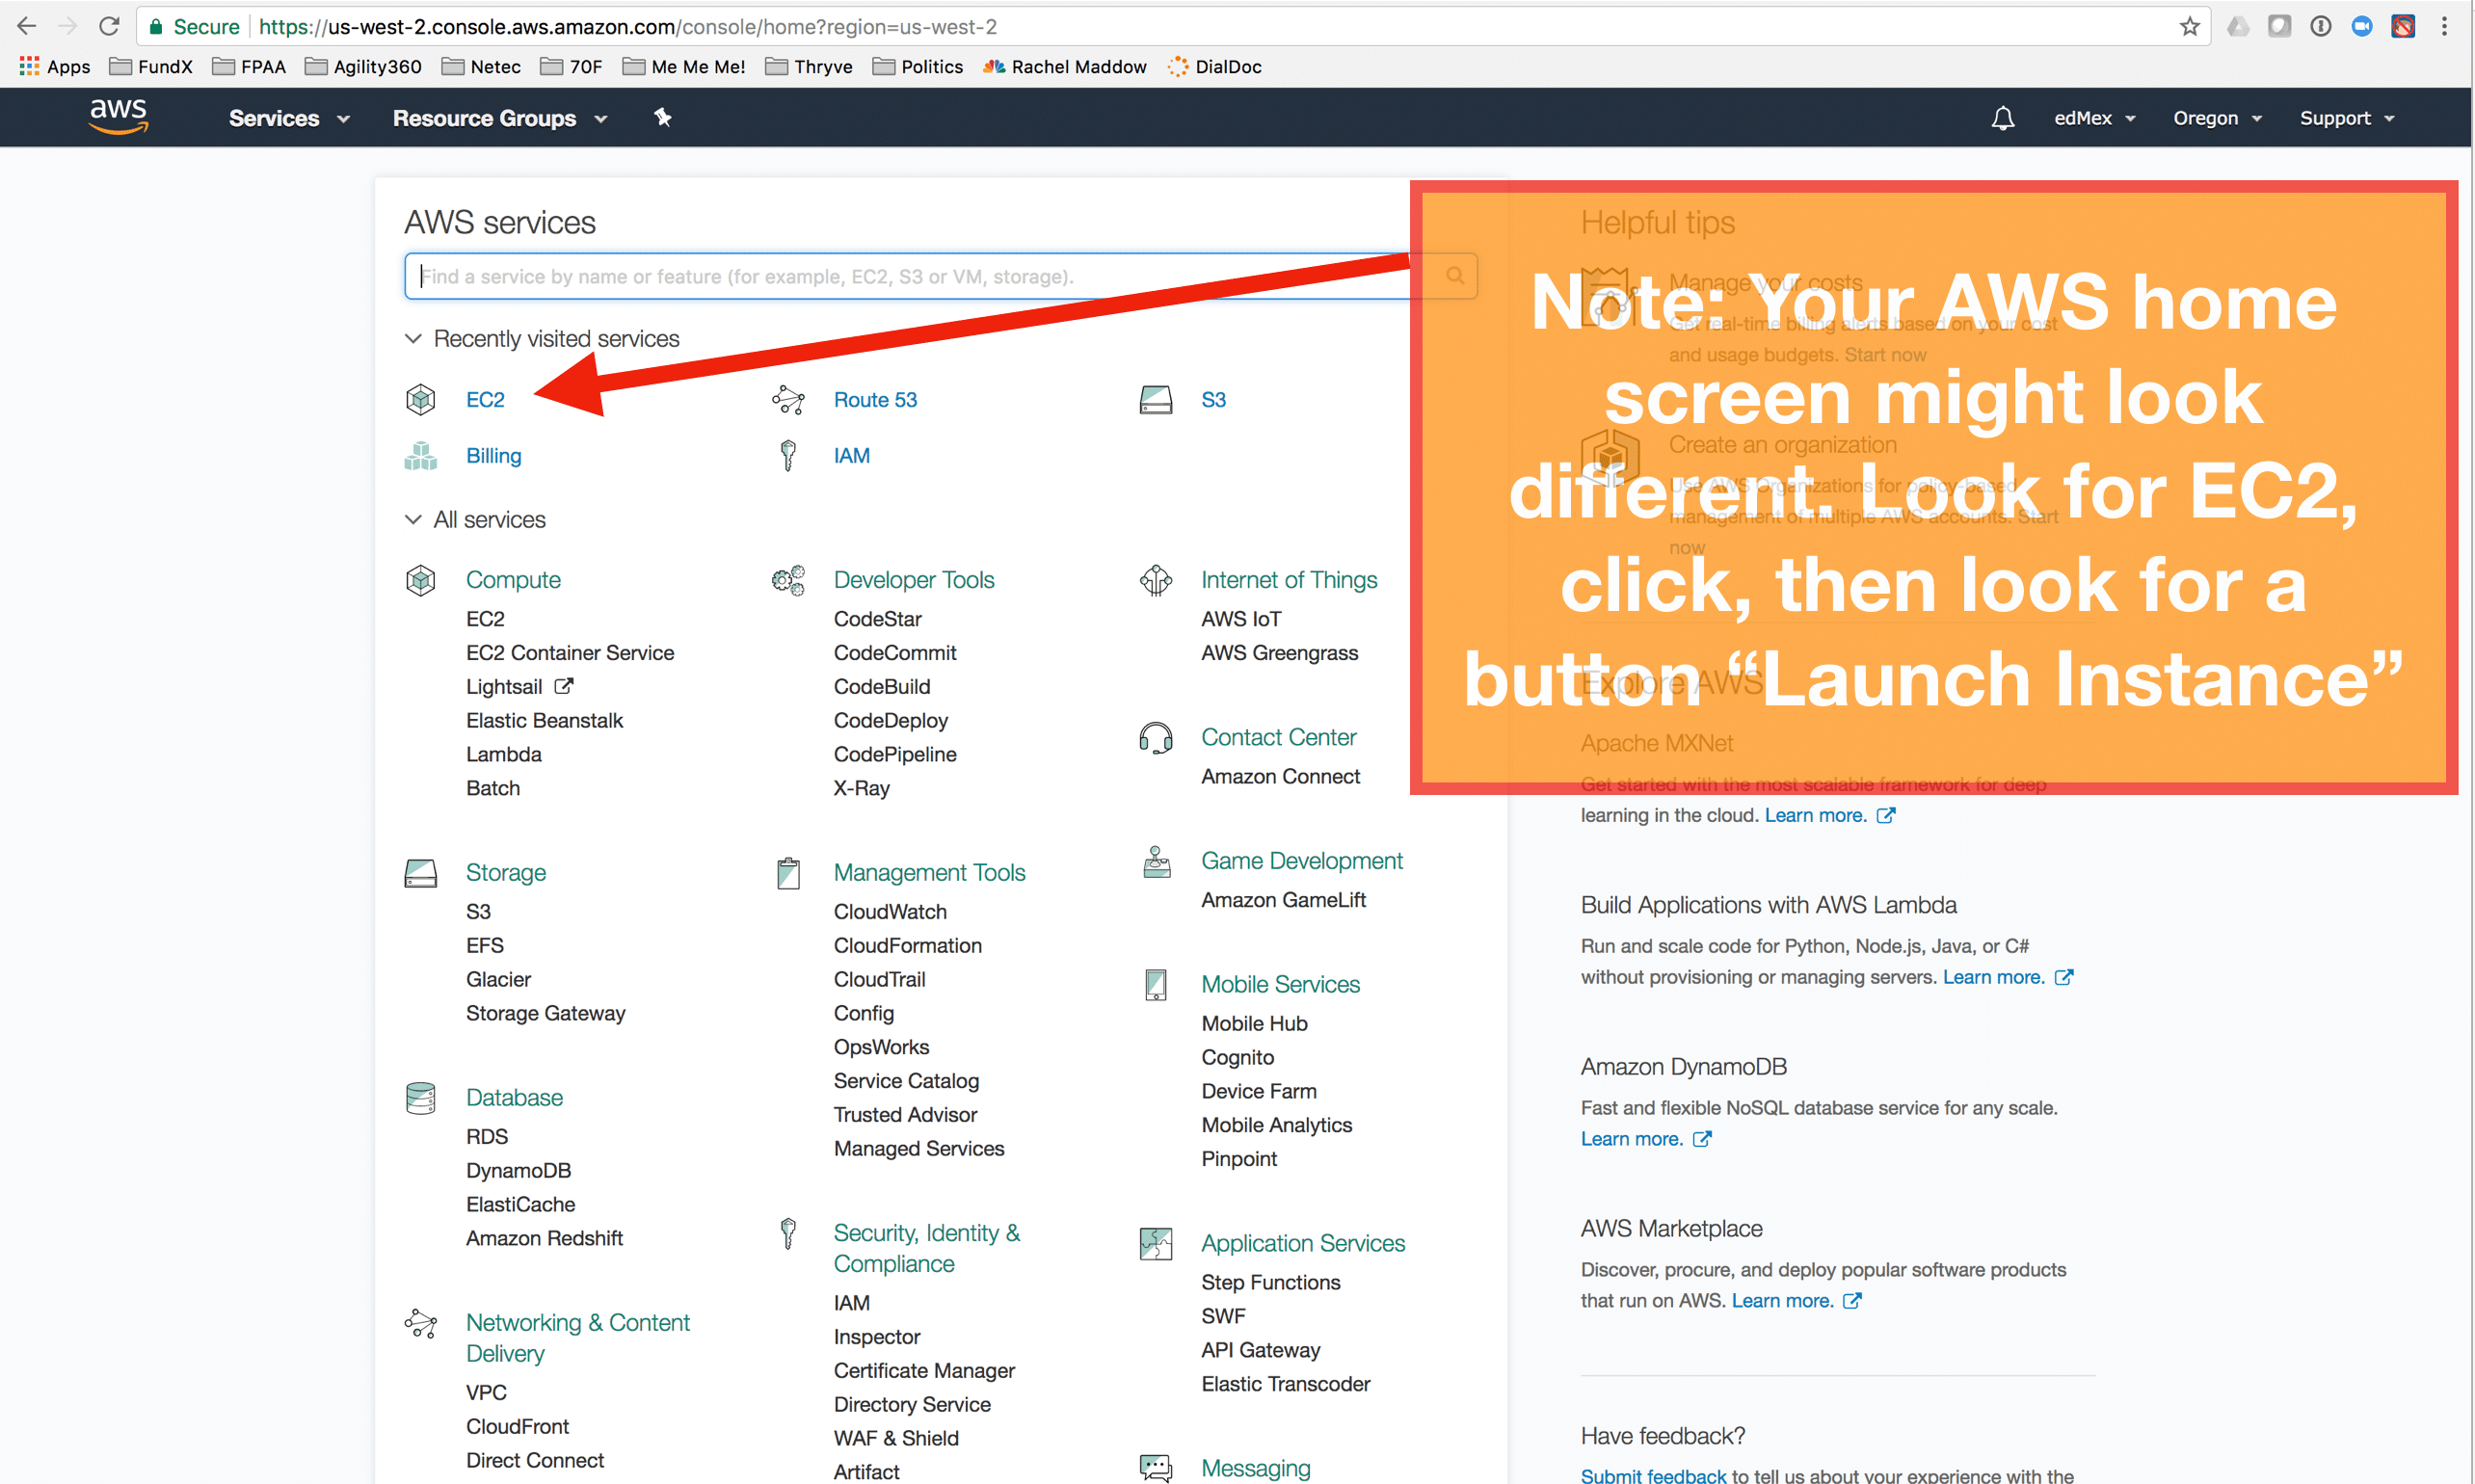
Login to your AWS Account. Navigate to the EC2 console. Look for an action button that reads “Launch Instance”
Step 1: Choose AMI
AWS provides you with a pick list of several common server operating systems. Technically speaking, each of these options is an AMI (Amazon Machine Image) that AWS internally maintains and makes available to their customers. For you, this means that you’re able to spin up an Ubuntu server in a few seconds, without needing to worry about where the operating system repo might be located and so on.

Step 2: Server Sizing
AWS EC2 Server Sizing: After prolonged experimentation I have gravitated to AWS EC2 T2.Large servers as my virtual server configuration of choice. Generalizing, this provides 2 cpu’s and 8gb of memory, which is sufficient resource for a small production implementation. As of September 2018 AWS charges $0.0928 per Hour ($67 USD per month) for a t2.large server. You can dramatically reduce the cost of the server by purchasing a one-year contract for the server instance, in which case the cost reduces to $42 USD per month. I launch these with 100gb of drive space, which thus far has been far more than sufficient for my needs. Bear in mind that my recommendation is almost exactly double that provided in the official edX documentation. My view on this is that it’s already challenging enough to get this platform up and running without adding unnecessary challenge by under-sizing your equipment.
Very generally speaking, this server config should handle a couple hundred concurrent learners. Look at the bottom of this page for links to downstream repos that are part of a simple horizontal scaling strategy for small (but not tiny) institutions.

Note: AWS only charges for time that your instance is running. You can stop the server from the AWS EC2 console at any time, which is logically identical to powering down a physical server.
Step 3: Instance Details
The default values provided in this screen are what you want. Later on it would be a great idea to revisit these settings to get a better understanding of your infrastructure-level configuration options.

Step 4: Add Storage
AWS instances by default come with 8gb of “hard drive” storage. However, you can modify this. You’ll need at least 50gb of storage for Open edX plus normal amounts of data. I suggest doubling that amount, to 100gb. I have not seen that this impacts the cost of the server in any meaningful way.

Step 5: Add Tags
Tags are a way to identify AWS resources inside your account. This is only important if you have many resources (for example, many server instances) in existence in your AWS account. Otherwise you can skip this step.

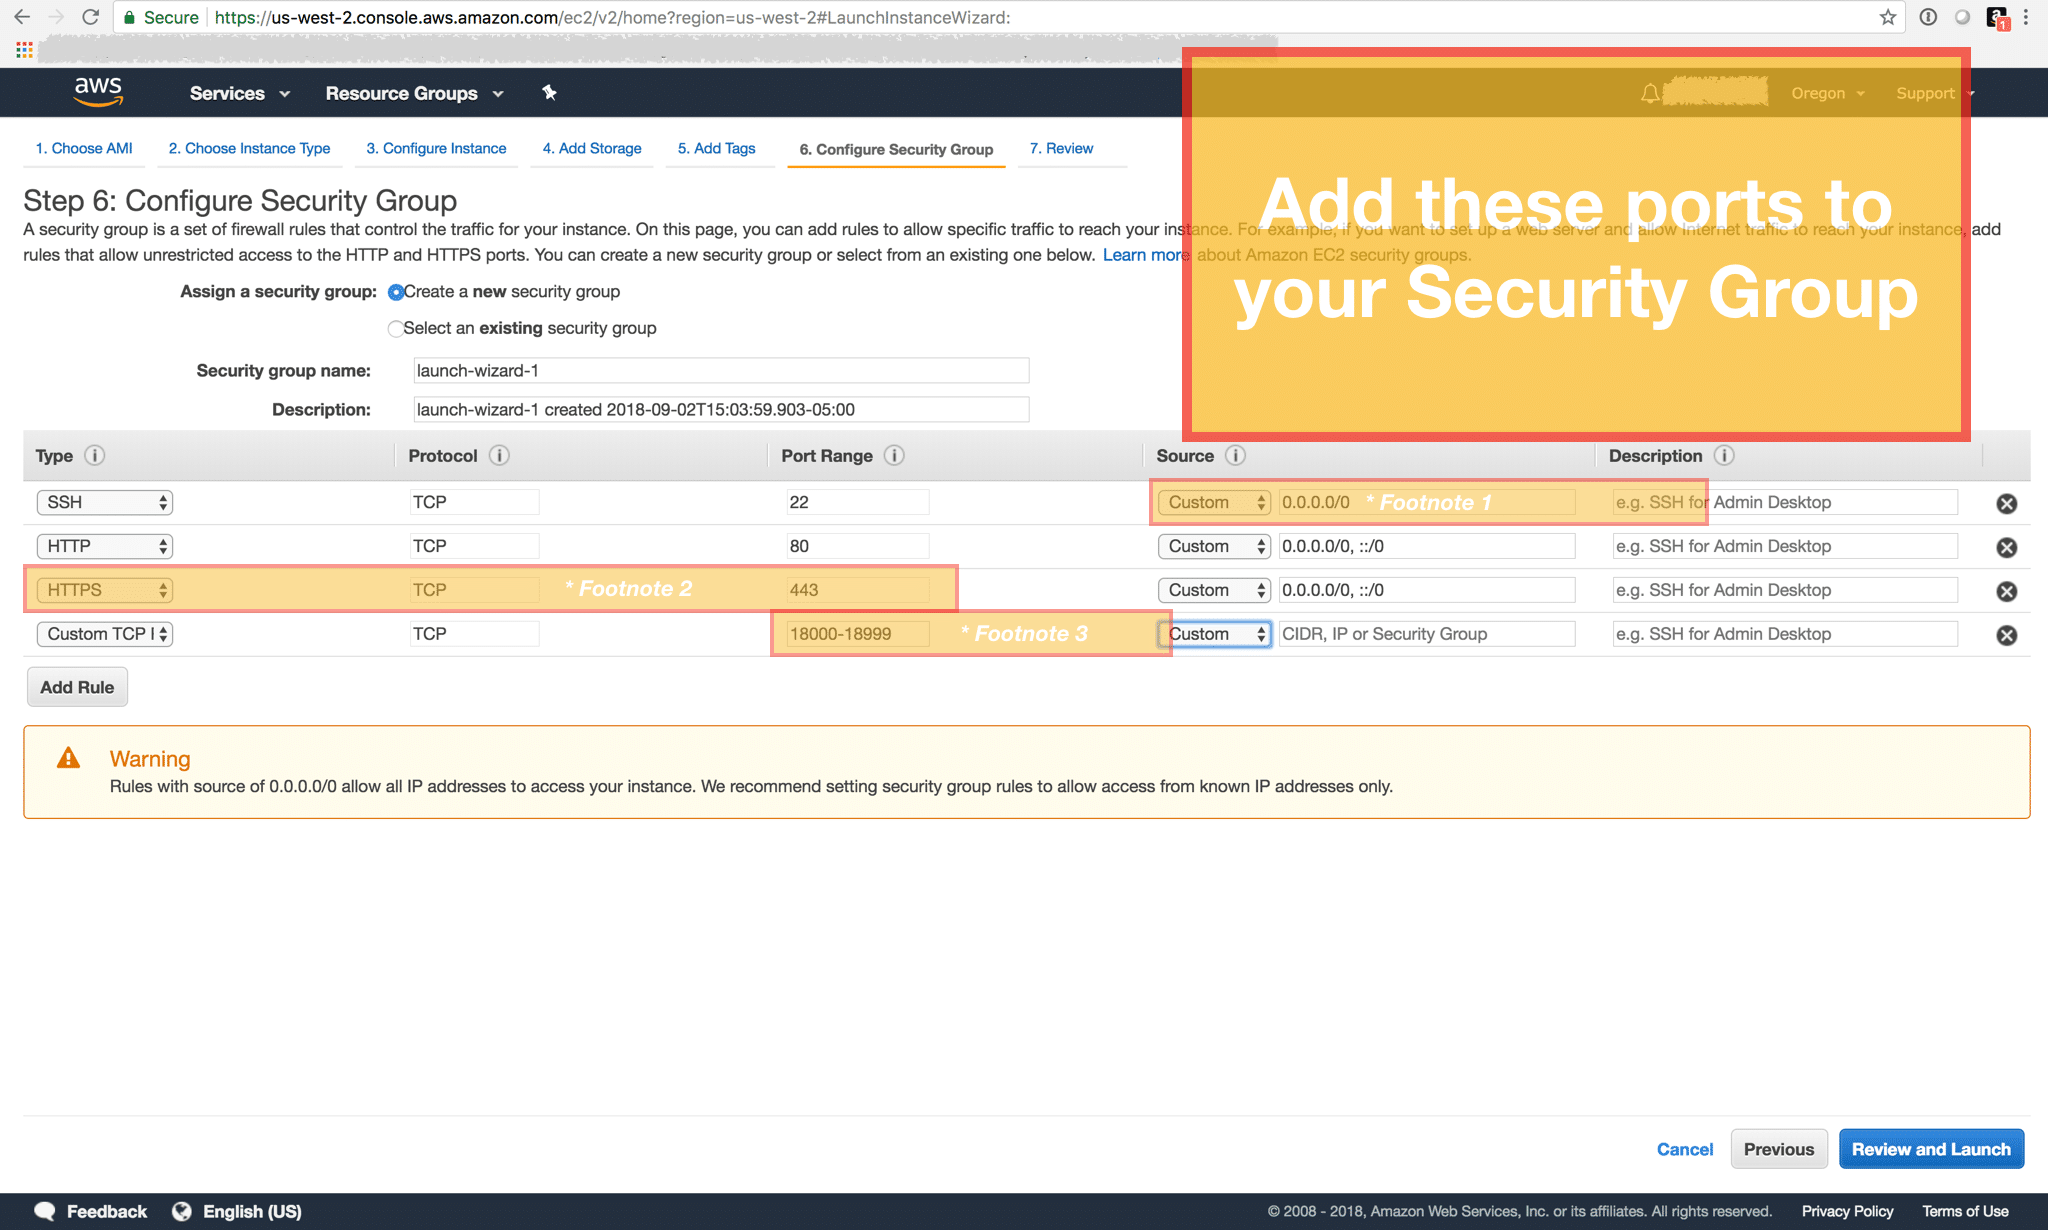
Step 6: Security Profile
This is important. You manage server port settings separately from the server itself. Generalizing, you create a port security profile, and then assign this profile to your EC2 instance. Open edX uses many ports as part of the standard installation. Note that this script installs ALL modules, and you therefore need to open many ports. Open edX default http addressing uses port numbers rather than subdomains or url paths/routes. The ports in the screen shot that follows correspond with the following Open edX modules.
| Module | Port |
|---|---|
| LMS | 80 |
| CMS | 18010 |
| Certs | 18090 |
| Discovery | 18381 |
| Ecommerce | 18130 |
| edx-release | 8099 |
| Forum | 18080 |
| Xqueue | 18040 |
Some of these urls lead to a landing page, others do not.
footnotes:
- SSH Source: This is an optional parameter that you can provide to limit the IP addresses that can attempt to connect to your EC2 instance using SSH. By default this parameter is set to 0.0.0.0/0, which allows ANY IP address to attempt to connect. You can improve the security of your server by limiting this to IP ranges for you and your team.
- HTTPS: this is an optional port. You should open this port if you are planning to setup HTTPS protocol with SSL/TLS encryption.
- This opens all of the ports from 18000 to 18999. This is the port range used by Open edX applications, subsystems, and API’s.
Step 7: Review Instance Prior to Launch

Step 8: Setup an SSH key pair
You’ll use a terminal emulator via SSH to connect to your server. If you’re unfamiliar with how to connect to a linux server then you can start your journey here: http://docs.aws.amazon.com/AWSEC2/latest/UserGuide/putty.html. Note that you will run this script as well as execute nearly all Open edX admin utilities from a linux command line. So, if you’re new to this then you should bite the bullet and do some online self-study on using linux terminal emulators and SSH.

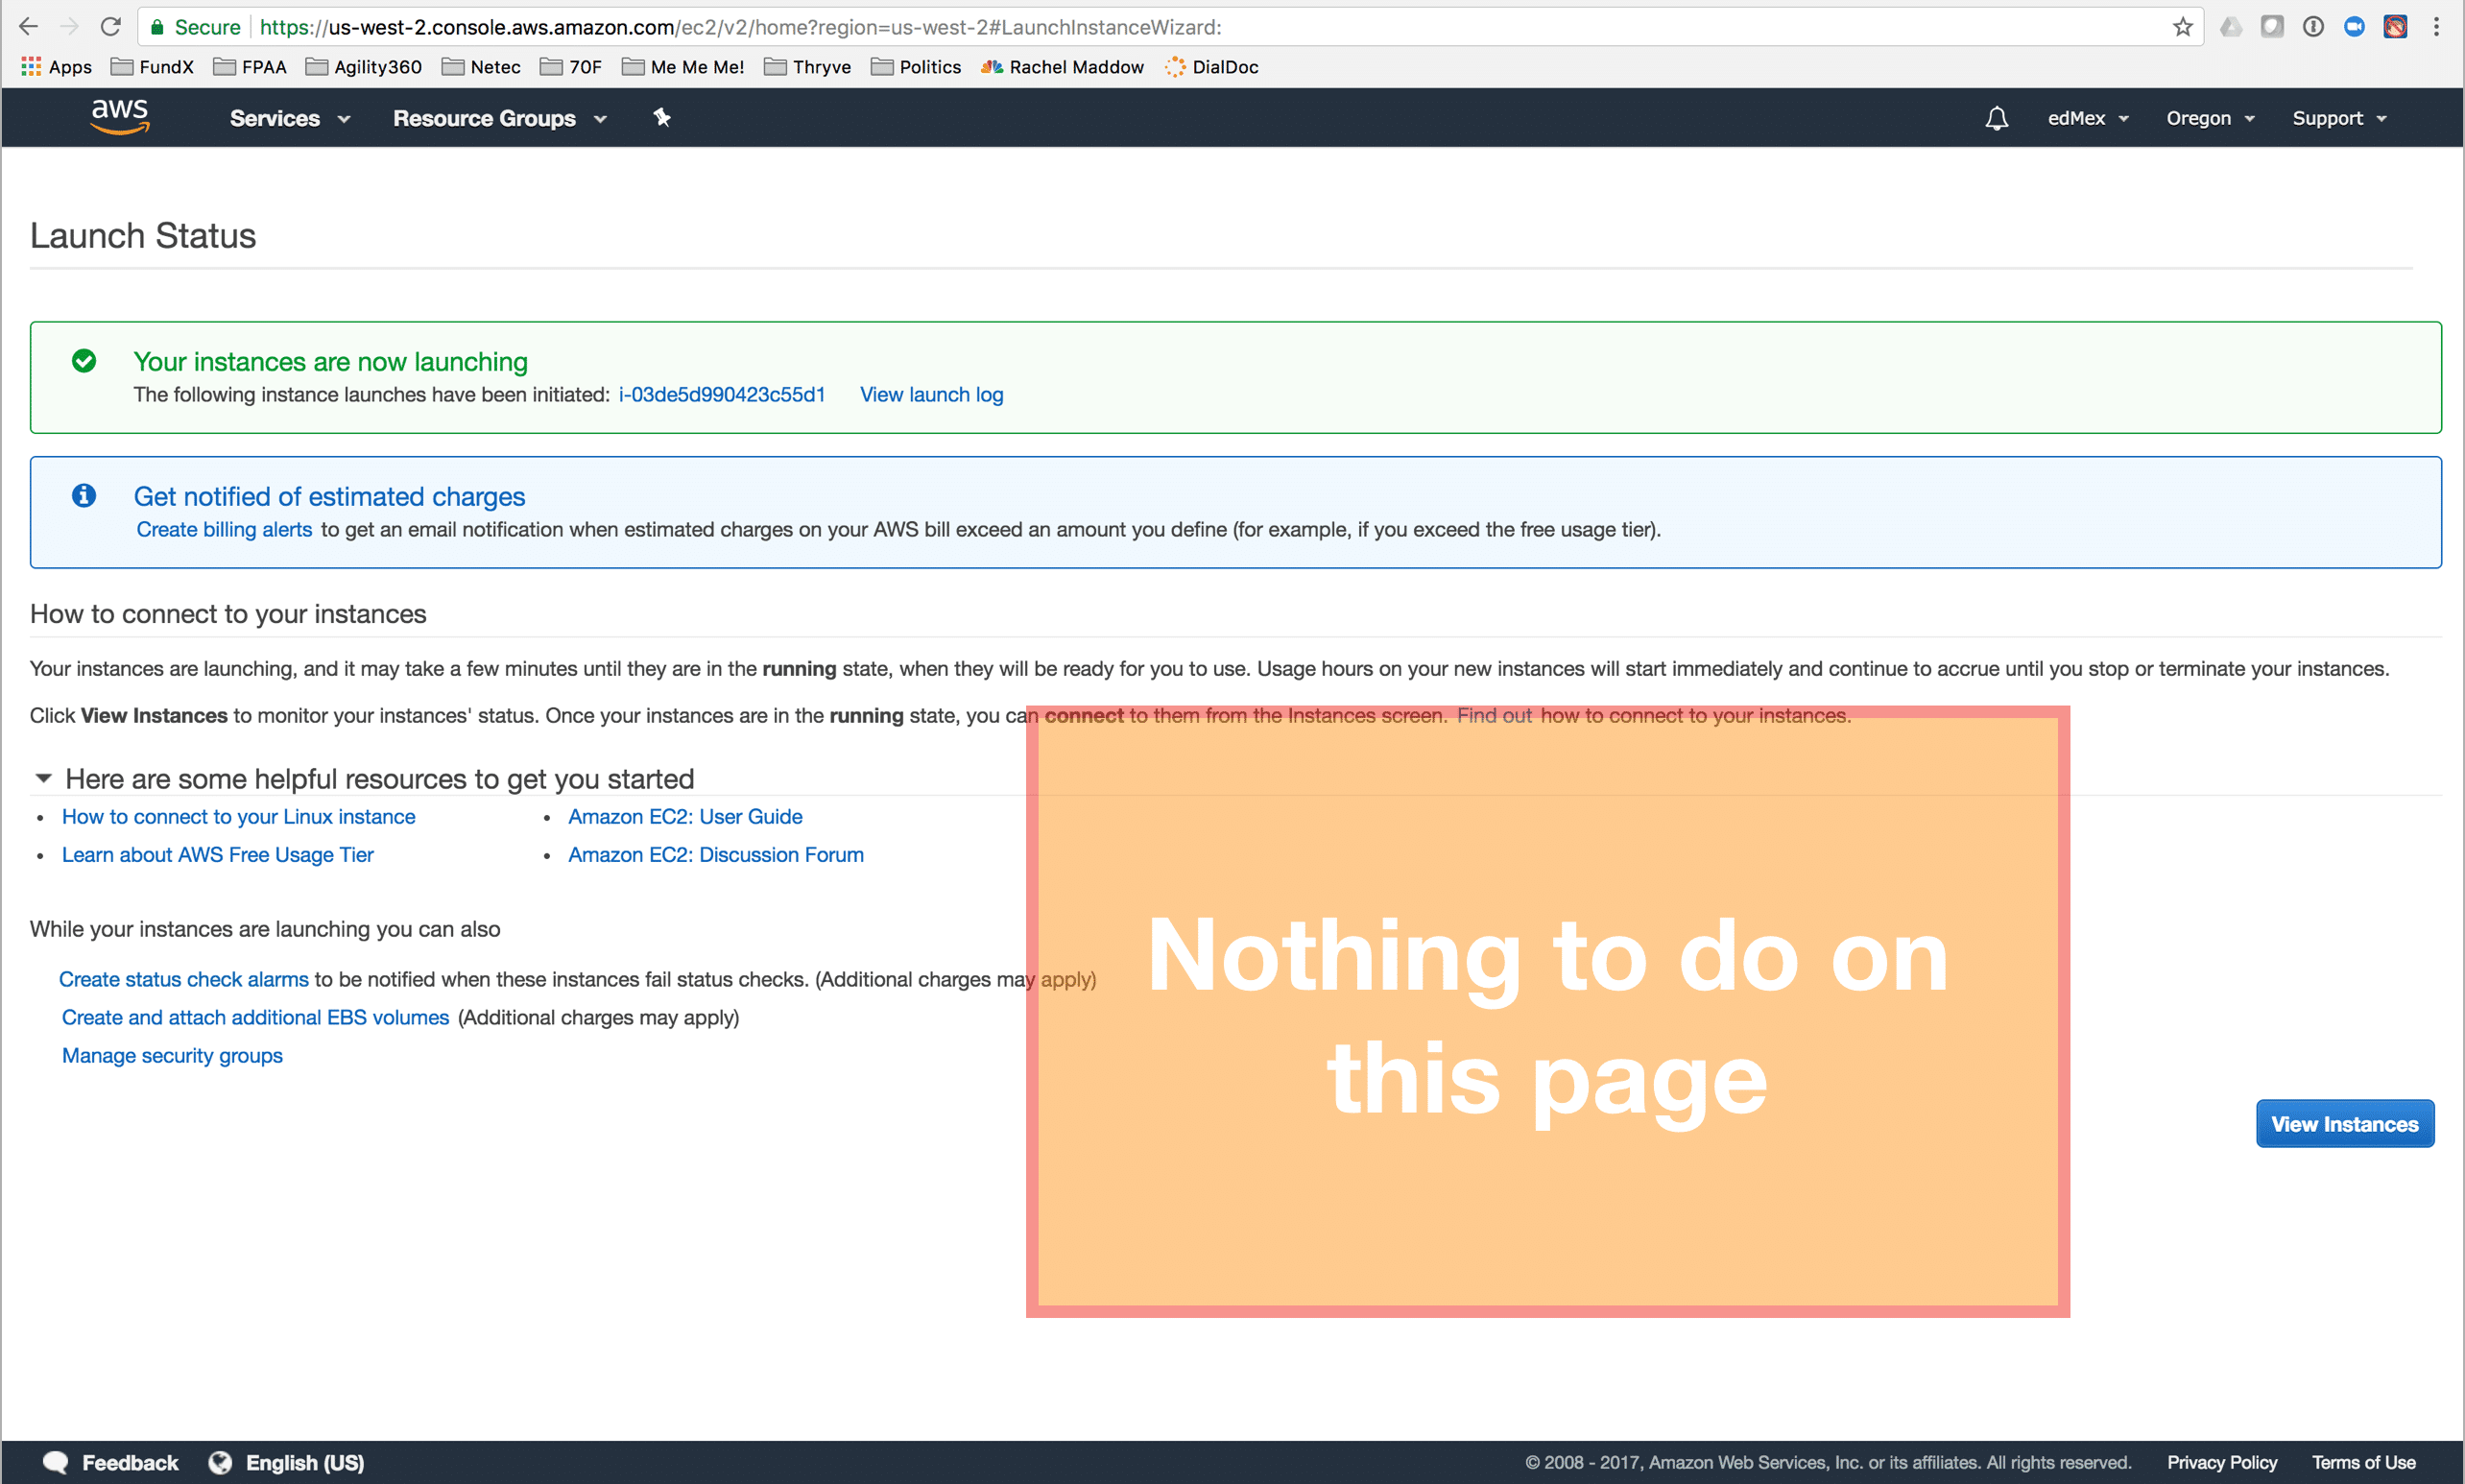
Step 9: Launch Status
Click the blue “View Instances” button at the bottom-right of this screen.
Step 10: EC2 Instance Console
If this is your very first EC2 instance then you’ll see a single row on this screen that shows the vital signs of your new Linux virtual server. It will take a few minutes for the server to instantiate itself and come online. When the server is ready the “Instance State” field will read “Running” and the icon color will change from yellow to green.

You are now finished with the AWS management console. Hereon you will interact with your EC2 instance using a terminal window over SSH.
II. Create Required Sub-domains
Tutor expects certain sub-domains to have been created before it runs. Two of these, for the LMS and CMS are gathered during a brief questionnaire at the beginning of the installation process (see screen shot in the next section). Other sub-domains are based on standard naming practices for Open edX software. Based on my responses to the questionnaire in the section, I created the following sub-domains using AWS Route53 based on the standard sub-domain naming practices Tutor anticipates.

III. Execute the script
cd ~
curl -sSL https://raw.githubusercontent.com/lpm0073/edx.scripts/master/tutor.install.ubuntu.sh | bash -e
sudo su - ubuntu
tutor local quickstart

After providing responses to Tutor’s 8 questions it will launch the automated installation process which takes between 8 and 10 minutes depending your choices. The following link contains the complete screen output of a Tutor installation I ran for this article.
On an aside, all of the information that that Tutor gathers and/or generates on behalf of your installation is stored in /home/ubuntu/.local/share/tutor/config.yml. Following are the configuration parameters from my installation just now:
[sourcecode language=”plain”]ACTIVATE_HTTPS: false
ACTIVATE_NOTES: true
ACTIVATE_XQUEUE: false
ANDROID_OAUTH2_SECRET: IjkyZaAOyuYuKlcpUtoi2PAL
CMS_HOST: tutor-studio.lawrencemcdaniel.com
CONTACT_EMAIL: lpm0073@gmail.com
ID: GybyawNm
LANGUAGE_CODE: en
LMS_HOST: tutor-lms.lawrencemcdaniel.com
MYSQL_ROOT_PASSWORD: YiW7NOx2
NOTES_MYSQL_PASSWORD: GlXkcmve
NOTES_OAUTH2_SECRET: EZMi5tG8MzxnfN22Gxq4TTI0
NOTES_SECRET_KEY: J1b1bCKH05mwQc8klkOAOqZH
OPENEDX_MYSQL_PASSWORD: Qd7KrVHe
PLATFORM_NAME: Schoolhouse Rocks
SECRET_KEY: JtEXvRvn22tYxMvNAPl0YU5i
XQUEUE_AUTH_PASSWORD: 3GUHtI0Y
XQUEUE_MYSQL_PASSWORD: ORIZpK77
XQUEUE_SECRET_KEY: 0sGWHIrBkl9GH8UDVejaqE6E[/sourcecode]
IV. Verify that the script worked
Once the script is complete you should be able to open the landing pages for both the LMS and the CMS. See below for additional information about the many port assignments and URL oddities of Open edX. More immediately, the landing pages for the LMS and CMS should look like the following:


Also, using the following admin command line script, you can view which Open edX modules are currently running:
docker ps
If the installation was successful then you should see the following: 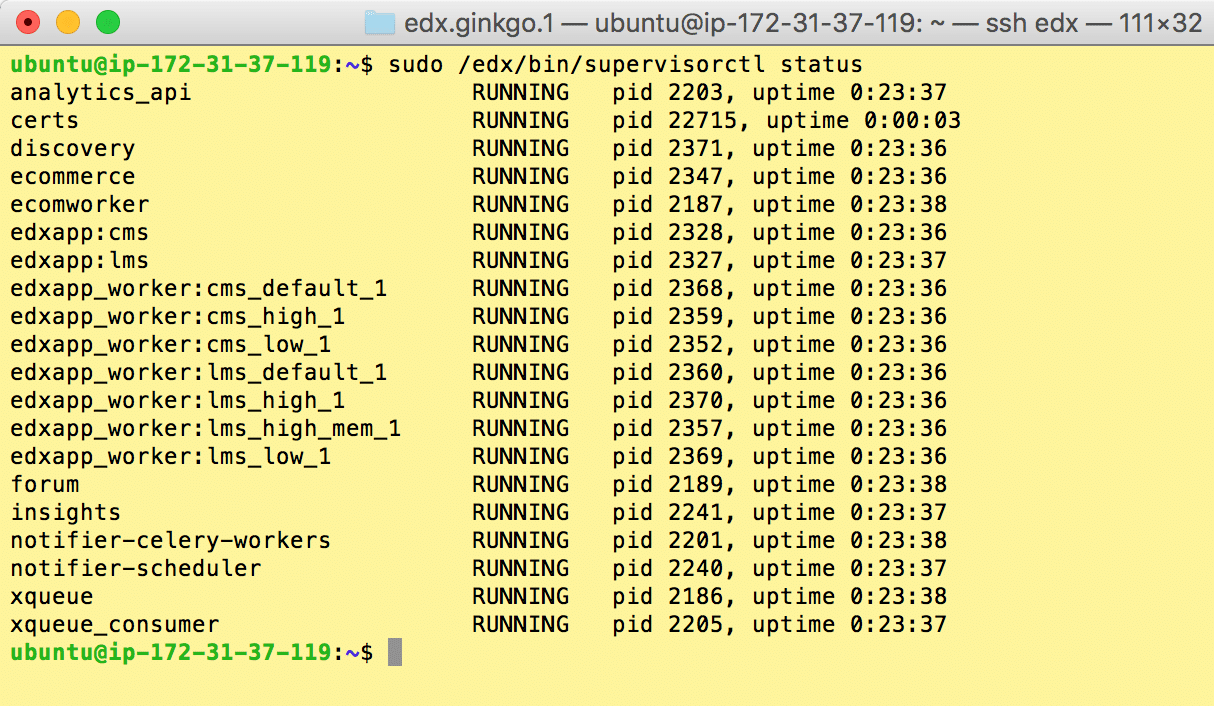
V. Create an admin account
You can save yourself a lot of future busy work by creating a root / admin account in this instance, prior to creating your AMI. Following are the commands to create a new superuser from the terminal command line:
tutor local createuser --staff --superuser yourusername user@email.com
VI. Create an AWS AMI
Read more here to learn about what an AMI (Amazon Machine Image) is, and how it is used: http://docs.aws.amazon.com/elasticbeanstalk/latest/dg/using-features.customenv.html
Meanwhile, here’s a screen shot short cut that at least points you in the right direction of where to go and what to do.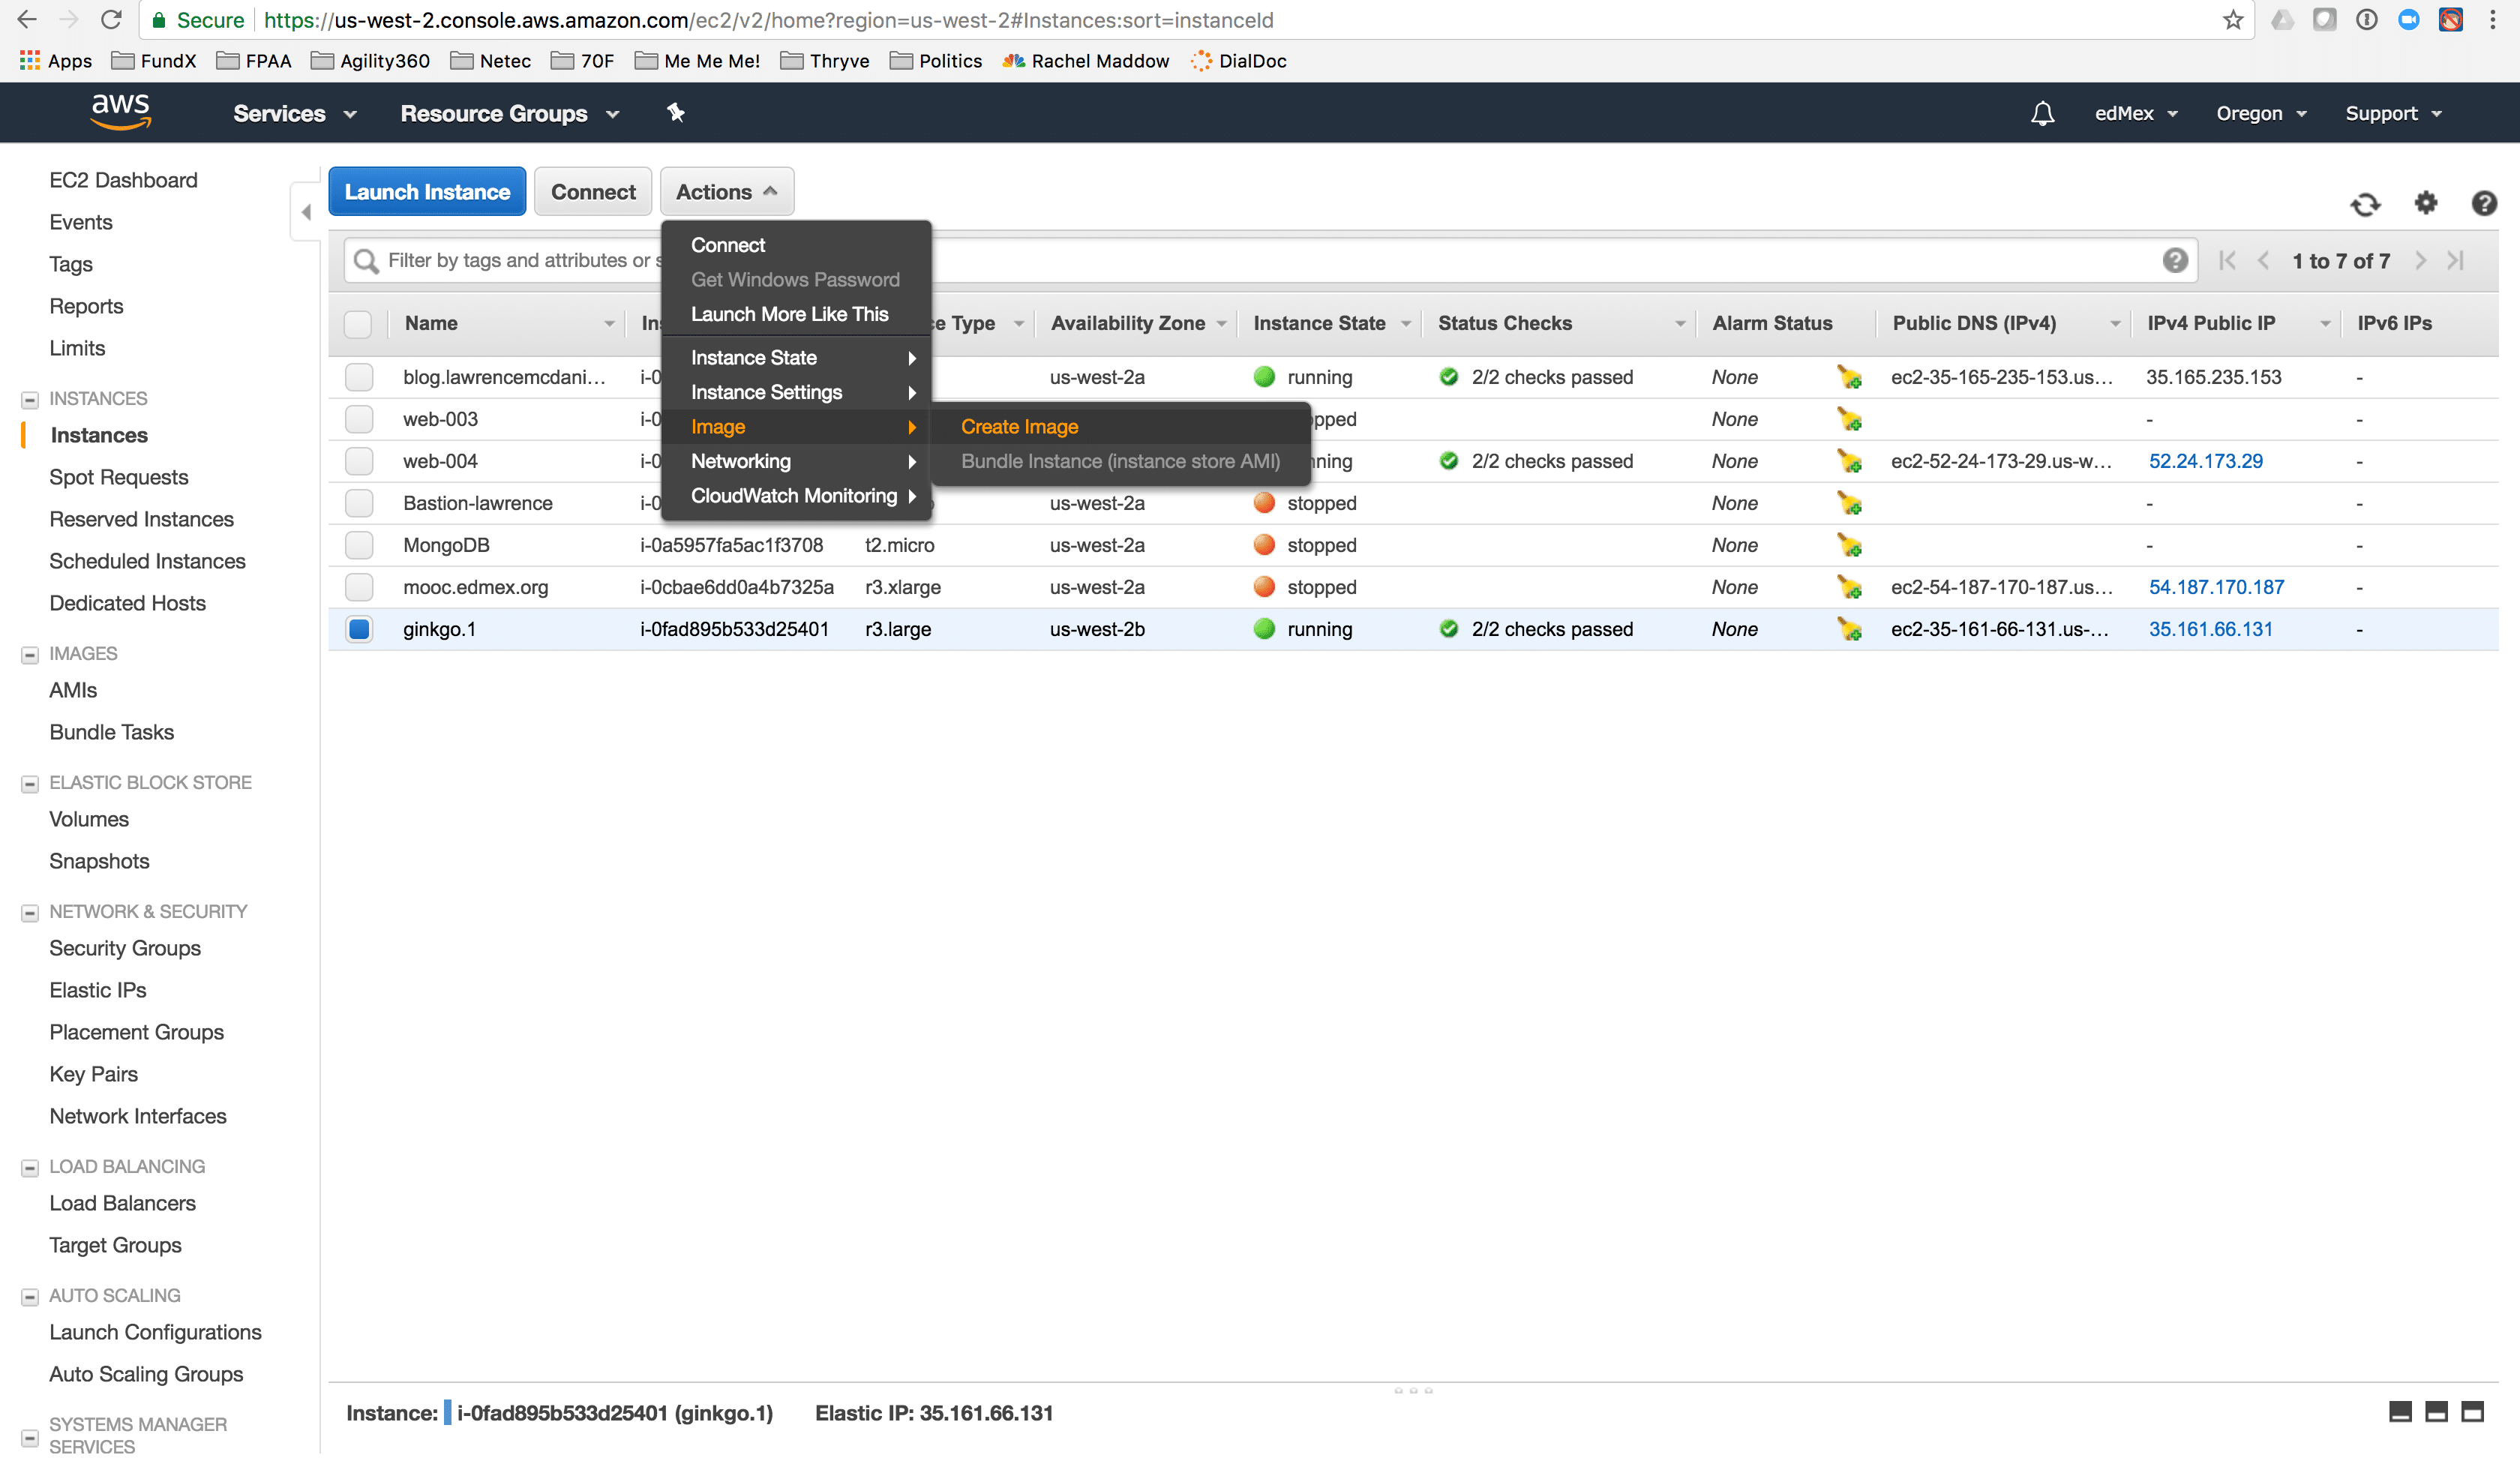
It will take around 15 minutes for the AWS Image to render. Once the process has completed, and only after the process has completed, you can terminate the original EC2 instance from the EC2 instance console.
VII. Configure Your LMS & Studio Applications

A tutor installation of Open edX is as customizable as that of native installation, but some of the methodologies and file locations are different. You should absolutely bookmark the Tutor Open edX platform Customisation page because I assure you will be referring to this page for technical guidance on every aspect of Open edX configuration and customization.
The Tutor configuration stores all of your data, configuration as well as application and user data, in a hidden folder named /home/ubuntu/.local/share/tutor/ in the ubuntu home folder. In the illustration to the left I’ve expanded the Open edX configuration folders so that you can see the locations of the Open edX .json files as well as the python settings files. Importantly, these files’ structures and behavior are identical to those found in a native build. The only difference is their location in the Ubuntu file system.
From this illustration it is also clear that the configuration files for all of the subsystems including MySQL, MongoDB, Nginx and LetsEncrypt are all located within this same folder tree.
While you can see that the Open edX platform data is located inside this folder tree, it’s important to point out that the commands to export data and access the MySQL and MongoDB shells are different because each of these subsystems are running from Docker containers.
Like the native installation, the Tutor installation creates the same four json files located in /home/ubuntu/.local/share/tutor/env/apps/openedx/config/ which contain the most important Django application parameters for your Open edX platform including for example, the name of your platform and the domain name. Unfortunately, the files are not user friendly, and to make matters worse, there is no way to add documentation to a JSON file.
Some basic configuration guidelines
- There are only four configuration files for the entire platform. These are located in /edx/app/edxapp
- Avoid editing lms.auth.json and cms.auth.json. These two files contain the dozens of passwords that the Open edX platform created during the native installation procedure. Other than setting the password for your SMTP email account, there is virtually no reason for you to edit either of these files.
- Any changes to any of these four jason files take effect after restarting the platform. The following command line instructions will restart your platform
# This is the command for restarting the LMS and CMS in Docker
tutor local restart openedx
Following are examples configuration files for a hypothetical MOOC named Surf School

Theming & Customization
You can install a custom theme to Tutor by saving your theme package to /home/ubuntu/.local/share/tutor/env/build/openedx/themes and then compiling assets with the following command:
tutor images build openedx
Note that your theme in a Tutor installation is subject to the same rules and guidelines as in a native build. Additionally, the asset compilation process effectively performs the same actions as does Paver in a native build.
XBlocks
You can install Xblocks in a Tutor installation. Tutor follows the strict Pythonic installation process of maintain a “requirements.txt” file that the installer reads to install Xblock packages. The requirements file is located in /home/ubuntu/.local/share/tutor/env/build/openedx/requirements.txt By way of example, the following code snippet will add the Opencraft Polling Xblock:
echo "git+https://github.com/open-craft/xblock-poll.git" >> $(tutor config printroot)/env/build/openedx/requirements/private.txt
tutor images build openedx
To install xblocks from a private repository that requires authentication, you must first clone the repository inside the openedx/requirements folder on the host:
git clone git@github.com:me/myprivaterepo.git ./openedx/requirements/myprivaterepo
Then, declare your extra requirements with the -e flag in openedx/requirements/private.txt:
echo "-e ./myprivaterepo" >> $(tutor config printroot)/env/build/openedx/requirements/private.txt
Forks
You may want to run your own flavor of edx-platform instead of the official version. To do so, you will have to re-build the openedx image with the proper environment variables pointing to your repository and version:
tutor images build openedx \
    --build-arg EDX_PLATFORM_REPOSITORY=https://mygitrepo/edx-platform.git \
    --build-arg EDX_PLATFORM_VERSION=my-tag-or-branch
Note that your release must be a fork of Hawthorn in order to work. Otherwise, you may have important compatibility issues with other services. In particular, don’t try to run Tutor with older versions of Open edX.
VIII. Administration
Tutor provides everything that you’ll need to administer your Open edX platform. My best recommendation is to thoroughly read the Official Tutor Documentation, but briefly summarizing the command line capabilities:
Monitoring Server Activity
docker stats
Logs
To view the logs from all containers use the tutor local logs command, which was modeled on the standard docker-compose logs command:
tutor local logs --follow
To view the logs from just one container, for instance the web server:
tutor local logs --follow nginx
The last commands produce the logs since the creation of the containers, which can be a lot. Similar to a tail -f, you can run:
tutor local logs--tail=0 -f
If you’d rather use a graphical user interface for viewing logs, you are encouraged to try out Portainer
Shell Access
tutor dev shell lms
tutor dev shell cms
Compiling Assets
tutor images build openedx
Restarting The Open edX Platform
tutor local restart openedx
Rebuilding the edX Platform
Prepare the edx-platform repo
In order to run a fork of edx-platform, dependencies need to be properly installed and assets compiled in that repo. To do so, run:
export TUTOR_EDX_PLATFORM_PATH=/path/to/edx-platform
tutor dev run lms npm install
tutor dev run lms pip install --requirement requirements/edx/development.txt
tutor dev run lms python setup.py install
tutor dev run lms openedx-assets build
MySQL shell Access
Work in progress. I still haven’t figured out how to do this.
MongoDB shell Access
Work in progress. I still haven’t figured out how to do this.
Open edX Github Repositories
The Tutor Docker Installation methodology relies on the same Open edX repositories as the Native installation. These are:
- The Open edX platform: https://github.com/edx/edx-platform
- the official installation scripts: https://github.com/edx/configuration edX uses github tags with both of these repositories to point to named releases. You’ll find the various named releases and their various github tag names here: https://openedx.atlassian.net/wiki/spaces/DOC/pages/11108700/Open+edX+Releases
Note that https://github.com/edx is the official repository organization for Open edX software. Also note that there are a gazillion repos in this organization. Peruse, download and experiment with these at your own peril. And at any rate, keep in mind that the only two repos you need in order to stand up your instance are the two listed above — the names and purposes of which i assume will never change in future.
Words of Advice
There are trade-offs to using Docker to deploy complex software systems like Open edX. Docker eliminates the notorious complexity of installing Open edX, but this comes at the cost of platform transparency. Quite frankly, for the vast majority of the organizations with whom I work this is a grand bargain. If you just want to get the platform up and running, and do not intend to spend any time under the hood, then Docker is a great alternative. On the other hand, if you intend to setup a development environment then, even though this is technically possible, it might become a choke point in your development process, plus, many of the platforms configuration files will be relocated, creating yet another a learning curve for you and your colleagues.
I leave you with a few suggestions:
- Read voraciously about Open edX.
- Read about Tutor
- Read about Docker. A lot about Tutor will make more sense if you’re well-grounded in basic Docker concepts.
- Build your pristine AMI from the master branch. Using the master branch will ensure that your installation picks up recent bug fixes and security patches. This also ensures that your installation’s code base is consistent with online documentation and community blog posts like this one.
- Review the scripts before executing. This install script calls four bash scripts written by Ned. To avoid future brain damage, invest the time necessary to get acquainted with what his scripts do.
- Avoid modifying the code base. I understand that this is the beauty of open source programming, but, a) it’s not necessary, and b) this platform is a beast: you’re inviting misery upon yourself if you tinker.
I hope you found this helpful. Contributors are welcome. My contact information is on my web site. Please help me improve this article by leaving a comment below. Thank you!


