Get AWS EFS working with WordPress. This article covers must-know tips on configuring NFS file caching, getting Php to work properly with a NFS volume, actively managing AWS Burst Credits, site management considerations, and performance monitoring.

Summary
AWS’ Elastic File System (EFS) service can seem like the white whale of the arcane world of horizontal scaling for WordPress. It’s so promising and so easy to create and mount, but it delivers repugnant performance results; initially at least. If you’ve already tried migrating a WordPress site for a local file system to an AWS EFS volume then you likely saw the performance of your site dramatically degrade to the point of being unusable. But why? There are two reasons.
First, with NFS there are unavoidable increases in file access latency. This situation amplifies whenever your web app (more rather its underlying Php engine) accesses many small files over a short period of time. Unfortunately, that’s basically what Php is doing all the time, making local file caching critically important. Fortunately this is easy to remedy by installing cachefiles and memcached.
Second, your IO operations on EFS volumes are subject to limits based on a size tier system called Burst Credits, and it is often the case that your EFS volume initially resides within the pathetically slow bottom tier of this system. This is also easily remedied, as we’ll see below.
Some site management processes, namely virus scanning and site backups, will require re-thinking so as to avoid exhausting Burst Credits. We’ll look at the key factors below.
EFS Is Slow
Let’s get that elephant out of the room right away. EFS is up to three orders of magnitude slower than the EBS counterpart from which you want to migrate, and the tips in this article are simply ways to work around this reality rather than change it. Php applications like WordPress are a worst-case scenario for this problem in that migrating to EFS will always result in some performance degradation in various parts of the application. Lets looks at why.
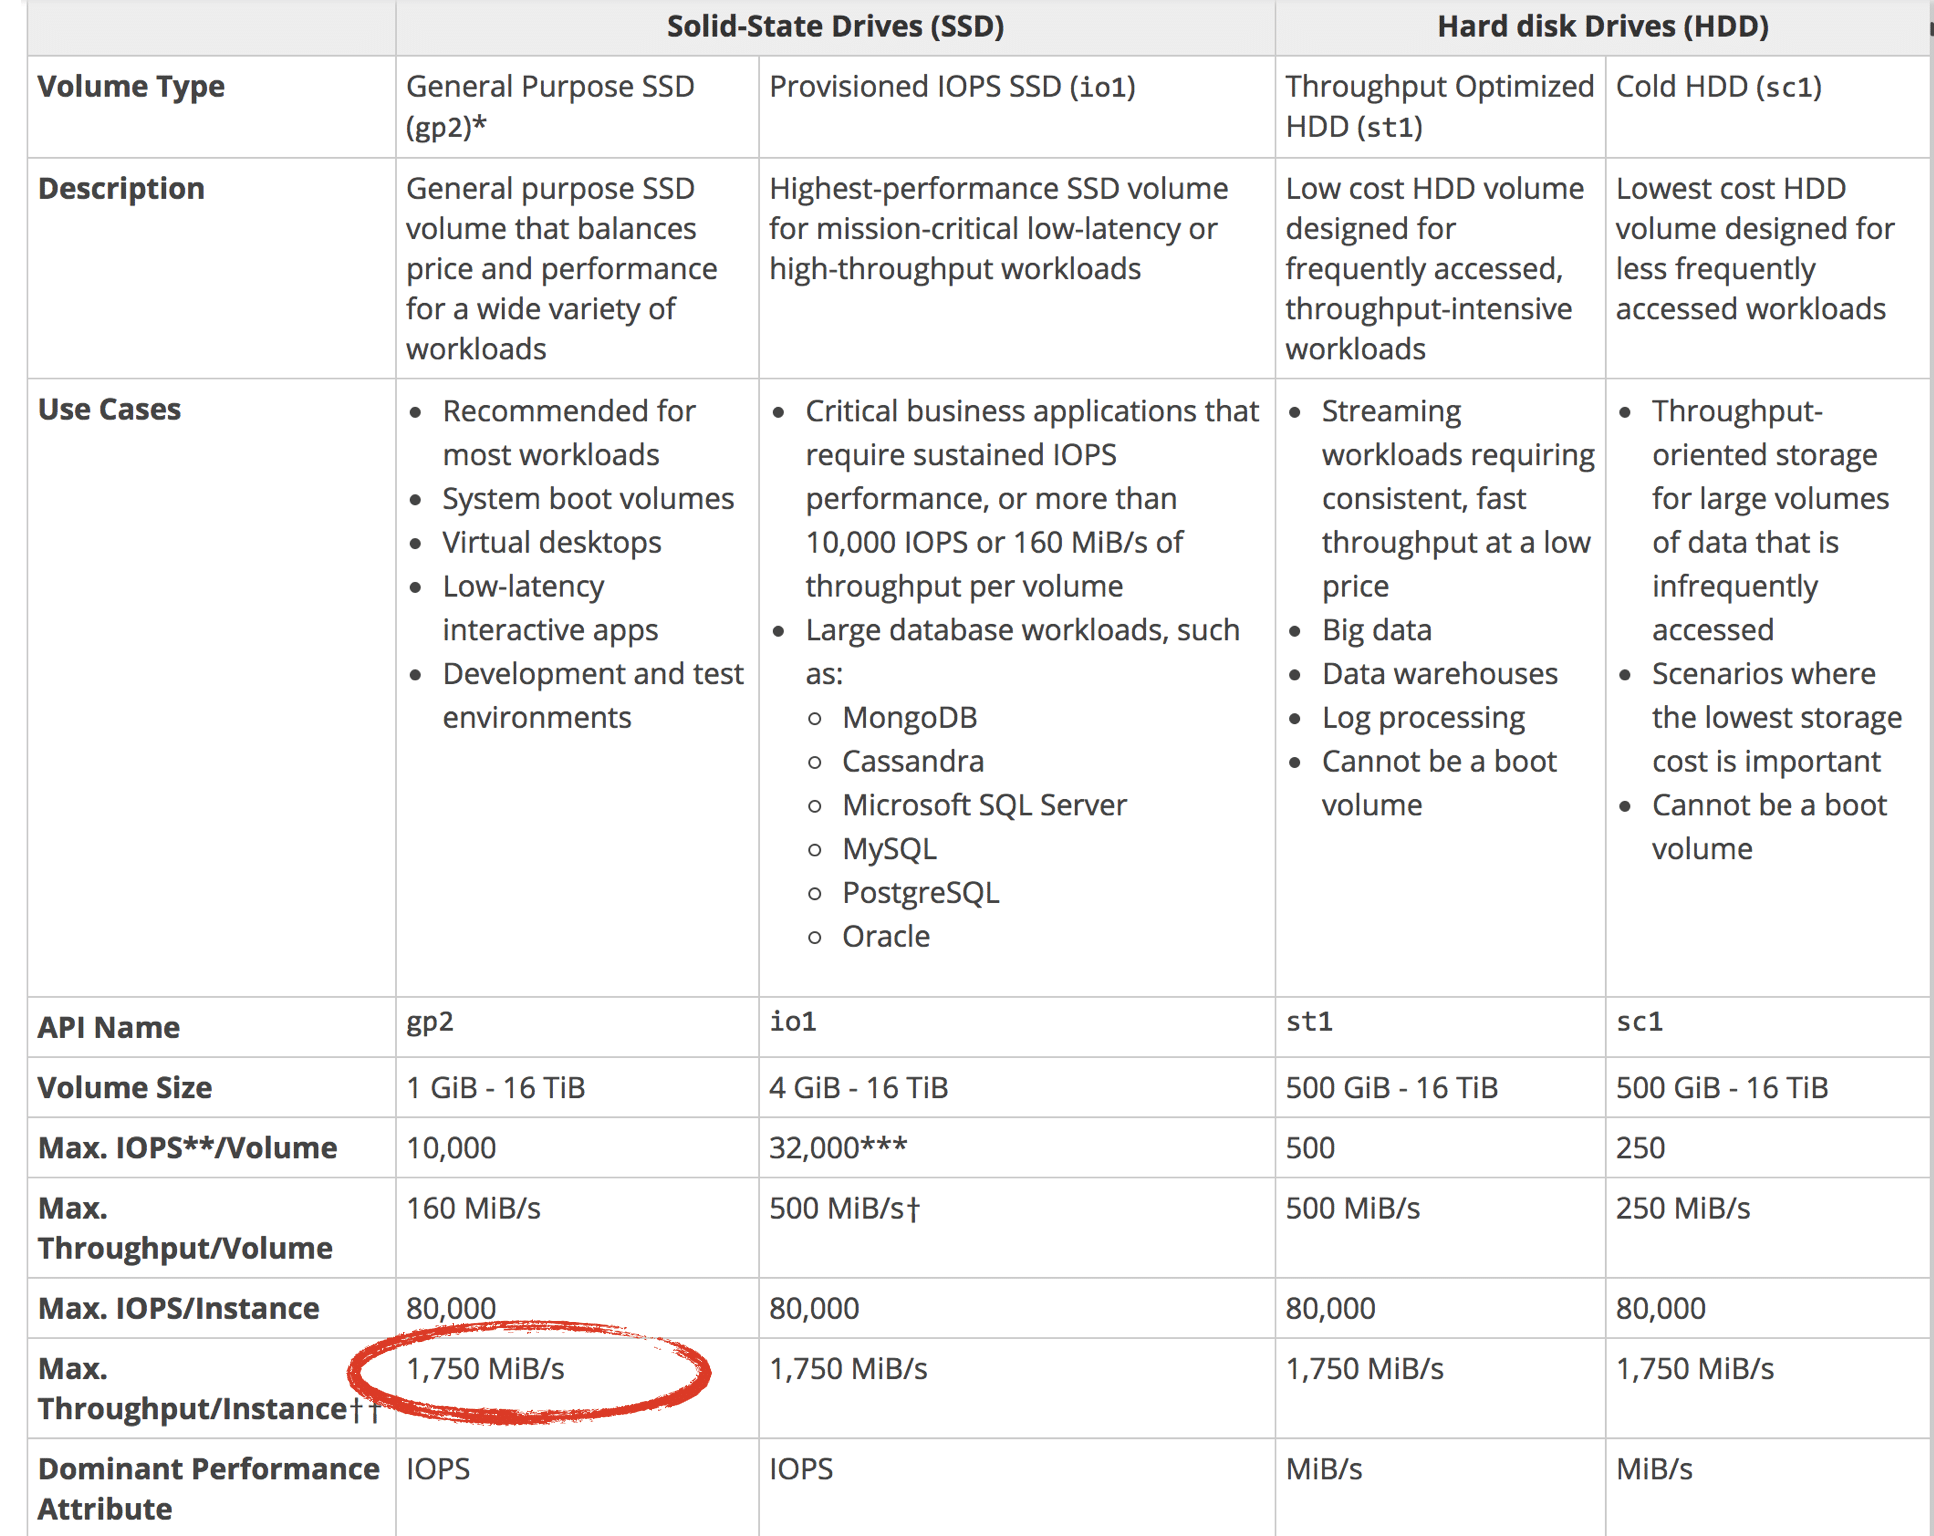
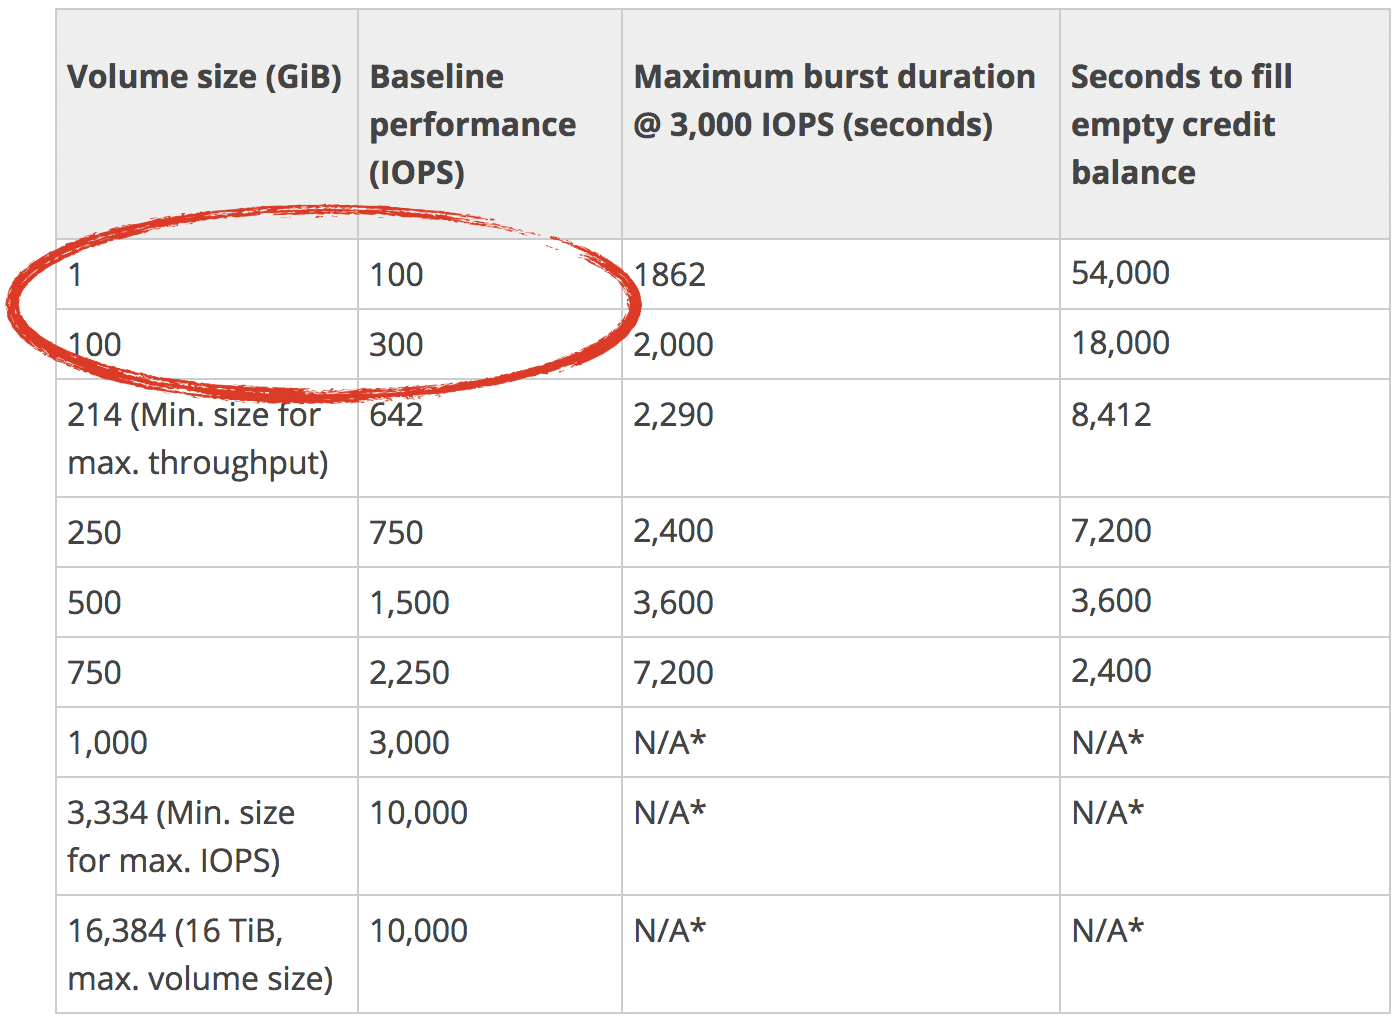
The charts below from Amazon EBS Volume Types indicate that EBS volumes of 100G or less allow throughput of 1,750mib / second whereas an NFS volume of the same size allows throughput of 500kib / per second (see table below for EFS Volume Sizing). That’s up to a 3,500x decrease in throughput! But this oversimplifies matters. You also need to look at what happens with individual disk fetches, or IOPS in AWS parlance. Generally speaking, any storage system will more efficiently retrieve a large stream of data like say, a video file, more efficiently that it can a random collection of small files like say, a bunch of Php files. That is to say that an EFS volume proportionately works harder to serve up a Php application, exacerbating an already-large reduction to data throughput. It behooves you to keep this in mind as we move on to my performance tuning tips.
EBS Throughput by Size

EBS IOPS by Size

1. Add File Caching To Your EC2 Instance
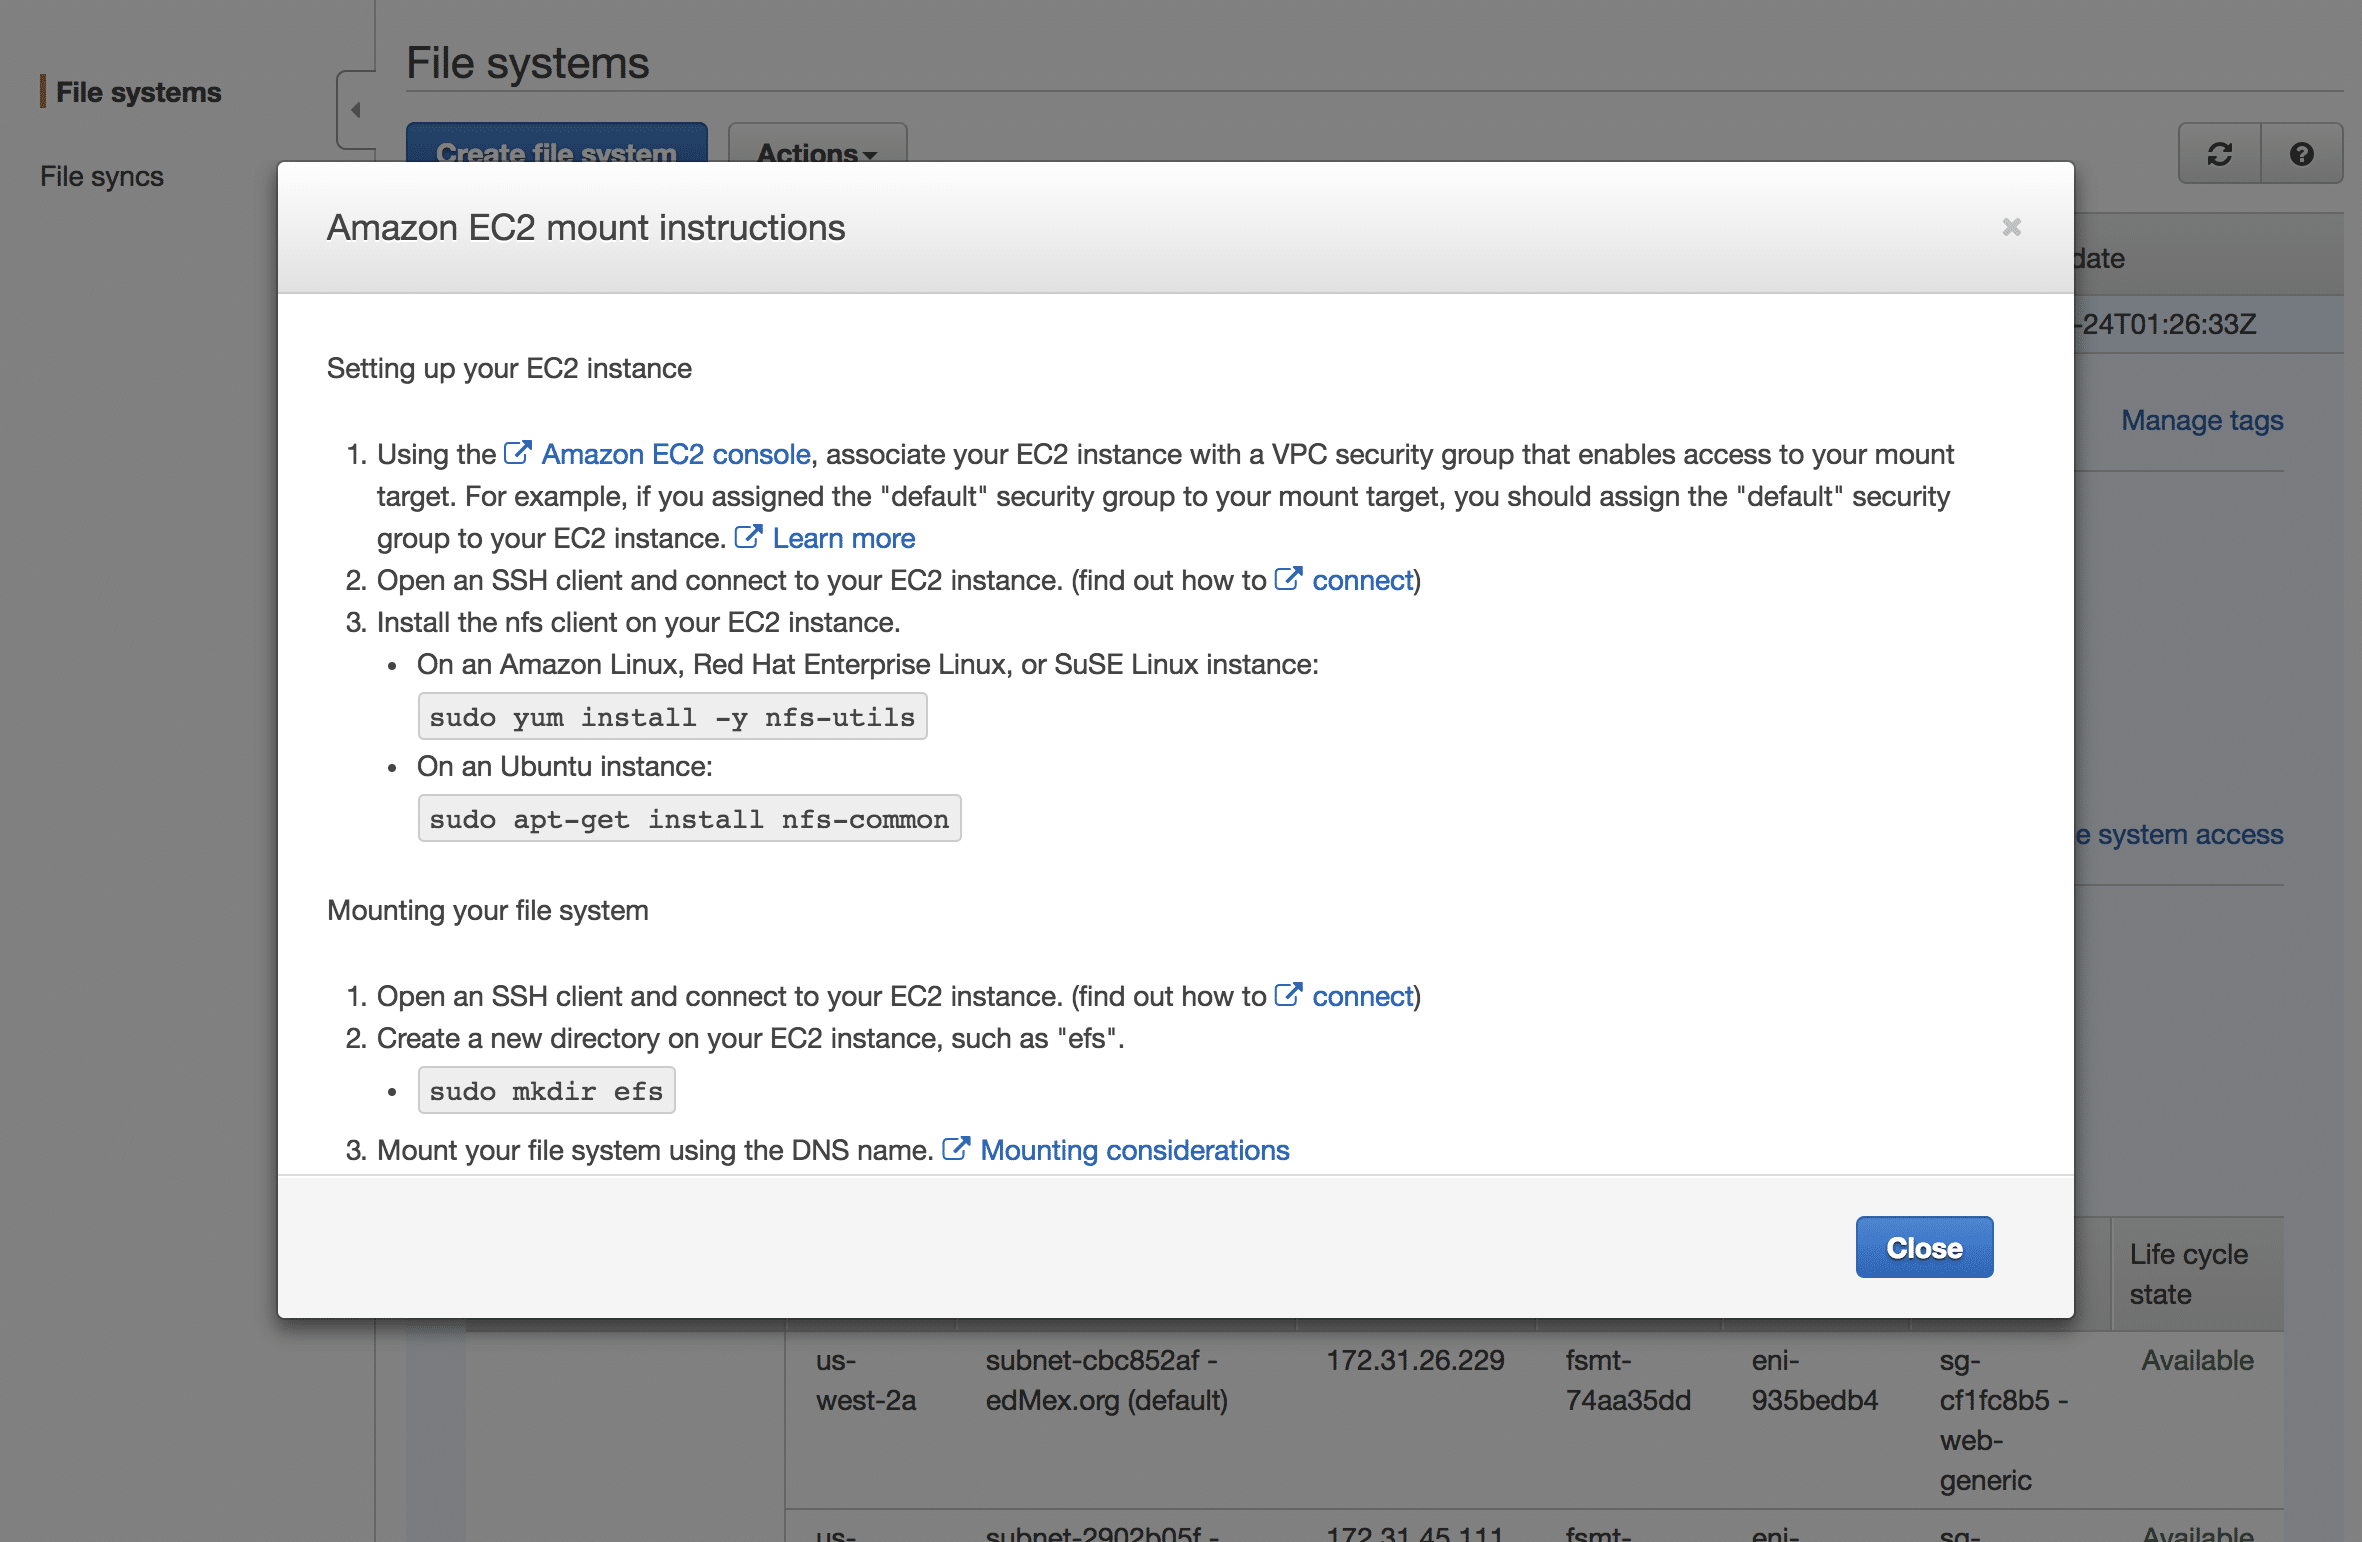
Red Hat published an excellent file caching solution for NFS back around 2006, and which is installable on Amazon Linux as a yum package. It’s idiot proof and a highly effective way to minimize file reads from your NFS volume. Given the wretched performance all customers initially see from EFS I don’t know why AWS does not include this in their mounting instructions.
sudo yum install -y nfs-utils   # to ensure that NFS is installed on your Amazon Linux instance.
sudo yum install cachefilesd
sudo service cachefilesd start
sudo chkconfig cachefilesd on    #autostart cachefilesd

AWS provides precise EFS volume mounting instructions via a hyperlink inside the settings of your EFS volume within the AWS Console. However, you’ll need to make a small modification to these instructions so that your volume is aware of cachefiles. AWS’ mount instructions include a list of options which you’ll see immediately after the -o parameter.
Change this line: “nfsvers=4.1,rsize=1048576,wsize=1048576,hard,timeo=600,retrans=2”
To the following: “nfsvers=4.1,rsize=1048576,wsize=1048576,hard,timeo=600,retrans=2,fsc”
The additional option “fsc” instructs NFS that we’ll be using File System Caching on the mounted volume. The complete set of instructions will look similar to the following:
sudo mkdir /efs
sudo mount -t nfs4 -o nfsvers=4.1,rsize=1048576,wsize=1048576,hard,timeo=600,retrans=2,fsc [ADD YOUR FILE SYSTEM END POINT]:/ /efs
sudo service cachefilesd restart  #to ensure that our cachefiles service becomes aware of our newly mounted efs volume
Automatically mount volume on startup.
sudo vim /etc/fstab
[ADD YOUR FILE SYSTEM END POINT]:/ /efs nfs4 nfsvers=4.1,rsize=1048576,wsize=1048576,hard,timeo=600,retrans=2,fsc,_netdev 0 0
2. Size Your Volume For AWS Burst Credits
AWS governs IO operations on EFS volumes based on their size. If you’re migrating a single WordPress site to EFS then this will almost certainly cause problems for you. The workaround is to create a dummy file to force the size of your EFS volume into the performance tier that your site requires. Personally, I’d never given any thought to my site’s IO performance requirements and so I had no idea of my needs. If that’s your situation as well you should take a close look at AWS’ pricing and performance tier structure, also presented below. Keep in mind that artificially increasing the size of your EFS volume also makes it cost more.
| File System Size (GiB) | Baseline Aggregate Throughput (MiB/s) | Burst Aggregate Throughput (MiB/s) | Maximum Burst Duration (Min/Day) | % of Time File System Can Burst (Per Day) |
|---|---|---|---|---|
| 10 | 0.5 | 100 | 7.2 | 0.5% |
| 256 | 12.5 | 100 | 180 | 12.5% |
| 512 | 25.0 | 100 | 360 | 25.0% |
| 1024 | 50.0 | 100 | 720 | 50.0% |
| 1536 | 75.0 | 150 | 720 | 50.0% |
| 2048 | 100.0 | 200 | 720 | 50.0% |
| 3072 | 150.0 | 300 | 720 | 50.0% |
| 4096 | 200.0 | 400 | 720 | 50.0% |
Here is an example code snippet that you can use to create a dummy file of exactly 256G, which is exactly enough size to push your EFS volume up to the 2nd performance tier. Change the parameters to tailor the file size to your needs. Take note however that it takes around an 90 minutes to create a dummy file 256G in size. This snippet therefore wraps the command in a “nohup” command that runs the command on a background thread. You can monitor progress using the command line “ls -lh”.
cd /efs
sudo nohup dd if=/dev/urandom of=2048gb-b.img bs=1024k count=256000 status=progress &
3. Install memcached
Memcached is an industrial-grade, multi-purpose in-memory object cache. It’s easy to install and it provides immediate improvement to any Php web app. Take a look at my post on how to install memcached to get it up and running on your WordPress server in just a few minutes.
4. Setup a CDN
This is out of scope for this post but bears mentioning because serving static assets from your EFS volume will result in poor performance as well as prematurely exhausting your AWS Burst Credits. If you’re new to the topic then I suggest you get started by reading more about AWS’ Cloudfront Service which is easy to setup and inexpensive.
5. Be Patient & Methodical When Migrating Files to an EFS
If you’re planning to migrate more than one WordPress site to an EFS volume then you should consider moving these individually, maximum one or two sites per day, so that you can monitor the impact of each site to the EFS IO operations. Additionally, you’ll observe unique behavior from each site for published content versus authoring activities. Authoring activities typically require more EFS IO and so you’ll need to observe each site for several days or weeks in order to develop a complete profile of EFS IO behavior.
6. Disable Plugins That Cause Full File Scans
Site backup and virus scanning plugins in particular can be problematic because they potentially will scan the entire file system for your site, and this consumes a lot of Burst Credit. For backups you should strongly consider implementing an EFS backup solution like AWS Glacier as a complete replacement to individual backups of site files. Ditto with virus scans. Personally, I’m still actively researching alternatives to common solutions like Wordfence that will play nicely with a EFS volume.
7. Monitor Your Page Performance
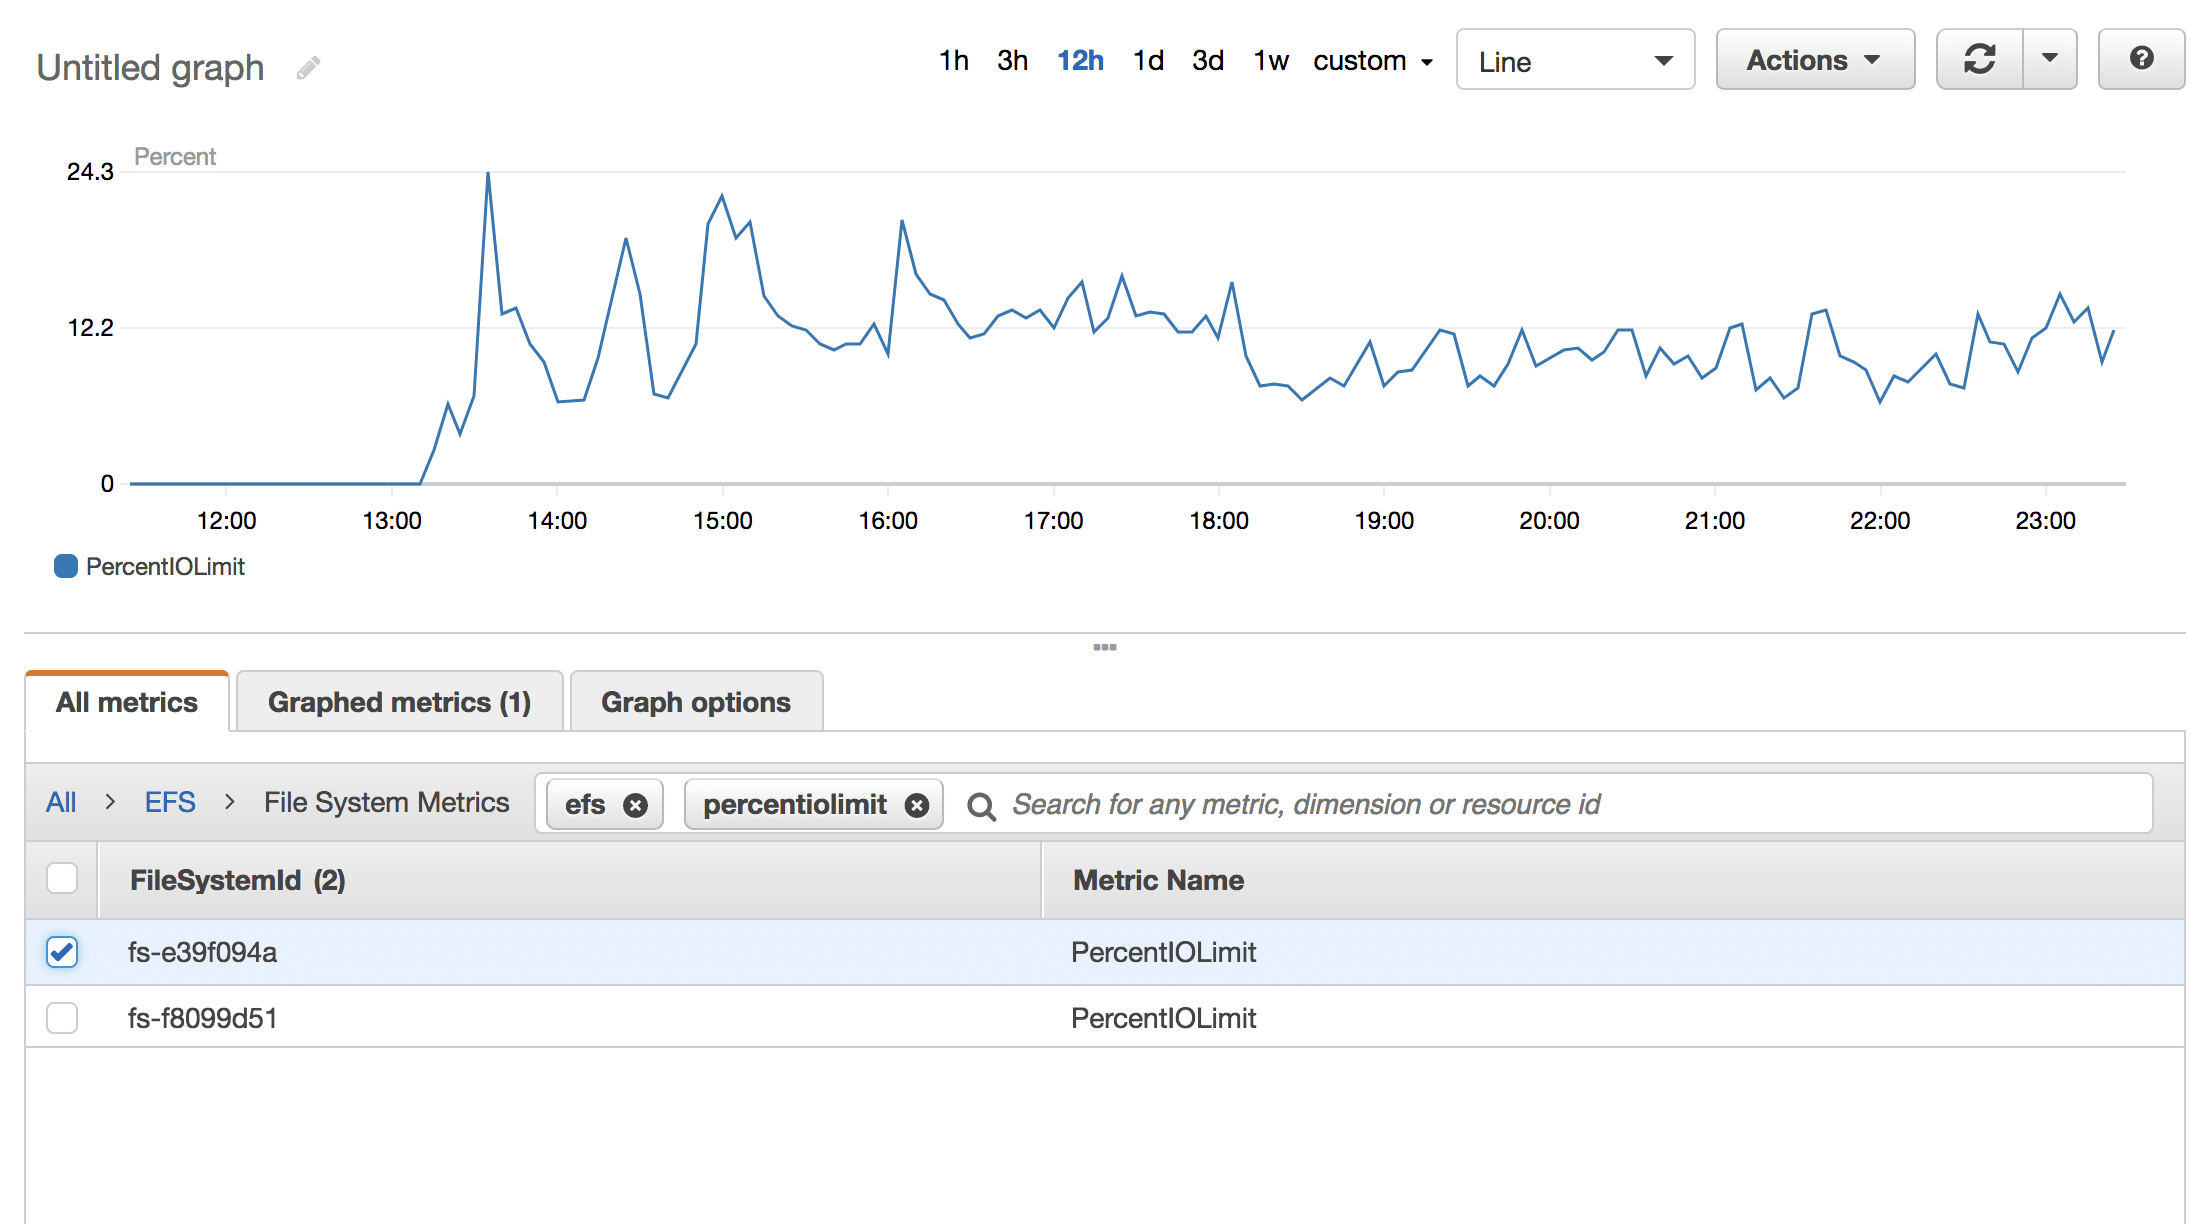
AWS Cloudwatch provides several performance metrics for EFS. The most important of these of course is your Burst Credit Balance. As you migrate sets of files to your EFS you’ll want to monitor this metric over the course of a day or so in order to fully understand it’s impact to your Burst Credit balance.

Additionally, you should monitor the impact of the EFS to your page download speed. In the worst of cases your site could come to a standstill, and in the best of cases the EFS will have no impact whatsoever. Many factors about your hosting environment come into play, making this aspect of setting up a EFS a very personal journey. Incidentally, this site runs on a AWS EFS.
Speaking of measuring page speed, an AWS business support tech from the EFS group sent the following snippet to me when I was in the early stages of trying to get an EFS volume to work for the first time. It provides an informative set of page retrieval metrics which I find incredibly useful for benchmarking purposes. Note that you’ll need to modify the snippet to replace your site name with that of this blog.
curl -v -s -w ‘\nLookup time:\t%{time_namelookup}\nConnect time:\t%{time_connect}\nAppCon time:\t%{time_appconnect}\nRedirect time:\t%{time_redirect}\nPreXfer time:\t%{time_pretransfer}\nStartXfer time:\t%{time_starttransfer}\n\nTotal time:\t%{time_total}\n’ -o /dev/null https://blog.lawrencemcdaniel.com


Wow! – Thank you!
Just enabling cached has transformed EBS, it’s serving WordPress at speed, actually, it’s not really appreciably slower than EBS. BTW, I’ve been testing solutions: file syncing, ObjectFS, S3FS, FSx Lustre and briefly considered slicing up the WordPress install to split files but, basically, I’m back to multi-AZ instances, load balancer, EFS, Cached and Aurora Serverless to create a shared-nothing solution with very little complication, happy days! Thanks. MPT
EFS doesn’t have tiers of performance.
All performance is a multiplier of something.
If 10Gb give you baseline of 0.5 MB/s, 100Gb give you 5MB/s
Besides, both give you the same burst capacity even for small disks.
Similar to EBS, and most others AWS product
James, wordpress core files don’t change very often (perhaps even less often than plugins, so they should be cached on the PHP nodes shortly after they have been modified on the EFS volume, no? Additionally, the compiled code may be stored in a memory cache like APC. I’m curious. thanks for the article!
At one point we came across this article and had set up something similar to this running the WordPress shared folders on EFS but in our specific scenario were often trying to deploy multiple WordPress instances (folders) into new locations on the EFS and unzipping one of our WordPress folders onto the EFS took upwards of 10 minutes. We ended up using the EFS only to host the wp-config files for sharing across multiple EC2s with a custom written wp-config on each instance to reference the proper config on the EFS. We now are using other methods to do CICD to propagate changes to all EC2 instances to update their WordPress folders running on each of their own EBS which is much faster. Still open to other ideas to optimize but this is how far we got with many methods of trial and error and benchmarking the performance results. I hope this can help others find a better approach for scaling.
Excellent article.
Do you have any recommendations for what wordpress folders to have mounted to EFS? The elastic beanstalk scripts AWS provides just mount the wp-content/uploads folder but I’ve heard of others including the entire wp-content folder to capture plugins as well.
hi james, keep in mind that you’re going to see a substantial performance degradation when you take this step. having said that, you’ll reap the most benefit by moving files that are non-homogenous and/or that change frequently. that is, i’d keep wordpress system files on Ubuntu, and i’d move custom content like uploads as well as plugins since these are upgraded frequently. hope that helps.