Lets take a closer look at using Zappa in a real-world development environment for a full-featured Django app deployed to an AWS Lambda function, with static assets loaded to S3 and served by Cloudfront.

Getting a Django app to run in Lambda is a game changer. Lambda gives you the luxury of abstracting away the minutia behind the computing power needed to serve your dynamic web site. Better still, operating system patches and security headaches become a thing of the past, and your monthly hosting costs will likely drop to nearly $zero. A command-line deployment tool named Zappa was created to do exactly that, provided that you’ve setup both your cloud environment and development environments according to the set of “norms” that are described in this article.
“Zappa makes it super easy to build and deploy server-less, event-driven Python applications on AWS Lambda + API Gateway.”
Body Calc is a Django app running in an AWS serverless architecture based on the following diagram. The complete source code for this app is available on Github at https://github.com/bodycalc/bodycalc.io. In contrast to blogosphere articles showcasing simple “Hello, World” apps, I wanted to evaluate Zappa on a project that leverages real-world technologies like Git, NPM, Pip, Pipeline, Environ, Yarn, Gulp, Webpack and Bower. The good news is that only one of these, Pipeline, is affected by deploying to a Lambda function. As of this publication I’ve successfully used Pipeline to compress CSS and Js files, and to compile Sass. But thus far I’ve been unable to implement “cache busting” strategies with Pipeline, so keep checking back on this article from time to time as I continue to trouble-shoot this last remaining pain point.

Identity Access Manager
Security is always a challenge, but especially so within cloud infrastructure environments like AWS because the services can be literally scattered around the world. Identity Access Management (IAM) is AWS’ internal role-based security model. We’ll be using IAM exclusively to manage access and permissions for all of the AWS services referenced in this tutorial; even in cases like MySQL where an alternative native security scheme already exists. IAM allows you to issue text security keys as an alternative to user names and passwords. This is helpful because Python, Django, Zappa and AWS CLI require this method of access.
Zappa will use the AWS Command-line Interface (CLI) to deploy your Django app to AWS. To manage the myriad permissions surrounding the deployment, you’ll need to create a custom IAM policy and then assign this custom policy to an IAM user that has “Programatic Access”. You can use a copy of this policy as a reference. Just copy/paste the text of the policy into the screen you see below.
Certificate Manager
bodycalc.io runs over https. This is made possible by issuing a free SSL/TLS certificate with AWS Certificate Manager, which enables your to easily provision, manage, and deploy public and private SSL/TLS certificates for use with AWS services. CM certificates automatically renew, which is enormously convenient. I used CM to create certificates for use with API Gateway and Cloudfront. We’ll see more about that below. The first certificate is created in my “home” data center of Oregon and is linked to a custom domain that I created within API Gateway in order to change the public URL from https://bl3r81quk5.execute-api.us-west-2.amazonaws.com/dev to https://bodycalc.io. The second certificate is created in US East (N.Virginia) and is used exclusively for adding a vanity domain for the Cloudfront CDN, changing the URL from d2aeb81h32shl0.cloudfront.net to cdn.bodycalc.io.
* There are many alternatives to Certificate Manager that you could use, if you wanted to.
Route 53
If you want access your Django/Lambda app via a custom domain name then you’ll need to add records to your DNS server mapping the native AWS URL’s to your custom domain or subdomain. If your DNS is currently managed elsewhere then you might want to consider moving it to Route 53, AWS’ domain name server (DNS) service. It works seamlessly with all other applicable AWS services, and cheap, fast, reliable and flexible. You can refer to this screen shot to see how I linked the API Gateway and AWS Cloudfront native URL’s to my custom domain, bodycalc.io.

API Gateway
Zappa will fully manage the API Gateway resources for this tutorial, so I’m mostly including this in the article just to make you aware that API Gateway will become part of your architecture so that you know to take a closer look at after you’ve deployed. Also, you’ll need to make some minor configuration changes after deployment if you want to use a vanity URL as I’ve done in the case of bodycalc.io. See the screen shot below as a reference.
It’s worth noting that Zappa pushes the boundaries of the intended API Gateway use case. The general idea behind API Gateway is that you’ll implement say, a REST api, one resource at a time, and in each case using API Gateway tools to define the resource name, its features and behavior, and the internal AWS resources with which it interacts. In the case of Zappa however, we’re really only using API Gateway as a simple wrapper for the entire Django app, such that all inbound http requests pass through a comparatively simple API Gateway resources that blindly forwards everything to Lambda to be further evaluated.

Lambda
AWS Lambda lets you run code without provisioning or managing servers, and you pay only for the compute time you consume. There is no charge when your code is not running. With Lambda, you can run code for virtually any type of application or backend service – all with zero administration. Just upload your code and Lambda takes care of everything required to run and scale your code with high availability. You can set up your code to automatically trigger from other AWS services or call it directly from any web or mobile app.
Better still, Zappa fully manages the single Lambda function onto which our Django app will be deployed. Actually, once deployed, the source code of your Django app will be too large to view with Lambda’s online code editor tools. However, there are useful dashboard deployment metrics that you’ll definitely want to take a closer look at.
Note: Zappa seriously pushes the boundaries of what Lambda functions are intended to do. But, it works, so no worries! A typical Lambda function (by the strict “micro-services architecture” definition) performs a single, atomic function. In our case however, we stuffing an entire Django app inside a Lambda function, including for example, Django’s routing functionality. Thus, our Lambda function will receive all inbound http requests and generate and serve all outbound http responses.
Relational Database Service
This tutorial uses MySQL database hosted on AWS Relational Database Service (RDS), which is really convenient but expensive ($50 USD per month or more). For production environments, RDS makes it easy to set up, operate, and scale a relational database in the cloud. It provides resizable capacity while automating time-consuming administration tasks such as hardware provisioning, database setup, patching and backups. But if you’re on a tight budget then keep in mind that any SQL database which Lambda can access will work fine. For example, you could alternatively create a standalone MySQL server on an Ubuntu EC2 instance running on the free usage tier. The important thing is that you think thru the connection and security implications of your chosen environment, all of which is beyond the scope of this article. Be aware however that your Django development environment needs a way to seamlessly switch between a development database and a deployment database.
Simple Storage Service
AWS Lambda does not expose its file system. You therefore will not be able to serve your static assets directly from the Lambda function itself. AWS’ Simple Storage System (S3) is a completely free cloud storage service that integrates easily with other AWS services and thus is a great substitute for a local file system. In this tutorial we’ll synchronize our Django static assets to an S3 bucket using the AWS command line interface (CLI).
S3 is an object storage service that offers industry-leading scalability, data availability, security, and performance. Organizations of all sizes use it to store and protect any amount of data for a range of use cases, such as websites, mobile applications, backup and restore, archive, enterprise applications, IoT devices, and big data analytics. S3 provides easy-to-use management features so you can organize your data and configure finely-tuned access controls to meet your specific business, organizational, and compliance requirements. S3 is designed for 99.999999999% (11 9’s) of durability, and stores data for millions of applications for companies all around the world.
Cloudfront
Cloudfront is AWS’ content delivery network (CDN) service. Technically, this is not necessary for this tutorial. However, AWS makes it easy to integrate an AWS S3 bucket to Cloudfront, as well as to create a vanity subdomain for your Cloudfront CDN as I have with cdn.bodycalc.io. With modest incremental effort on your part your static assets will be propagated to more than 100 content servers located around the world. This results in a significant reduction to page load times for your international site visitors.

I. AWS Environment
The challenge of getting Django to work inside a Lambda function is mostly about finding a workable combination of services to take care of the miscellaneous stuff that Lambda cannot do. For example, Lambda functions are not public facing, so you have to find an alternative way to host a public-facing URL that provides users with access to your site. Lambda functions do not include a file system either, so you need to implement an alternative strategy for serving the static assets associated with your site. Lambda functions cannot persist data, so your SQL database has to reside elsewhere, and in a location where Lambda can gain access over port 3306. Finally, you need a reasonable way to manage the myriad set of permissions across the various cloud services that makeup your deployment environment; sufficient to enable you to deploy your code, but secure enough that you’re not running the risk of your account getting breached.
II. Development Environment Prerequisites
pip is already installed if you are using Python 2 >=2.7.9 or Python 3 >=3.4 downloaded from python.org or if you are working in a Virtual Environment created by virtualenv or pyvenv. Just make sure to upgrade pip.
pip --version  #check to see if pip is already installed
pip 18.1 from /Users/mcdaniel/github/bodycalc.io/.env3/lib/python3.6/site-packages/pip (python 3.6)
Installation: https://pip.pypa.io/en/stable/installing/
Zappa leverages your AWS CLI installation to manage all aspects of deployment of your Django app. Additionally, we’ll also use the AWS CLI to upload and synchronize our app’s static assets to an S3 bucket.
$ aws --version  #check to see if awscli is already installed
$ pip install awscli --upgrade --user
$ aws configure
Python is an interpreted high-level programming language for general-purpose programming. Created by Guido van Rossum and first released in 1991. Django is a framework that runs on Python. Importantly, there are many different versions of Python in circulation, and believe it or not, it’s common to have more than one version installed on the same computer.
Installation instructions: https://realpython.com/installing-python/
The dirty business of keeping multiple versions of Python from wreaking havoc on your computer is taken care of by a pip package named Virtualenv . We’re using virtualenv in this tutorial so that we can install exact versions of downloadable, open-source software; not only of Python but also of the various dependencies such as Django and Zappa. It’s worth 15 minutes of your time to read the summary page on the Virtualenv web site that describes how Virtualenv works. spoiler alert: it’s really simple.
$ virtualenv --version #check to see if virtualenv is already installed
15.0.3
$ [sudo] pip install virtualenv
Zappa does not explicitly require Node. I’m including it in this article solely because it’s a common project dependency. In the case of Body Calc (to the extent you’re interested) I’m using Node for a handful of common project automation tools including Yarn and Gulp, as well as for a few html and static asset optimizers that are called by Django Pipeline.
node -v  #check to see if Node is already installed
v6.10.0
Installation: https://nodejs.org/en/download/
like Node, NPM is not explicitly required by Zappa. Node Package Manager (NPM) is to Node as pip is to Python. That is, if you’re installing Node then you’re definitely also going to need npm, because that’s how you install all of the really cool stuff. NPM is a splendidly organized tool. It creates and maintain a detailed manifest of everything that it’s installed into your project, along with version information. You can see the manifest for Body Calc here: https://github.com/bodycalc/bodycalc.io/blob/master/package.json
$ npm -v  #check to see if npm is already installed
6.4.1
$ [sudo] npm install npm -g
Django is a pip package. It only takes a couple of minutes to install and then use to create a simple “Hello, world!” app by following their “Getting Started” instructions.
$ virtualenv .env  #create a new virtual environment named ".env"
$ source .env/bin/activate  #activate the new virtual environment
$ pip install Django  #install Django
Zappa is — surprise — a pip package. Once installed it is a command line tool that leverages your AWS CLI and Python / Django project files to package, upload and deploy your Django app to AWS. It’s really simple to use (see below). Once deployed, Zappa will echo the URL of your app to the console.
$ pip install zappa
$ zappa init
III. Django Development Environment

I initially had a lot of difficulty getting Zappa to work because of the locations of files and folders in my project. In my case, problems ranged from simple stuff like Zappa including my static assets when it uploaded everything to Zappa not being able to see certain Django files within my project. Take note of my “final” working structure on the right, as this might save you some time.
More generally, following are my commands to create this project and to run it locally in order to verify that it at least works in a development environment.
$ virtualenv .env  #create a new virtual environment named ".env"
$ source .env/bin/activate  #activate the new virtual environment
$
$ django-admin startproject app   # create a new project named app
$ cd app
$ python manage.py runserver  # to verify that django installed and initialized correctly
$ python manage.py startapp bmi   # create the BMI web app
$ pip install django mysqlclient zappa django-environ django-npm django-pipeline jsmin
Settings.py is modified so as to relocate things in a way that works for Zappa. You can review the file in its current state here: https://github.com/bodycalc/bodycalc.io/django/app/settings.py
IV. Zappa setup
Zappa is actually a simple, easy-to-use command line tool. Once I’d properly organized my project files I only ran into a couple of other setup challenges. The more opaque of these regards the information that is supposed to get gathered up during the zappa init process. In my case at least, the settings identifying the AWS Virtual Private Network (VPC) subnet id values didn’t get populated, and so I had to look these up and add the values to the zappa_settings.json file manually as per this illustration.
You can lookup these values by navigating to “VPC” from the main console of AWS. From there, look for “subdomains”. The values in the json file correspond to the “Subnet ID” values that you’ll see on that screen. There should be three subnets.
You can probably disregard the SecurityGroupIds value, unless you need access to AWS resource like for example, RDS, for your development environment. If you do need this then you can lookup your security id values by navigating to “EC2” from the main console of AWS and then choosing “Security Groups”.

The second problem regards security and the IAM profile that I created. Zappa needs admin-level access to each AWS resource in your deployment architecture, which frankly, is a LOT of access. Compounding matters, IAM security is granular, and the specific permissions that Zappa needs remain unclear as of this publication. I ultimately had to temporarily add “admin” privileges to my IAM user to get my site deployed initially. Afterwards, after a lot of tweaking, I was able to use the IAM profile that you can review here: https://github.com/bodycalc/bodycalc.io/aws-iam-policy.json
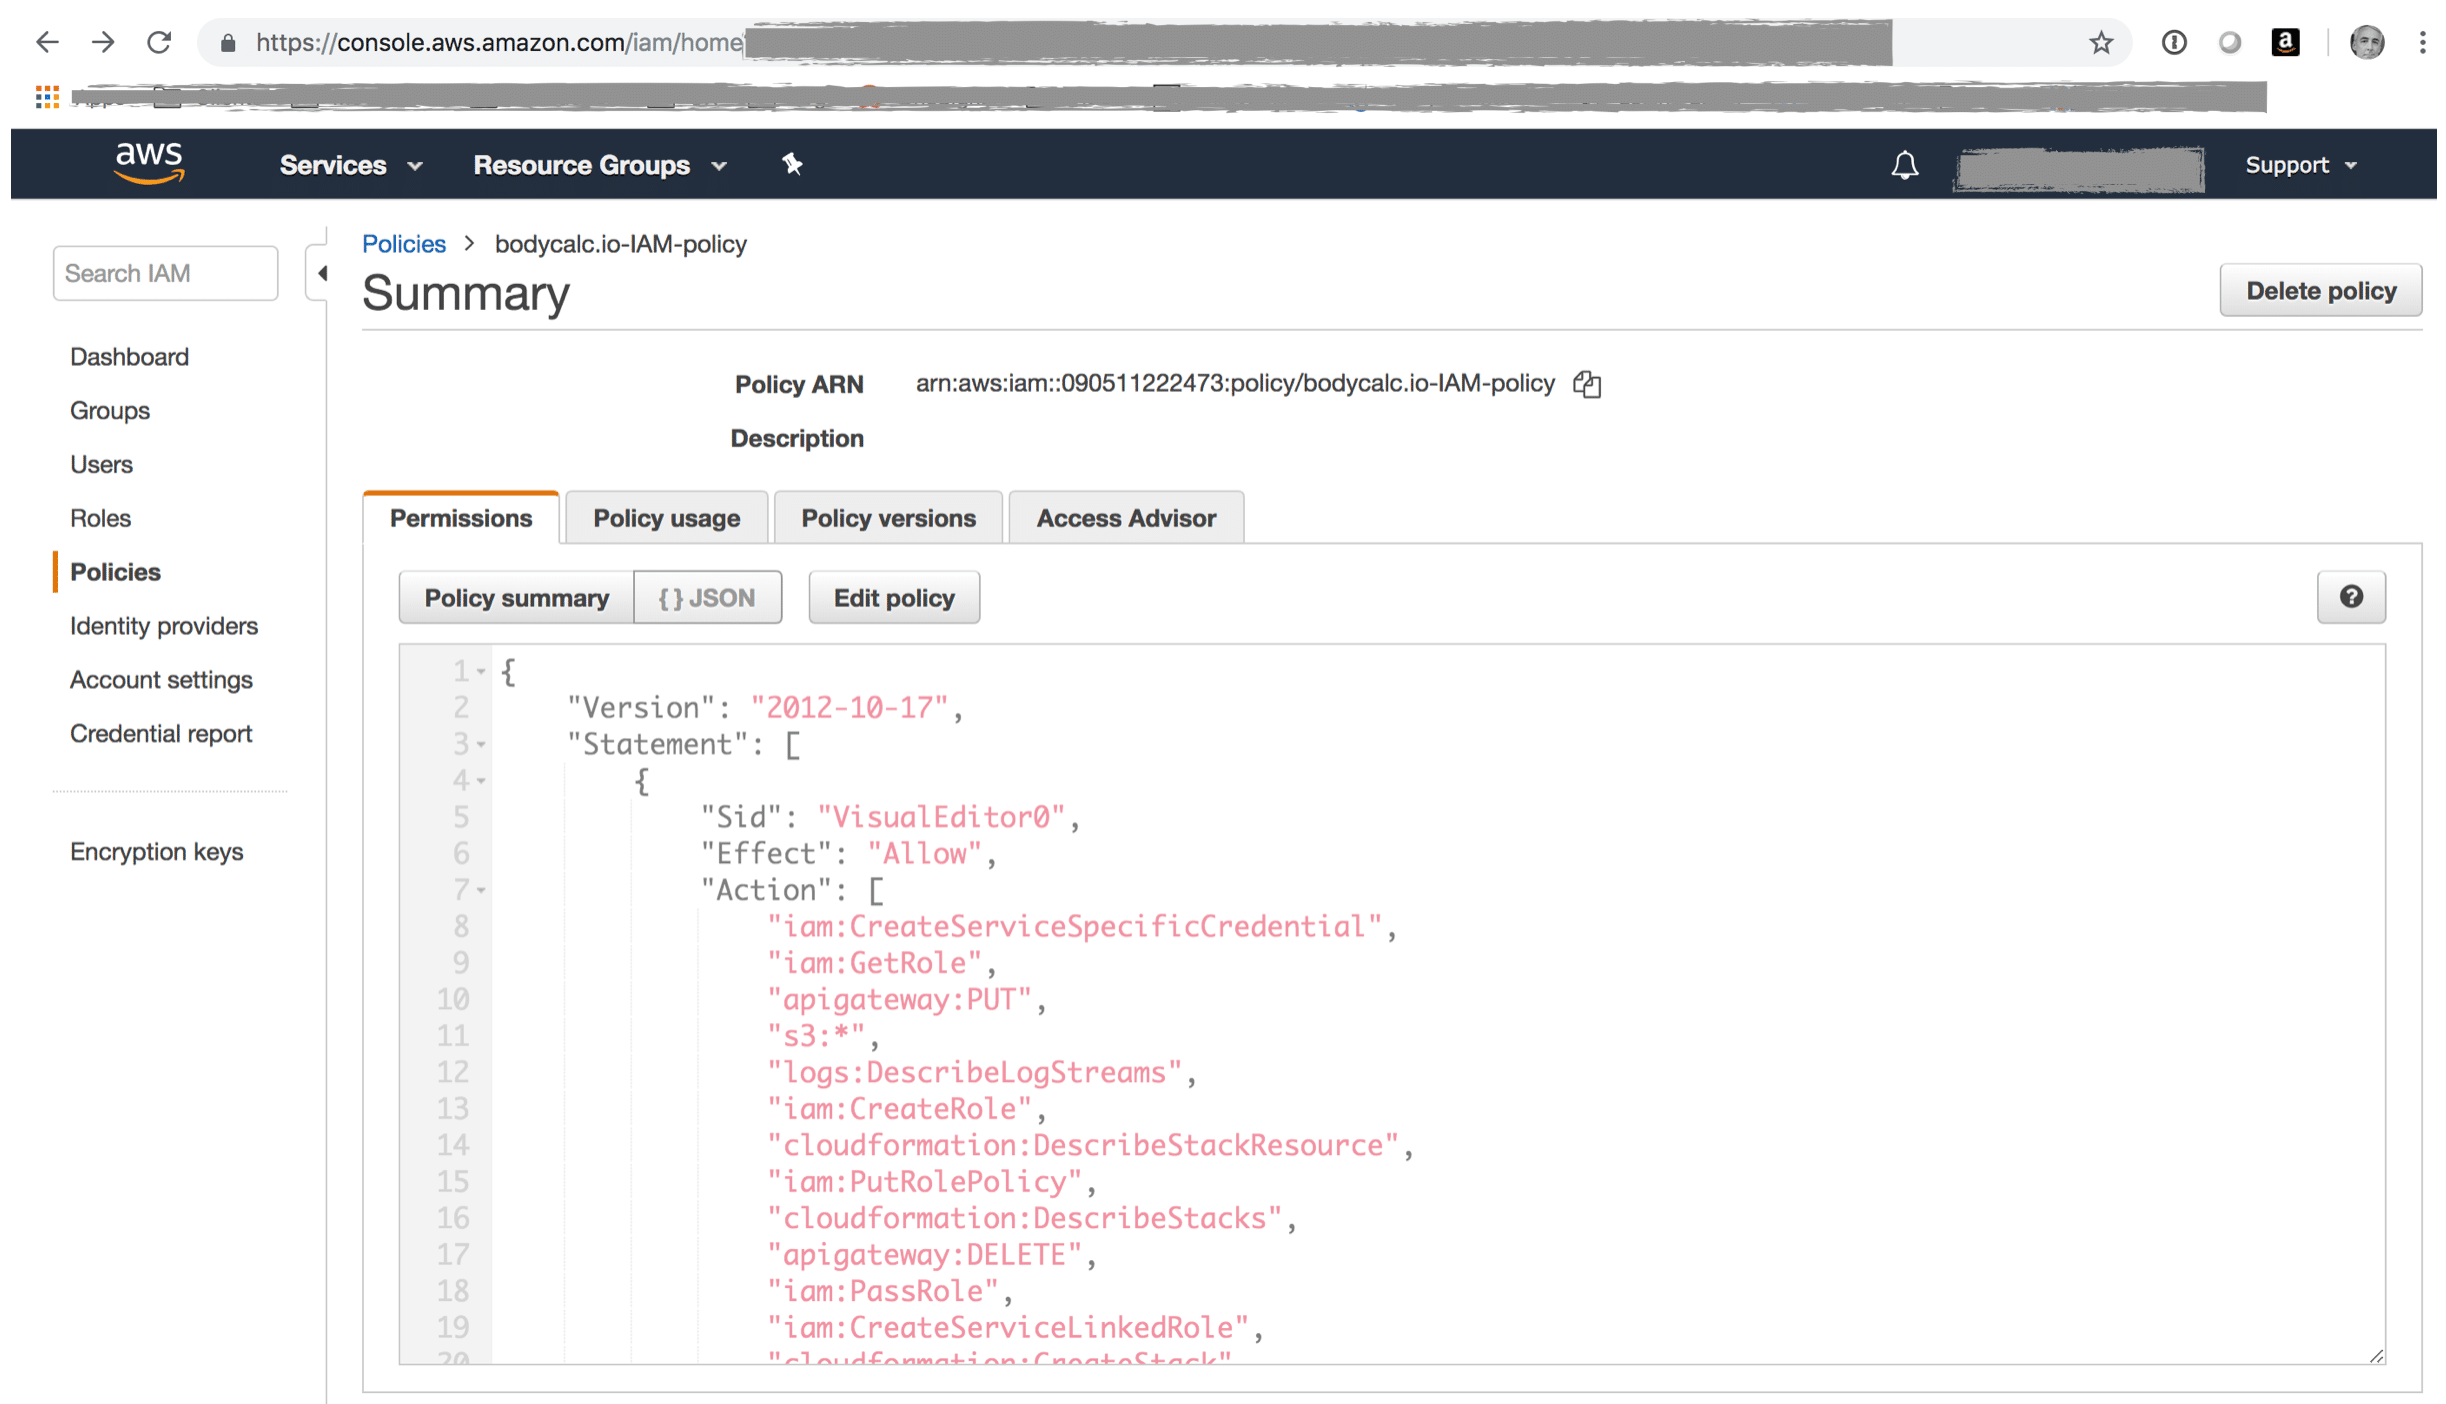
I’m including the next couple of screenshots in case you’re new to IAM and are unsure what you’re supposed to do with this file. The basic idea is that you create an IAM user with programatic access (ie it uses a public ID and a secret key), and then you create and assign an IAM security profile that is custom tailored to the permissions that Zappa needs to deploy your Django app to AWS.

My IAM policy in Github is a json file which you can paste into your IAM policy by clicking the “Edit Policy” button from this screen, and then afterwards clicking on the “JSON” viewer option.
Following are the sources I used while researching this post. You might find these useful.
I hope you found this helpful. Please help me improve this article by leaving a comment below. Thank you!


Hi, Thanks for sharing nice articles…
Can u tell us the cost to set up the architecture? Lambda depends on usage. But how about rds s3 cloudfront, etc? What is the monthly cost to keep it up and running?
hi Emile, i wasn’t familiar with the `exclude` setting, thanks for bringing it to my attention. at a glance it looks very helpful, and at a minimum would reduce the upload/transfer time for deployments. i saw the following example usage which looks generically helpful:
{
“production”: {
“s3_bucket”: “nueverest”,
“aws_region”: “us-west-2”,
“app_function”: “vue_flask.app”,
“delete_local_zip”: false,
“exclude”: [“deployed/”, “static/”, “unit_tests/”, “*.css”, “*.js”, “*.json”, “*.csv”, “*.ico”]
}
}
Nice post! One question, did you look at using the `exclude` setting for your zappa json file?