With comprehensive theming you can completely customize the look & feel of your Open edX instance while also protecting your customizations from being overwritten by future platform upgrades. This tutorial will help you get started on the most common theming tasks like a custom header, footer, logo and adding your Google Analytics tracking code.

How Comprehensive Theming Works
Open edX’s Comprehensive Theming Framework (also known as “Stanford Theming”) provides a powerful and infinitely flexible way for you to tailor your user interface to your unique needs. By leveraging the comprehensive theming framework as opposed to directly editing UI source code you’ll also be able to better manage your customizations and protect your work from the risks of being overwritten whenever you upgrade your Open edX platform.
Note that there is good system documentation located on your Open edX installation Ubuntu file system: /edx/app/edxapp/edx-platform/themes/README.rst, and also in the Open edX Official documentation.
The basic software pattern for Open edX’s comprehensive theming framework is refreshingly similar to theming systems with which you might already be familiar, such as Drupal and WordPress. In the case of Open edX, the platform ships with a default theme that is preloaded with the standard “Native Build” installation. If no alternative theme is specified, as is the case when you’ve only just installed the platform, then Open edX renders the UI using the files from the default theme. Once comprehensive theming has been enabled then Open edX will first look for files in the custom theme folders, reverting to the files from the default theme only in cases where files were not found in the custom theme folder.
Let’s take a look at this in practice. Suppose the the Open edX web browser needs two files: the logo png file, and the header.html file. Let’s furthermore assume that we’ve modified the logo png file in our custom theme but we’ve made no other changes to the header of our site. Here is how the comprehensive theming system will evaluate these file requests:
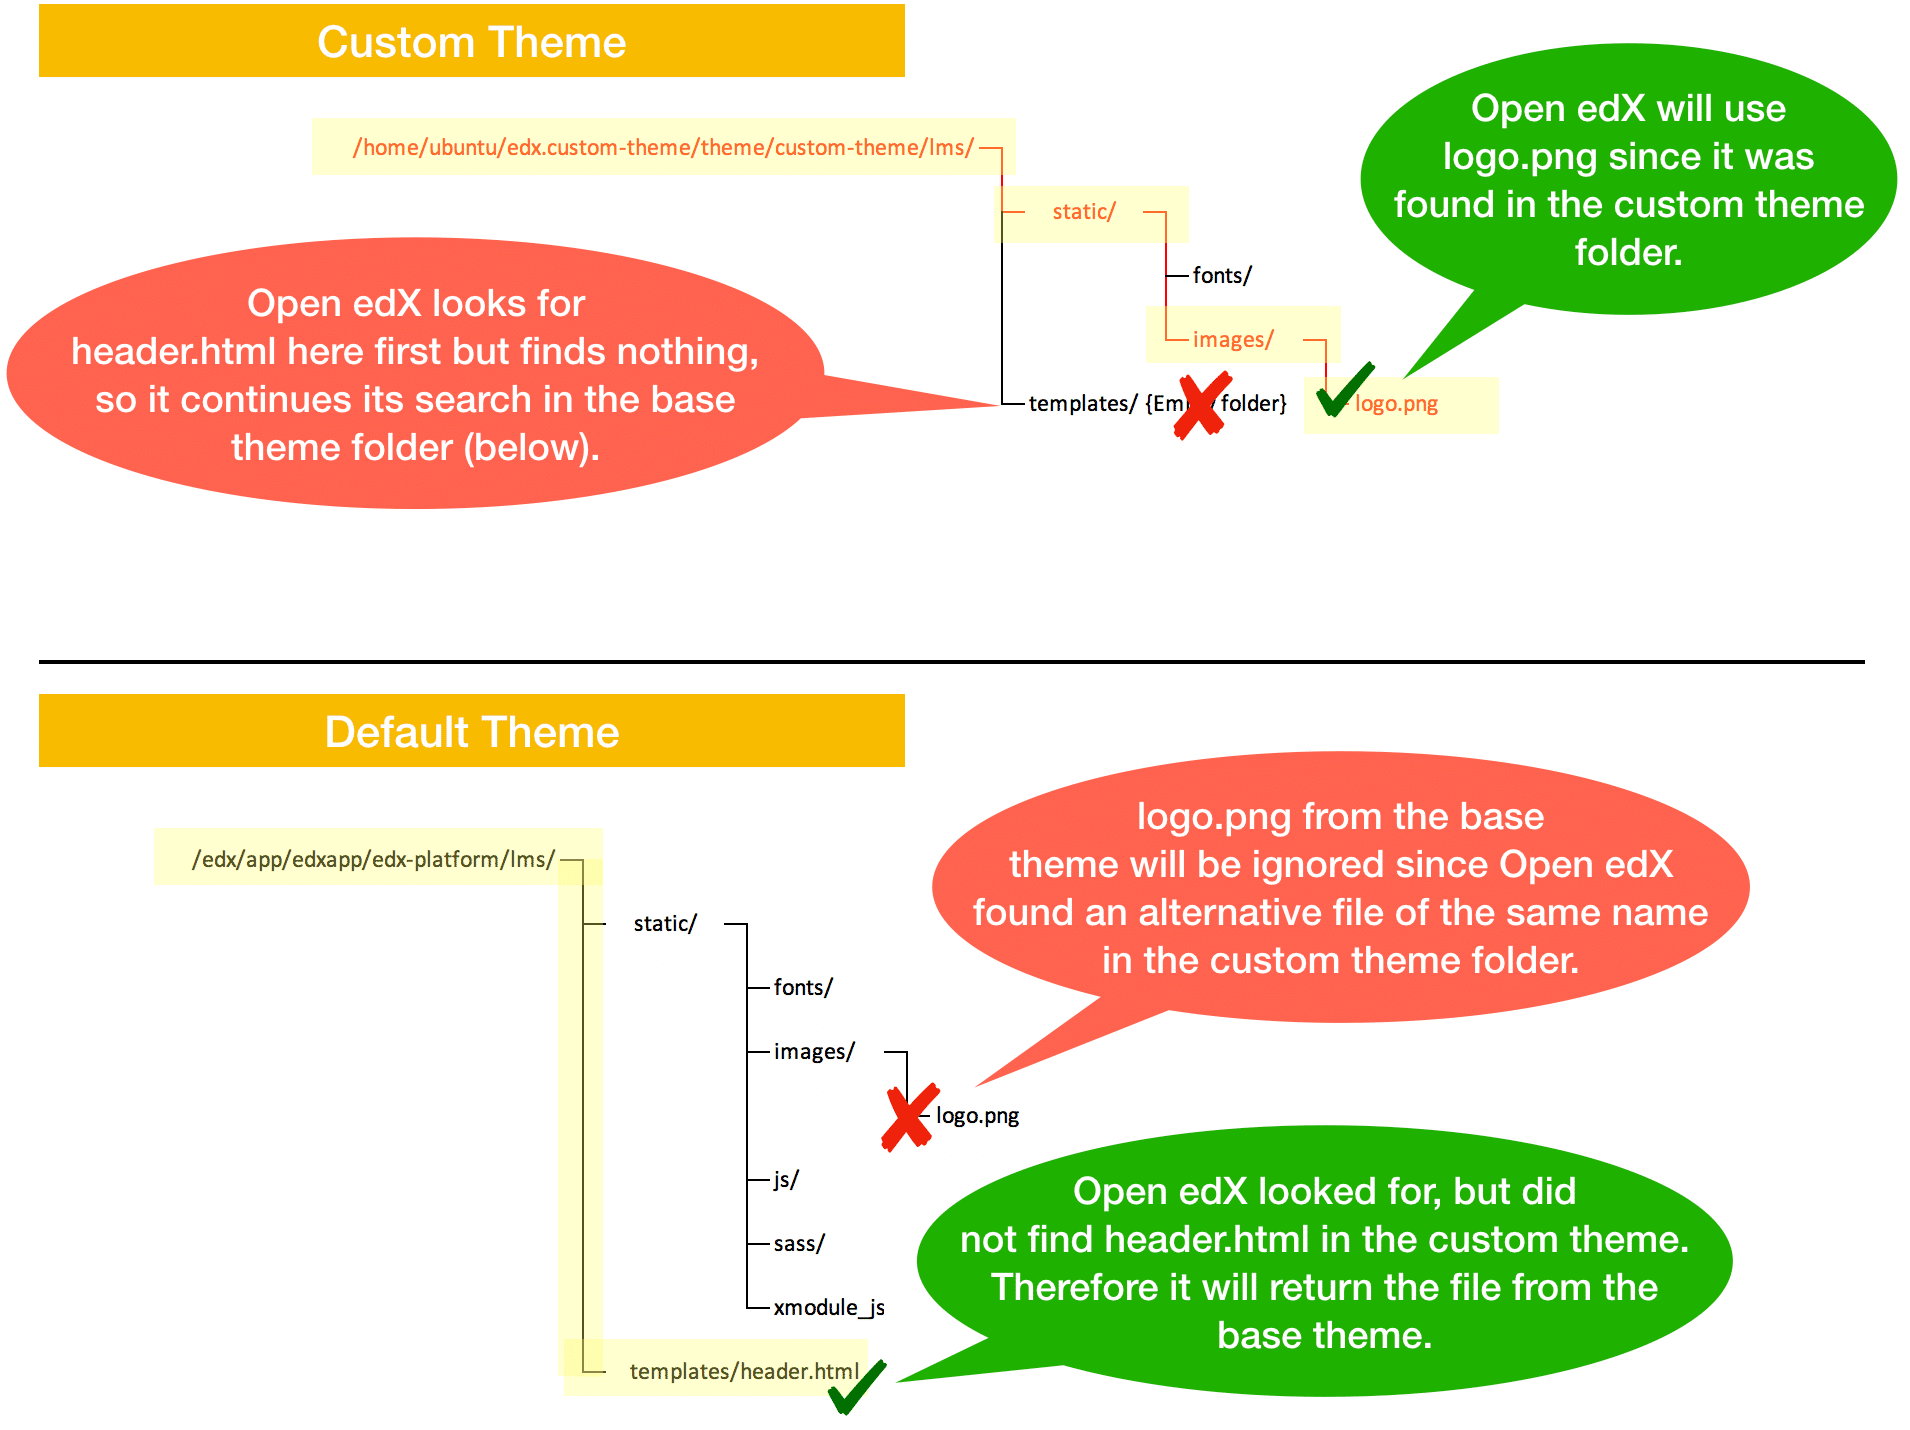
The comprehensive theming framework elegantly determines the correct combination of source files using this very simple 2-factor search protocol. Bear in mind however that this evaluation is NOT done on a real-time basis as you might expect. On the contrary, in the case of Open edX the UI files must be compiled, which is a multi-step process that deals with a host of UI related technologies so that at run-time the Nginx web server only has to work with pure HTML, CSS, Javascript and media assets. We’ll look at this in more detail below.
The default theme is enormous, containing nearly 2,000 source files combined between the Learning Management System (LMS) and the Course Management Studio (CMS). Fortunately however you’ll probably only need to modify a dozen or so. The reasoning behind this is pretty simple: the header and footer makeup the bulk of the content areas that most organizations want to customize, and these areas of the platform are rendered with a limited set of source files, as follows:
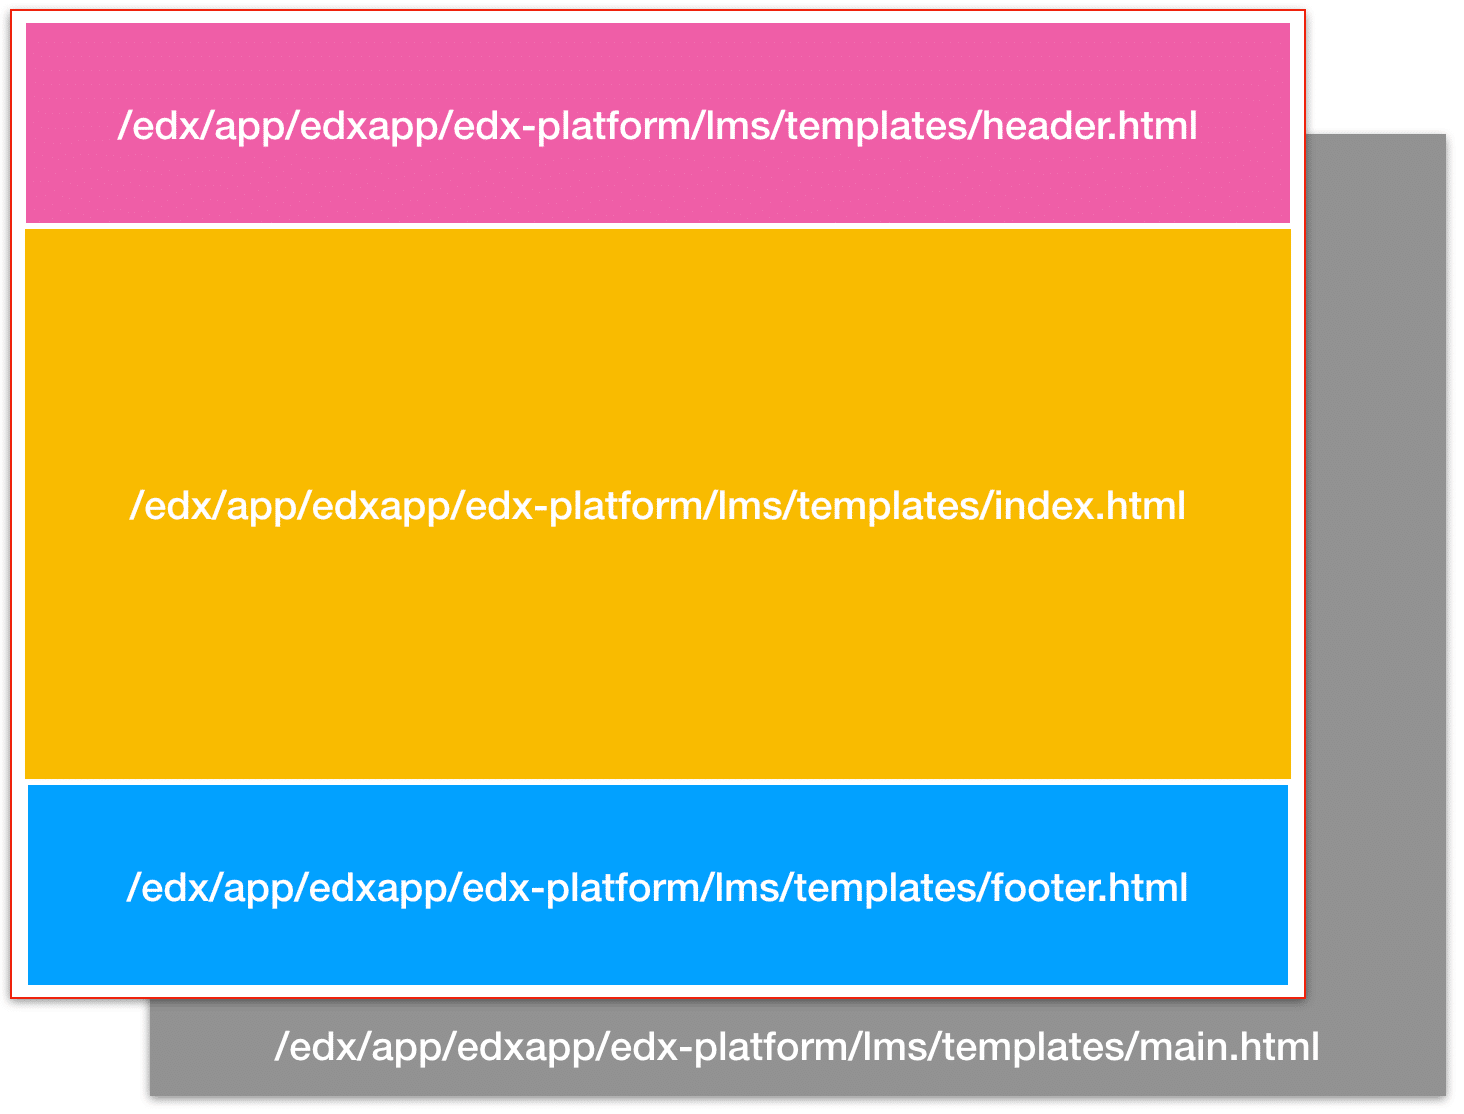
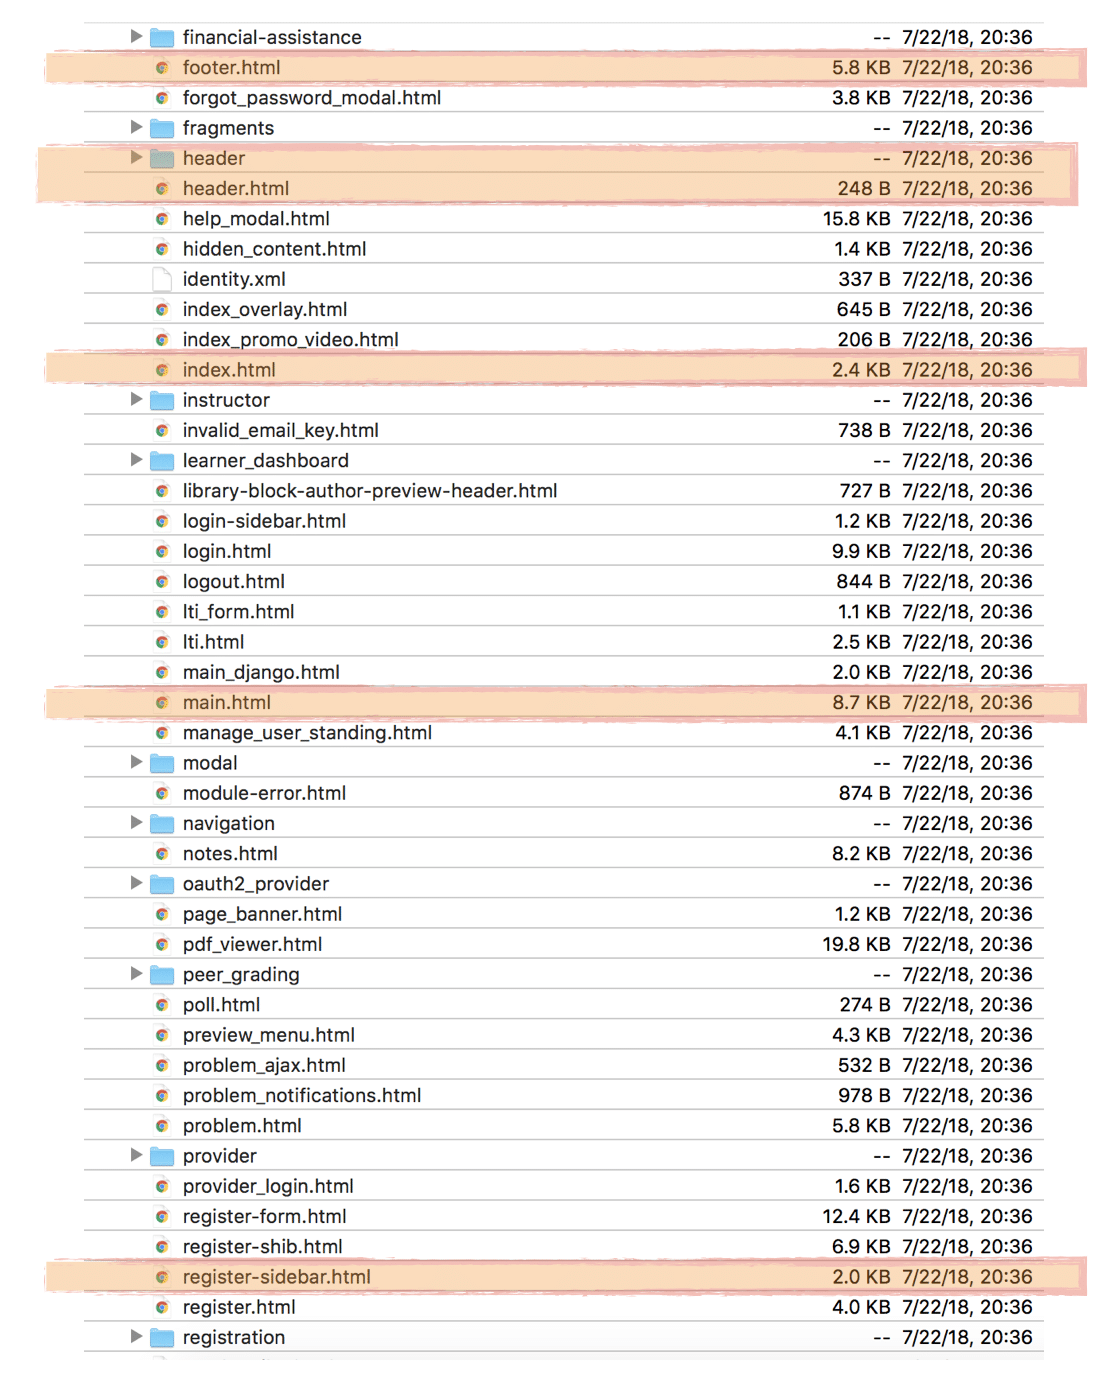
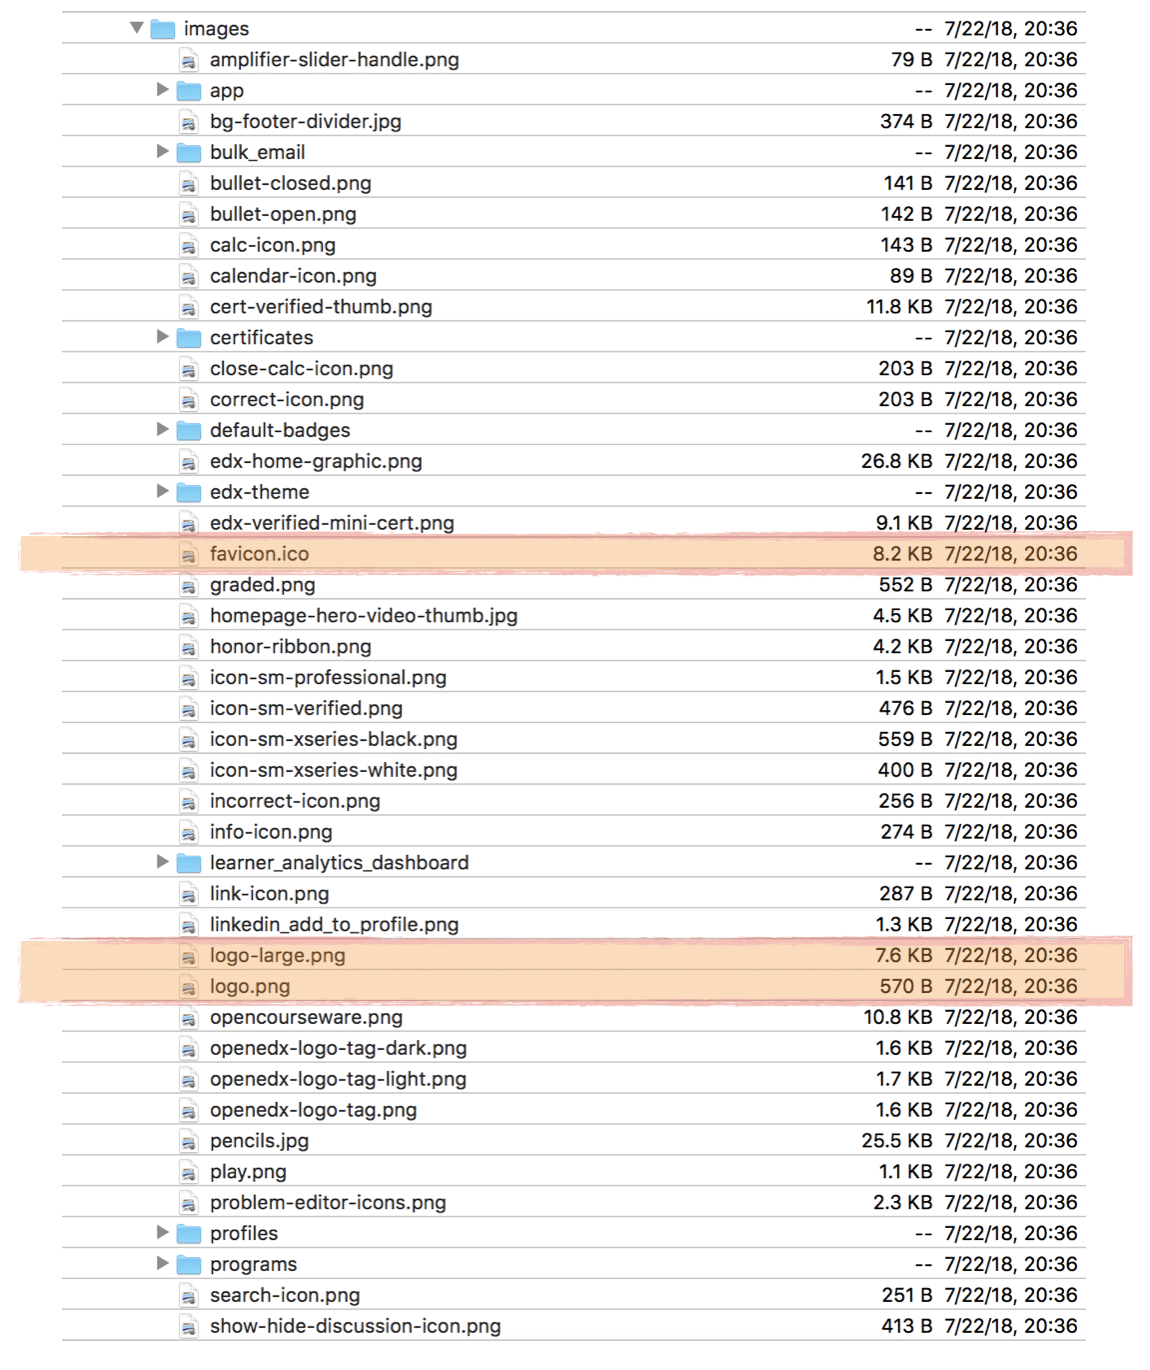
Lets take a closer look at some of the contents of the default theme files and folders. Take note of the highlighted files as these are the most commonly customized parts of the default theme.
How to Enable Comprehensive Theming
By following this procedure you should be able to enable comprehensive theming working in around one hour. The steps we will complete:
- Fork my Github repository edx.custom-theme
- Clone the repository to the home folder of your EC2 Ubuntu instance
- Edit /edx/etc/lms.yml
- Compile static assets
- Restart the Open edX LMS and CMS
1. Fork my GitHub repository
This repository should save you some time and potential confusion getting everything setup. This repository contains an empty theme, and so it won’t change your UI in any way. However, it does include the correct folder structure as per the framework’s technical requirements. I struggled with this the first time created a custom Open edX theme, which is why i eventually created and began using this template. The repository is located here: https://github.com/lpm0073/edx.custom-theme
Note: you’ll need to create a free Github account if you don’t already have one.
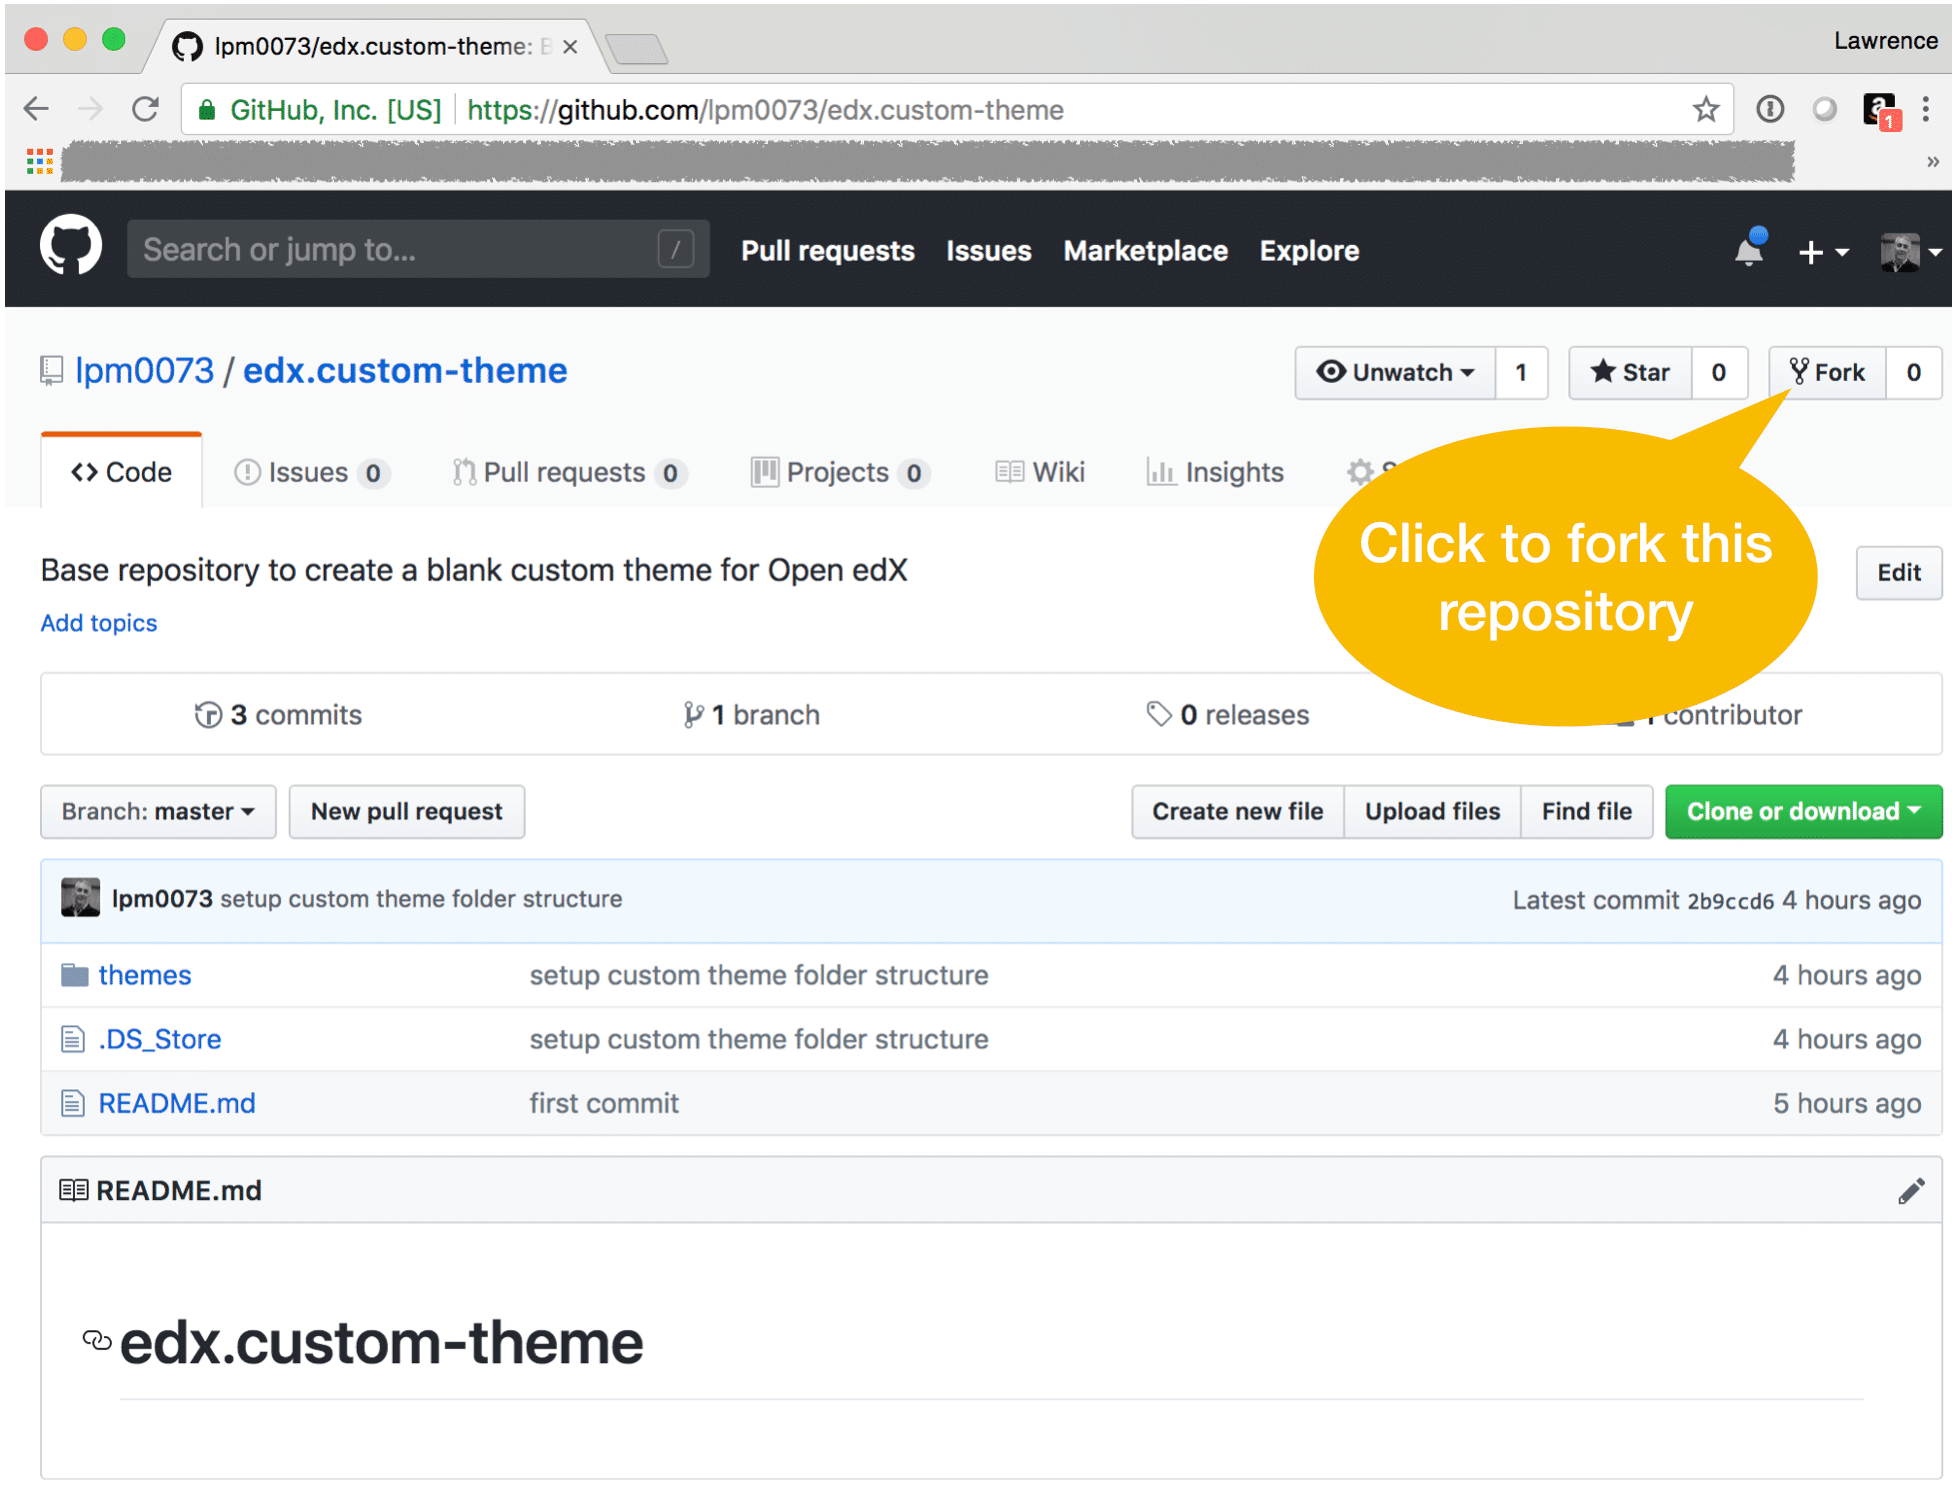
Once you’ve forked the repository the basic idea is that you’ll manage this like any other software development project. You’ll copy source files from the Open edX default theme into your repository folders, and then permanently manage these files using Github as your source control system and code repository.
2. Clone Repository To Your EC2 Ubuntu Instance
SSH into your Open edX Ubuntu instance and then clone your repository into the home directory. For this tutorial I’m going to use the path to my own original edx.custom-theme repository, so make sure that you edit the path information so that these commands point to your forked repository.
Update September 24, 2018: Please take note that on my most recent installation of Hawthorn I was unable to compile static assets after cloning the sample theme into my home folder. Instead, I had to move the theme folder to /edx/app/edxapp/edx-platform/themes, where incidentally you’ll find a set of additional preinstalled themes created by the Open edX team. Some of the comments below suggest that others have recently run into this same problem. This problem might work itself out in subsequent releases, so for the time being I’m leaving the original technical instructions unchanged.
[sourcecode language=”bash”]cd ~
# Change this URL to YOUR repository
git clone https://github.com/lpm0073/edx.custom-theme.git
chown edxapp -R edx.custom-theme
chgrp edxapp -R edx.custom-theme[/sourcecode]
3. Edit /edx/etc/lms.yml
Once again, keep in mind that these code samples reference my Github repository rather than your forked repository, so make sure you edit the path data accordingly. This file has around 400 rows of parameter values, and you’ll make edits in three different parts of the file so make sure to take note of the row numbers in the screen shots below.
Update September 24, 2018: Please also take note that if you cloned your theme into /edx/app/edxapp/edx-platform/themes then you’ll need to modify the lms.yml parameter value “COMPREHENSIVE_THEME_DIRS” accordingly.
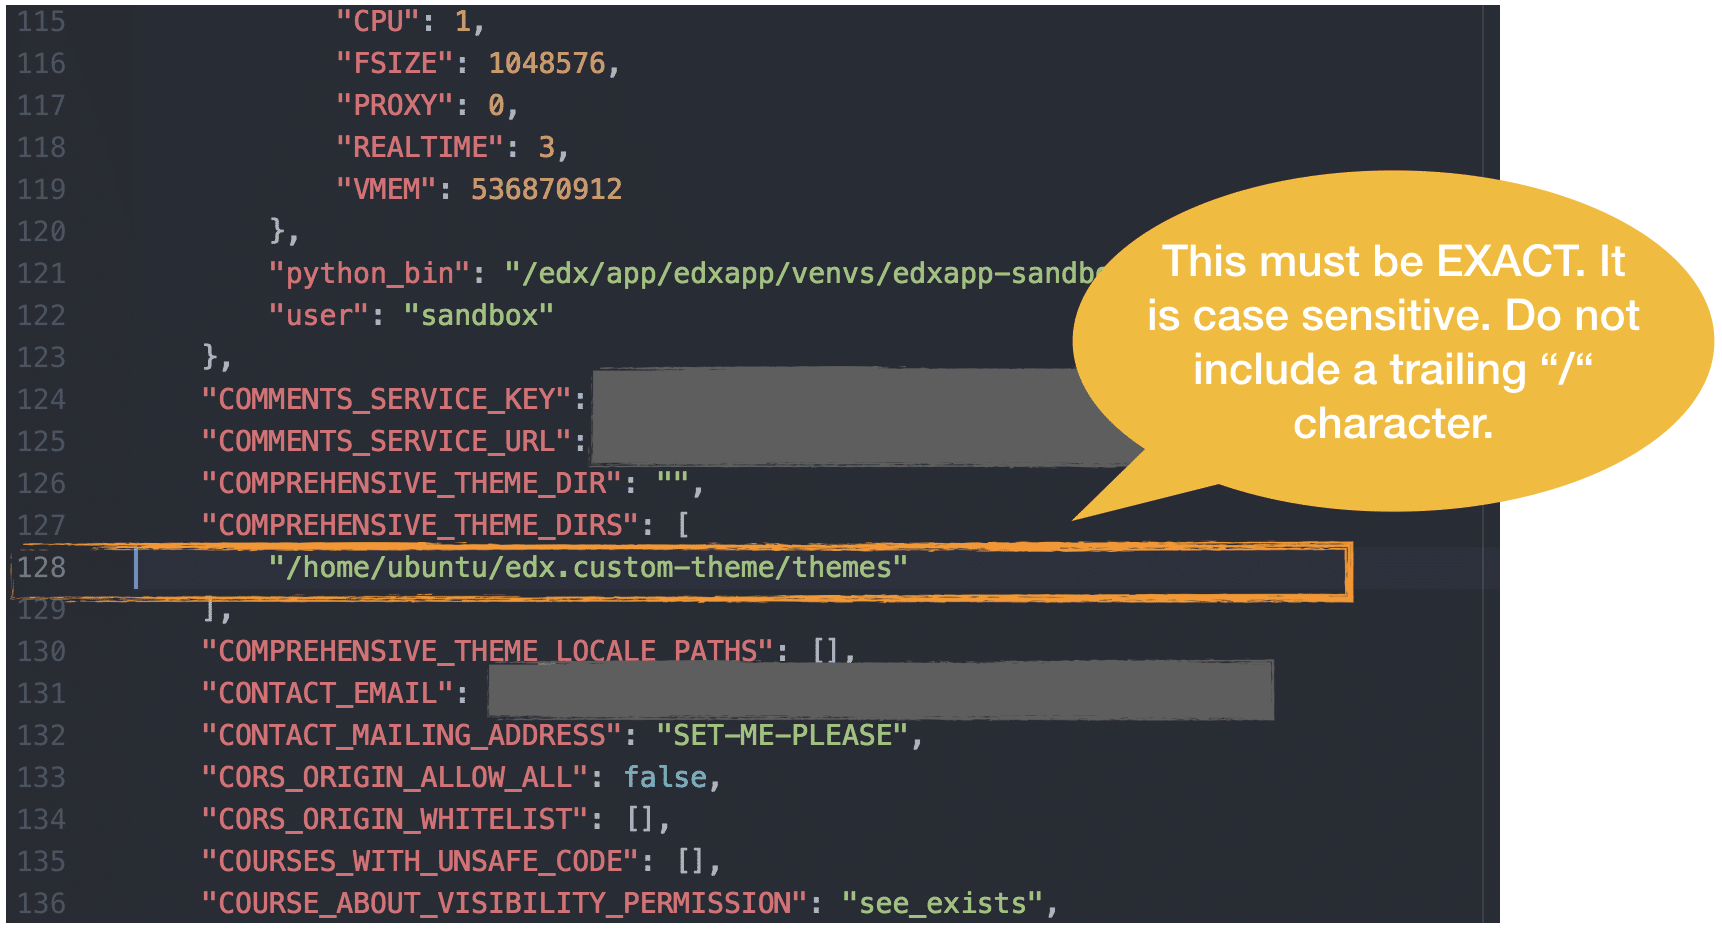


4. Compile Static Assets
In most cases, the effects of modifying your custom theme will not take effect until you re-compile static assets. The Open edX static asset compilation process is somewhat murky to me, but so far I can confirm that it uses both Webpack and Paver to consolidate static assets into a single location (which incidentally is /edx/var/edxapp/staticfiles/) and then it encodes the files with system-generated filename suffixes, which as best I can tell is a crude way to invalidate client browser caches.
One exception to the re-compilation requirement is Mako templates, which are magically evaluated real-time. AWESOME!
Take note that this process runs for around 15 minutes, and your Open edX platform will not be available until the process completes. Also be aware that if your theme contains any compilation errors then your Open edX platform will almost certainly break.
The commands to re-compile static assets are as follows:
[sourcecode language=”bash”]# for Hawthorn version and later
# 1. switch to Ubuntu username ‘edxapp’, and then simultaneously launch a bash shell
sudo -H -u edxapp bash
# 2. load the virtual environment for user ‘edxapp’ that is shipped with your Open edX installation
source /edx/app/edxapp/edxapp_env
# 3. switch to the Open edX "main" working directory (this is where the Paver executable as well as other Open edX utility apps are located)
cd /edx/app/edxapp/edx-platform
# 4. execute paver to recompile static assets for the LMS (Learning Management System) Django project.
# this takes between 10 and 20 minutes to run, and generates a LOT of screen output.
paver update_assets lms –settings=production
# 5. (optional step) execute paver to recompile static assets for the CMS (Course Management Studio) Django project
paver update_assets cms –settings=production
# ————————————————————————
# * If you’re running an older version of Open edX and the commands
# above do not work.
# ————————————————————————
sudo -H -u edxapp bash
source /edx/app/edxapp/edxapp_env
cd /edx/app/edxapp/edx-platform
paver update_assets lms –settings=aws # note that ‘settings’ file is different
paver update_assets cms –settings=aws # note that ‘settings’ file is different
exit[/sourcecode]
5. Restart the LMS and CMS
You have to restart the LMS and CMS for two reasons. First, you modified the Django environment configuration file lms.yml and in order for these changes to take effect the file needs to be reloaded, which is most easily accomplished by stopping and re-starting the application. Second, you recompiled static assets, and for reasons entirely unknown to me this necessitates a restart of at least the LMS (but restart both LMS and CMS just to be safe).
[sourcecode language=”bash”]# restart edx instance
/edx/bin/supervisorctl restart lms
/edx/bin/supervisorctl restart cms
/edx/bin/supervisorctl restart edxapp_worker:[/sourcecode]
If you followed the steps correctly then your Open edX platform should be running, but you should not notice any visual changes to the UI. Next you should add a file to your new custom theme and then repeat steps 2 thru 5 to verify that Open edX detects and includes your new file when it renders the UI. Changing the platform logo is a great way to get started. The platform logo file should be saved in the following location in your theme:
edx.custom-theme/themes/custom-theme/lms/static/images/logo.png
I hope you found this helpful. Please help me improve this article by leaving a comment below. Thank you!


Hi everyone,
I added a logo.png in this path edx.custom-theme/themes/custom-theme/lms/static/images/logo.png but did’t work.
My theme is upload correctly and if I edit the index.html I can see the changes.
Why don’t override the default logo with my custom logo?
Thank you!
Hi,
I haven’t the file /edx/app/edxapp/lms.env.json, why? Someone can help me?
Thank you
the file path changed to /edx/etc/lms.yml
time to update the lms.yml file path. it has now moved to /edx/etc/lms.yml
Hi, I’m getting a strange error after following your steps:
Upon trying to log in to the site after following your guide I get:
Forbidden (403)
CSRF verification failed. Request aborted.
You are seeing this message because this site requires a CSRF cookie when submitting forms. This cookie is required for security reasons, to ensure that your browser is not being hijacked by third parties.
If you have configured your browser to disable cookies, please re-enable them, at least for this site, or for ‘same-origin’ requests.
How can this be affected by the change of a theme? Any idea what this is and how to fix it?
Best Regards
Andreas
Hello Lawrence, I have a question.
How i can change page “Course view”? Link as: test.com/courses/course-v1:spbu+dbs+spaced/course/
I can’t find a mako template for this page.
Hi,
First of all, great blogg! It´s very useful.
I´ve followed the native installaition on the Open edX docs and installed it on a VM on Azure. It´s working as expected so I wanted to move on to create a custom theme. Following the instuctions in this post I get the following error after running
paver update_assets lms –settings=production
———
python manage.py lms –settings=production print_setting STATIC_ROOT 2>/edx/app/edxapp/edx-platform/test_root/log/print_settings.log
Unable to print the value of the STATIC_ROOT setting:
WARNING:py.warnings:/edx/app/edxapp/edx-platform/lms/djangoapps/courseware/__init__.py:5: DeprecationWarning: Importing ‘lms.djangoapps.courseware’ as ‘courseware’ is no longer supported
warnings.warn(“Importing ‘lms.djangoapps.courseware’ as ‘courseware’ is no longer supported”, DeprecationWarning)
Traceback (most recent call last):
File “manage.py”, line 119, in
startup = importlib.import_module(edx_args.startup)
File “/usr/lib/python2.7/importlib/__init__.py”, line 37, in import_module
__import__(name)
File “/edx/app/edxapp/edx-platform/lms/startup.py”, line 9, in
settings.INSTALLED_APPS # pylint: disable=pointless-statement
File “/edx/app/edxapp/venvs/edxapp/local/lib/python2.7/site-packages/django/conf/__init__.py”, line 56, in __getattr__
self._setup(name)
File “/edx/app/edxapp/venvs/edxapp/local/lib/python2.7/site-packages/django/conf/__init__.py”, line 41, in _setup
self._wrapped = Settings(settings_module)
File “/edx/app/edxapp/venvs/edxapp/local/lib/python2.7/site-packages/django/conf/__init__.py”, line 110, in __init__
mod = importlib.import_module(self.SETTINGS_MODULE)
File “/usr/lib/python2.7/importlib/__init__.py”, line 37, in import_module
__import__(name)
File “/edx/app/edxapp/edx-platform/lms/envs/production.py”, line 486, in
AUTH_TOKENS = json.load(auth_file)
File “/usr/lib/python2.7/json/__init__.py”, line 291, in load
**kw)
File “/usr/lib/python2.7/json/__init__.py”, line 339, in loads
return _default_decoder.decode(s)
File “/usr/lib/python2.7/json/decoder.py”, line 364, in decode
obj, end = self.raw_decode(s, idx=_w(s, 0).end())
File “/usr/lib/python2.7/json/decoder.py”, line 382, in raw_decode
raise ValueError(“No JSON object could be decoded”)
ValueError: No JSON object could be decoded
I´m not finding anything on this issue so would really appreciate any help in figuring out what the problem is 🙂
Thanks
Hi Lawrence, can you give a clue on how to implement theme with course category?
Or is there any existing open edx theme that comes with course category? I use Hawthorn release.
Hello, Chris.
I know two ways to solve it. 1 Set categories on the home page using javascript. 2 set tags in discovery + elasticsearch (need some code in discovery)
I am using ironwood.master.
All the steps complete without any error and able to load pages without any breakage.
But I am not sure if custom theme installation worked as I am not able to see the updated logo in browser.
In fact i am not seeing the custom-theme directory in /edx/var/edxapp/staticfiles/ post compilation and restart as the post “how-to-change-the-open-edx-logo” is indicating.
To add, I have tried both, keeping custom theme in home directory as well as in /edx/app/edxapp/edx-platform/themes/
Please note that I had to move directories after git clone, to match the structure of an existing theme, ie having lms and cms dirs right inside the “edx.custom-theme” dir.
Hi,
Thanks a lot for this article.
Amine
Your articles are very precise. Can’t thank you enough.
I am going to try this out soon.
Hi Lawrence, when I run the commands specified by you I get this :
Build failed running pavelib.assets.update_assets: Subprocess return code: 1
When I scroll up it shows some error : File to import not found or unreadable : @edx/frontend-component-cookie-policy-banner
I added my logo.png but it is not showing up.
But in homepage :
Well done!
You successfully added Bootstrap 4.0 to your homepage without breaking the LMS. This example text is going to run a bit longer so that you can see how spacing within an alert works with this kind of content.
— this is showing up
you’re almost there Mohit. 🙂 you need to recompile static assets.
hello;
my theme is succesufuly compiled but it not work
i have this message
Internal Server Error
Can I create some staff user who can see only microsite users (tagged by course_org_filter variable) or can I hide not microsite tagged users for specific user in admin?
Hi, Lawrence.
‘WELL DONE!’ -> How can I clear this?
Hi
I’m using openedx docker devstack on ubunto 18.04
Make custom theme dir in edx-platform
Edit lms.env.json
After running these commands edit was persistent
In devstack dir > make lms-static
> make lms-retstart
No error seen while all doing that but new theme also not working
Hello Lawrence, I have a question.
I can update a single topic in particular, is that I have several microsites and each one with a specific theme and when I want to update a single topic by finishing all of them and I would like to know if I can do the update for a single topic, I read that You can use the “–theme = nameoftheme” but I do not know if you will do what I really try to do.
Have a great day.
Erick Estrada
I am getting this error while restarting LMS. My edx instance is running in docker.
unix:///edx/var/supervisor/supervisor.sock no such file
supervisor.sock no such file
Hi Lawrence,
I want to give course a different theme,
But i can’t find the template or python file where full course resides.
Well done!
You successfully added Bootstrap 4.0 to your homepage without breaking the LMS. This example text is going to run a bit longer so that you can see how spacing within an alert works with this kind of content.
Thanks!!
I’d note that, at first I saw my ‘red-theme’ test, it takes forever to render, even clearing cache locally doesn’t work.
Hi, Kevin.
Could you clearing that note?
Hi, Kevin.
Could you clear that?
Hi,
Im trying to restart the LMS using the command ” /edx/bin/supervisorctl restart lms” given in step 5. Unfortunately it keeps printing this to screen:
“[sudo] password for edxapp:”
I have tried using the following commands to get over this “sudo -H -u edxapp bash” and “sudo -H -u edxapp /edx/bin/supervisorctl restart lms” but neither work.
Any suggestions?
Cheers,
Kris
you need to type “exit” first. your currently logged in to your shell as the user edxapp.
Hi! It’s because you’re at the user ‘edxapp’, switch to another user that has sudo permissions before you try to restart the lms. I did it by issuing “su – userwithsudo” where userwithsudo is another user that has sudo permissions 🙂
Hi, I’m having an issue in compiling static assets. I done all the steps recently along with Chris’s problems, but anything doesn’t seem to work.
Traceback (most recent call last):
File “/edx/app/edxapp/venvs/edxapp/bin/xmodule_assets”, line 11, in
load_entry_point(‘XModule’, ‘console_scripts’, ‘xmodule_assets’)()
File “/edx/app/edxapp/edx-platform/common/lib/xmodule/xmodule/static_content.py”, line 250, in main
write_webpack(root / ‘webpack.xmodule.config.js’, module_files, descriptor_files)
File “/edx/app/edxapp/edx-platform/common/lib/xmodule/xmodule/static_content.py”, line 211, in write_webpack
with output_file.open(‘w’) as outfile:
File “/edx/app/edxapp/venvs/edxapp/local/lib/python2.7/site-packages/path.py”, line 747, in open
return io.open(self, *args, **kwargs)
File “/usr/lib/python2.7/contextlib.py”, line 35, in __exit__
self.gen.throw(type, value, traceback)
File “/edx/app/edxapp/venvs/edxapp/local/lib/python2.7/site-packages/path.py”, line 106, in io_error_compat
raise os_err
OSError: [Errno 13] Permission denied: ‘common/static/xmodule/webpack.xmodule.config.js’
Captured Task Output:
———————
—> pavelib.assets.update_assets
—> pavelib.prereqs.install_node_prereqs
—> pavelib.assets.process_xmodule_assets
—> pavelib.prereqs.install_python_prereqs
xmodule_assets common/static/xmodule
Build failed running pavelib.assets.update_assets: Subprocess return code: 1
I’m trying to build a VM in Azure.
you have permissions problems, and perhaps file and ownership problems as well. the path /edx/app/edxapp/ and all subdirectories should be owned by ‘edxapp’. the group varies: some files / directories are ‘edxapp’ whereas others are ‘www-data’, so you should review the file system and look for any outlying cases and modify accordingly.
Thank you for your response. I’ll try to fix it.
Thanks for your wonderful blog, Lawrence. It has been a life saver.
There seems to be an error on this post, though. The recompile static assets box above shows:
paver update_assets lms settings=production
Should it not be one of these?
paver update_assets lms –settings=production
or perhaps
paver update_assets lms –settings=aws
hi henry, i’m glad the article helped. yes, you’re correct. the web server keeps cutting the hyphens off the command :/
Dear Lawrence,
Suggest you to please update this post to include the “–” characters in the below command:
paver update_assets lms –settings=aws
or
paver update_assets lms –settings=production
I struggled a lot because of this. I was getting paver error message as below:
“Build failed running pavelib.assets.update_assets: Subprocess return code: 1”
And I had no clue whats happening!!!
I reinstalled the open edx from scratch but the same issue was occurring.
Luckily once I tried the below command :
“paver update_assets lms –settings=aws”
and I was overwhelmed by the successful run of “update asset” command.
May be other users will stumble upon this.
Thanks for pointing that out Jaleel. I just changed the code highlighter from Google Prettyprint to Alex Gorbatchev’s SyntaxHighlighter (http://alexgorbatchev.com/SyntaxHighlighter/), which seems to work a lot better.
Hi Lawrence,
No need to compile static assets to enable comprehensive theme. It just works once you restart LMS. I only edited *.html file and once I restart LMS those changes were reflected.
I still have error when I compile static assets, not sure what is the problem, even though no changes applied to any file. I have also moved the theme to /edx/app/edxapp/edx-platform/themes/
often the problem is a syntax error in one or more of your scss files. regardless, you’ll find meaningful debugging information in the screen output.
Hi Lawrence, I copied the theme directly from your github and without any changes.
you need to read the screen output to determine the source of your problem. if you want you can pipe it to an output file and email it me, and i’ll take a look.
Thank you Lawrence for your kindness. I tried to do the following step:
1. assign r+w access to custom theme directory
sudo chmod -R u+rw /my-open-edx-themes
2. add additional option to paver command as follow ( adding –watch )
paver update_assets lms –settings=production –theme-dirs=/edx/app/edxapp/edx-platform/themes/edx.custom-theme/ –watch
It shows this success message:
Successful compilations:
— “common” sass files.
— lms sass for system.
Then it doesn’t show error message for maybe 7-8 minutes. At the end of execution, it shows this error :
python manage.py cms –settings=production print_setting STATIC_ROOT 2>/dev/null
/bin/sh: 1: /webpack: not found
But the change that I made to favicon.ico is reflected in the LMS after I restart lms. Does it mean my compilation successful?
Hi Lawrence,
I reset my instance of open edx back to the state after enabling SMTP and still encounter the build failure when I try to rebuild the themes. I have not put anything into the themes folder. I did edit lms.env.json and cms.env.json to use the red-theme.
john
Hi!!
In this moment i have the same problem of Chris, i was move to edx/app/edxapp/edx-platform/themes but doesn’t work!! please help me!!
when compiling assets there is a lot of screen output. you need to review this carefully. most likely you have a syntax error in your Sass files (at least, that tends to be the case for me). if there are any other problems then you’ll find some error messaging in your screen output.
Awesome!! Thank you!
Hi Lawrence,
Wondering if there’s a way to compile assets for a specific theme and not all the themes (I’m using multiple themes for multiple microsites)
Hi Lawrence, enjoying your blogs .. Very helpful. I use custom themes on different microsites, is there a way to compile a specific theme and not all of em? Thanks
hi Yafe, great question. unfortunately no. Hawthorn includes several example themes which, if you’re not using them, you can delete to speed up the process somewhat.
what will be th epassword for edxapp user
no password is required if you use the following command: sudo -H -u edxapp
Hi Lawrence,
thanks for your post.
i face the same problem as Mario
when i finish pavar i get some files lms-main-v1-rtl.css,lms-main-v1-rtl.css not found error in the browser console.
i sovled it by add another link tag to the correct path
“/static/css/lms-main-v1-rtl.css”
the wrong one was
“css/lms-main-v1-rtl.css”
but of course this is not a solution this is a work around
any suggestion for a real solution?
Hi Lawrence,
thanks for your post.
I tried do what you say on my native installation, but without any success.
After paver compilation, apparently without any errors but with many warnings, when I access the lms I get a lms-main-xxxx.css not found error in the browser console.
Do you have any suggestion?
Thanks
Mario
hi mario. Paver generates several dozen deprecation warnings. these are normal. however, file not found error makes me wonder if maybe you have compilation error(s) in your scss files?
Hi Lawrence,
I followed the steps but I failed during this step to call paver:
paver update_assets lms –settings=aws
The error message is just like this:
Build failed running pavelib.assets.update_assets: Subprocess return code: 1
What did I do wrong? Thanks
hi Lawrence,
When I ran this command: paver update_assets lms –settings=aws
It gives me this error below. I don’t use AWS to install it but another cloud.
Build failed running pavelib.assets.update_assets: Subprocess return code: 1
I have removed –settings=aws but the error still the same. What could have been gone wrong?
Hi chris, the message, “Build failed running pavelib.assets.update_assets” means that the Paver / Webpack process encountered errors within your theme files. themes are tricky to trouble-shoot since the Paver process takes so long to run; usually 10 minutes or so on most builds. I’d suggest that you strip down your theme theme to the bare minimum and then gradually add files / assets, recompiling assets until you isolate your problem. good luck!!
Hi Lawrence,
o it
The theme that I used was the one that I forked from your github. I haven’t added anything to it, so it was the first time I ran it.
ok. try this: move the theme files to /edx/app/edxapp/edx-platform/themes/. don’t forget to modify the path in the array parameter, “COMPREHENSIVE_THEME_DIRS” accordingly. i had to do this on my most recent hawthorn installation. if that still does not work then temporarily disable comprehensive theming by setting ENABLE_COMPREHENSIVE_THEMING = false and then attempt to compile static asset one more time, just to verify that it works with your default installation.
Hi Lawrence, moving to edx/app/edxapp/edx-platform/themes does work! Also –settings=aws has been deprecated, replace with this one : –settings=production
Dear Chris,
Try the below command:
sudo -H -u edxapp bash
source /edx/app/edxapp/edxapp_env
paver update_assets lms –settings=aws
exit
Please note that there are two characters before the “settings” word in the above command which is “-” and “-”
When the comment is posted it merges the two characters into one.