Learn how to secure and scale your WordPress site with an AWS Elastic Load Balancer configured for SSL encryption. This detailed step-by-step how-to guide will get you up and running quickly and painlessly.

Summary
In recent past AWS introduced new serverless load-balancing models that are designed to sit in front of your web app architecture and importantly, these new ELB models are both highly-reliable and free. If you use an AWS EC2 instance to host your WordPress environment then there are many advantages to adding an AWS Elastic Load Balancer (ELB) to your infrastructure architecture.
- Horizontally scale your WordPress site.
- Add an automatically-renewing SSL certificate to your site for free.
- Improved site response times
- Perform maintenance to your server without having to take your site offline
Unfortunately, getting an ELB with an SSL certificate to work with WordPress is tricky. Namely, WordPress can get stuck in an infinite loop of URL redirections whenever you try to redirect traffic to HTTPS. After a long afternoon of banging my head against the keyboard I finally got HTTPS working. This article will hopefully help you to get your own ELB and SSL certificate up and running quickly and painlessly. Let’s get started!
Theory
This wasn’t immediately obvious to me, but, HTTPS and SSL are only necessary for traffic between your site’s visitors and the ELB. The upstream traffic between your ELB and your EC2 instance(s) resides inside your Virtual Private Cloud (VPC) and can therefore communicate safely using HTTP. This means that you only need to add an SSL certificate to your ELB, and you can (mostly) continue to use HTTP on your EC2 instance.
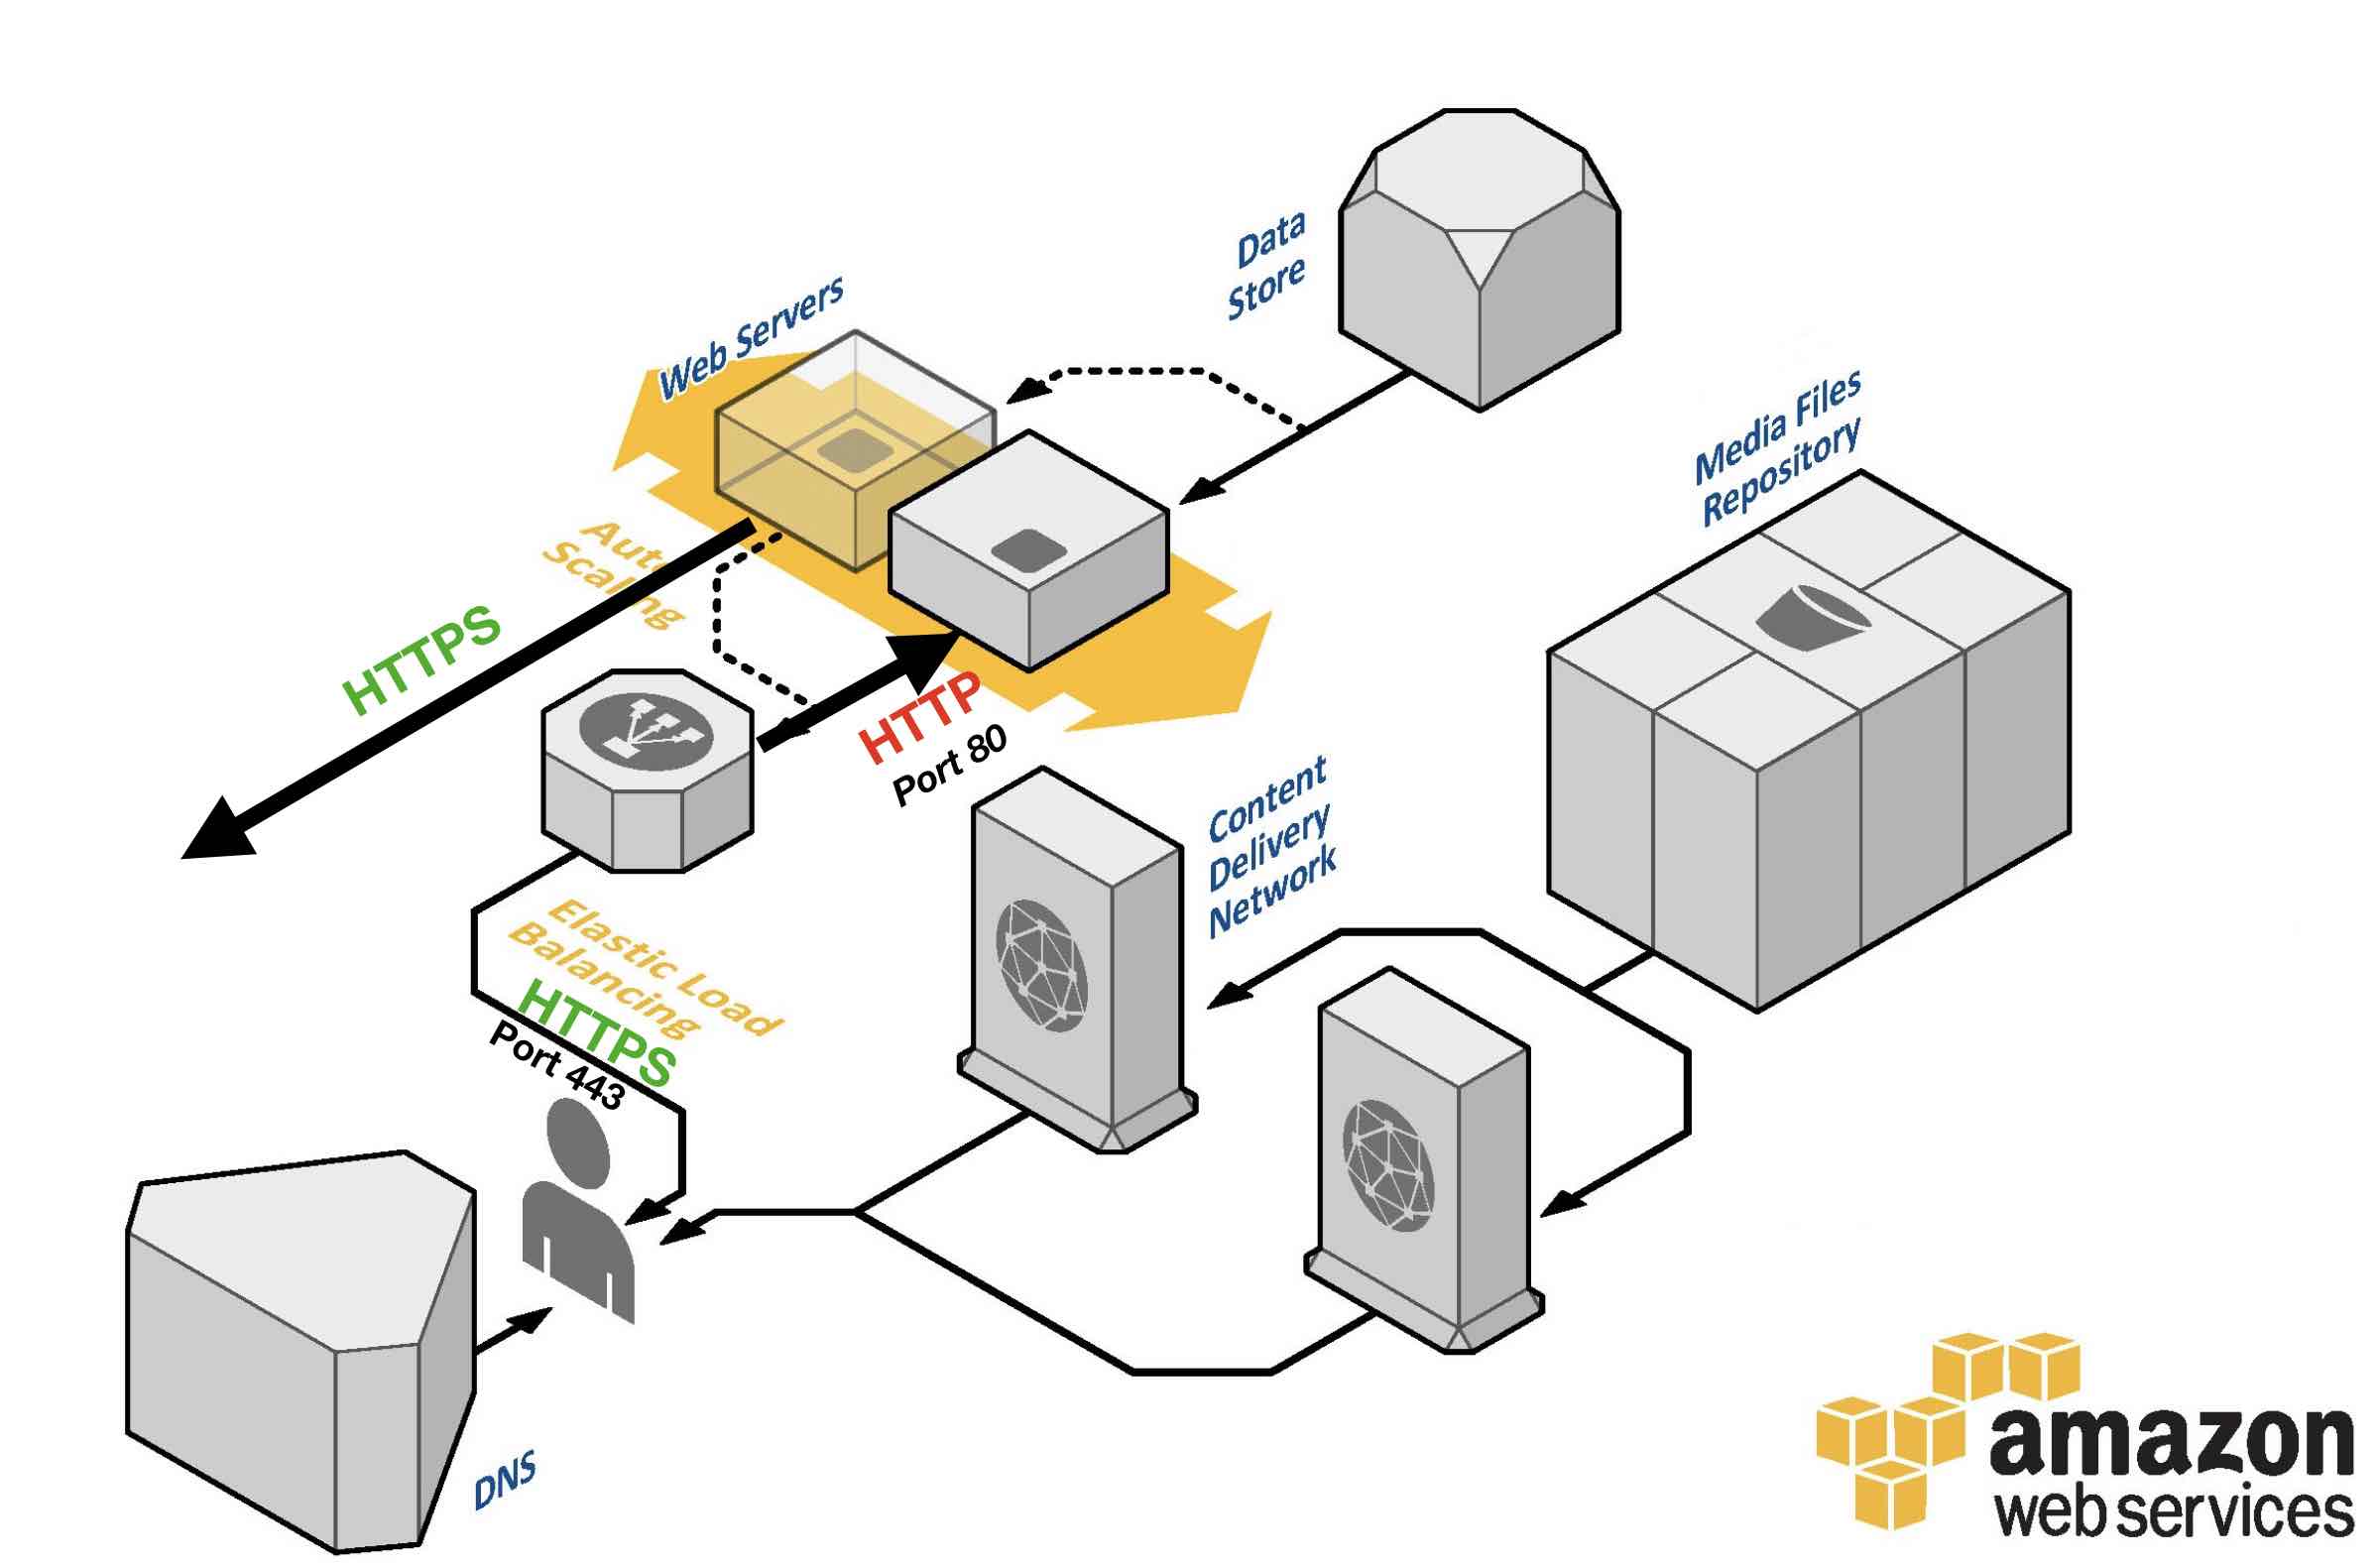
This is not only easier to manage but also provides better page hosting performance. The tricky part is configuring WordPress so that is doesn’t get confused or otherwise behave in a way that would undermine our aim of providing site visitors with a secure browsing experience.
Implementation
First, this article assumes that your WordPress environment is hosted on a single AWS EC2 instance, largely based on AWS’ Tutorial: Install a LAMP Web Server with the Amazon Linux AMI and Hosting a WordPress Blog with Amazon Linux.
1. Get an SSL certificate thru AWS Certificate Manager.
I highly recommend using AWS Certificate Manager to create your SSL certificate. This is an especially good choice if you’re new to SSL because the certificate application process is well-documented and intuitive. Take a look at my how-to article for requesting a SSL certificate from AWS.
2. Create an ELB
You’ll find the link to the Elastic Load Balancer console on the left sidebar of the EC2 console.
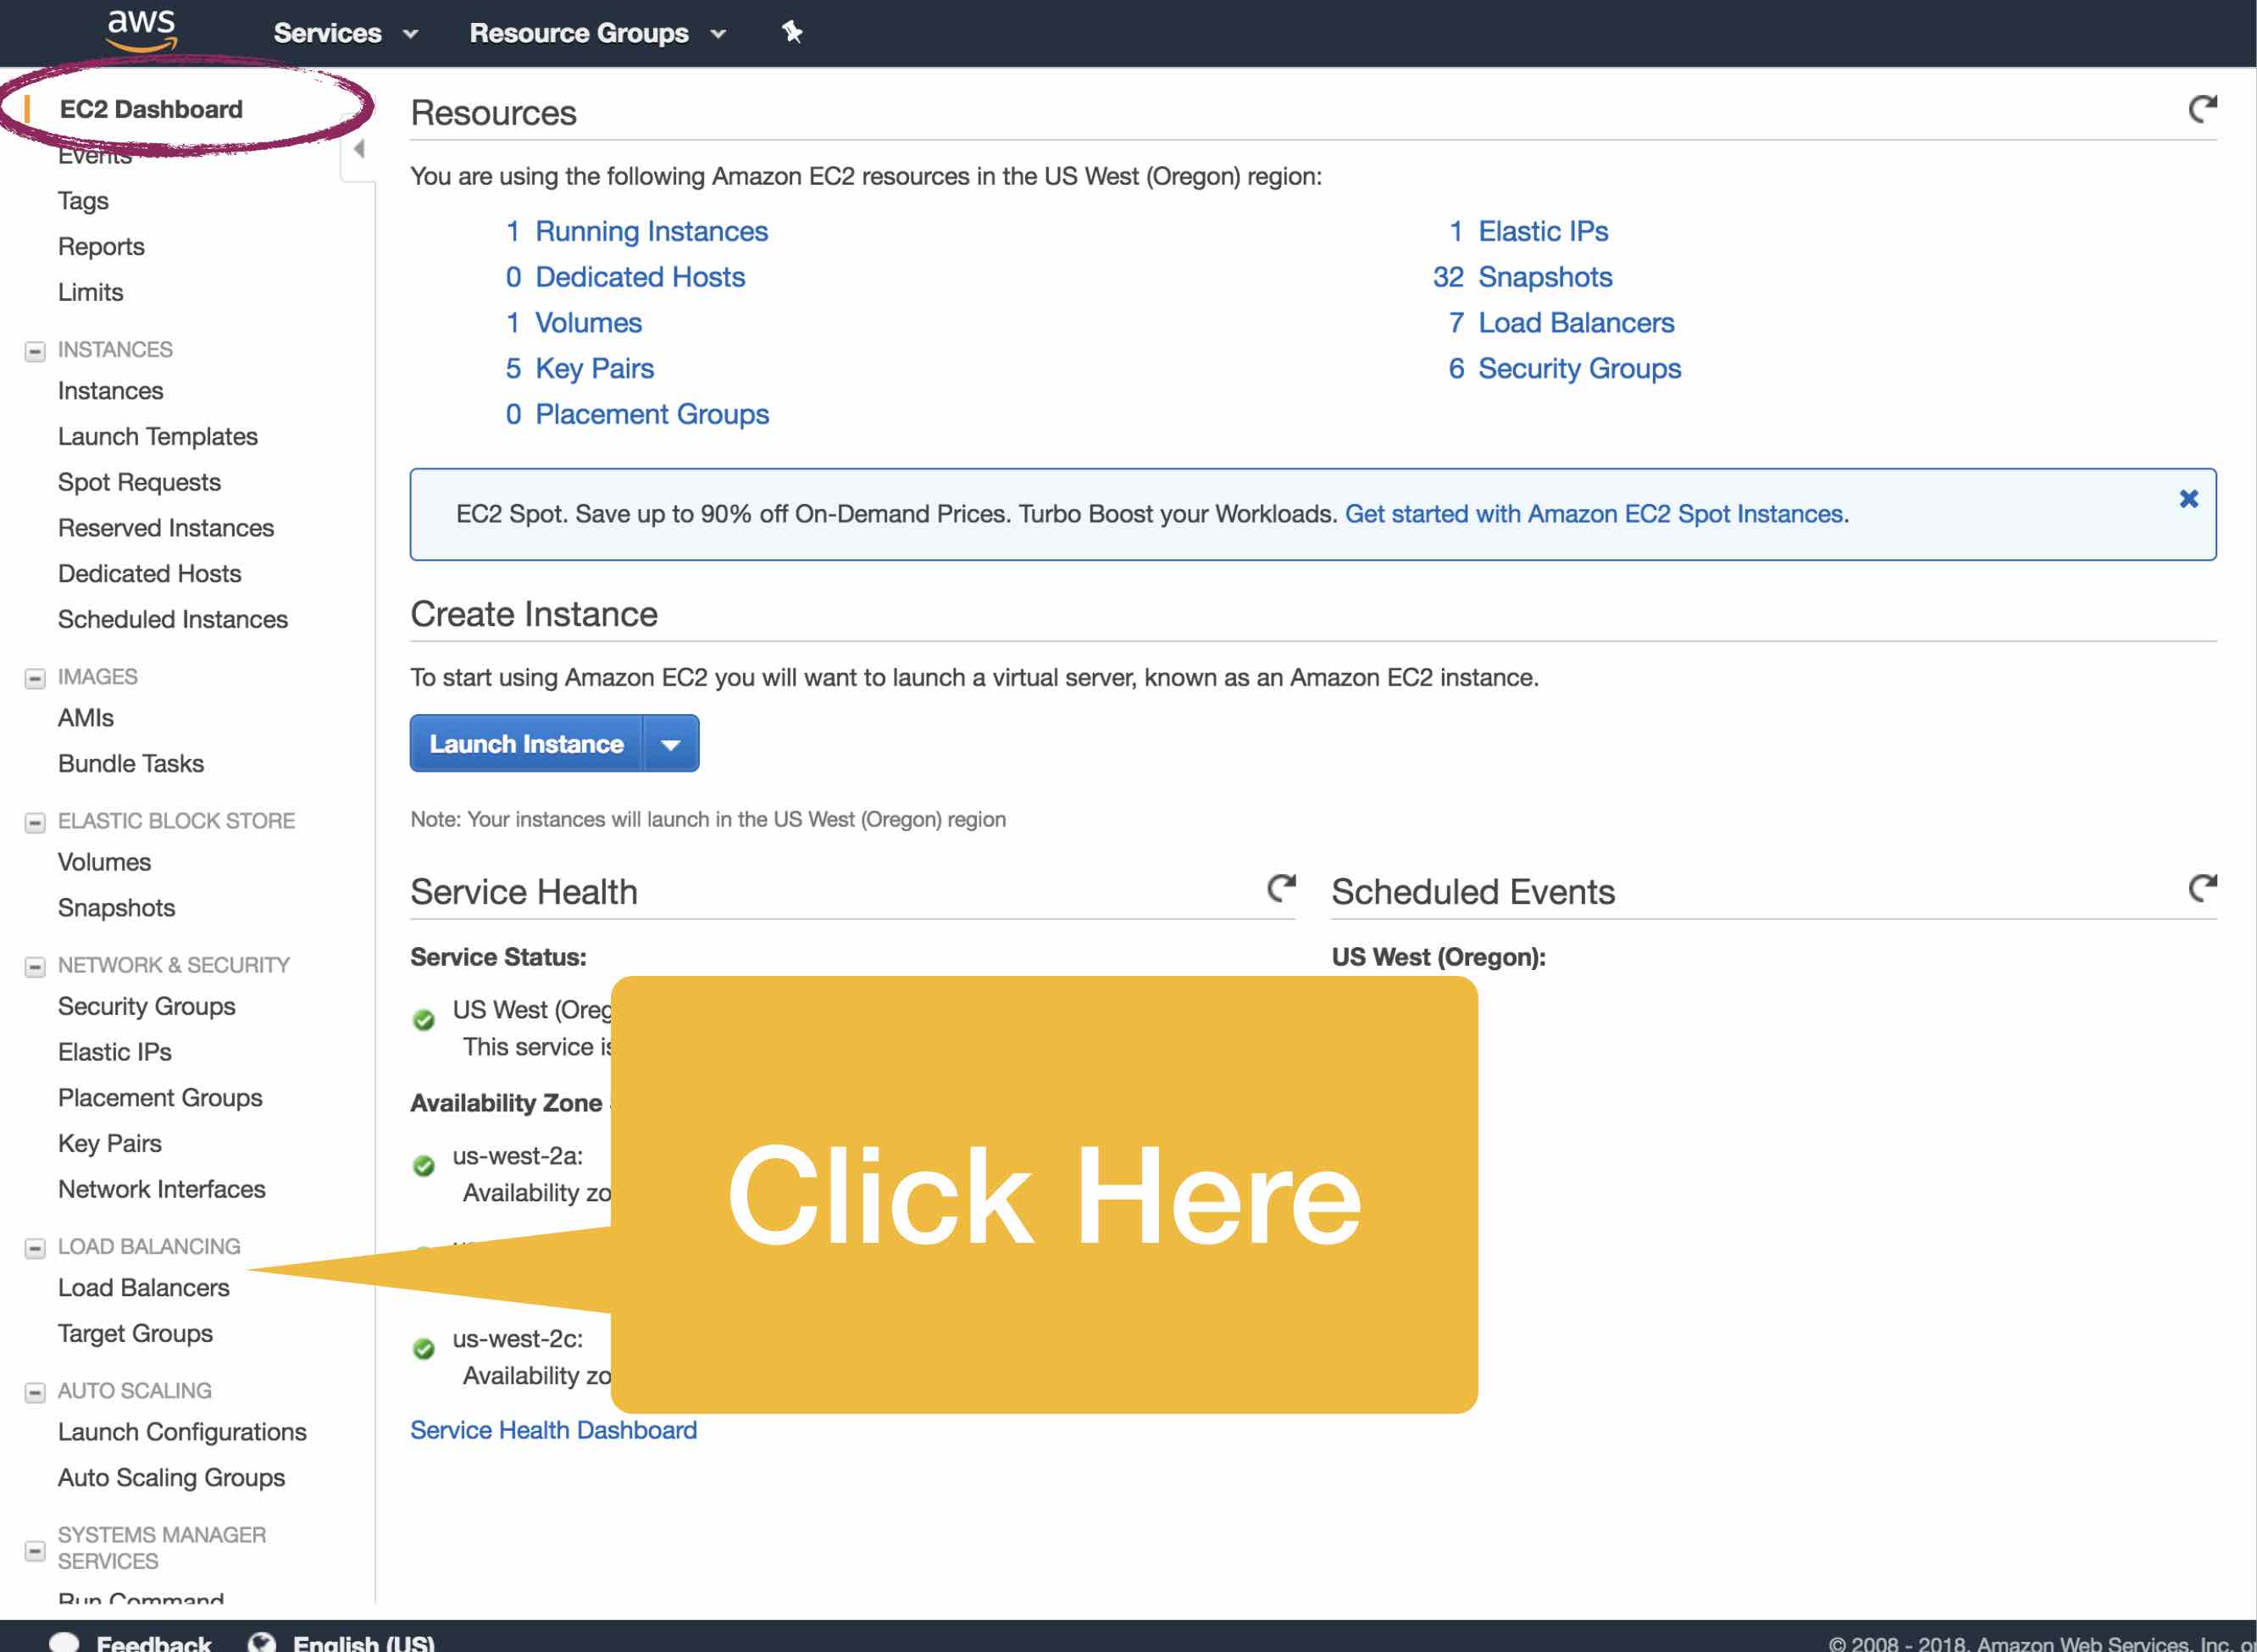
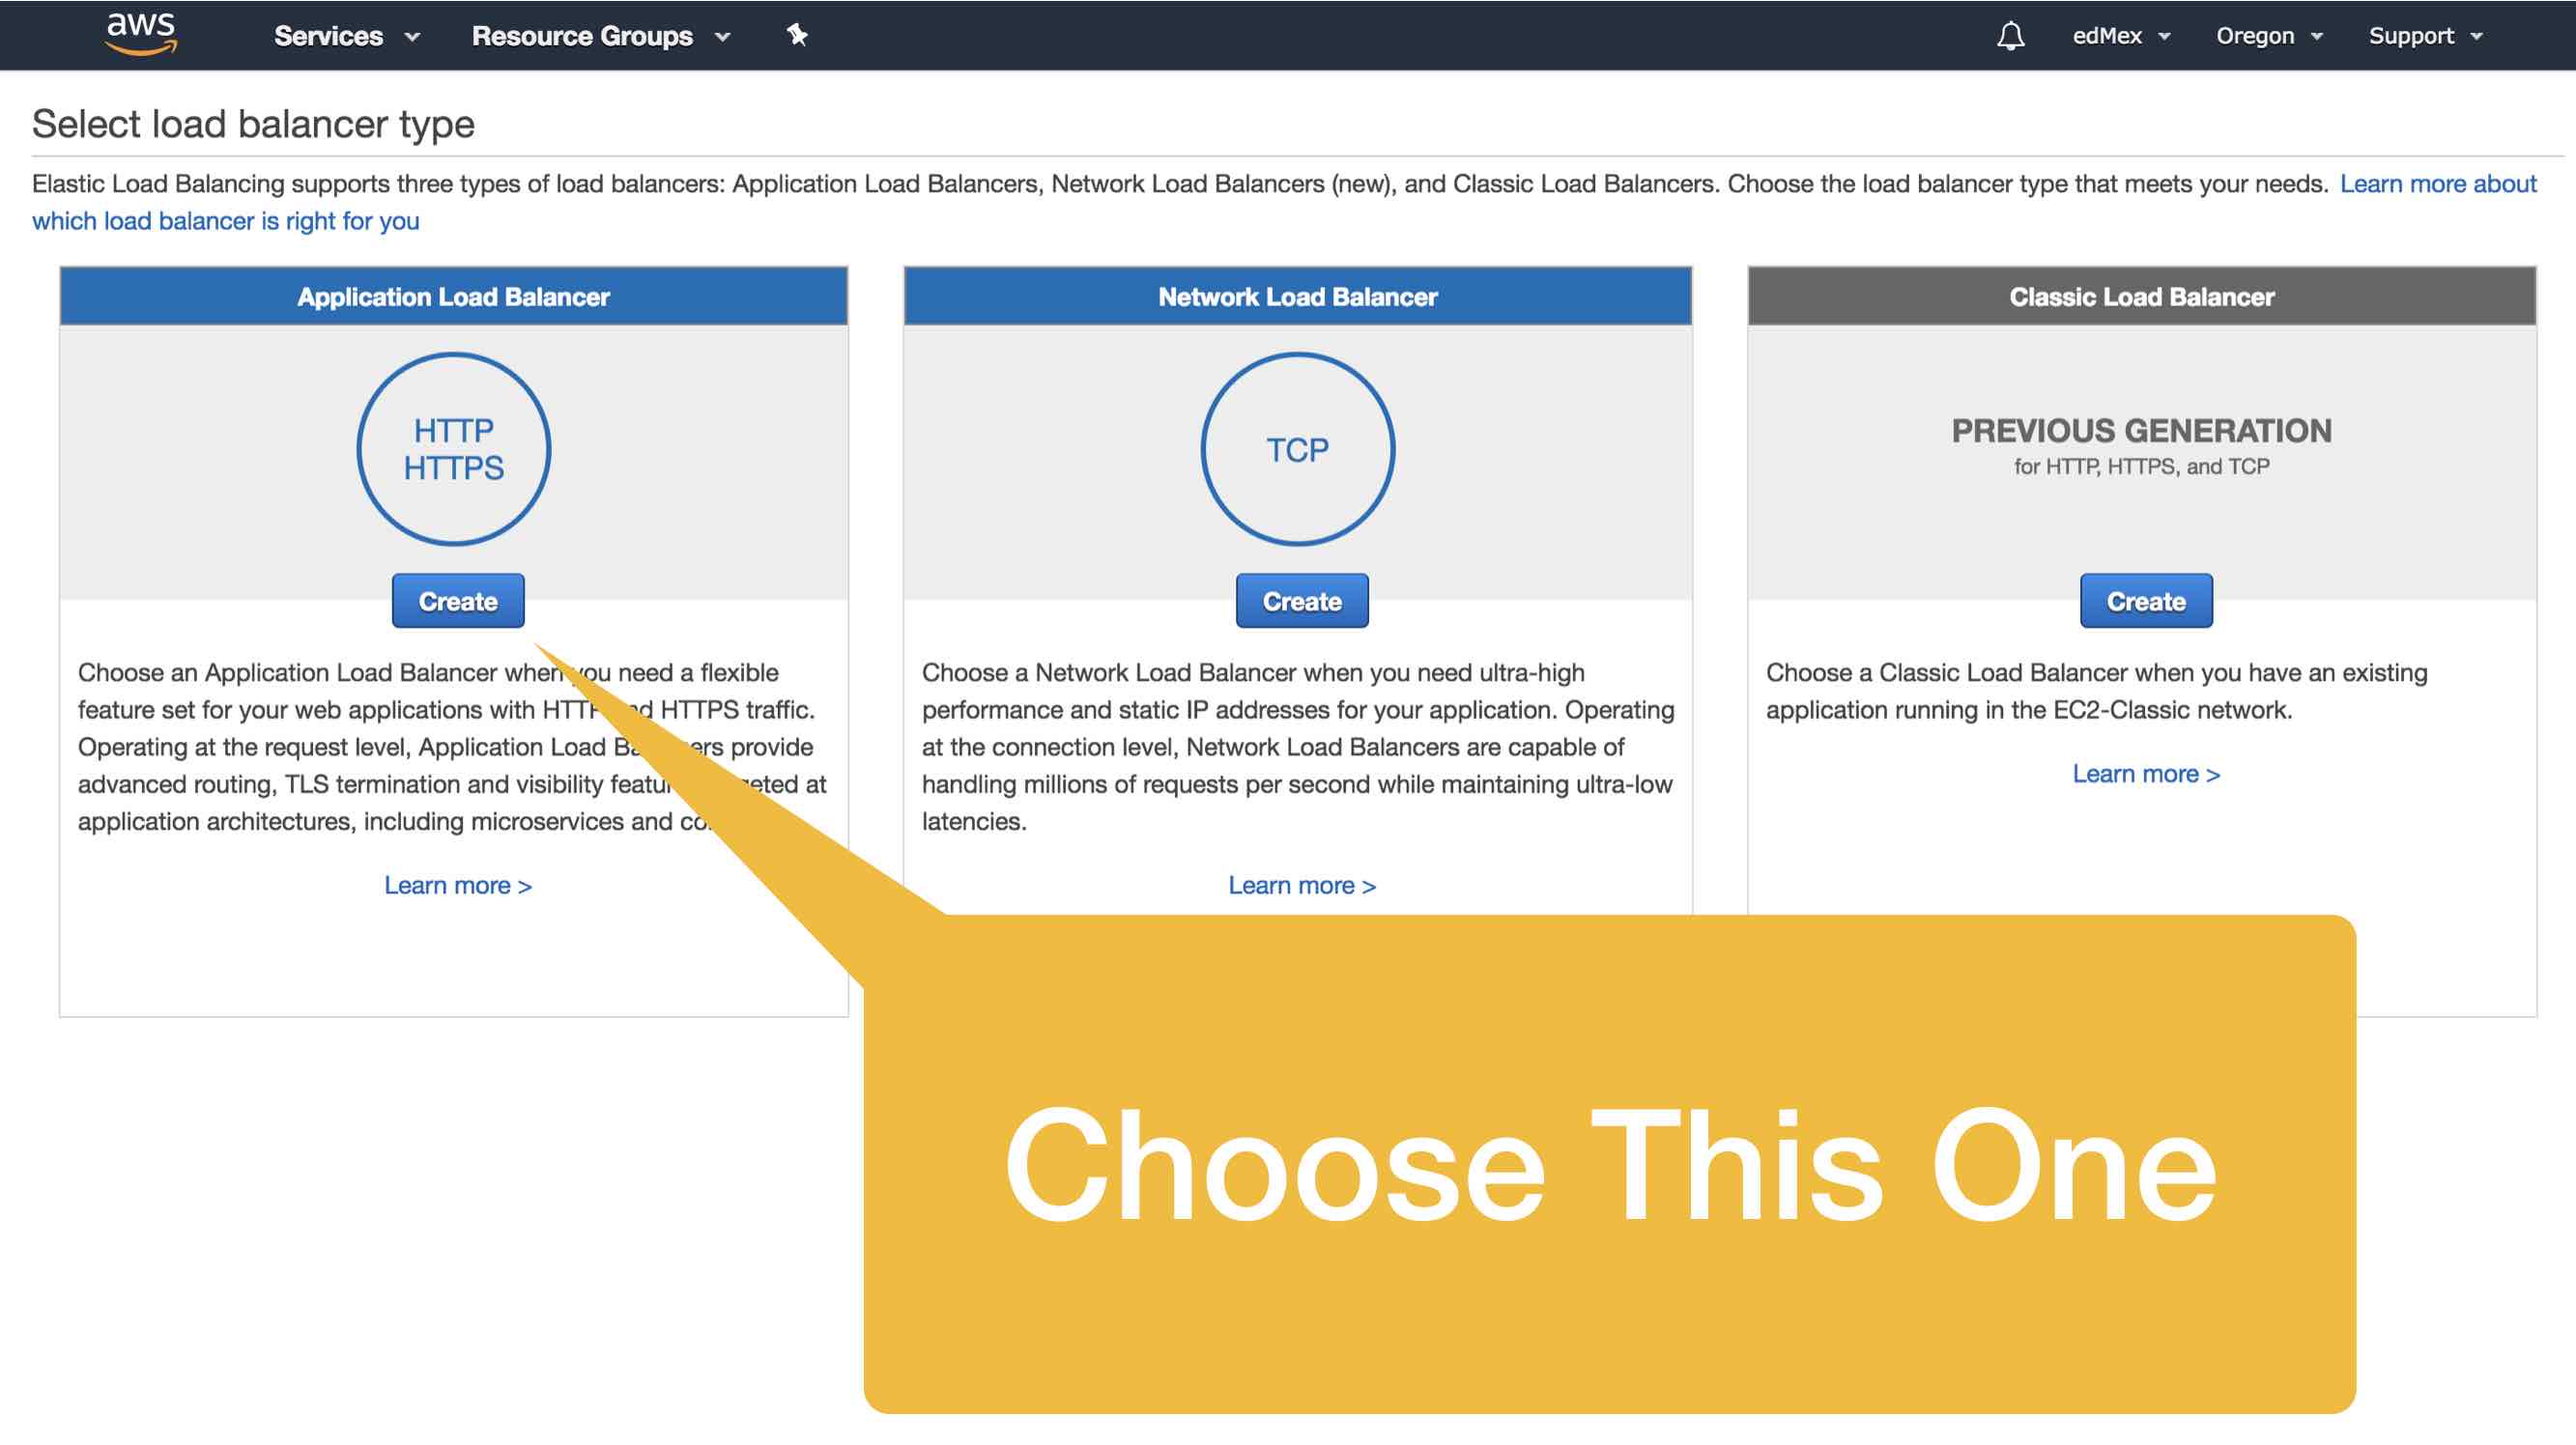
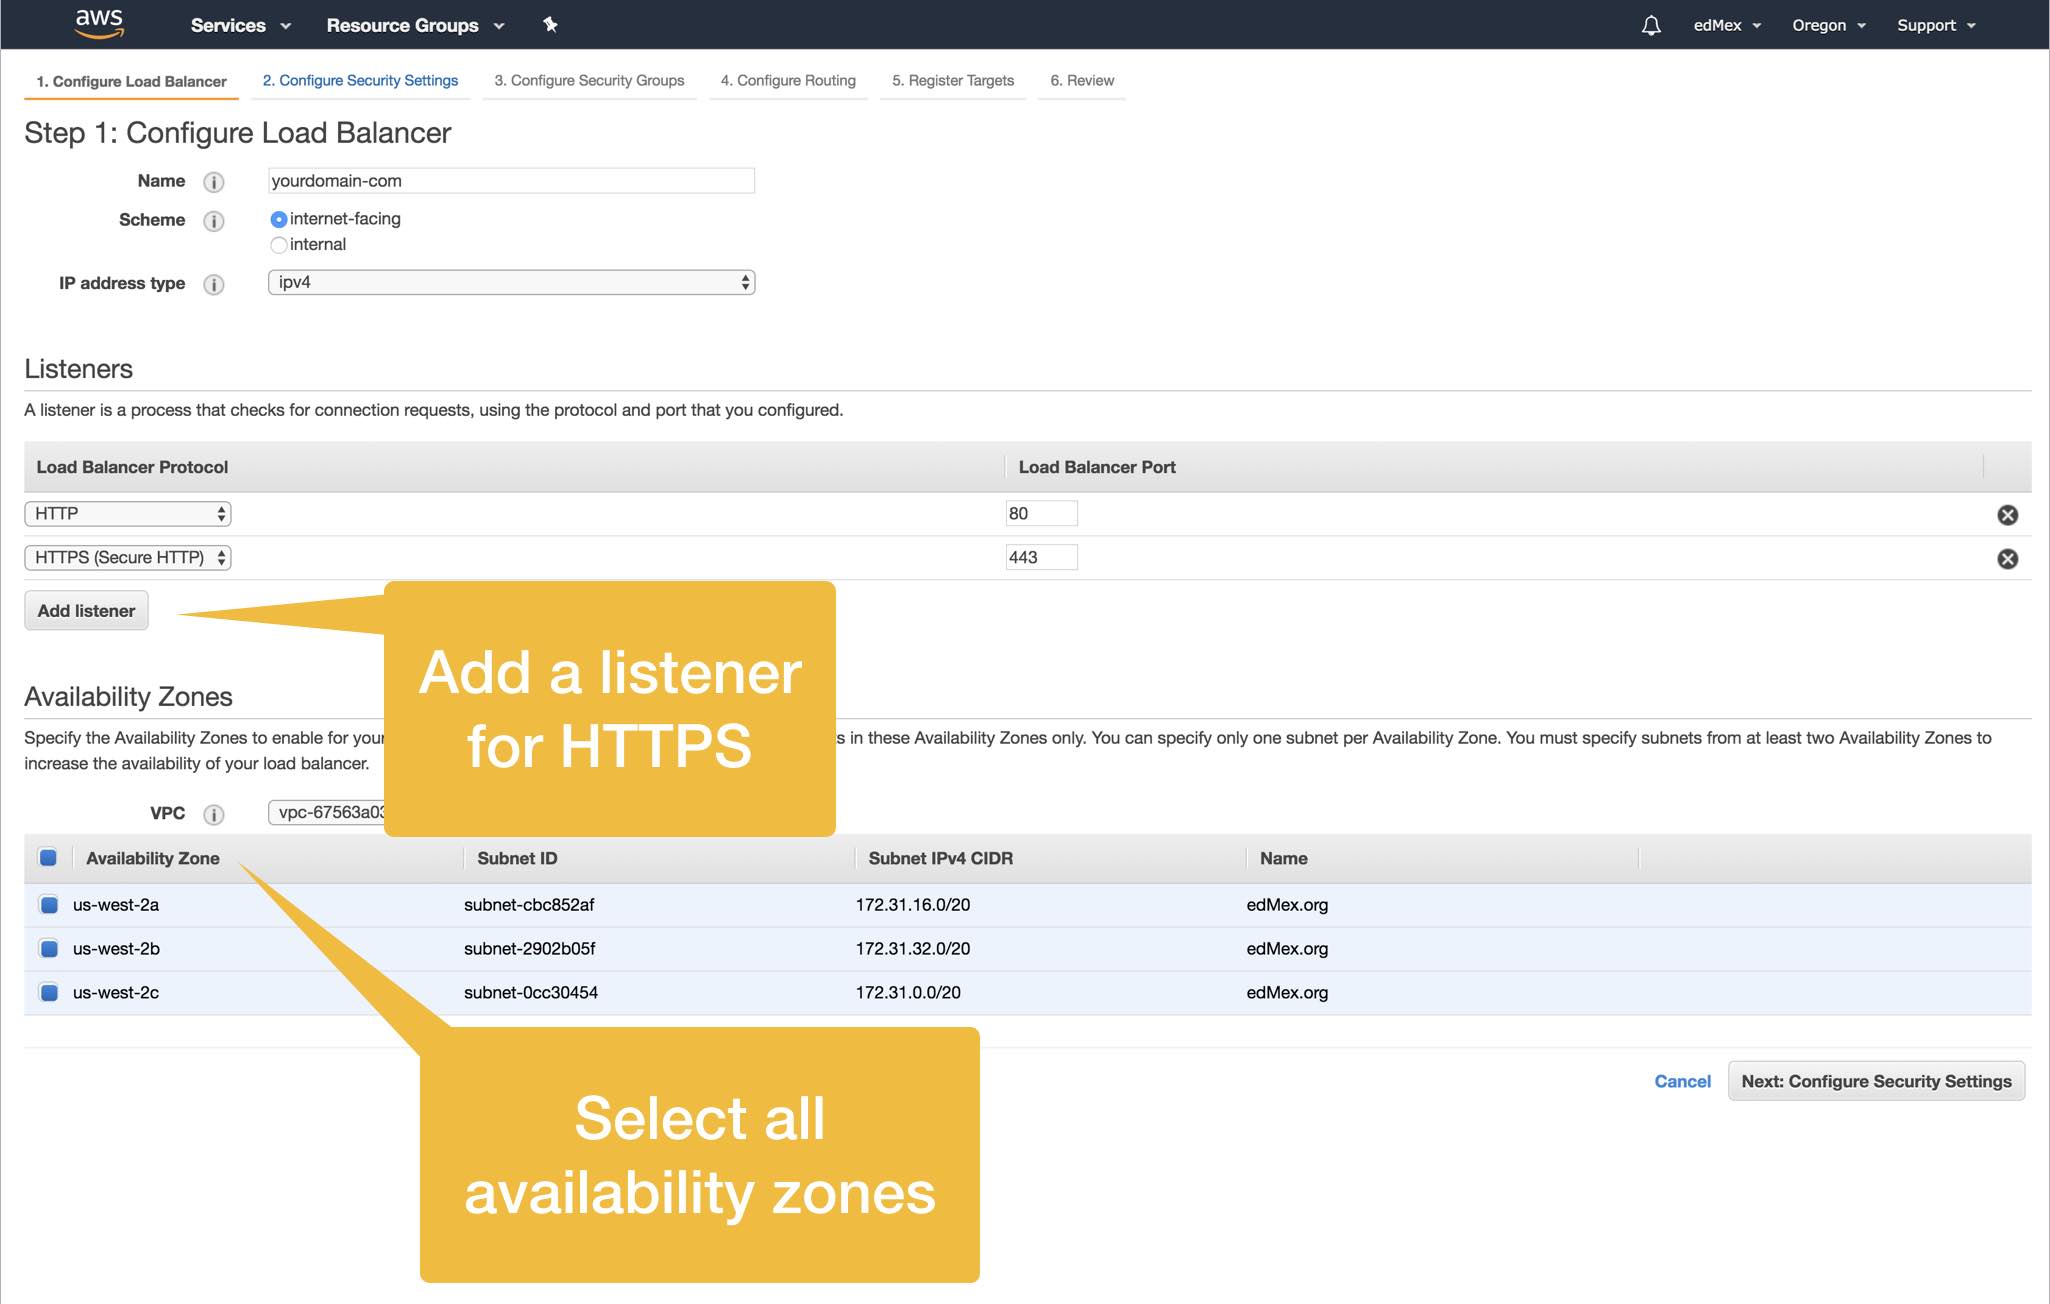
3. Add The Certificate To Our New ELB
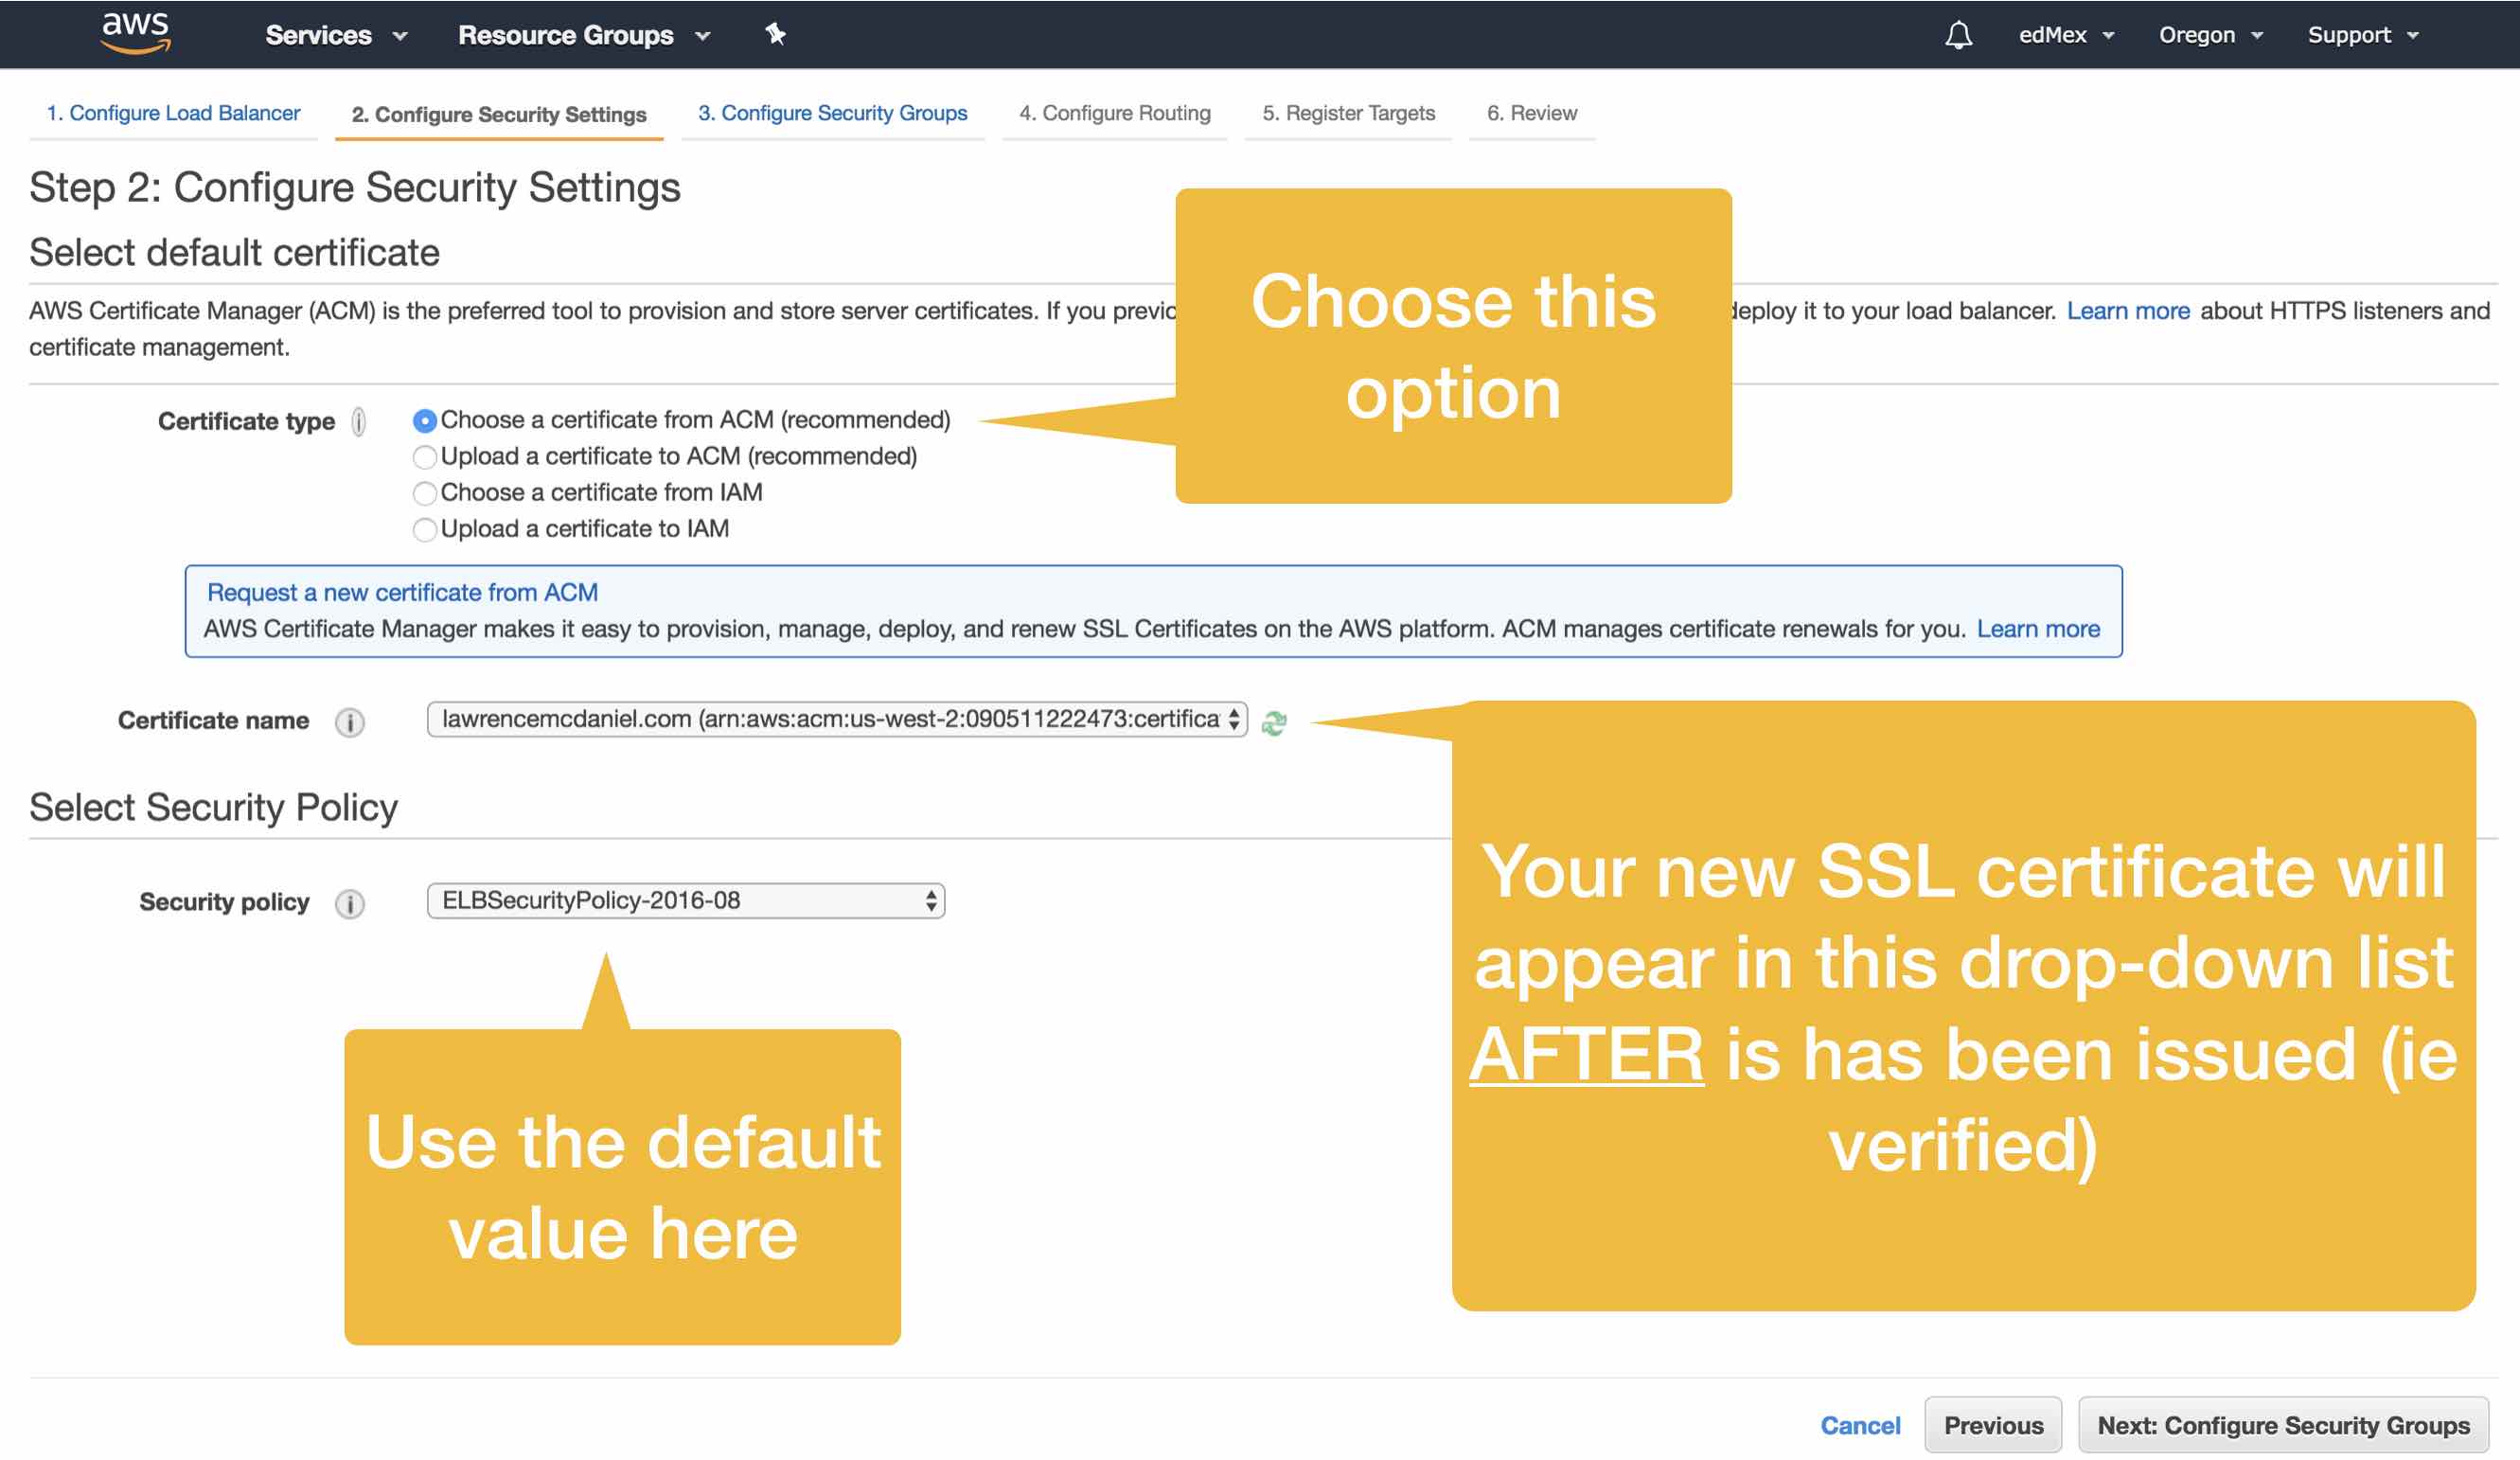
In Step 3 (Configure Security Groups) you should select the same security group that your EC2 instance currently uses. Note however, that your security group must include HTTPS (port 443) in its inbound rules.
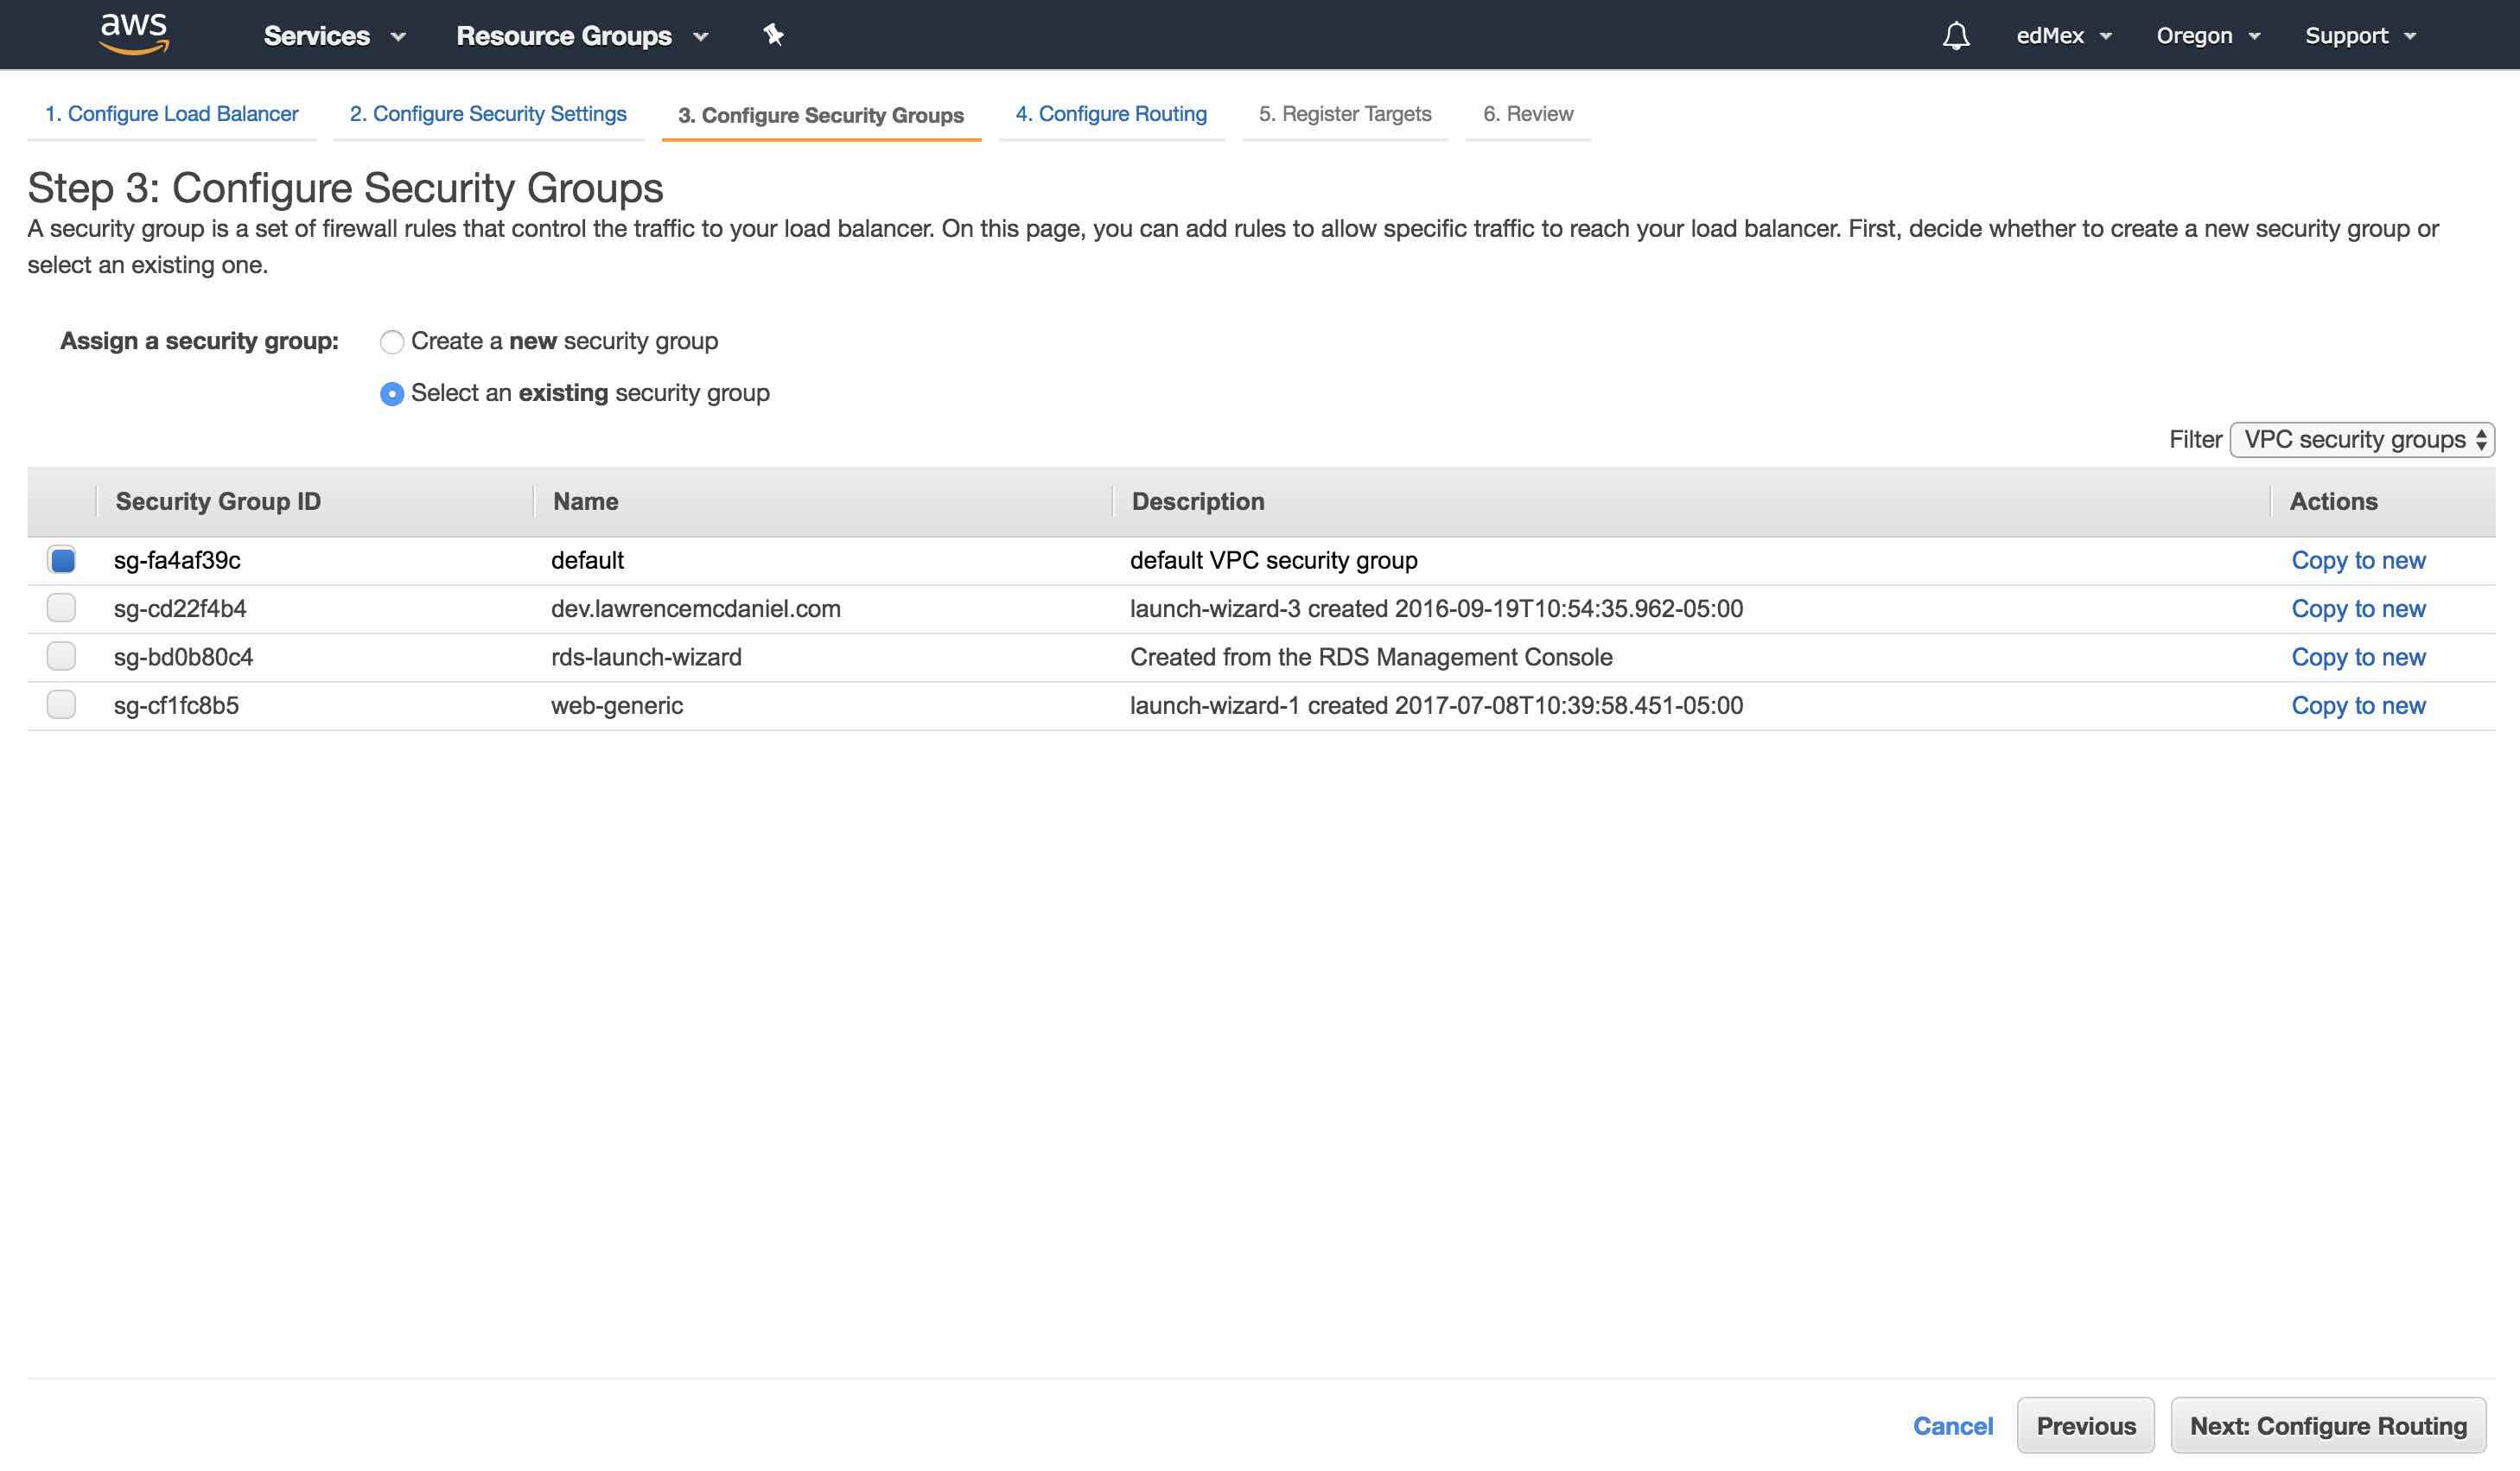
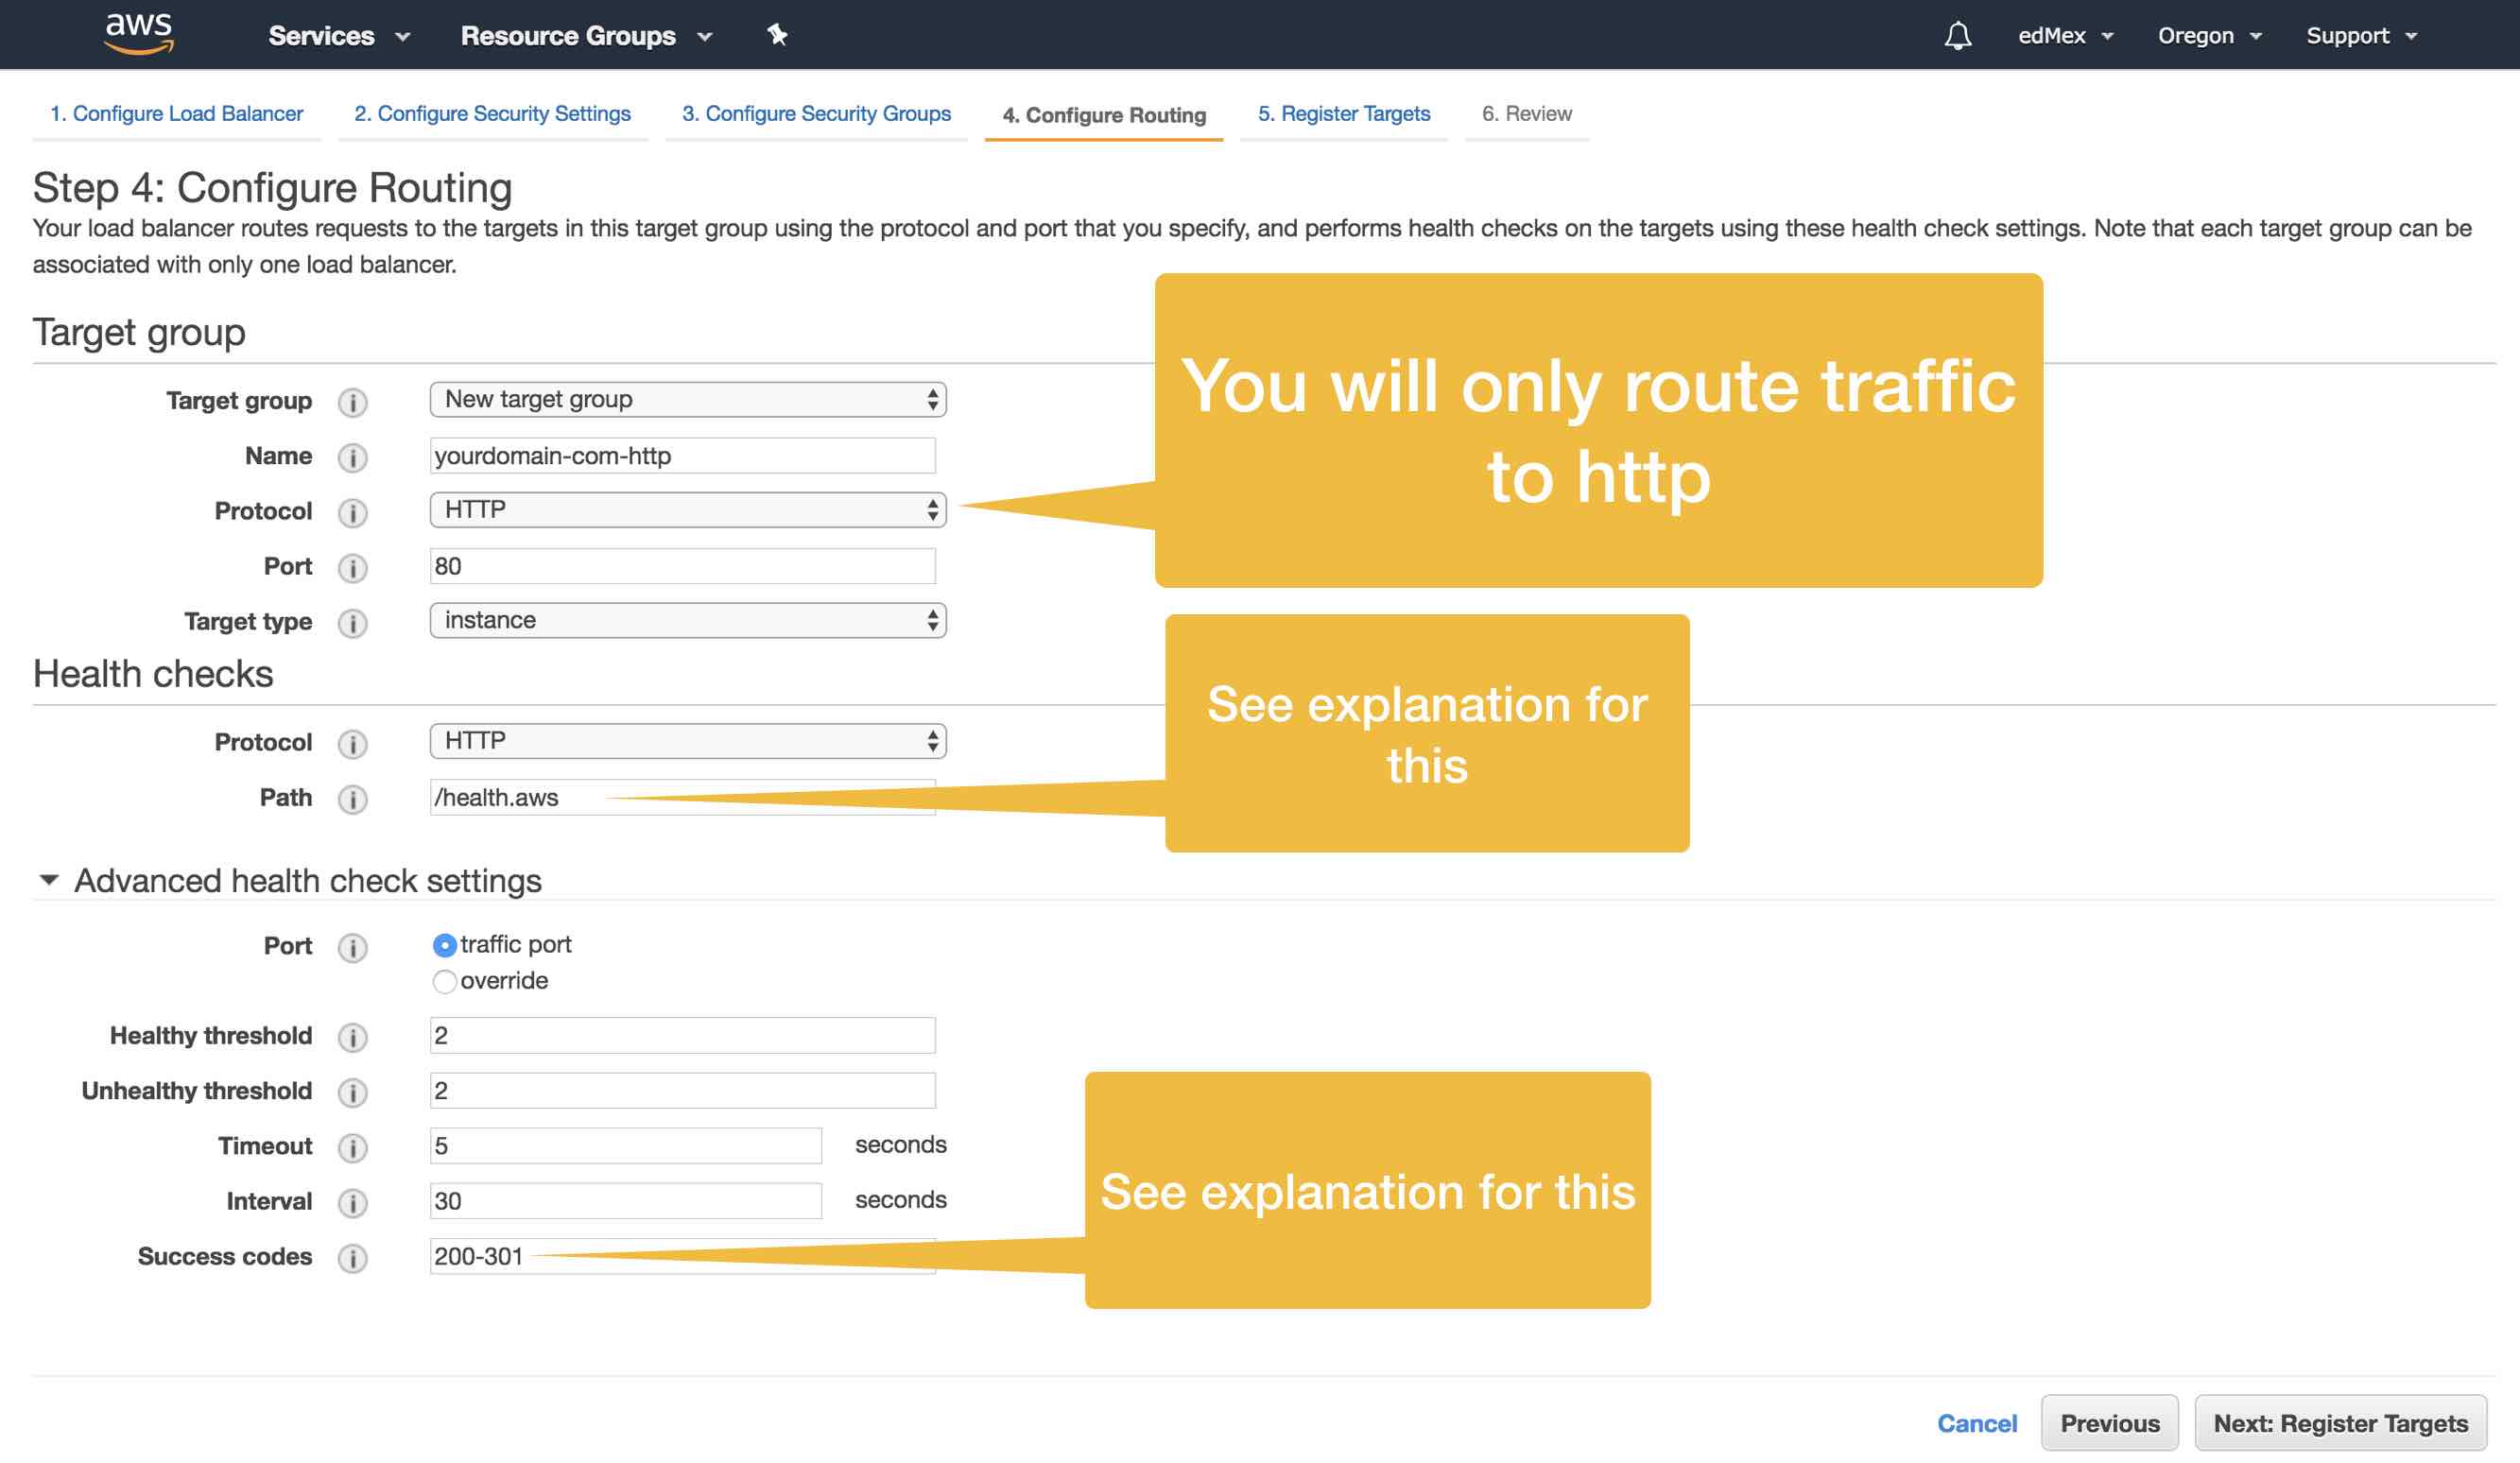
In Step 4 you will configure routing of your inbound web traffic. That is, as site traffic arrives to your application ELB, you need to provides instructions on where the ELB should send this traffic. You’ll be able to edit this information later, just fyi.
Now then, to get the ELB to work at all I had to get creative with a couple of things. One of my more vexing problems regarded Health Checks. The theory behind this is simple: AWS ELB’s will regularly try to ping a certain file. For any EC2 instance included in your Target Pool, if the success code returned matches up with the value in the routing configuration (the, “Success Code”) then the EC2 instance is considered healthy. Mind you, there are additional details which hopefully are self explanatory. Ok, so, in my case i host multiple virtual servers from the same Apache server, and this, along with the fact that all web sites are WordPress sites, caused problems with the default health check, which is to ping index.php. To workaround these problem I created an empty file in the root of each of my WordPress sites named health.aws. Additionally, Apache didn’t necessarily return a 200 status code; even if the file could be pinged. After some investigating I learned that — sometimes, depending on particulars of your server state — Apache might send a redirection code like say, 301, instead of a success code like 200. To work around this I added 301 as a possible valid response code, and voilá, the ELB can correctly determine the health (or lack thereof) of my EC2 instances.
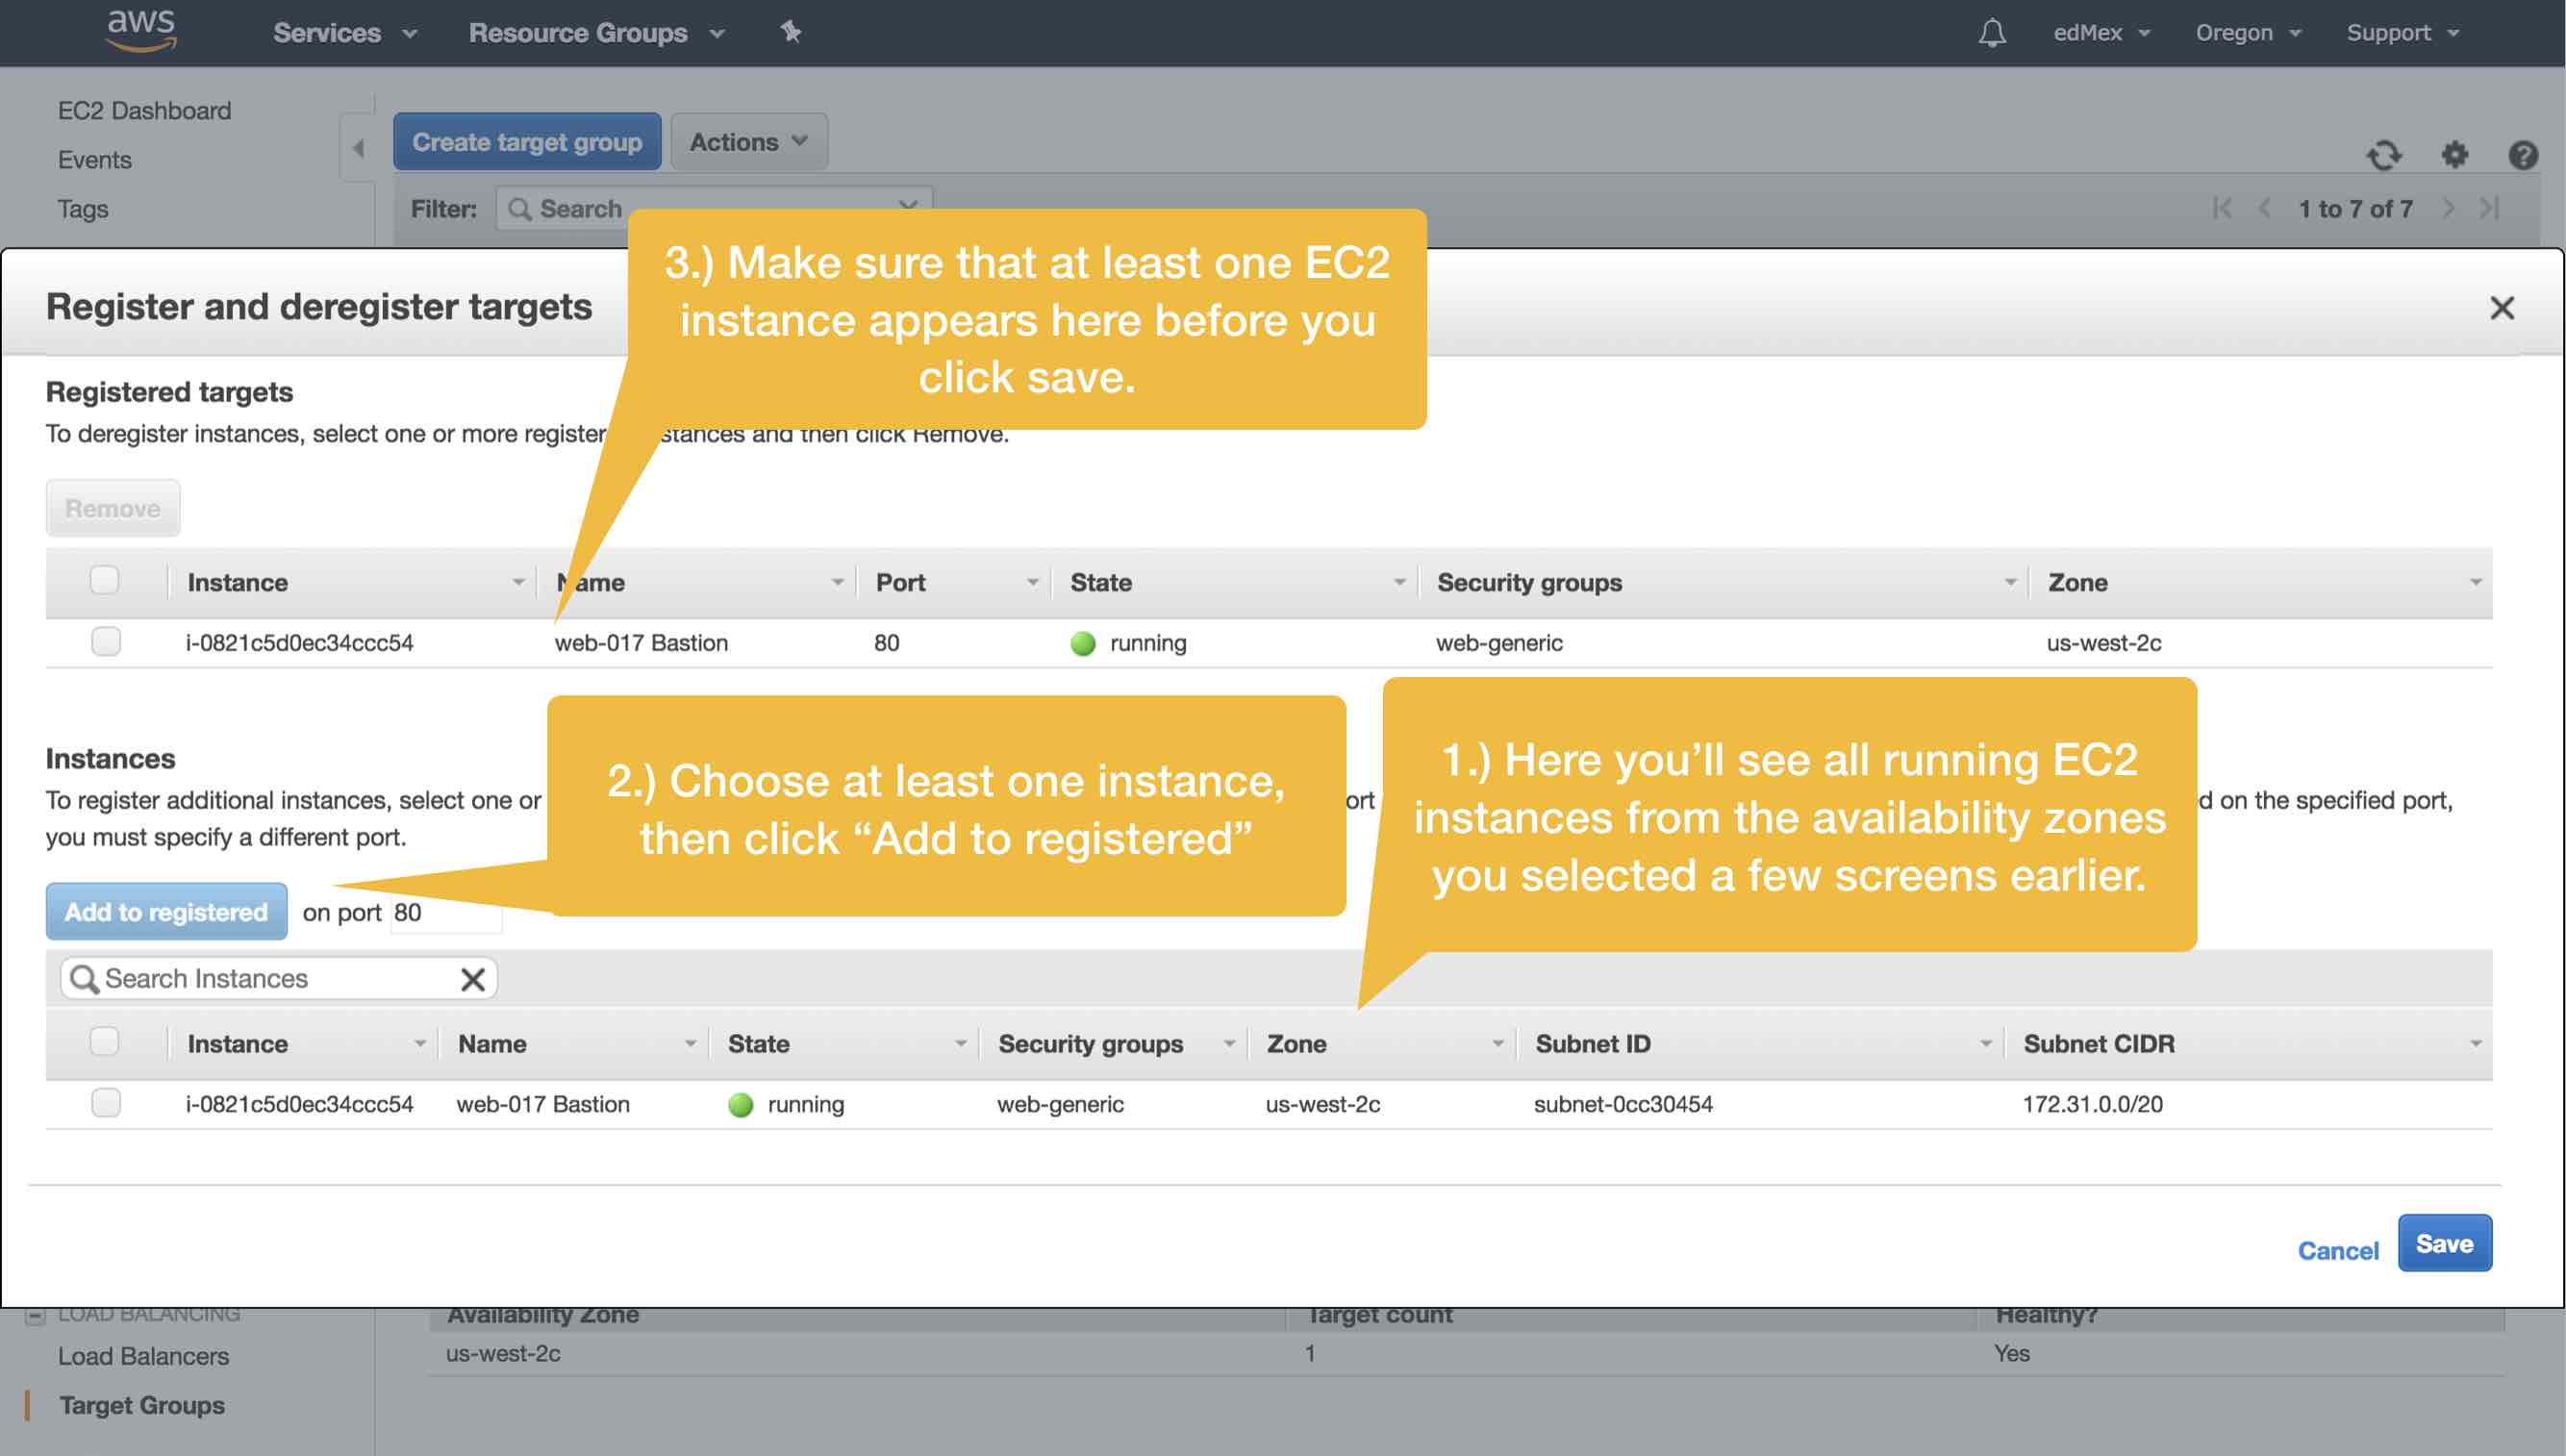
In the screen that follows you’ll add one (or more) EC2 server instance(s) to your Target Group. Keep in mind that with AWS ELB it’s possible for you to horizontally scale your WordPress platform. But, also keep in mind that, on the basis of this article alone, you are definitely not ready to manage an ELB with multiple EC2 targets. Thus, the prudent thing for you to do at this point is to add your sole EC2 instance to the list of registered targets, and to leave horizontal scaling experiments for another day.
And, that’s a wrap. You’ve configured your first AWS Application ELB! Now that the heavy lifting is behind us we can shift our attention to re-configuring Apache and WordPress on our EC2 instance.
4. Modify Apache Configuration To Redirect HTTP to HTTPS
You will not make any changes to your Apache configuration. If that seems counterintuitive then let me explain why. In AWS’ own support documentation they recommend that you add “X-Forwarded-Proto” headers to redirect your HTTP traffic to HTTPS, and while this is in fact the correct methodology, we cannot do this YET because if we did it would cause an infinite loop. Instead, we’re going to add these headers from within our wp-config.php file in the next section.
A little more explanation: by default Apache is installed to use HTTP (port 80), therefore all configuration for this protocol was taken care of for you when your originally setup your server. Importantly, inbound traffic originating from the ELB also is traveling over HTTP as per the diagram above and thus we a) should continue to listen on port 80, and b) we should continue to use HTTP all the way to our WordPress server. Now then, to provide an end-to-end HTTPS connection for our users we’ll need our WordPress server to return all web pages over HTTPS rather than over HTTP. We do that below. Meanwhile, following is a sample Apache virtual server configuration which contains a snippet of the code that AWS actually recommends. You can uncomment the snippet and add to your own config in order to test/verify my claim:
  ServerName blog.lawrencemcdaniel.com
  ServerAlias blog.lawrencemcdaniel.com

  DocumentRoot /var/www/html/blog.lawrencemcdaniel.com
  ServerAdmin lpm0073@gmail.com
  ErrorLog /var/www/logs/error_log_blog.lawrencemcdaniel

  #I'm leaving you with a copy of the snippet referenced above in case you want to experiment.
  #RewriteEngine On
  #RewriteCond %{HTTP:X-Forwarded-Proto} =http
  #RewriteRule .* https://%{HTTP:Host}%{REQUEST_URI} [L,R=permanent]
Restart Apache
sudo service httpd restart
Here is some additional reading on how and why this configuration works:
5. Update WordPress Configuration
We need to update the WordPress Address URL and the Site Address URL; both of which are visible within the Settings -> General console window. However, you’ll need to update these values using your wp-config.php file located in the root directory of your site.
define('WP_HOME','https://blog.lawrencemcdaniel.com');
define('WP_SITEURL','https://blog.lawrencemcdaniel.com');

// Update 8-April-2018: I moved https redirection from the Apache virtual server config to wp-config.php using this snippet.
if (strpos($_SERVER['HTTP_X_FORWARDED_PROTO'], 'https') !== false)
       $_SERVER['HTTPS']='on';
Cached files and cookies in your browser will affect your browser behavior while you’re implementing and testing these changes. Make sure you regularly clear these two elements of your browser cache to avoid confusing and misleading results.
6. Update Webmaster tools
It’s really important to be aware that Google distinguishes between HTTP and HTTPS in terms of recognizing and indexing your site. Make sure that you add your “new” HTTPS site as a new Web Property in Webmaster Tools.





Hi Lawrence,
Thank a lot for this blog.
But, I’d like to say an adjust I had to do referring to the position of the code snippet you’d mentioned on wp-config.php file. It worked for me just when I put it in this position:
if ( ! defined( ‘ABSPATH’ ) ) {
define( ‘ABSPATH’, __DIR__ . ‘/’ );
}
// Update 8-April-2018: I moved https redirection from the Apache virtual server config to wp-config.php using this snippet.
if (strpos($_SERVER[‘HTTP_X_FORWARDED_PROTO’], ‘https’) !== false)
$_SERVER[‘HTTPS’]=’on’;
require_once ABSPATH . ‘wp-settings.php’;
If I put the code after the line “require_once ABSPATH . ‘wp-settings.php’;” my page has broken. Sorry, I don’t know if this line has only on my environment.
Best Regards.
junio 2024, esta solución está funcionando perfectamente, muchas gracias.
This was so helpful, thank you!
Thanks Lawrence. This is exactly what I was looking for. The SSL Redirect fix plugins did not work. I need the code lines to check the X-FORWARDED-PROTO.
Thank you so much!
Worked great – thank you very much!!
Me and my teammate – HieuTK was almost desperate to find information that could handle the “ERR_TOO_MANY_REDIRECTS” error during wordpress installation!
Hi Lawrence,
This is a great post! I was up all night trying to debug my wordpress blog for the “ERR_TOO_MANY_REDIRECTS” error. Thanks for linking the resources, they are a great explainer.
Thanks,
David
Hi Lawrence,
Thanks for putting this together so nicely. I have WordPress set up with an ALB on AWS. Out of all the “solutions” to this issue that I have found online, yours is the only one that worked ‘once’. Then it stopped working. Not sure why.
Here’s my setup in AWS:
— 1 VPC
— 2 Subnets (EC2 and RDS)
— 1 IGW
— 1 Internet Facing ELB
— 1 Target Group (TG)
— Health Checks range: 200-301
— Health Checks on port 80
— 2 Listeners in ALB: HTTP 80 forwarding to the TG and HTTPS 443 forwarding to the TG
I updated the wp-config file to include the code below. It only worked once. Then it stopped. I have no idea why. It is still redirecting me back to the login page.
if (strpos($_SERVER[‘HTTP_X_FORWARDED_PROTO’], ‘https’) !== false)
$_SERVER[‘HTTPS’]=’on’;
Cache and cookies are cleared after any changes. I’ve been pulling my hair out these past few days while trying to resolve this redirect nagging issue. I searched Google and read other “solutions” but none have worked.
Is there anything I missed??
I found the solution to this on the new elastic load balancer is to set up the redirect on the port 80 of the load balancer and ignore anything with wordpress / apache.
Thanks for the very detailed tutorial.
I have hosted my wordpress website on AWS EC2 t2 micro instance. I configured a Load balancer recently.
Now my website is not loading and getting the error: TOO MANY REDIRECTS
I followed bitnami documentation to make the changes.
I did setup the load balancer successfully and modified the Server configuration as advised. (Followed all steps in the documentation)
I found the same issue mentioned in forums several times. The solution they had given was, including this code on wp-config.php file:
if (strpos($SERVER[‘HTTPX_FORWARDED_PROTO’], ‘https’) !== false)
$_SERVER[‘HTTPS’]=’on’;
But I have already added this code and rechecked it several times.
Checked for the system status as well and all services are up and running.
Rebooted the server 2 times
Hope you could support me and provide a solution.
you’re on the right track. you definitely have to read and forward the basic http header settings from your proxy host, HTTPX_FORWARDED_PROTO being at least one of these. the reason that you’re getting the “too many redirects” error is because your web server redirecting http to https and then back to http. it’ll do this a few time and then error out. you might also need to set the HOST header field as well.
Hi Lawrence,
Thanks for your article.
I have one doubt. Once ELB is implemented for your blog, how do you manage the update of your site? Like if I install a new plugin, it will be only available on one server, not the other. How do you make sure that all files on one server is synced to another one?
This also applies to uploaded images, but I have workarounded the issue by migrating all my images to S3 and serve them through CDN. But I do not think plugins/themes will work that way.
Thanks a lot!
Eric Lin
Hi Lawrence,
Thank you very much for posting this blog. It’s amazing, and very informational. Very few posts are like this out there
I have a doubt about my HTTPS connection to the WordPress instance using a Load Balancer.
Currently I have the following infrastructure set up:
– Application Load Balancer
== 1 HTTP listener on port 80 that would Redirect to 443, with status code 301
== 1 HTTPS listener on port 443 that would just forward traffic to the WordPress instance
– Target Groups set to HTTP: 80
=== Health Checks with from 200 to 301 status code
– EC2 WordPress instance
== Listening on 80
I tried modifying the .wp-config file, but not sure whether this URLs should be set to http or https. This is something I might be interested to know
Even after doing all of this, my website still goes to HTTP instead of HTTPS.
Sorry for disturbing, I would really appreciate any sort of help right now.
Have a great rest of your day
Thanks
Ed
Hi Lawrence,
First of all, thank you very much for putting this post together. All the information here is very useful and helpful.
I have some questions I was hoping you could clarify for me. I followed the steps pretty much to its precision, however, when I’m trying to access the server from the ALB domain, I get an error saying that my site cannot be reached at the moment. When I try using the server public DNS or the public IP, I get a response but with HTTP.
I have the following set up (pretty much the same as you have described above):
– ELB
— 2 Listeners, 1- HTTP 80 as forward to the target group, 2- HTTPS 443 as forward to the target group
— 1 Target Group
— Health checks range: 200-301
— Port 80 for the Health Checks
I have a question regarding your script, when you have the following lines in the wp-config.php:
define(‘WP_HOME’,’https://blog.lawrencemcdaniel.com’);
define(‘WP_SITEURL’,’https://blog.lawrencemcdaniel.com’);
Are they supposed to be https or http?
Thanks,
Looking forward to hearing back
Ed
Will this work for a wordpress multisite?
yes, it will.
You are awesome!
The steps can’t be more clearer. I had missed editing the wp-config.php part and finally, the Load Balancing setup started working as it should!
Thanks a ton!
Thanks for the wonderful article!
can you please tell this applies for Ubuntu 18.04 too?
yes, the same instructions work if you’re on any version of Ubuntu.
Thanks a lot! This works for getting the site running. However, my wp-login.php page still loads CSS via http.
And after logging in, I get message “Sorry, you are not allowed to access this page.”
Can you help me figure out what the issue is?
I had the same issue but found the solution at:
https://wordpress.stackexchange.com/questions/250240/setting-serverhttps-on-prevents-access-to-wp-admin
Hey man,
you are awesome, this post can not be better.
I owe you hours of troubleshooting and searching this problem.
Tons of thanks.
Thank you!!!! 🙂
Hi Lawrence,
Firstly, thanks for an awesome post. I have no idea how I would be able to do this without this!
I’ve followed everything and it seems to have gone smoothly, however I’m getting a “self signed certificate” warning on my browsers now. I’m presuming it’s somehow not seeing the AWS certificate?
Do you know how I can check this, or if I’ve gone wrong somewhere?
Thanks in advance,
Heinz
Hi Lawrence,
Thank you for your post.
I didn’t get the health.aws part very well.
Is this a folder /var/www/html/health.aws and index.htm inside the folder? What exactly should writing in this index.html? 301
the file health.aws exists simply to provide a known path to the AWS ELB for purposes of checking whether or not the server is healthy. AWS ELB periodically issues http requests to this path and file name. if it receives a 200 or 300 response then it assumes that the server is healthy. otherwise it assumes that the server is not healthy.
Hi Lawrence,
Great tutorial! Thanks for posting.Quick question below.
I am able to reach my site only through https://www.mysite.com and https://mysite.com.
http://www.mysite.com and http://www.mysite.com is not working in my case.
Any advise would be greatly appreciated. Thanks again for all your help!
Best,
Varun
in your AWS ELB you need to create a listener for port 80 that redirects to port 443.
Hi Lawrence, thanks for the article.
I tried the same way , modified wp-config.php. But when i’m loading the website , lock symbol is appearing on the left side of url for few milliseconds and disappearing. Cannot able to get https://example.com for my website. Pls suggest.
What the actual heck??!! If I had not found your post, I would have just given up on this. Thank you so much for figuring this out and taking time to post what you learned.
Hi Lawrence,
Thank you for this blog. I followed the instructions to configure the WordPress multisite with ALB balancer. Everything works fine and sites are loading properly. But when I try to use wp-cli, I am getting the following error.
PHP Notice: Undefined index: HTTP_X_FORWARDED_PROTO in phar:///usr/local/bin/wp/vendor/wp-cli/wp-cli/php/WP_CLI/Runner.php(1153) : eval()’d code on line 7
Also, I found a similar log in apache error logs.
PHP Notice: Undefined index: HTTP_X_FORWARDED_PROTO in /var/www/html/cdpblog/wp-config.php on line 9
Any suggestions?
Hi Lawrence,
Thank you for the great tutorial.
Everything works fine except that if I search my website on a browser it only loads when i type https://my-domain.com.
if I type just my-domain.com or http://www.my-domain.com it won’t load.
how to fix this problem?
I am not a technical guy just followed your instruction.
Thanks,
Neil
hi neil, i’m glad you found the post helpful! your problem is in Step 5: Update WordPress Configuration. but bear in mind that you might have performed this step correctly, and that it’s your browser cache that’s causing this problem. testing your site from any other device, like say, a friend’s mobile phone, will help you determine where your problem lies.
Hi Lawrence and Neil,
I am having the exact same issue as Lawrence. Can you confirm if it was a browser cache issue in your case? On mine it is definetly not a browser cache issue. I am able to reach my site only through https://www.mysite.com and https://mysite.com. http://www.mysite.com and http://www.mysite.com is not working in my case.
Thanks for all your help!
Best,
Varun
Thank you for the article. Can you tell me where in the wp-config.php file you put the snippet from 8-April-2018?
(if (strpos($_SERVER[‘HTTP_X_FORWARDED_PROTO’], ‘https’) !== false)
$_SERVER[‘HTTPS’]=’on’;)
I just want to be sure I am not screwing anything up.
Thank you again for sharing your knowledge.
i put it near the top of the file, just below all of my “define()” imperatives. but it’s unlikely that the location matters.
I require the lines in wp-config.php for SSL termination, wp cli complains about them
$_SERVER isn’t populated in the CLI context. You’ll need to check if the index is set:
if ( isset( $_SERVER[‘HTTP_X_FORWARDED_PROTO’] ) && $_SERVER[‘HTTP_X_FORWARDED_PROTO’] == ‘https’)
$_SERVER[‘HTTPS’]=’on’;
https://github.com/wp-cli/wp-cli/issues/2562
This fixed this error for me
HI Lawrence,
Thank you for this article – I think it explains why I am getting mixed content error on my blog and the infinite redirect when I try to login to wp-admin. Unfortunately for me, my blog resides in a subdirectory of my site and the edits to httpd.conf are necessary for the other portions of my site to display using https. Do you know of any way to edit httpd.conf so that all directories EXCEPT http://www.mysite.com/blog use the rewrite rule and then perhaps I can use the information in this blog to get my WordPress site working properly on my EC2 instance? Any advice would be most appreciated@
Hi,
Everytime I try to login to my WordPress Panel, it gives me an error cookies are blocked or not supported on your browser.
I am pretty sure I have not blocked them on my browser. Can you please suggest what could be the issue
Hi Lawrence,
Thanks for the great documentation. It’s entirely consistent with what I’ve been figuring out, but being without sufficient programming chops, left feeling like the bride at the church steps.
Anyway, I go through all the steps as per your outline, and get to a 502 Bad Gateway. Suggestions? The good news is that the SSL indicator is green, and I’m not looking at an unrendered html page. The bad is that I’m still 1/2 way up the aisle without the ring!
Please advise, and I’ll go through one more time to see if I can find my error.
Excellent presentation… …my only critical offering, I’d suggest making it possible for reader to zoom in on your images. Otherwise clean, professional, and easy to follow.
Best regards,
admin@reportrkr.com
i’m glad you found it helpful. it’s entirely possible that your 502 error will work itself out in the next 45 minutes or so, thus, this might be an opportune moment to take a short break. 502 errors sometimes indicate a temporary state.
The 502 message has not cleared, and registered target still showing as “unhealthy”… …set up the Health Check to /health.aws, and have that file sitting in EC2 instance root directory. Settings exactly as per your Configure Routing illustration. Is the root ownership and permission setting special?
Everything else seems to be checking out as I go through the various security groups. Target name in my case entered as “b2b-ioda-org.http” and is resolving properly to the instance ID.
I’d added in the 08 April update to the wp-config as per below, sitting on two lines:
// Update 8-April-2018: I moved https redirection from the Apache virtual server config to wp-config.php using this snippet.
if (strpos($_SERVER[‘HTTP_X_FORWARDED_PROTO’], ‘https’) !== false)
$_SERVER[‘HTTPS’]=’on’;
I had not added in the redirect recommended by AWS that you had #’d out.
Thoughts?
that helps. the file path to “health.aws” is relative to HTTP rather than you linux file system, thus in my case, i created a folder with the following path: /var/www/html/health.aws, and this folder includes a simple index.html file with the following contents:
Tried that. No luck, though I remain pretty sure that we’re on the right track.
In your notes, you set the Document Root in httpd.conf as:
DocumentRoot /var/www/html/blog.lawrencemcdaniel.com
Doesn’t that place the http root one directory down?
In the Health Edit dialogue box, on your notes above, you show it as “/health.aws” …I assume that’s how it should be entered on the AWS Control Panel?
Also, I can’t seem to find the logs. In your notes, you’d advised updating the httpd.conf in the form of ErrorLog /var/www/logs/error_log_blog.lawrencemcdaniel …:
– should the location not be “logs” without an s, ie /log/?
– should the location be enclosed in apostrophe marks?
– so “ErrorLog /var/www/log/error_log_blog.lawrencemcdaniel”
Anyway, sorry for all the niggly questions… …but it’s in the nature of the beast.
Much appreciated
ChiefCook
Protocol
HTTP
Path
/health.aws
Port
traffic port
Healthy threshold
2
Unhealthy threshold
2
Timeout
5
Interval
15
Success codes
200-301
–
this is helpful. you should first focus on getting your ELB report that it’s in good health. keep in mind that the ELB communicates with your EC2 instance using http, and thus, the “root” path is not the same as the root of your linux file system. it seems from your comments that you’re already on the right path. there’s nothing magical about the “/health.aws” file btw — the ELB health test sends a regular http get request to your server, and if the http response headers include a response code that’s in the range of what you specified in your setup (ie, 200-301) then it considers itself to be healthy. thus, you can specify any file that is accessible via http. my rationale for creating an independent file (health.aws) is that i’m assured that it will always exist (since i created it).
Great! I have implemented it but wp-admin page coming without CSS and it not allow me to login with working credentials.
Hi mohamed, if you’re using Chrome then open the javascript console and tell me what error code you see. meanwhile, try logging with safari or firefox. if these work correctly while chrome does not then i think i know your problem.
I was Googling around for content WordPress with AWS ELB and SSL this morning, when I came across your excellent page.
Great stuff!!
I just wanted to say that your page helped me a ton. I would have never found any deep insight article on WordPress with AWS ELB and SSL. I specially like you add flowchart of process,
It helps to learn WordPress with AWS ELB and SSL
It’s funny: I recently published top online resources to learn Aws tutorial.
Here it is in case you’d like to check it out: https://hackr.io/tutorials/learn-amazon-web-services-aws
Also, my tutorial might make a nice addition for learning Aws tutorial.
Either way, thanks. And have a great day!
thanks Amit! i just registered on your site and submitted a couple of my AWS tutorials. hackr.io looks really useful, good luck with next steps! 🙂
Hi Lawrence,
I also struggled for an afternoon with setting up a WordPress site with TLS/Loadbalancer. I tried plugins (really…), but got stuck in the loop before I could activate it. But with your steps, it worked immediately. Thanks for posting.
Hi Lawrence,
Thank you very much for this information. There is limited resources online regarding this particular set up and any of the blogs/ guides I have followed have left me with a broken site in an infinite loop. I just have one question, I am correct in saying that for step 4 all I have to do is add:
RewriteEngine On
RewriteCond %{HTTP:X-Forwarded-Proto} =http
RewriteRule .* https://%{HTTP:Host}%{REQUEST_URI} [L,R=permanent]
anywhere in my wp-config.php file and then run the server restart command?
And then update:
define(‘WP_HOME’,’https://blog.lawrencemcdaniel.com’);
define(‘WP_SITEURL’,’https://blog.lawrencemcdaniel.com’);
and add:
// Update 8-April-2018: I moved https redirection from the Apache virtual server config to wp-config.php using this snippet.
if (strpos($_SERVER[‘HTTP_X_FORWARDED_PROTO’], ‘https’) !== false)
$_SERVER[‘HTTPS’]=’on’;
to my wp-config.php also?
Do I run a second server restart after?
Sorry, I do not have any experience with this kind of thing.
Thank you,
Conor
hi conor, no, you should not edit your apache config. this is why your getting an infinite loop. the alternative commands that you’re placing in wp-config.php are the only modifications that you need. btw, these two sets of edits are duplicative (they do exactly the same thing, but at different stages of creating the http response headers). when using AWS ELB you’ll need to make the modifications ONLY in wp-config.php.
Hi Lawrence,
Worked great – thank you very much!!
Quick question: the if wp-config.php => (strpos($_SERVER[…. statement works great for redirecting traffic that lands on http://www.YourURL.com however, it does not work if you land on http://www.YourURL.com/SomePage. Any idea why this does not work?
hi chuck, that actually sounds more like the effect of a page caching plugin. the line “if (strpos($_SERVER[‘HTTP_X_FORWARDED_PROTO’] … ” evaluates the http header, not the URL path. you might try completely clearing any caches on your wordpress site, and for good measure you might also clear your browser cache in case of any other similar side effects.
Hi, I’ve tried the approach (without changing my apache conf – only wp-config). While the home page loads over https, I cannot access the dashboard. Once I try to login using my wp admin user, I do not see the dashboard. Instead, I get an error: “Sorry, you are not allowed to access this page.”
hi Sagi, that’s great. looks like you’re almost done. you need to clear your browser cache AND clear the site cache of any performance plugin that you might be running on your site.
Hi LAwrence,
Thanks for this blog. I added step 4 config into /etc/httpd/conf/httpd.conf file,
RewriteEngine On
RewriteCond %{HTTP:X-Forwarded-Proto} =http
RewriteRule .* https://%{HTTP:Host}%{REQUEST_URI} [L,R=permanent]
and then step 5 in wp-config as well.
MY target group is displaying target as healthy and i have https configured as inbound rule as SG of My EC2 instance. i
https still doe snot works. what should i check next ?