The rapid adoption of Tutor as a build and deployment solution for Open edX has also opened the door to using Kubernetes. But what is Kubernetes and what problem does it solve for an Open edX platform? Well, plenty! Read on to see what, why, and how you can begin leveraging this next-generation system management technology.

What are Kubernetes, anyway?
The name Kubernetes originates from Greek, meaning helmsman or pilot. K8s as an abbreviation results from counting the eight letters between the “K” and the “s”. Open-sourced in 2014, the Kubernetes project combines over 15 years of Google’s experience running production workloads at scale with best-of-breed ideas and practices from the community. But in hard concrete terms, what problems does it solve for an Open edX installation, and why would you want to use it?
“Kubernetes is a portable, extensible, open source platform for managing containerized workloads and services.”, so says the Kubernetes web site. Let’s unpack that statement in strict, Open edX terms, beginning with the part about, “containerized workloads and services“.
First of all, what containers? Where did they come from? What do containers have to do with Open edX software? Well, it turns out that Tutor converts the traditional monolithic Open edX platform into a collection of containers, and so if you’re installing with Tutor then that part has already been taken care of. Not only that, Tutor provides native support for Kubernetes, so you really don’t have to do much of anything other than decide that you want to deploy to a Kubernetes cluster.
Let’s defer definitions of “portable and extensible” for the moment, and instead I’ll add my own thoughts. Kubernetes orchestrates the collection of containers that Tutor creates at deployment. That is, if you create a Kubernetes cluster consisting of more than one virtual Linux server instance then Kubernetes takes responsibility for deciding on which server to place each container.
But, how many containers does Tutor create, and even if the answer is “a bunch” is it really necessary to introduce industrial grade systems like Kubernetes just to spread out the workloads across the servers? I mean, why can’t you just break up the application stack yourself, putting the LMS on one server, the CMS on another, MySQL on another, and so on? Well, you can. And I have. And I’ve written copious articles on how to do exactly that. Kubernetes is simply a more robust way for you to automatically and more efficiently allocate your workloads (LMS, CMS, Forum, etc) across your server instances.
Let’s look at a practical example. The screen shot below is a Kubernetes cluster managing multiple Open edX environments for dev, test, staging, and prod; all for the same client. Each environment is grouped into “namespaces”, and you can see that each namespace contains individual pods (a pod is a collection of one or more containers) for lms, cms, worker threads, forum, miscellaneous jobs, and a handful of system-related pods. To be sure, all of these pods were created by Tutor, in mutually exclusive deployments. I safely deployed each of these environments into the same cluster using Tutor, and with no risk whatsoever of these environments accidentally bleeding into one another. That simply does not happen with Kubernetes. You can see from a cursory review of the “AGE” column that some of these containers have been running for upwards of a year. In fact, this screen shot presents fewer than half of the pods running on this cluster, which in reality is running more than 50 pods right now. The “NODE” column indicates on which AWS EC2 instance each container is running which in point of fact is completely irrelevant to me because Kubernetes takes care of all of this and with absolutely no human intervention whatsoever. If a server node was to fail, which does happen on occasion, Kubernetes would simply spin up a replacement EC2 instance and redeploy the containers.

You could obviously do this without Kubernetes, and I have. However, you’d need at least twice the number of EC2 instances, and your workloads would not be as well-balanced nor as stable, and you’d need to take care of Ubuntu updates and up-time yourself.
So, summarizing with the help of the illustration below. The “Traditional Deployment” would represent an on-premise installation of Open edX to a single physical server, the “Virtualized Deployment” would represent a partially horizontally-scaled installation of the same platform but running on virtual server instances instead of bare hardware, and the “Container Deployment” would represent our Kubernetes cluster above.

But wait, there’s more!
Stability
Kubernetes actually provides you with multiple ways to improve your up-time. Like I mentioned above, Kubernetes will intervene in the event of an all-out EC2 instance failure in which a computing node becomes completely unresponsive. But it also does the same thing if an individual pod becomes unresponsive. In fact, Kubernetes is designed to manage multiple replicas of the same service; as many as you think you might need. For example, you could deploy the LMS service as a collection of six replicas, and Kubernetes will deploy and distribute the six resulting pods across as many EC2 instances as it can. If one of these individual pods fails then Kubernetes will automatically replace it. Kubernetes can even scale these pods automatically based on real-time workload.
Scalability
Kubernetes also has a platform-agnostic way to scale the computing nodes that makeup the cluster. In the case of AWS these are EC2 instances, but Kubernetes itself does not contain any AWS-specific product awareness. Instead, Kubernetes implements a concept called “Ingress” that goes well beyond the scope of this article and that you should read more about. Technically speaking, an ingress’ sole role is to expose your cluster to the outside world, like say, to open port 80 to the public so that your cluster can receive web requests. That’s why it’s called an ingress. get it? Incidentally however, in the case of AWS at least, this is exactly where EC2 load balancers come into play, and thus the two topic kind of merge together.
Vastly summarizing, it is common for a Kubernetes cluster running on AWS EKS to also have a companion AWS Load Balancer that manages the number of EC2 nodes based on real-time workload. This is a powerful combination that gives your Open edX installation immense scale.
Cost Efficiency
In addition to my comments in the previous section about how Kubernetes orchestrates workloads, there are a couple of other ways that you can bring even more efficiency to a Kubernetes cluster. First, you can be incredibly specific about what kinds of EC2 instances are running in the cluster, and when, and why. For example, you might launch your cluster with a pair of modest-sized t3-large compute nodes but scale the cluster with t3-2xlarge instances. That would be a sensible configuration if your Open edX platform is idle for extended periods of time but prone to sporadic bursts of student activity. Second, you can create multiple node groups inside of a cluster made up of whatever combinations of EC2 instance types you like, and, you can use selectors to direct different kinds of pods to different node groups. This would enable you for example, to run LMS pods on one kind of EC2 instance while LMS worker threads run on a different kind. And finally, in the case of AWS at least, they offer a “serverless” compute option called Fargate that is anecdotally kind of the same thing as Lambda, in which you can deploy pods onto serverless compute nodes that are managed by the Kubernetes cluster.
How to create a Kubernetes cluster
You have two choices that I know of, and they’re both anticlimactic. Honestly, there’s not much to it. Tutor and AWS combined have created what very well might be the easiest new-fangled IT gadget on-ramp you’re ever going to encounter.
From the AWS Console web app
The easy, 1-click way to create a cluster is to use the AWS console. Navigate to Elastic Kubernetes Service (Amazon EKS), click the “Add cluster” button, give it a name, and voilá, a new cluster appears about 5 minutes later.

With Terraform
If you’re more ambitious then you should check out the Terraform Kubernetes EKS module in Cookiecutter Openedx Devops. This is way out of scope for this article, but I promise to write more about it soon.
Note
Cookiecutter OpenedX Devops is a completely free open source tool that helps you to create and maintain a robust, secure environment for your Open edX installation. The Github Actions workflow we review below is only one of the many fantastic devops tools that are provided completely free by Cookiecutter OpenedX Devops. If you want, you can follow the README instructions in the Cookiecutter to create your own repository, pre-configured with your own AWS account information, your Open edX platform domain name and so on. It’s pretty easy.
Kubernetes cluster administration
Generally speaking, Kubernetes is a mostly hands-off service. But having said that, there are certain things that you’ll need to do as an administrator, primarily during the setup process. Most real devops professionals with whom I’ve worked use kubectl and/or k9s. But I’ll show you all three ways here, in the name of completeness.
With kubectl
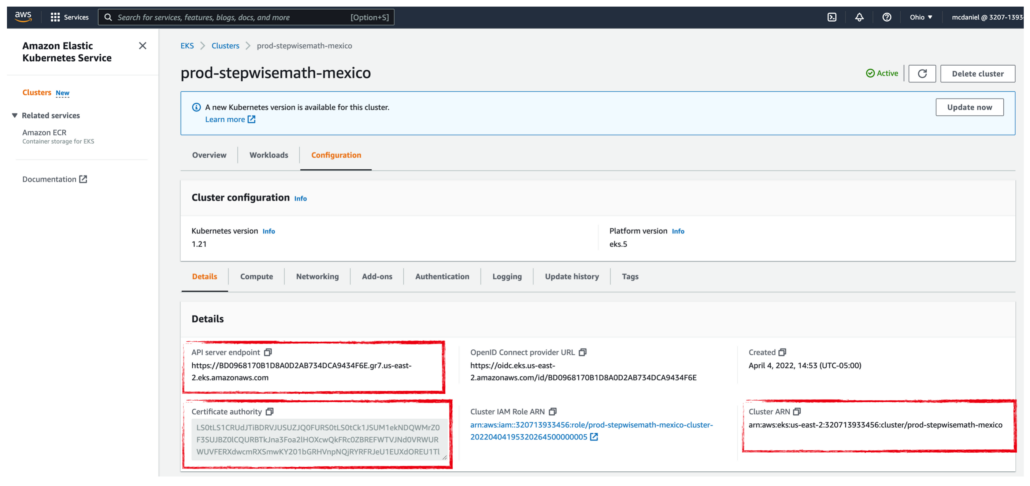
There’s an API CLI deeply rooted at the heart of Kubernetes, deftly named kubectl that you’ll want to install on your local dev environment. Find your platform on the official download site, follow the instructions, and have at it! To save you some time, a couple of words of guidance on getting kubectl setup. There are three data items located in the AWS EKS console page, near the bottom of the Configuration -> Details section of your new Kubernetes cluster which you’re going to need in order to get kubectl running on your dev environment. Additionally, just an fyi that you are the only person who will be able to see or interact with the cluster until you explicitly grant access to other users; not even other AWS account admins nor the root account will be able to see the cluster until you (the cluster creator) grant access.

Once you get kubectl running on your dev environment you’ll be able to do anything which a Kubernetes cluster is capable, from the command line. Granted, it’s pretty crude, but this is how devops pros prefer things. I guess.
With k9s
k9s is the Cadillac of Kubernetes cluster administrator tools. It’s hipster retro UI is elegantly crafted from only the finest 8-bit ASCII characters and it’s on-screen help provides you with only what you really, really, really, REALLY …… really must know, and not a single thing more. Aesthetics aside, it’s an amazing tool that basically puts a lightweight GUI on top of kubectl. It has broad community support and it works exceptionally well. I’ve found it to be indispensable while I continue up the learning curve of using kubectl. To whet your appetite, from the screen below, I’m one keypress away from viewing the MySQL root password, which is stored in Kubernetes Secrets and easily referenced from k9s.

It is absolutely true to say that anything you can do in k9s can also be done with kubectl. On the other hand it might also be true that anything you can do with kubectl you can also do with k9s, but I don’t know that for a fact. By way of example, here’s another common k9s screen that displays all of the pods for the namespace “openedx” and in the foreground is a terminal window presenting the same data by calling kubectl from the command line: kubectl get pods -n openedx.

Hence, the kubectl command line is pretty simple and easy to learn, and very convenient once you get up the learning curve. But k9s’ ASCII art!!!! just say’n.
From the AWS Console web app
The AWS console for EKS is nearly useless. That’s why devops folks prefer kubectl and k9s. I cannot think of anything useful that it does beyond providing a way for you to copy the API service endpoint, Certificate authority, and Cluster ARN which you need for configuring kubectl. But even that is debatable. You can use the AWS CLI to do the same thing, like this: aws eks --region us-east-1 update-kubeconfig --name prod-stepwisemath-mexico, which saves you from having to login to the console, find EKS and drill down 4 more screens. Plus, the aws cli actually stores the three parameters inside the kubectl config file for you, automagically.
Kubernetes api tips & tricks
I’ve been working with Kubernetes for around a year, and truth be told I mostly just need to keep the clusters healthy and running. I’m mostly not doing anything daring nor ambitious. That said, I lean heavily on k9s and kubectl to do everything. Following is a k9s cheat sheet, understanding that for anything I show you here, there’s a command-line equivalent that you can look up in the kubectl online help site.
- menu: type “:” (minus the quotes) to raise the command menu. From there, type any of the following commands
- namesapces: presents a complete list of the namespaces that exist in cluster. Choosing one of these will cause any other screen in k9s to automatically filter its contents to include only the namespace that you selected
- contexts: a context is a fancy word for a cluster. You can administer more than one cluster with k9s. I manage five. Choose one, k9s automatically filters all other screens accordingly.
- secrets. Kubernetes can store secrets. It’s very useful. You should read about it. Cookiecutter Open edX Devops tools makes extensive use of this capability. Highlight any secret and press “x” to un-encrypt and view.
- pods. You get a list of every pod contained in the context / namespace that you selected. Surprised? Perhaps more interestingly, it’s from this screen that you can tail logs and shell into a terminal window for each pod. Ok, how about now? Surprised!!??!!!
- services. You get a list of every service for the context / namespace you selected. More interestingly, you can edit the service manifests directly from this screen.
- ingress. Ditto. You get a list of ingresses which you can directly manage from this window.
- jobs. Ditto.
Here’s a link to the official command reference for kubectl (and k9s): https://kubernetes.io/docs/reference/generated/kubectl/kubectl-commands. It does a lot. Lots more than what I’m showing you here.
Good luck on next steps with adding a Kubernetes cluster to your Open edX installation!! I hope you found this helpful. Contributors are welcome. My contact information is on my web site. Please help me improve this article by leaving a comment below. Thank you!


Leave A Comment