Get Notes & Annotations working on your Open edX native build. This post is a supplement to the official documentation, “How to Get edX Notes Running“, covering installation and configuration plus some pro tips on maintaining your environment afterwards.

Summary
Open edX Notes & Annotations is one of the coolest, most value-added upgrades that you can add to your Open edX Native build. Hopefully some day it will ship with the platform’s core functionality, but until then this post will help you get Notes & Annotations up and running on your Ginkgo installation (or later) in just a couple of hours. Notes itself is a Django app which largely follows the conventions of norms of the rest of the Open edX ecosystem. Technically speaking, it’s beautifully designed, works great, and really showcases the edX design team’s ability to thread the needle when it comes to enhancing the user experience while keeping the platform manageable.
Setup Procedure
We’ll use Ansible for most of the installation, leaving us with just a few chores beforehand and some cleanup activities afterwards. Here’s our installation and setup procedure:
1. Setup Oauth between LMS and the Notes API
First, we’ll use the Django admin console of the LMS to setup seamless Oauth authentication between the LMS and the Notes API. You’ll need to login using a super user account. You can review the “Managing Open EdX Tips and Tricks” page for instructions on how to convert your account. For the Python/Django uninitiated, Django apps like LMS and CMS come with a “back end” admin console where additional configuration parameters are available beyond what you’ll find in the four JSON files in /edx/app/edxapp/. Refer to this screen shot for the URL path and guidelines for creating your Oauth client.
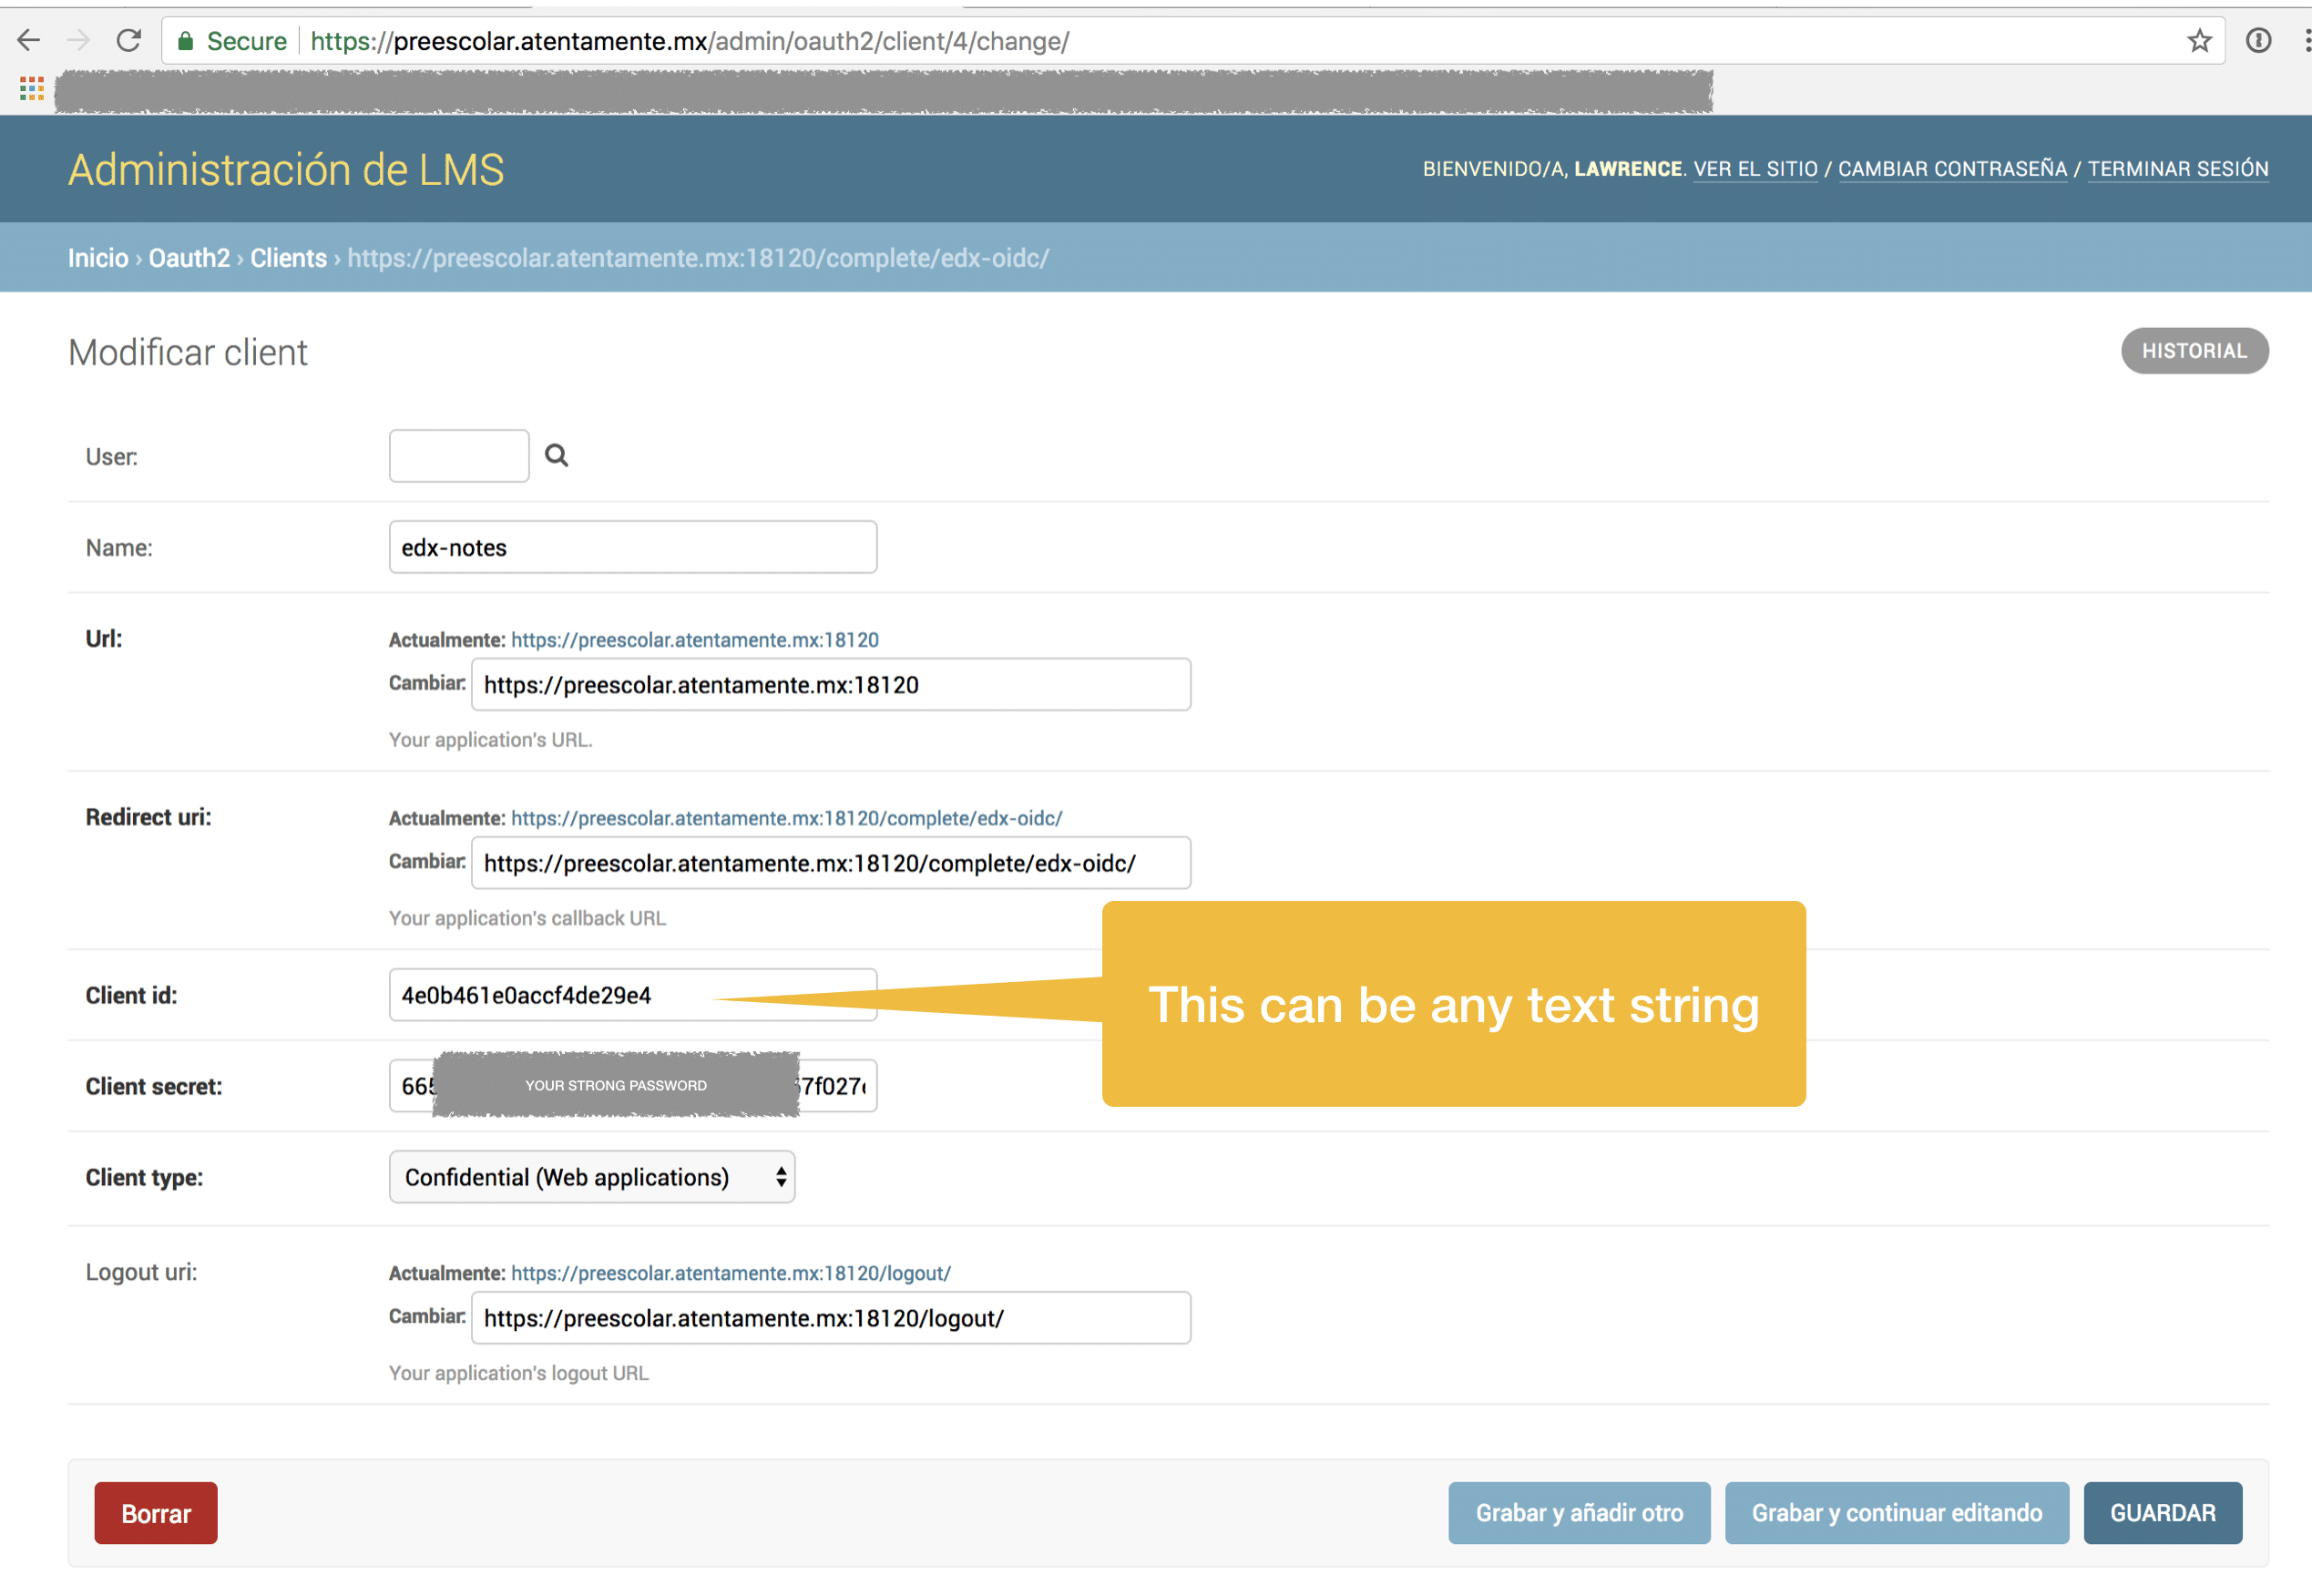
2. Set Configuration Parameters
Take note that what follows is an unorthodox approach compared to most other configuration activities you’ll perform on your Open edX installation, but so far I haven’t come up with a better alternative.
A. Set Ansible Parameters
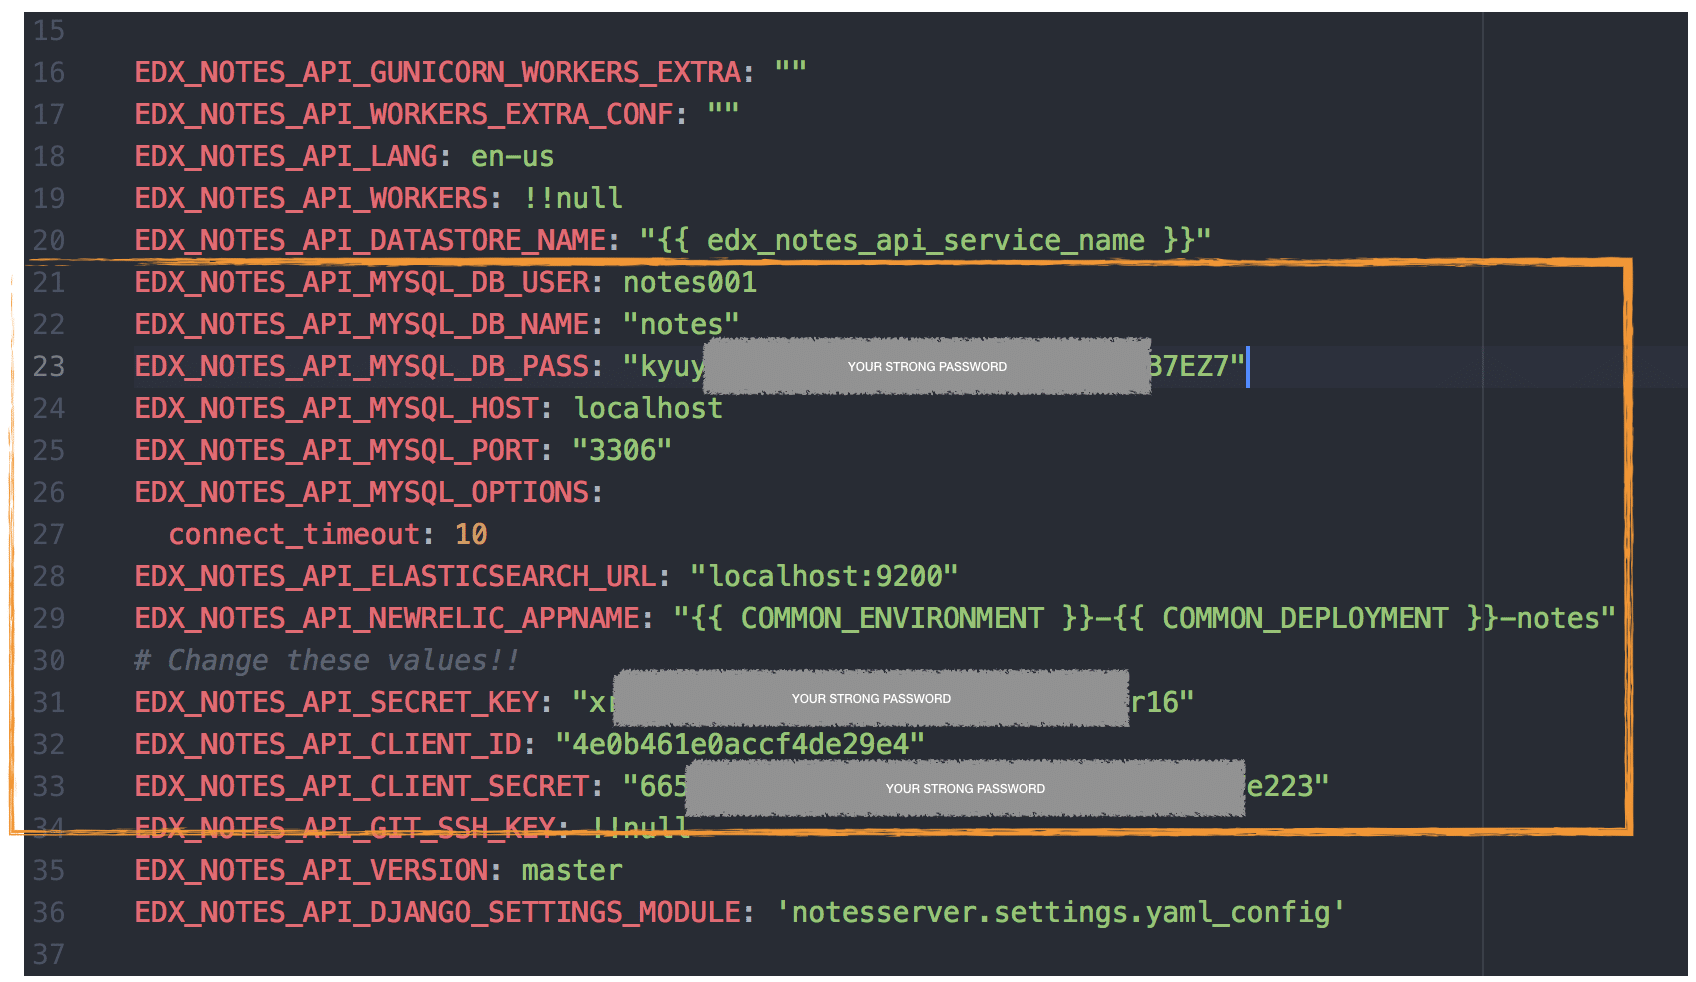
First, we’ll edit the Ansible Notes API defaults parameters file that is part of the edx “Configuration” github repository: /edx/app/edx_ansible/edx_ansible/playbooks/roles/edx_notes_api/defaults/main.yml. Following are the exact parameters that we’ll modify.
- EDX_NOTES_API_MYSQL_DB_PASS – Choose a new strong password that the Notes user will pass to MySQL when connecting to the Notes database.
- EDX_NOTES_API_MYSQL_HOST – This is “localhost” by default on Native installations unless you have migrated your MySQL environment elsewhere.
- EDX_NOTES_API_ELASTICSEARCH_URL – set this to “localhost:9200”
- EDX_NOTES_API_DATASTORE_NAME – This is the name of the MySQL database that Ansible will create for you. Use a simple, sensible name like “notes”
- EDX_NOTES_API_SECRET_KEY – Choose a new strong password of at least 16 characters.
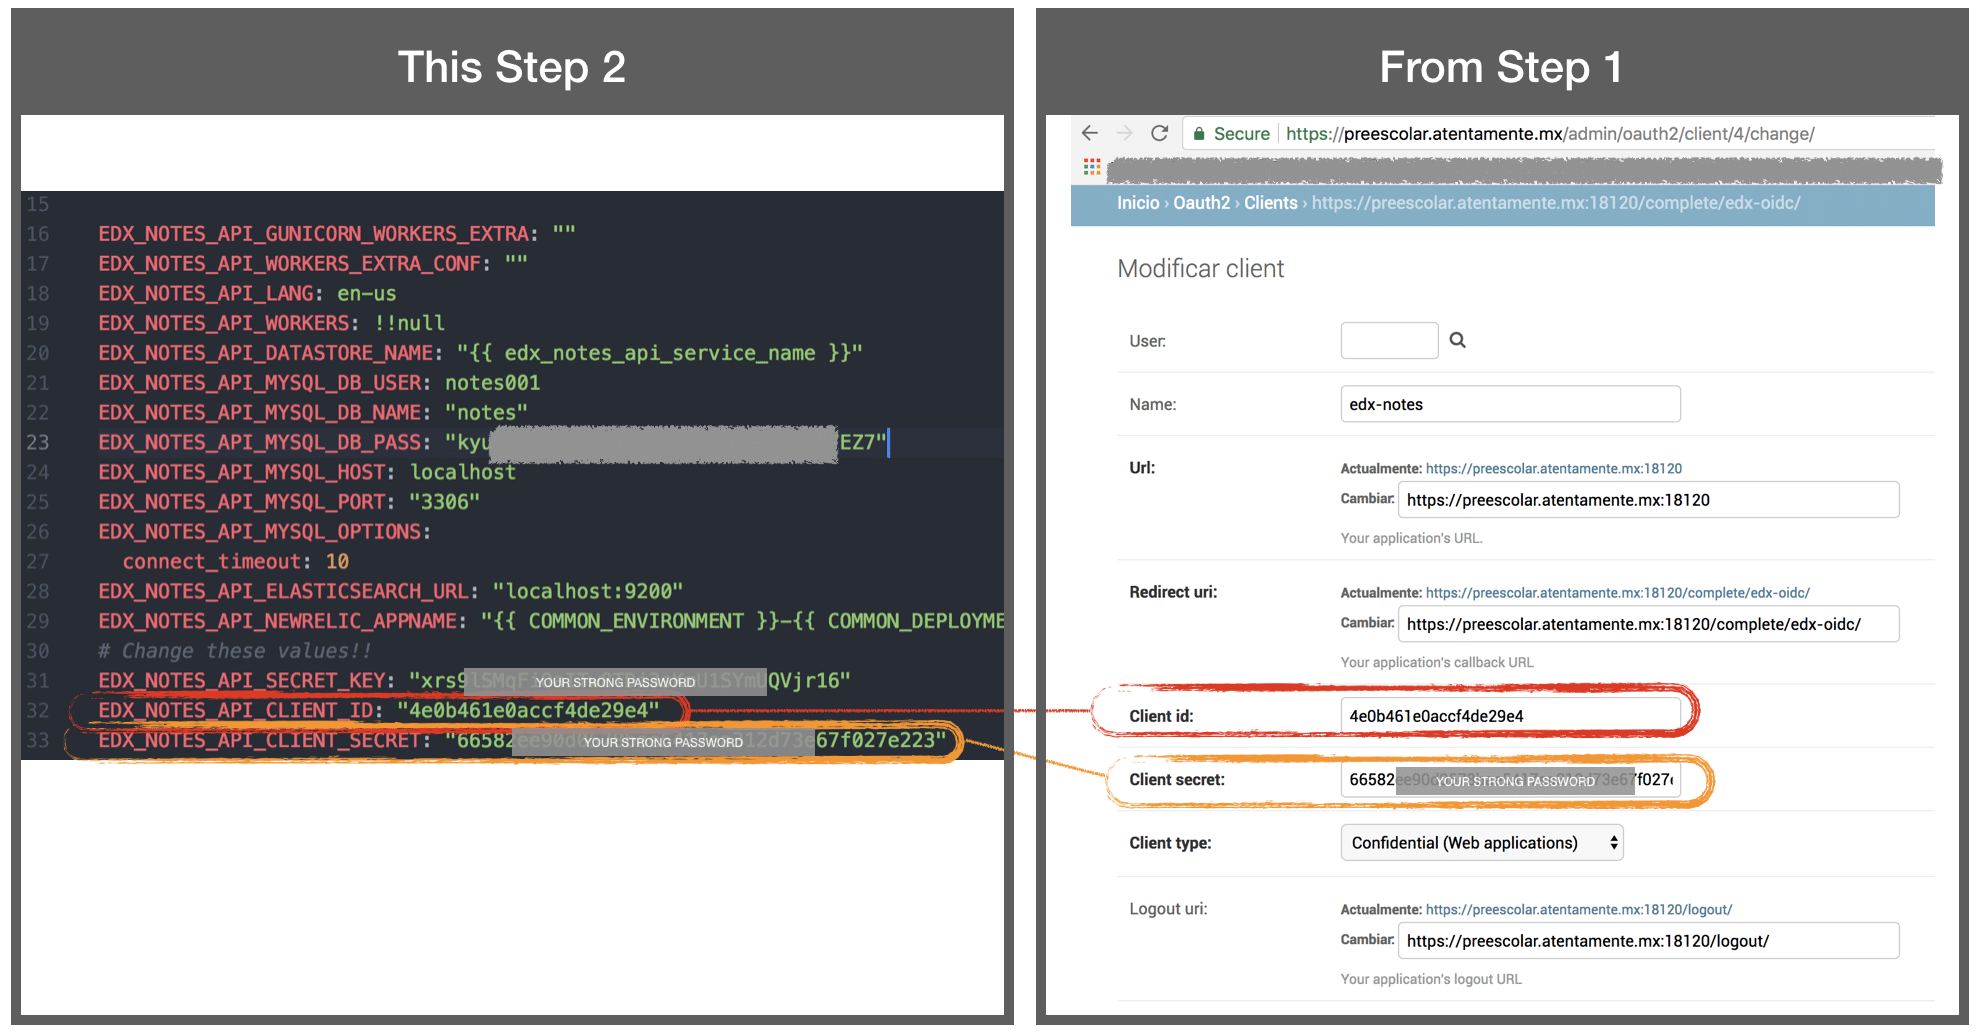
- EDX_NOTES_API_CLIENT_ID – This is the “Client ID” value from the Oauth setup screen from the previous step
- EDX_NOTES_API_CLIENT_SECRET – This is the “Client Secret” value from the Oauth setup screen from the previous step
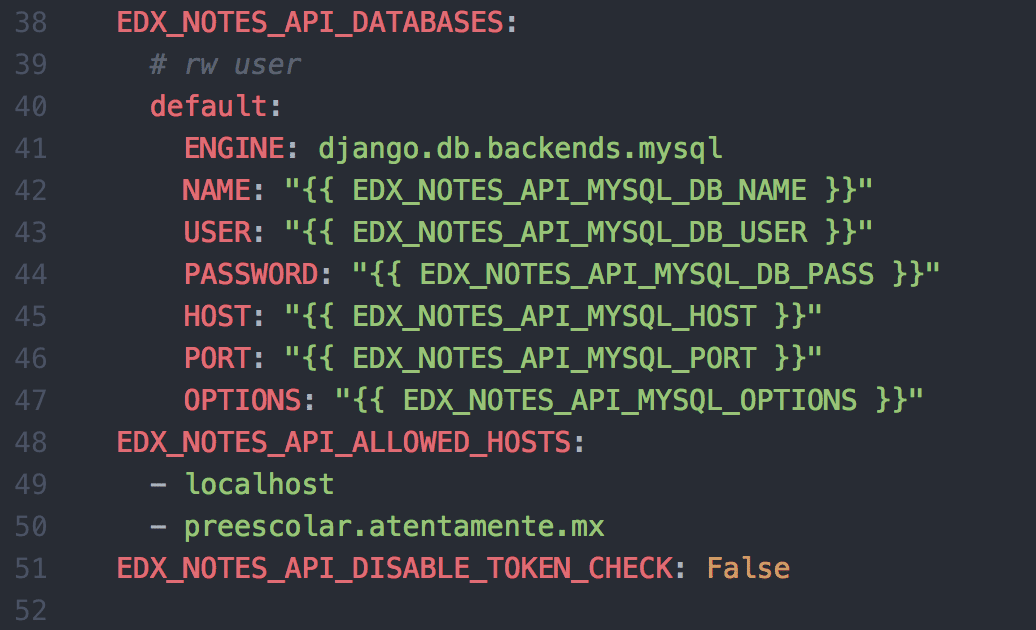
- EDX_NOTES_API_ALLOWED_HOSTS – add a new item to this list containing the fully qualified domain name of your LMS. See my example below (Row 50)
Following is an example showing how your Oauth configuration from step 1 should map to your Ansible parameter values in this step.
B. Set Application Parameters
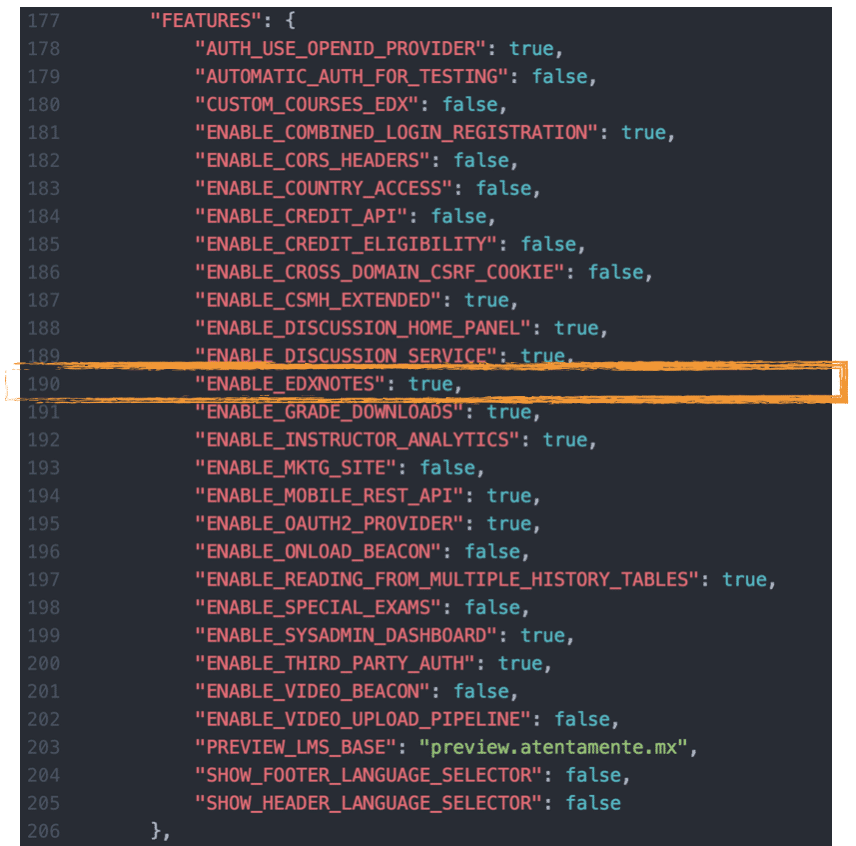
Next we’ll edit the LMS environment configuration to enable Notes in the front end: /edx/app/edxapp/lms.env.json. There are three sets of changes within the Open edX platform json configuration files:
- EDXNOTES_INTERNAL_API & EDXNOTES_PUBLIC_API (row 154): The Notes application relies on a REST api that is authenticated by the LMS via Oauth. The API provides the annotation highlight meta data along with descriptive and tag data that the learner might have provided. These two parameter values by default are set to 127.0.0.1 (your local host). You’ll need to explicitly set both of these parameter to your fully qualified domain name. http[s]://[your-domain.com]:18120/api/v1
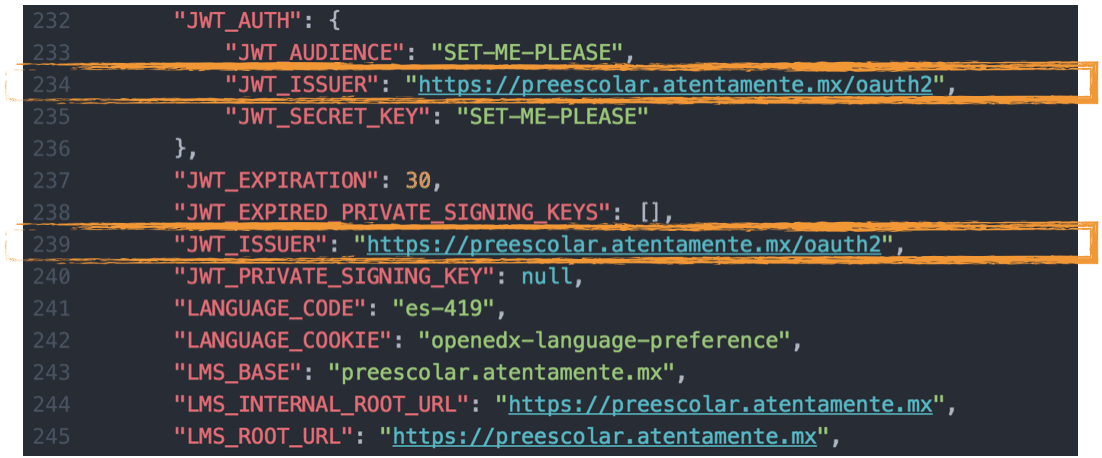
- JWT_ISSUER (rows 234 & 239): JSON Web Token (JWT) is an open standard (RFC 7519) that defines a compact and self-contained way for securely transmitting information between parties as a JSON object. These tokens are used by the Oauth authentication processes. Change each of these parameters from 127.0.0.1 to your fully qualified domain name, as you did in the previous step above.
- ENABLE_EDXNOTES (row 190): Set this to true.

NOTE: Running Ansible sometimes results in the configuration files in /edx/app/edxapp being overwritten.
3. Create Users with Ansible
March 19, 2019 – Note regarding Ginkgo native installations and newer. I got a run-time error when I ran this step on a Ginkgo.2 native installation. As a workaround I created the MySQL user manually using mysql from the command line. The Ansible script in this step reads the parameters in your main.yml file and then creates a user in MySql with full access to the edX Notes database.
Ok, we’re ready to put Ansible work, which is a two-step process for this installation. In this step we’ll use Ansible to create a new Linux user, “edx_notes_api”, plus create a MySQL user and then finally add permissions so that our new user can perform basic CRUD operations on the database. This is quick. This should take one or two minutes.
source /edx/app/edx_ansible/venvs/edx_ansible/bin/activate
cd /edx/app/edx_ansible/edx_ansible/playbooks
sudo ansible-playbook -i 'localhost,' -c local ./run_role.yml -e 'role=edxlocal' -e@roles/edx_notes_api/defaults/main.yml
4. Install Notes Software with Ansible
Now we’re ready to install the Notes Django app. This is also quick. This should take a minute or two to complete.
source /edx/app/edx_ansible/venvs/edx_ansible/bin/activate
cd /edx/app/edx_ansible/edx_ansible/playbooks/edx-east
sudo ansible-playbook -i 'localhost,' -c local ./notes.yml -e@/edx/app/edx_ansible/server-vars.yml
5. Run Database Migrations
For anyone new to Django, there’s a process that is generally referred to as “Database Migrations” whereby Django introspects it’s own code to deduce what database tables, fields and relationships are necessary to persist the data described in the various Python objects referred to in the code. This is one of the most compelling features of the Django framework but it can also make software installations seem buggy or at least problematic the first time you slug through the process.
Following are the commands to run database migrations for the edX Notes API, noting that DB_MIGRATION_USER refers to the MySQL user, which probably should be either “root” or “admin”, and DB_MIGRATION_PASS refers to the password for this user. Note also that the “admin” user is created as part of the Native build. You’ll find the password for this user in /home/ubuntu/my-passwords.yml, stored as the parameter value COMMON_MYSQL_ADMIN_PASS on or around row 12 of this file.
export EDXNOTES_CONFIG_ROOT=/edx/etc/
export DB_MIGRATION_USER=root
export DB_MIGRATION_PASS=replacethisstringwithyoursuperduperaswesomepassword
/edx/bin/python.edx_notes_api /edx/bin/manage.edx_notes_api migrate --settings="notesserver.settings.yaml_config"
The first time your run this you should see a few screens worth of output. You can run migrations any time and as often as you want. It only modifies your database structures if/when its really needed.
6. Compile Assets & Restart edX Applications
The Open edX developer team created a defined process to sweep up and organize all static assets in the LMS and CMS, generically referred to as, “Compiling Assets”. Any time you add or modify either of these two applications you’ll need to run this process again. Otherwise you’re prone to getting some really quirky behavior in the UI. In the worst of cases the app will fail to start, leaving you with a stoic photo image of a sinking ship – yikes.
Following are the operating system commands to manually compile assets for both the LMS and CMS:
sudo -H -u edxapp bash
source /edx/app/edxapp/edxapp_env
cd /edx/app/edxapp/edx-platform
paver update_assets cms --settings=aws
paver update_assets lms --settings=aws
Note: this process takes up to 15 minutes to complete during which time the LMS and CMS will be unavailable to end user.
After this process finishes you should restart the two applications using these commands, and noting that the “:” symbols are intentional and should be included the commands:
/edx/bin/supervisorctl restart edxapp:
/edx/bin/supervisorctl restart edxapp_worker:
7. Enable Notes In One Or More Of Your Courses
For Notes to appear as an option to your online learners you first have to explicitly enable this feature on a course-by-course basis from the “Advanced Options” selection of the “Configuration Menu” in Studio for each course. You’ll find a true/false parameter option “Enable Notes” around halfway down this screen.
8. Verify The Installation
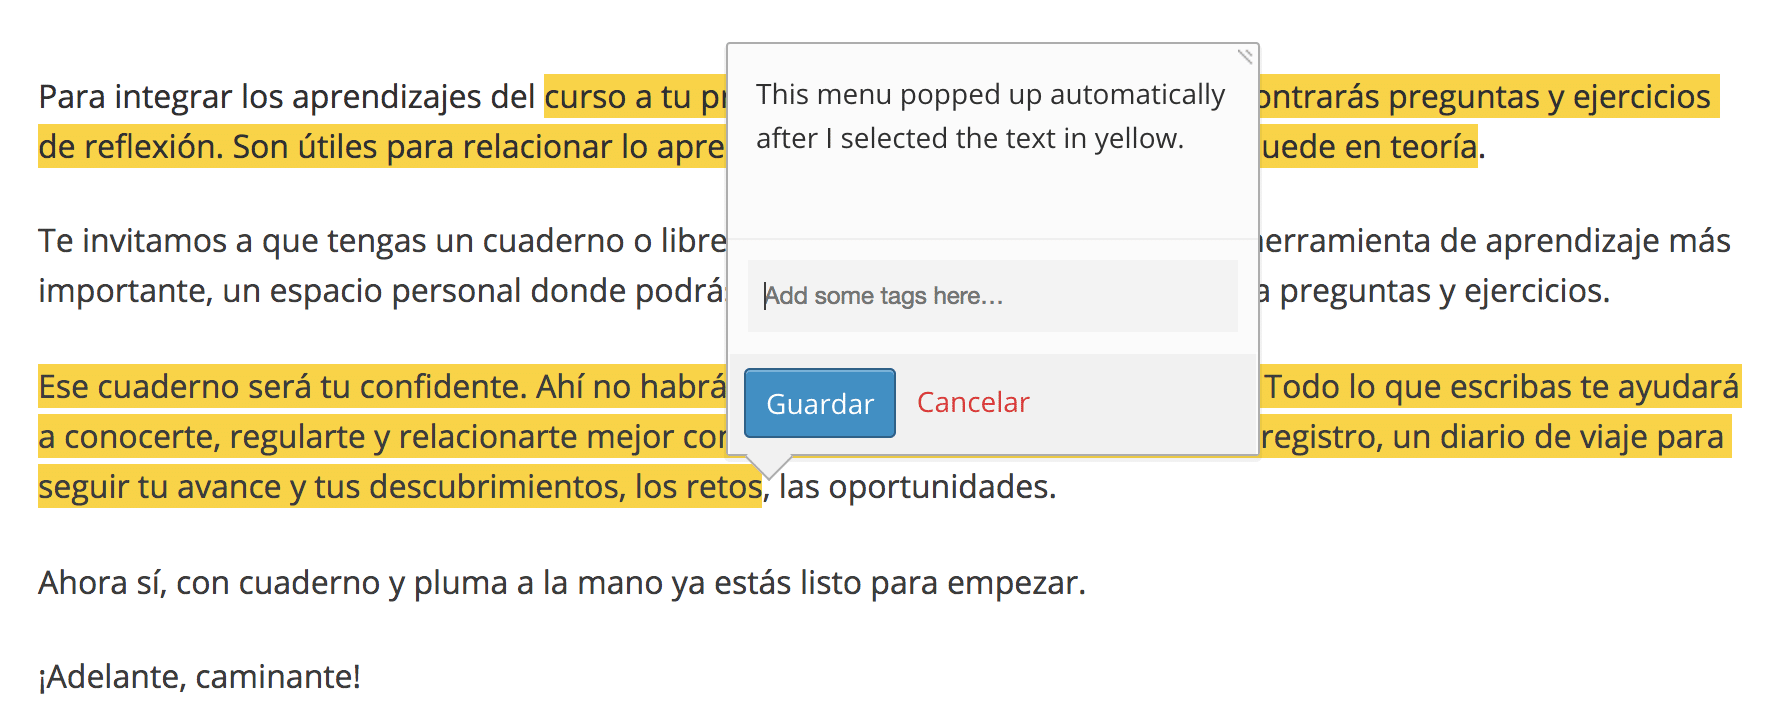
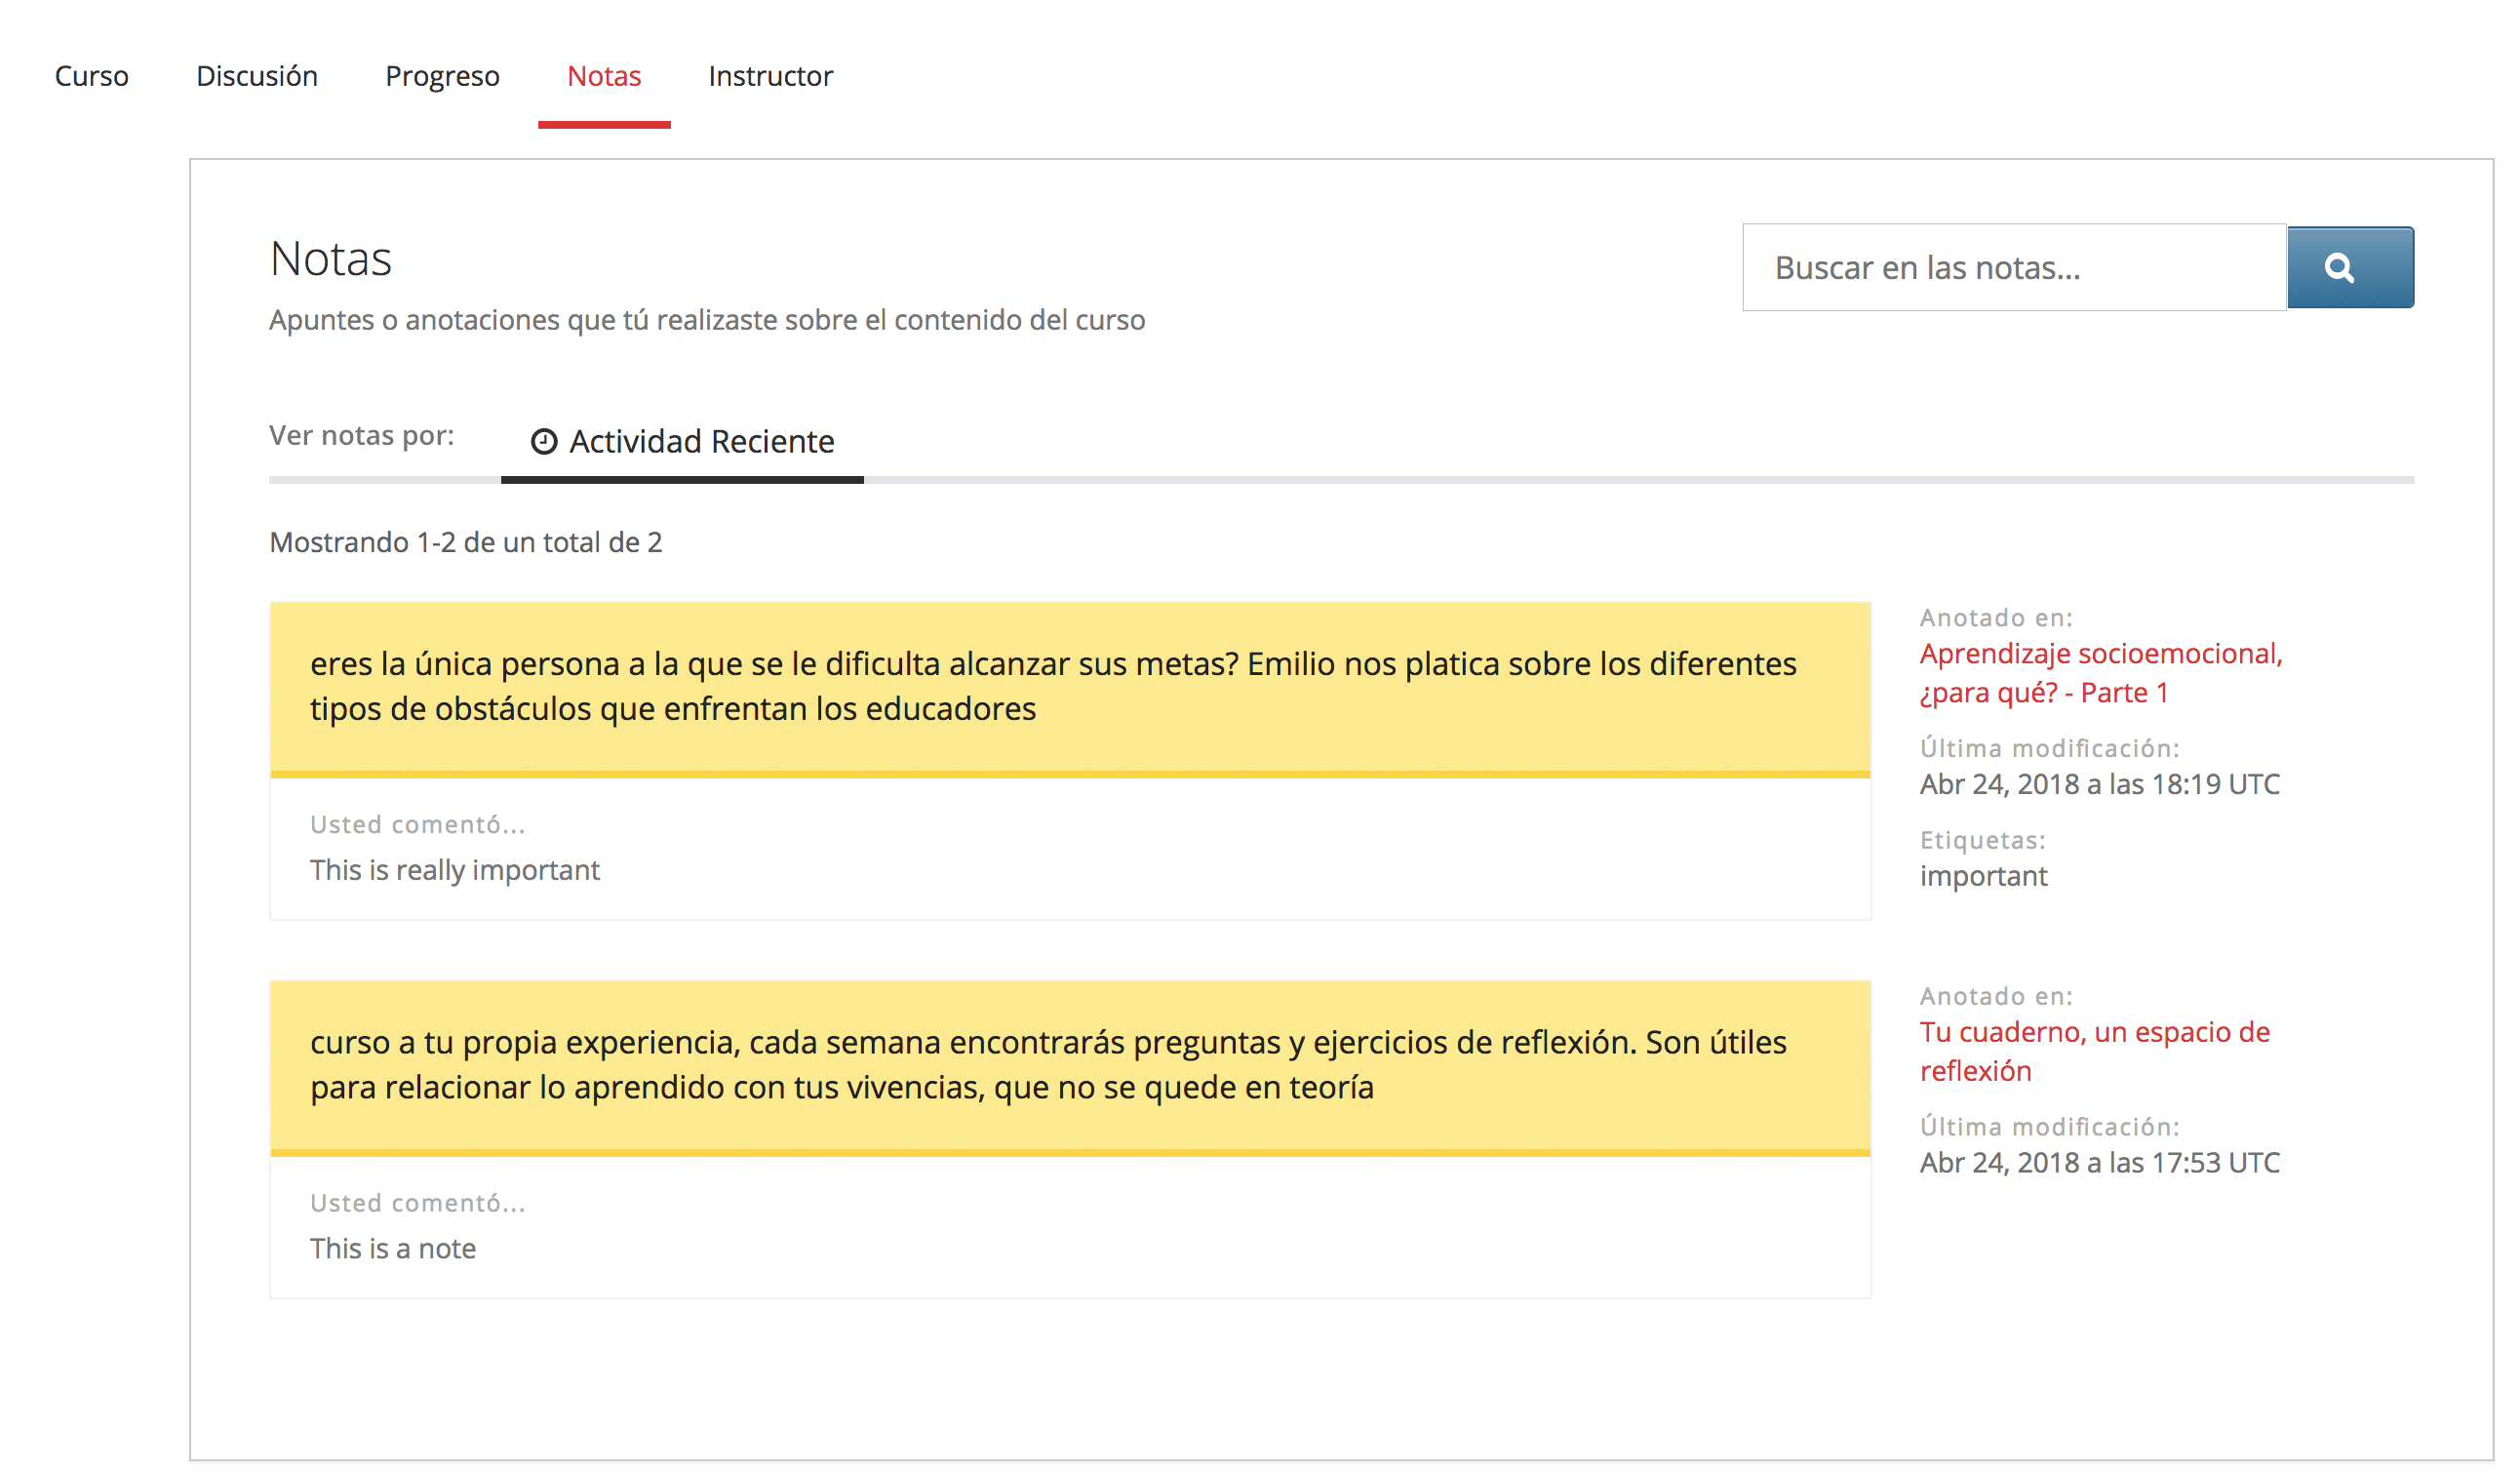
After logging in to the LMS as a student user and entering any course which you’ve enabled Notes you should see a new window tab, “Notes” where annotations will appear. Highlighting text anywhere in this course should result in a popup floating menu with Annotation options.
Trouble Shooting
- Log Files. You’ll see a 500 error in your browser if your configuration is not perfect. You’ll need to review the edX Notes logs to get more diagnostic information on the true nature of your problem. These are located in two different locations: accidentally I assume: /edx/var/log/edx-notes-api and /edx/var/log/edx_notes_api.
- Configuration File. The configuration file for edX Notes is located in /edx/etc/edx_notes_api.yml. You can edit this file using a text editor like vi in case you need to make changes. You have to restart the LMS for changes to take effect.
- Firewall. You should pay close attention to the ports used by the Notes API. You might need to open port 18120 on your firewall.
- Nginx. If you’re using SSL on your site then you probably need to make adjustments to the Nginx virtual server configuration file /edx/app/nginx/sites-available/edx_notes_api. See screen shot below for an example of a site that uses a Letsencrypt SSL certificate.
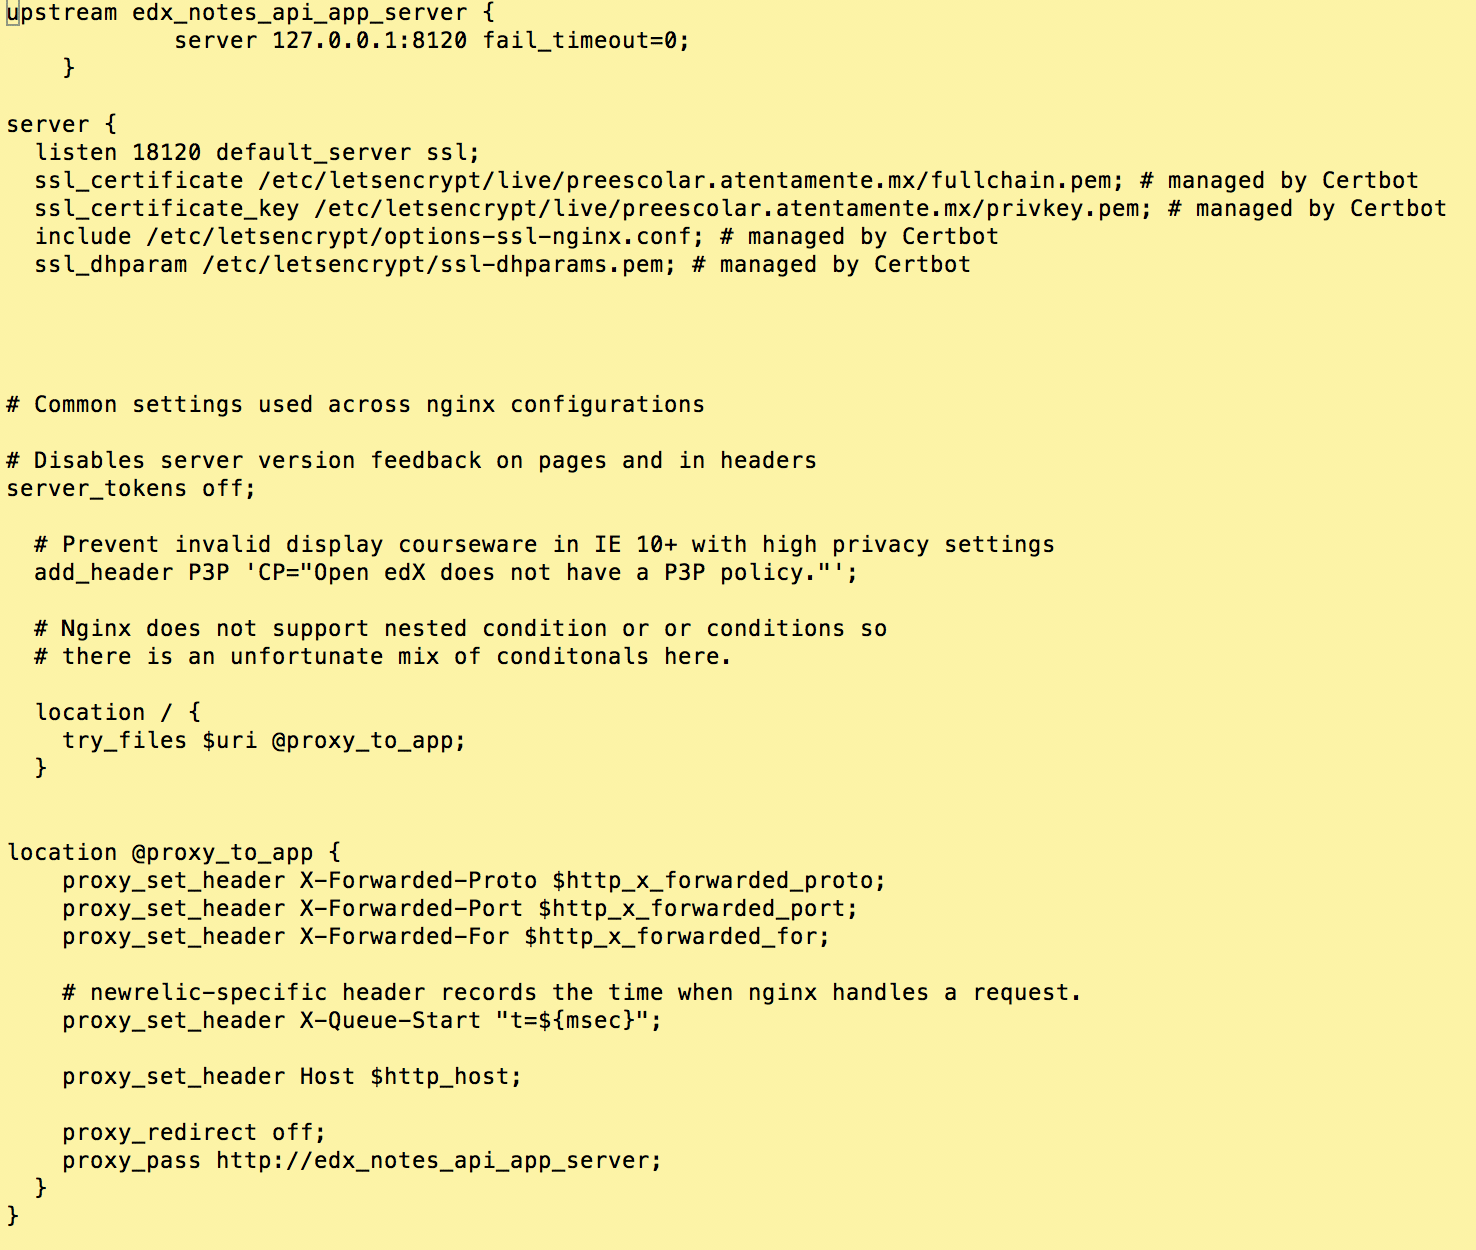
I hope you found this helpful. Please help me improve this article by leaving a comment below. Thank you!


Hi Lawrence, amazing guide.
Im getting a “failed to get mappings on indices” error, no clue why:
[2020-07-30 22:22:02,313][DEBUG][action.admin.indices.mapping.put] [Cyclops] failed to put mappings on indices [[notes]], type [modelresult]
org.elasticsearch.index.mapper.MergeMappingException: Merge failed with failures {[mapper [user] has different index values, mapper [user] has different tokenize values, mapper [user] $
at org.elasticsearch.cluster.metadata.MetaDataMappingService$4.execute(MetaDataMappingService.java:511)
at org.elasticsearch.cluster.service.InternalClusterService$UpdateTask.run(InternalClusterService.java:365)
at org.elasticsearch.common.util.concurrent.PrioritizedEsThreadPoolExecutor$TieBreakingPrioritizedRunnable.runAndClean(PrioritizedEsThreadPoolExecutor.java:188)
at org.elasticsearch.common.util.concurrent.PrioritizedEsThreadPoolExecutor$TieBreakingPrioritizedRunnable.run(PrioritizedEsThreadPoolExecutor.java:158)
at java.util.concurrent.ThreadPoolExecutor.runWorker(ThreadPoolExecutor.java:1142)
at java.util.concurrent.ThreadPoolExecutor$Worker.run(ThreadPoolExecutor.java:617)
at java.lang.Thread.run(Thread.java:748)
Any guidance will be much appreciated.
Im working on ironwood.master.
Hi
Student notes error.
When I try and load notes this is the error received.
Traceback (most recent call last):
File “/opt/bitnami/apps/edx/venvs/edxapp/lib/python2.7/site-packages/django/core/handlers/exception.py”, line 41, in inner
response = get_response(request)
File “/opt/bitnami/apps/edx/venvs/edxapp/lib/python2.7/site-packages/django/core/handlers/base.py”, line 249, in _legacy_get_response
response = self._get_response(request)
File “/opt/bitnami/apps/edx/venvs/edxapp/lib/python2.7/site-packages/django/core/handlers/base.py”, line 187, in _get_response
response = self.process_exception_by_middleware(e, request)
File “/opt/bitnami/apps/edx/venvs/edxapp/lib/python2.7/site-packages/django/core/handlers/base.py”, line 185, in _get_response
response = wrapped_callback(request, *callback_args, **callback_kwargs)
File “/opt/bitnami/apps/edx/venvs/edxapp/lib/python2.7/site-packages/django/utils/decorators.py”, line 185, in inner
return func(*args, **kwargs)
File “/opt/bitnami/apps/edx/venvs/edxapp/lib/python2.7/site-packages/django/contrib/auth/decorators.py”, line 23, in _wrapped_view
return view_func(request, *args, **kwargs)
File “/opt/bitnami/apps/edx/edx-platform/lms/djangoapps/edxnotes/views.py”, line 62, in edxnotes
notes_info = get_notes(request, course)
File “/opt/bitnami/apps/edx/edx-platform/lms/djangoapps/edxnotes/helpers.py”, line 346, in get_notes
raise EdxNotesParseError(_(“Invalid JSON response received from notes api.”))
EdxNotesParseError: \u067e\u0627\u0633\u062e JSON \u0646\u0627\u0645\u0639\u062a\u0628\u0631 \u0627\u0632 \u06cc\u0627\u062f\u062f\u0627\u0634$
I am able to complete up through step 3 (creating a linux user “edx-notes-api” and mysql user with ansible).
When I try to complete step 4 (installing the django app), I run into problems.
First, I created a server-vars.yml file based on the Stanford Template to fix the initial errors, but when I run the following lines of code:
source /edx/app/edx_ansible/venvs/edx_ansible/bin/activate
cd /edx/app/edx_ansible/edx_ansible/playbooks/edx-east
sudo ansible-playbook -i ‘localhost,’ -c local ./notes.yml -e@/edx/app/edx_ansible/server-vars.yml
I get the following error:
TASK [git_clone : Checkout code over https] ***********************************************************************************************************************************************************
failed: [localhost] (item=(censored due to no_log)) => {“censored”: “the output has been hidden due to the fact that ‘no_log: true’ was specified for this result”}
to retry, use: –limit @/edx/app/edx_ansible/edx_ansible/playbooks/notes.retry
Previously I was getting an error that said:
TASK [edx_notes_api : Install application requirements] failed… no matching distribution found for django-cors-headers==3.2.1…
but I am unable to backtrack and corroborate the new error I am getting after playing around and re-cloning the edx-notes-api repo.
The notes tab is showing up, but when I click on the notes tab from the “learner” view – I get a 500 error.
Thank you in advance for your help!
Hi,
If anybody has solved the following error on the installation of Notes Tool in ironwood.master release, please help:
TASK [aws : Gather ec2 facts for use in other roles] ****************************************************************************************************************************************************************************************
fatal: [localhost]: FAILED! => {“failed”: true, “msg”: “The module ec2_metadata_facts was not found in configured module paths. Additionally, core modules are missing. If this is a checkout, run ‘git pull –rebase’ to correct this problem.”}
to retry, use: –limit @/edx/app/edx_ansible/edx_ansible/playbooks/notes.retry
PLAY RECAP **********************************************************************************************************************************************************************************************************************************
localhost : ok=31 changed=3 unreachable=0 failed=1
Or a guide to install notes tool on ironwood.master.
you have to comment the aws role as explained here: https://discuss.openedx.org/t/open-edx-notes-installation/1000/7
Hello, I tried to install edx notes but it fails on 4 step with error
TASK [aws : Gather ec2 facts for use in other roles]. Edx Platform is installed on a virtual server but not an amazon one.
How can I step over this error?
Hello, I tried to install edx notes but it fails on 4 step with error
TASK [aws : Gather ec2 facts for use in other roles]. Edx Platform is installed on a virtual server but not an amazon one.
How can I step over this error?
when i click `notes`, it shows error: `There has been a 500 error on the Your Platform Name Here servers`, check the log :`EdxNotesParseError: Invalid JSON response received from notes api.`?
what version of Open edX are you running?
Hi, i have same error of gang wang, and my version of open edx is Hawthorn.2. What can cause this error?
i am facing the same issue
Hi Lawrence,
I followed the steps and was able to set up edx notes but I am getting “Sorry we could not create this annotation” when I load any course page. This also occurs while saving any note.
Hi Lawrence,
I was able to successfully set up edx notes. But on the course page, I get a 500 error “Sorry we could not create this annotation”. It also occurs while saving any note. Following is the log for the same: <> is my domain for noteserver
Aug 30 15:32:45 ip-10-0-2-84 [service_variant=edx-notes-api][django.request][env:no_env] ERROR [ip-10-0-2-84 3249] [exception.py:135] – Internal Server Error: /api/v1/annotations/
Traceback (most recent call last):
File “/edx/app/edx_notes_api/venvs/edx_notes_api/local/lib/python2.7/site-packages/django/core/handlers/exception.py”, line 109, in get_exception_response
response = callback(request, **dict(param_dict, exception=exception))
File “/edx/app/edx_notes_api/venvs/edx_notes_api/local/lib/python2.7/site-packages/django/utils/decorators.py”, line 145, in _wrapped_view
result = middleware.process_view(request, view_func, args, kwargs)
File “/edx/app/edx_notes_api/venvs/edx_notes_api/local/lib/python2.7/site-packages/django/middleware/csrf.py”, line 277, in process_view
good_referer = request.get_host()
File “/edx/app/edx_notes_api/venvs/edx_notes_api/local/lib/python2.7/site-packages/django/http/request.py”, line 113, in get_host
raise DisallowedHost(msg)
DisallowedHost: Invalid HTTP_HOST header: ‘<>’. You may need to add u”<>’ to ALLOWED_HOSTS.
hi Ashutosh, interesting error. a couple of questions: a) have you made any changes to your Nginx configuration? and b) where are you hosting your Open edX instance?
Thank you for your quick reply.
a) I have made no changes to the Nginx config.
b) I have hosted the production stack on AWS.
It is probably an issue with some settings file. So to at least make it work, I edited the request.py file and hardcoded my noteserver URL. Now I’m able to save notes in the database (notes are visible in the Notes tab). But it looks like it is not getting saved in elasticsearch. I’m still getting the “Sorry we could not create this annotation” error on top.
Here is the edx-notes-api log for the same –
Sep 3 11:33:25 ip-10-0-2-55 [service_variant=edx-notes-api][django.request][env:no_env] ERROR [ip-10-0-2-55 31684] [exception.py:135] – Internal Server Error: /api/v1/annotations/
Traceback (most recent call last):
File “/edx/app/edx_notes_api/venvs/edx_notes_api/local/lib/python2.7/site-packages/django/core/handlers/exception.py”, line 41, in inner
response = get_response(request)
File “/edx/app/edx_notes_api/venvs/edx_notes_api/local/lib/python2.7/site-packages/django/core/handlers/base.py”, line 249, in _legacy_get_response
response = self._get_response(request)
File “/edx/app/edx_notes_api/venvs/edx_notes_api/local/lib/python2.7/site-packages/django/core/handlers/base.py”, line 187, in _get_response
response = self.process_exception_by_middleware(e, request)
File “/edx/app/edx_notes_api/venvs/edx_notes_api/local/lib/python2.7/site-packages/django/core/handlers/base.py”, line 185, in _get_response
response = wrapped_callback(request, *callback_args, **callback_kwargs)
File “/edx/app/edx_notes_api/venvs/edx_notes_api/local/lib/python2.7/site-packages/django/views/decorators/csrf.py”, line 58, in wrapped_view
return view_func(*args, **kwargs)
File “/edx/app/edx_notes_api/venvs/edx_notes_api/local/lib/python2.7/site-packages/django/views/generic/base.py”, line 68, in view
return self.dispatch(request, *args, **kwargs)
File “/edx/app/edx_notes_api/venvs/edx_notes_api/local/lib/python2.7/site-packages/rest_framework/views.py”, line 489, in dispatch
response = self.handle_exception(exc)
File “/edx/app/edx_notes_api/venvs/edx_notes_api/local/lib/python2.7/site-packages/rest_framework/views.py”, line 449, in handle_exception
self.raise_uncaught_exception(exc)
File “/edx/app/edx_notes_api/venvs/edx_notes_api/local/lib/python2.7/site-packages/rest_framework/views.py”, line 486, in dispatch
response = handler(request, *args, **kwargs)
File “/data/edx/app/edx_notes_api/edx_notes_api/notesapi/v1/views.py”, line 367, in post
note.save()
File “/edx/app/edx_notes_api/venvs/edx_notes_api/local/lib/python2.7/site-packages/django/db/models/base.py”, line 808, in save
force_update=force_update, update_fields=update_fields)
File “/edx/app/edx_notes_api/venvs/edx_notes_api/local/lib/python2.7/site-packages/django/db/models/base.py”, line 848, in save_base
update_fields=update_fields, raw=raw, using=using,
File “/edx/app/edx_notes_api/venvs/edx_notes_api/local/lib/python2.7/site-packages/django/dispatch/dispatcher.py”, line 193, in send
for receiver in self._live_receivers(sender)
File “/edx/app/edx_notes_api/venvs/edx_notes_api/local/lib/python2.7/site-packages/haystack/signals.py”, line 52, in handle_save
index.update_object(instance, using=using)
File “/edx/app/edx_notes_api/venvs/edx_notes_api/local/lib/python2.7/site-packages/haystack/indexes.py”, line 284, in update_object
backend.update(self, [instance])
File “/edx/app/edx_notes_api/venvs/edx_notes_api/local/lib/python2.7/site-packages/haystack/backends/elasticsearch_backend.py”, line 190, in update
bulk(self.conn, prepped_docs, index=self.index_name, doc_type=’modelresult’)
File “/edx/app/edx_notes_api/venvs/edx_notes_api/local/lib/python2.7/site-packages/elasticsearch/helpers/__init__.py”, line 188, in bulk
for ok, item in streaming_bulk(client, actions, **kwargs):
File “/edx/app/edx_notes_api/venvs/edx_notes_api/local/lib/python2.7/site-packages/elasticsearch/helpers/__init__.py”, line 160, in streaming_bulk
for result in _process_bulk_chunk(client, bulk_actions, raise_on_exception, raise_on_error, **kwargs):
File “/edx/app/edx_notes_api/venvs/edx_notes_api/local/lib/python2.7/site-packages/elasticsearch/helpers/__init__.py”, line 132, in _process_bulk_chunk
raise BulkIndexError(‘%i document(s) failed to index.’ % len(errors), errors)
BulkIndexError: (u’1 document(s) failed to index.’, [{u’index’: {u’_type’: u’modelresult’, u’_id’: u’v1.note.64′, u’ok’: True, u’_version’: 1, u’_index’: u’edxnotes’}}])
Elasticsearch logs have these errors which are not always thrown on requests –
[2018-09-03 10:19:55,417][DEBUG][action.index ] [Arsenic] [edxnotes][2], node[XRX6RWoDR0uivEw64qHXMg], [P], s[STARTED]: Failed to execute [index {[edxnotes][_mapping][modelresult], source[{“modelresult”: {“properties”: {“ranges”: {“index”: “not_analyzed”, “type”: “string”}, “django_id”: {“include_in_all”: false, “index”: “not_analyzed”, “type”: “string”}, “created”: {“type”: “date”}, “quote”: {“type”: “string”, “analyzer”: “snowball”}, “tags”: {“type”: “string”, “analyzer”: “snowball”}, “updated”: {“type”: “date”}, “django_ct”: {“include_in_all”: false, “index”: “not_analyzed”, “type”: “string”}, “user”: {“index”: “not_analyzed”, “type”: “string”}, “text”: {“type”: “string”, “analyzer”: “snowball”}, “course_id”: {“index”: “not_analyzed”, “type”: “string”}, “data”: {“type”: “string”, “analyzer”: “snowball”}, “usage_id”: {“index”: “not_analyzed”, “type”: “string”}}}}]}]
org.elasticsearch.indices.InvalidTypeNameException: mapping type name [_mapping] can’t start with ‘_’
at org.elasticsearch.index.mapper.MapperService.merge(MapperService.java:212)
at org.elasticsearch.index.mapper.MapperService.merge(MapperService.java:200)
at org.elasticsearch.index.mapper.MapperService.documentMapperWithAutoCreate(MapperService.java:351)
at org.elasticsearch.index.shard.service.InternalIndexShard.prepareIndex(InternalIndexShard.java:373)
at org.elasticsearch.action.index.TransportIndexAction.shardOperationOnPrimary(TransportIndexAction.java:205)
at org.elasticsearch.action.support.replication.TransportShardReplicationOperationAction$AsyncShardOperationAction.performOnPrimary(TransportShardReplicationOperationAction.java:556)
at org.elasticsearch.action.support.replication.TransportShardReplicationOperationAction$AsyncShardOperationAction$1.run(TransportShardReplicationOperationAction.java:426)
at java.util.concurrent.ThreadPoolExecutor.runWorker(ThreadPoolExecutor.java:1142)
at java.util.concurrent.ThreadPoolExecutor$Worker.run(ThreadPoolExecutor.java:617)
at java.lang.Thread.run(Thread.java:748)
Have you solved this error now?I encounter the same error using tutor. It probably caused by not having a notes database. I‘m working on create databases in tutor now.
Hi Lawrence, any updates on this issue?
No. on my most recent installation of Notes & Annotations — on Ginkgo — i followed the procedure published here in this article. what version are you running? incidentally, i did not make modifications to requests.py as part of the installation.
I’m running it on Ficus 4. Everything is working fine except storing the notes in elasticsearch.I have shared the logs for that as well in my previous comment. Thanks
Ok, thank you!
Hi Lawrence,
Thank you for the great work. In step 4, did you mean “-e@/edx/app/edx_ansible/edx_ansible/server-vars.yml”? I think your “-e@/edx/app/edx_ansible/server-vars.yml” ommitted one “edx_ansible” folder.
I could be wrong though. Please confirm.
hi Eric, technically server-vars.yml can reside wherever you like. to my knowledge it’s only referenced once, in a single python script edx/bin/update, which itself is easy to modify. But at any rate this script looks for the file in this path /edx/app/edx_ansible/server-vars.yml. hope that helps! 🙂
Thanks for your response, Lawrence!
I didn’t see server-vars.yml so I run main.yml and ended destroying my edx environment. Do you have any idea how I can create a server-vars.yml file for the Native Installation Ubuntu 16.04?
you can likely get your platform back online by recompiling static assets. see: https://github.com/lpm0073/edx.scripts/blob/master/edx.compile-assets.sh
best if you reboot the server afterwards. you can setup a “blank” server-vars.yml file following this template: https://gist.github.com/dangtrinhnt/b260ccd3db902b55accc
lmk if you need more help.
Thanks again, Lawrence! Unfortunately, I had to restore the platform from an image backup. I follow your instructions next time to recompile.
By the way, will the “blank” server-vars.yml file overwrites my current configuration settings?
no, not when installing Notes.
Great!! I’m eager to start!!
hi luis, thank you for your help trouble-shooting this installation procedure. i’ve added additional configuration instructions to step 2 for the JWT Issuer and the EDX Notes API.