Learn the best practice for managing the 5 states of sensitive data in CI workflows using Github Actions and Kubernetes

Note: Code samples and snippets included in this article were prototyped from the production source code for, “Open edX Tutor k8s get environment secret“, a reusable component in the Github Actions Marketplace.
Practical Theory
In this article I’ll demonstrate best practice for each of the five states of sensitive data management. By sensitive data, I mean passwords, authorization tokens, key pairs, ssh keys, encryption keys, and so on. Basically, any data that is considered ‘secret’ for your platform. Sensitive data presents unique challenges to automating build and deployment workflows using modern CI tools. The conundrum is that you need to store your sensitive data in a safe place with controlled access, and, you need a safe means of retrieving the data and applying it your configuration in such a way as to avoid it leaking or becoming publicly exposed. The practical example that follows will use Terraform, Github Actions and Kubernetes to manage a workflow to configure a MySQL service for a fictitious Django application. But keep in mind that the basic theory that I present should also work with any combination of alternative technologies and platforms.
First things first, summarizing the five steps:

- Create. If you control the credential in question then ideally you’ll leverage a tool to programmatically generate its value using some predetermined pattern and policy. Whenever possible I try to use Terraform for these because it provides configurable modules for typical kinds of secrets, and also because it persists its state. That is, if you used it in the past to generate a credential of some sort then it will remember everything that it previously did.
- Persist. If you control the credential then another good reason to use Terraform is because it can automate persisting its results. In my case I’ll use Kubernetes, but keep in mind that Terraform can save data to other storage technologies as well. If on the other hand you do not control the secret then we’ll handle things a bit differently. For example, suppose the credential in question was issued to you by a 3rd party like say, an API key. We’ll leverage Github Actions proprietary ‘Secrets’ management feature for these, as this gives us a reliable way to store and retrieve the credential without risk of it becoming exposed.
- Retrieve. Regardless of the storage methodology we chose for creating and persisting the credential, we’ll need a way to retrieve it from within a Github Actions workflow. For the credentials that we stored in Kubernetes Secrets we have kubectl, and for 3rd party credentials we have some proprietary syntax from Github Actions for accessing any secrets that we’ve added to our repository. Either way, we’ll be storing the retrieved value as an environment variable inside the Github Actions workflow.
- Transform. We’ve retrieved a credential for the express purpose of adding it to some application configuration, and most likely the retrieval format will not be quite what we need. Hence, it’s likely that we’ll need to perform some number of transformations of the retrieved data in order to get it into the exact form that our configuration tool (and it’s underlying technologies) expects.
- Consume. Ultimately our configuration tool will consume our transformed credential, and our work is done.
Adding Secrets to a Github Repository
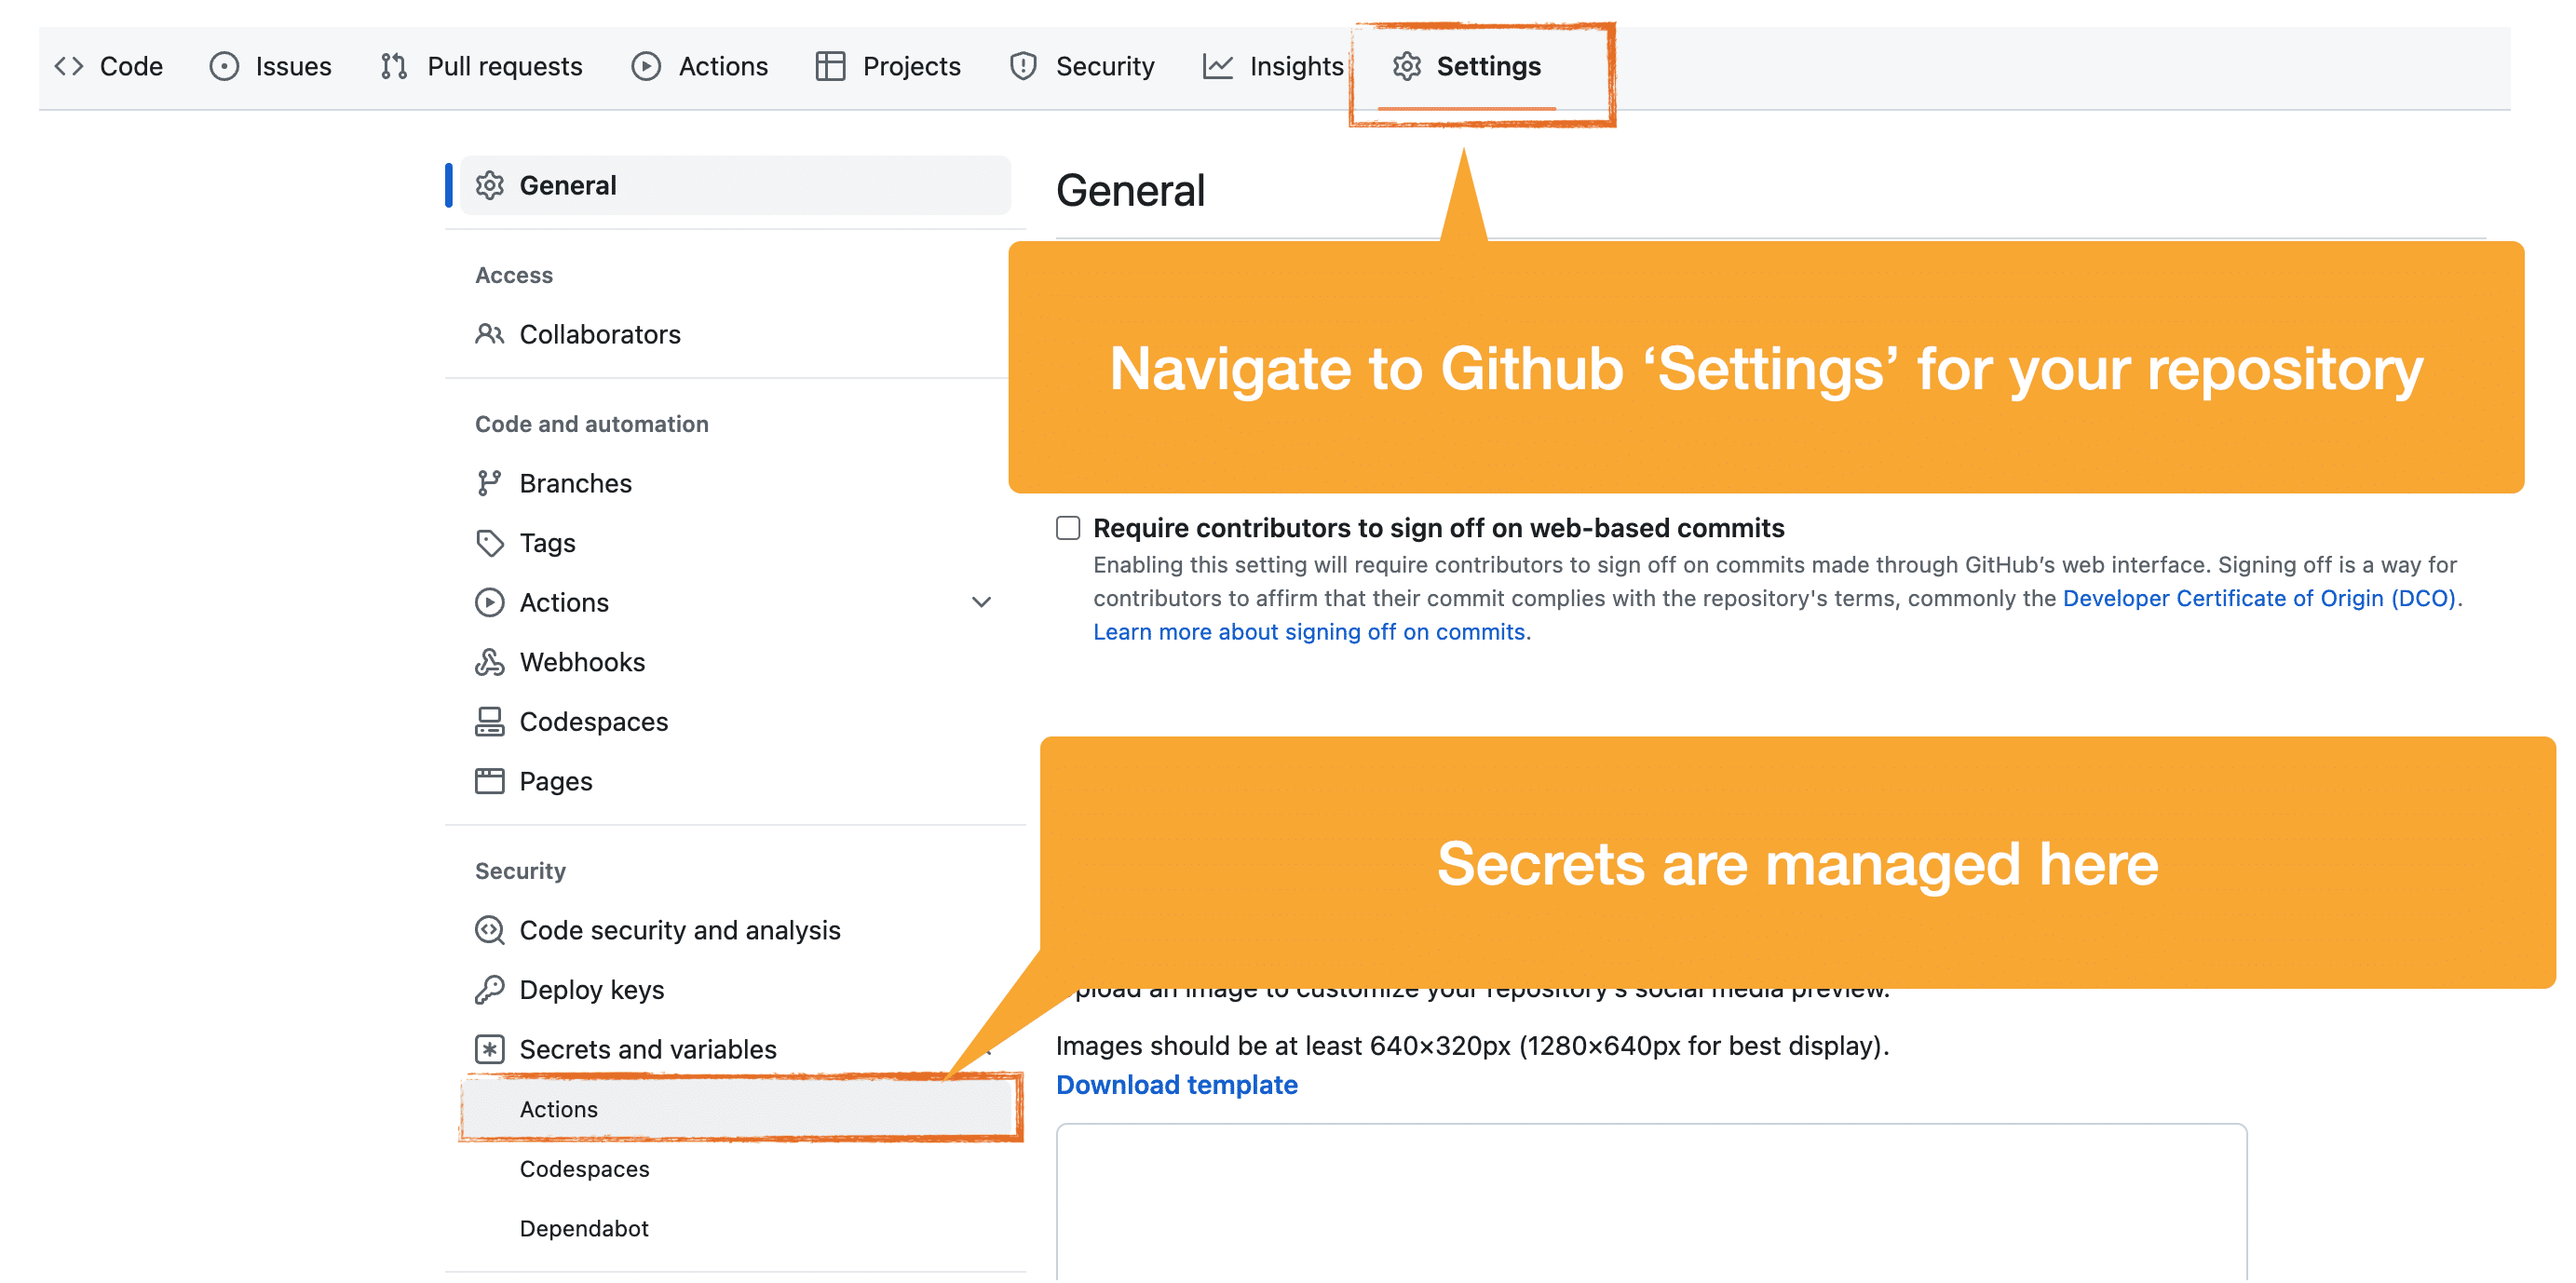
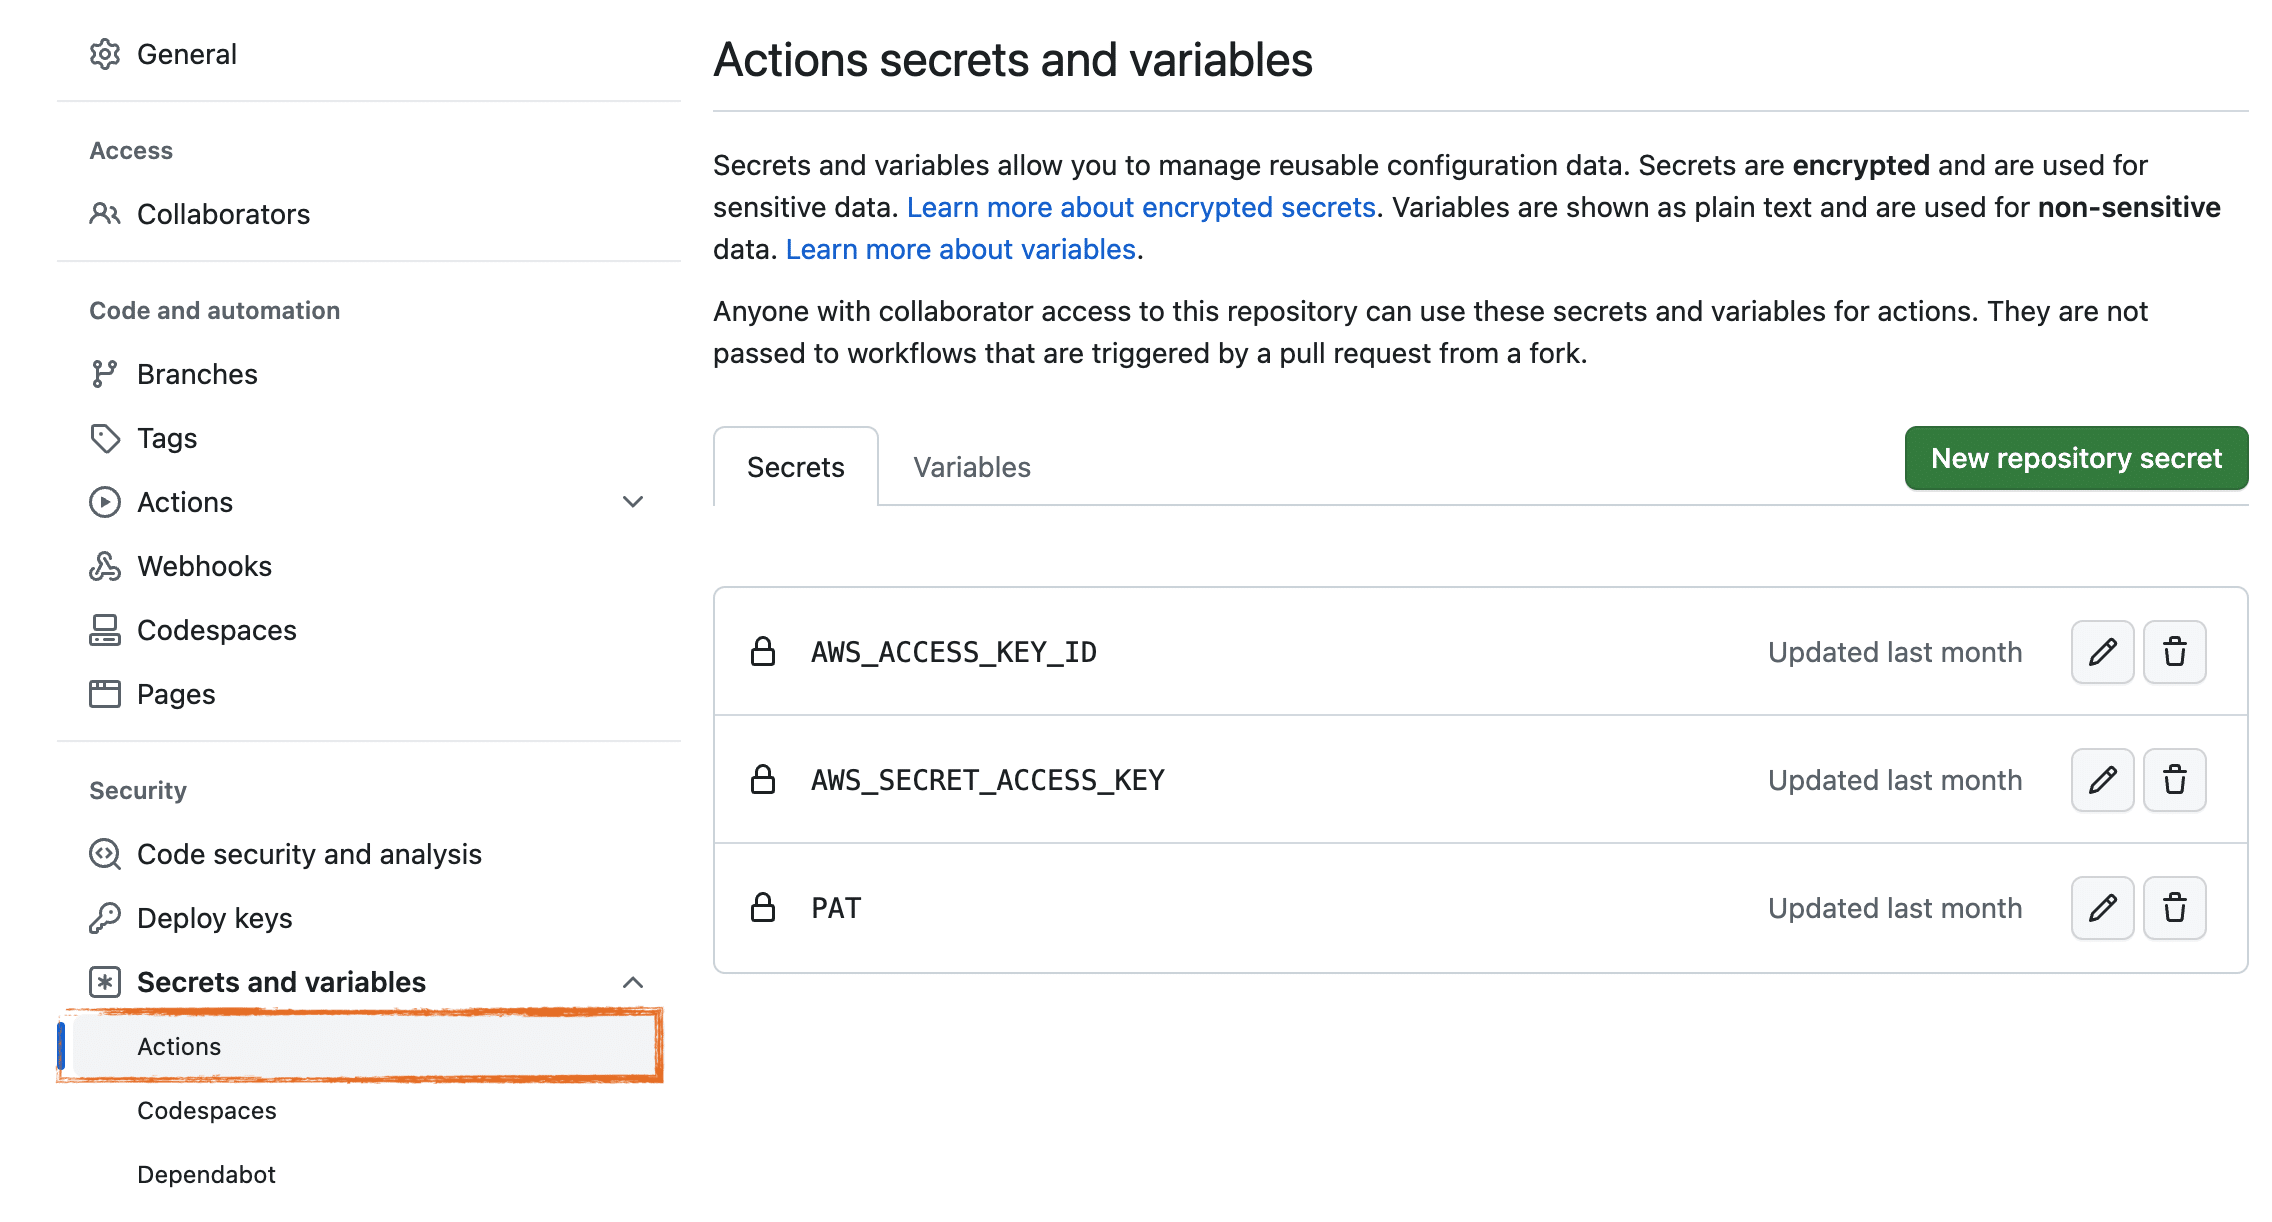
Github, and presumably competitors of Github as well, provide a free secrets management feature where you can create and name a new secret, and paste its value as unicode text. The value of your secret is only visible at the moment of its creation. Afterwards it is permanently invisible, even to the repository owner (presumably that’s you).
In the example below I’ve added an AWS IAM key-pair, along with a Github Personal Access Token (PAT). These are pretty common examples illustrating the kinds of 3rd party credentials that you’ll need to add to your workflow using Github Actions’ Secrets. In my case, my workflow will need to interact with a Kubernetes cluster that runs on AWS Elastic Kubernetes Service, and, my PAT is required if I need to access any private Github repositories.
Creating Kubernetes Secrets using Terraform
These snippets are paraphrased for the sake of brevity. Summarizing some important assumptions about your environment:
- we’re relying on Terraform’s Hashicorp AWS provider which itself assumes that you’ve installed the awscli and configured it with an AWS IAM key-pair with permissions sufficient to access all resources included in the Terraform script.
- we’re relying on Terraform’s Hashicorp Kubernetes provider which itself assumes that you’ve installed kubectl locally and that you have authorized access to a Kubernetes cluster.
- we’re using terraform-aws-modules/rds/aws to create an AWS RDS instance of MySQL, noting however that I’ve skipped LOTS of required inputs for this module.
Important!
A common practice with Terraform is storing the remote state data in an AWS S3 Bucket. If this is what you’re doing, then you should properly secure this bucket because the values of all Terraform-generated passwords are persisted inside the files in this bucket.
terraform {
  required_version = "~> 1.3"

  required_providers {
    aws = {
      source  = "hashicorp/aws"
      version = "~> 4.48"
    }
    kubernetes = {
      source  = "hashicorp/kubernetes"
      version = "~> 2.16"
    }
  }
}

data "aws_eks_cluster" "eks" {
  name = var.resource_name
}

data "aws_eks_cluster_auth" "eks" {
  name = var.resource_name
}

provider "kubernetes" {
  host                   = data.aws_eks_cluster.eks.endpoint
  cluster_ca_certificate = base64decode(data.aws_eks_cluster.eks.certificate_authority[0].data)
  token                  = data.aws_eks_cluster_auth.eks.token
}

module "db" {
  source = "terraform-aws-modules/rds/aws"
  version = "~> 5.2"
  username = 'root'
  publicly_accessible = false
  create_random_password = true
}

# example 1: password is generated for us by a Terraform module
resource "kubernetes_secret" "mysql_root" {
  metadata {
    name = "mysql-root"
    namespace = var.resource_name
  }

  data = {
    MYSQL_ROOT_USERNAME = module.db.db_instance_username
    MYSQL_ROOT_PASSWORD = module.db.db_instance_password
    MYSQL_HOST = "mysql.example.com"
    MYSQL_PORT = module.db.db_instance_port
    }
}

# example 2: we create our own password
resource "random_password" "mysql_openedx" {
  length = 16
  special = true
  override_special = "_%@"
  keepers = {
    version = "1"
  }
}

resource "kubernetes_secret" "openedx" {
  metadata {
    name = "mysql-openedx"
    namespace = var.environment_namespace
  }

  data = {
    OPENEDX_MYSQL_DATABASE = 'openedx'
    OPENEDX_MYSQL_USERNAME = 'openedx_user'
    OPENEDX_MYSQL_PASSWORD = random_password.mysql_openedx.result
    MYSQL_HOST = "mysql.example.com"
    MYSQL_PORT = module.db.db_instance_port
  }
}
Summarizing what’s happening in the code above of which you should be mindful:
- Kubernetes Secrets‘ payload is a JSON dict that follows the rules of JSON and is therefore capable of storing more than one value.
- Note that in the two examples below, we are storing ALL mysql connection information rather than only the password.
- the namespace is in lower case with words separated by hyphens. This is important because later on we’re going to use kubectl on a Linux command line to retrieve this data, and we want to avoid incompatibilities between Kubernetes -> kubectl -> bash.
- the secrets are named in upper case with words separated by underscores. This is also important because later on we’re going to use jq for our transformations and we want to simplify our embedded assumptions about how our secret’s keys are named. Separately, the underscores are important to avoid misinterpretation of our data by jq.
- Kubernetes secrets will store our secret as text, noting however that this text will be base64 encoded. Because of the base64 encoding it is not readable until we decode it. This is less a form of a security than it is intended to facilitate storage of unicode data.
Retrieving a Kubernetes Secret using kubectl
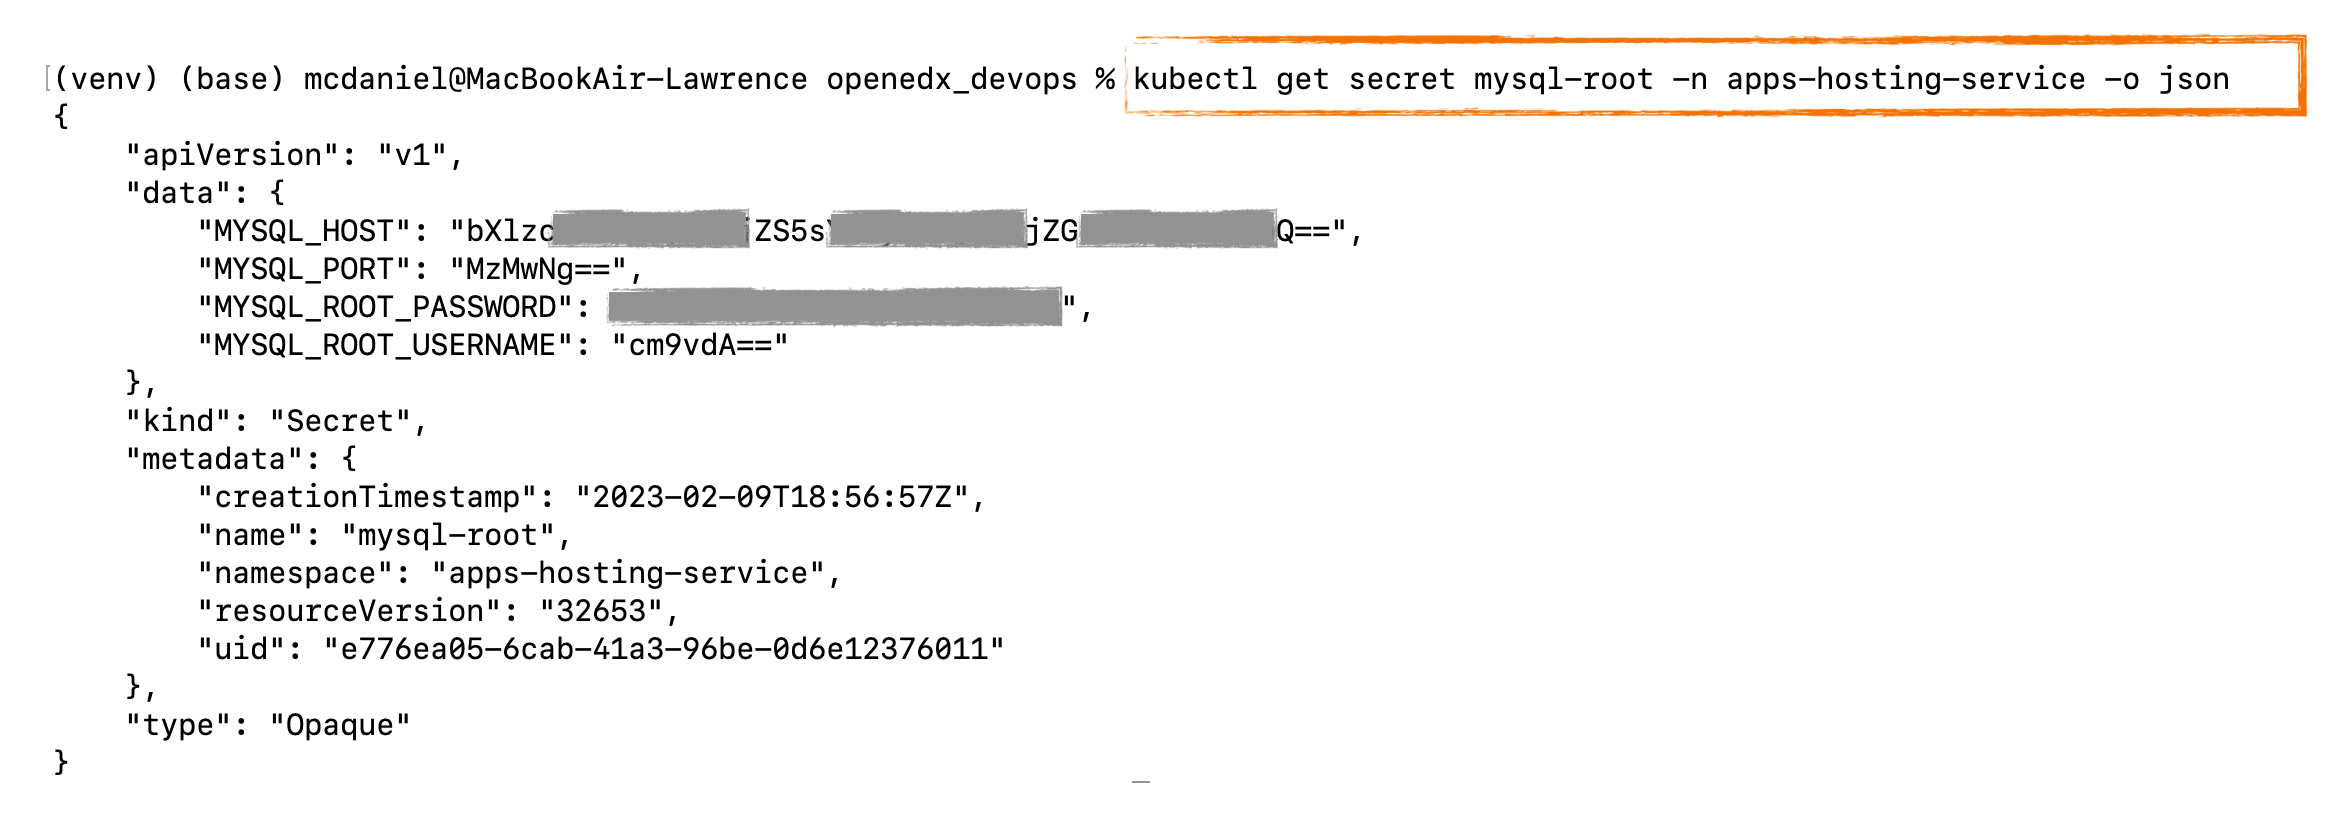
Retrieving a Kubernetes Secrets is pretty straightforward, as it is part of the kubectl CLI. As I mentioned above however, the contents of the secret are base64 encoded and so for the moment we still can’t see the actual values. Breaking down the salient parts of the command below:
kubectl get secret [SECRET NAME] -n [NAMESPACE] with output requested in JSON format.
Transforming a Kubernetes Secret Into Something Useful
I’m going to use a command line tool name jq for this step, but remember that to use jq in your Github Action workflow you’ll first need to install it. Like most Linux commands, you can pipe a series of jq commands in order to achieve your intended result. Here’s the complete series of commands:
kubectl get secret mysql-root -n apps-hosting-service -o json | jq ‘.data | map_values(@base64d)’ | jq -r ‘keys[] as $k | “\($k|ascii_upcase)=\(.[$k])”‘
which produces the following output:
MYSQL_HOST=mysql.example.com
MYSQL_PORT=3306
MYSQL_ROOT_PASSWORD=oYShoobyDoobyDo
MYSQL_ROOT_USERNAME=root
Putting It All Together in a Github Action
We can automate all of these steps in Github Actions, and then generalize it by adding input parameters so that it can be used for other kinds of secrets. If you’re not yet familiar, Github Actions is a pretty amazing free service offered by Github. GitHub Actions is a continuous integration and continuous delivery (CI/CD) platform that allows you to automate your build, test, and deployment pipeline. You can create workflows that build and test every pull request to your repository, or deploy merged pull requests to production. GitHub Actions goes beyond just DevOps and lets you run workflows when other events happen in your repository. For example, you can run a workflow to automatically add the appropriate labels whenever someone creates a new issue in your repository. GitHub provides generous free usage tiers for Linux, Windows, and macOS virtual machines to run your workflows, or you can host your own self-hosted runners in your own data center or cloud infrastructure.
The following code, in YAML format, needs to be saved in your Github repository in the following exact path:
.github/k8s-get-secret/action.yml
Where ‘k8s-get-secret’ will eventually become the name of our published Github Action.
#------------------------------------------------------------------------------
# - Extract a secret from a k8s namespace
# - unpack and decode the data values
# - format into a collection of bash environment variables that can be
#   consumed by our configuration tool on the command line
# - add a mask for the password values so that these do not leak into the console
#------------------------------------------------------------------------------
name: k8s get environment secret
description: Github Action to convert k8s secrets into config variables.
branding:
  icon: 'cloud'
  color: 'orange'
inputs:
  eks-namespace:
    description: 'The Kubernetes namespace to which the application will be deployed. Example: prod'
    required: true
    type: string
  eks-secret-name:
    description: 'The name of a secret stored in the Kubernetes cluster. Example: mysql-root'
    required: true
    type: string

runs:
  using: "composite"
  steps:
    # - fetch from Kubernetes secrets
    # - dump secret metadata to console
    # - parse data and decode values
    # - output in JSON format
    - name: Fetch secret meta data from k8s and echo to the console
      id: fetch-metadata
      shell: bash
      run: |-
        echo "k8s secret:"
        echo "=================================================="
        kubectl get secret ${{ inputs.eks-secret-name }} -n ${{ inputs.eks-namespace }}  -o json | jq  .metadata | jq -r 'keys[] as $k | "\($k)=\(.[$k])"'
        echo "=================================================="
    # Fetch, decode, and transpose into environment variables consumable by our configuration tool
    - name: Fetch decode and transform into environment variables
      id: transform-secret
      shell: bash
      run: kubectl get secret ${{ inputs.eks-secret-name }} -n ${{ inputs.eks-namespace }}  -o json | jq  '.data | map_values(@base64d)' | jq -r 'keys[] as $k | "\($k|ascii_upcase)=\(.[$k])"' >> $GITHUB_ENV

    # see: https://www.cyberciti.biz/faq/linux-unix-bsd-xargs-construct-argument-lists-utility/
    - name: Mask this output
      id: add-mask
      shell: bash
      run: kubectl get secret ${{ inputs.eks-secret-name }} -n ${{ inputs.eks-namespace }}  -o json | jq  .data | jq 'keys[] as $k | "::add-mask::$\($k|ascii_upcase)"' |  xargs echo -I {}
Important Note
Console output is another area of potential weakness with regard to your sensitive data. You should regularly audit your Github Actions workflow console output, checking for any evidence of sensitive data that is being incorrectly echoed to the console. Additionally, as an added precaution, you might consider adding a workflow post cleanup step to explicitly destroy everything in the bash environment of the Github runner itself, even though this technically is ephemeral.
Using Your New Github Action
Your new local Github Action is now callable from any locally defined Github Actions workflow. Lets scaffold a deployment workflow that calls our ‘k8s-get-secret’
name: Deploy apps prod

on:
  workflow_dispatch:

jobs:
  deploy:
    runs-on: ubuntu-latest
    env:
      # environment settings
      # --------------------------------------------
      AWS_REGION: us-east-1
      ENVIRONMENT_ID: prod
      NAMESPACE: apps-hosting-prod
      EKS_CLUSTER_NAME: apps-hosting-service


    # deployment workflow begins here
    # --------------------------------------------
    steps:
      # -----------------------------------------------------------------------
      # initializations steps ...
      # -----------------------------------------------------------------------

      # checkout github repos: this repo, plus, all Gihubs Actions repos in this workflow
      - name: Checkout
        uses: actions/checkout

      # AWS helper method. creates a session token that's usable by all other
      # aws-actions. Prevents us from having to explicitly provide authentication credentials
      # to each aws-actions method individually.
      - name: Configure AWS credentials
        uses: aws-actions/configure-aws-credentials
        with:
          aws-access-key-id: ${{ secrets.AWS_ACCESS_KEY_ID }}
          aws-secret-access-key: ${{ secrets.AWS_SECRET_ACCESS_KEY }}
          aws-region: ${{ env.AWS_REGION }}

        - name: Check awscli version
          shell: bash
          run: |-
            echo "aws cli version:"
            echo "----------------"
            aws --version
            echo
            echo "aws IAM user:"
            echo "-------------"
            aws sts get-caller-identity

      # this assumes that the IAM user associated with the AWS credentials above
      # has auth access to the Kubernetes cluster.
      - name: Configure kubectl
          id: kubectl-configure
          shell: bash
          run: |-
            sudo snap install kubectl --channel=1.25/stable --classic
            aws eks --region ${{ env.AWS_REGION }} update-kubeconfig --name ${{ env.EKS_CLUSTER_NAME }} --alias ${{ env.EKS_CLUSTER_NAME }}
            echo "kubectl version and diagnostic info:"
            echo "------------------------------------"
            kubectl version --short --v=9

      # -----------------------------------------------------------------------
      # Deployment steps ...
      # -----------------------------------------------------------------------
      - name: Retrieve mysql root credentials
        uses: ./.github/actions/k8s-get-secret
        with:
          eks-namespace: apps-hosting-service
          eks-secret-name: mysql-root

      - name: Retrieve more credentials
        uses: ./.github/actions/k8s-get-secret
        with:
          eks-namespace: apps-hosting-service
          eks-secret-name: smtp-config
Publishing To The Github Action Marketplace
With modest effort you can publish your new Github Action to the Github Actions Marketplace, which makes it generally available to any Github repository. See this tutor-k8s-get-secret, which is an application specific implementation that is based on the same techniques and theory I cover in the article. If you want to take this extra step then please note the following:
- Github should automatically recognize that your repository is a “Github Action” when it detects the file ‘action.yml’ in the root of the repo, assuming that this file contains valid Github Action syntax and semantics
- You should add a good README that largely follows the style that you see in the example tutor-k8s-get-secret
- You’ll need to release a version, and ideally you should use semantic versioning for your repo
- You might consider forking tutor-k8s-get-secret and renaming the workflow in order to get started. If you take this approach then most or all of the technical requirements for your Github Actions should already be met.
Good luck on next steps!! I hope you found this helpful. Contributors are welcome. My contact information is on my web site. Please help me improve this article by leaving a comment below. Thank you!




Leave A Comment