The Open edX platform code base includes a comprehensive set of REST API’s that cover everything from viewing the course catalogue, to managing users, to administering your e-commerce system, and more. This article provides step-by-step instructions on how to enable and interact with this powerful set of API’s that you can leverage to integrate Open edX’s core functionality to your other systems as well as to develop your own custom web apps.

Summary
This article is a supplement to the official Open edX documentation, edX Course Catalog API User Guide, that really only covers a small subset of the complete set of REST api’s that Open edX implements. Additionally, the official documentation is written for the specific use case of someone gaining access to the course catalogue of the edx.org web site. For the avoidance of doubt, there are thousands of Open edX platform installations that are not actually affiliated with edx.org in any way but that run on the exact same open-source code base managed here.
This how-to article is aimed at helping developers and technical professionals to enable and expose the REST api’s on these independent Open edX installations. More specifically, it is intended to get the built-in api’s working on your Open edX installations under two distinct schemes:
- authenticated as an Open edX Django superuser, so that you can view REST api output from any url end point using an http client such as Postman, curl, or a web browser.
- a production environment of any third party platform in which you intend to use a secret key to manage access to the Open edX api’s.
These instructions are written to work with both the native installation method as well as the Tutor 1-Click installation method.
The Open edX platform implements nearly 300 different URL end points covering most aspects of its core functionality.
These are the production api’s that are also used on edx.org to support the stringent systems integration requirements of its hundreds of large affiliate educational institutions. These api’s are also leveraged extensively within the Open edX code base for inter-application communications and operations across its many components. If you are planning to integrate a third party system to Open edX for any reason, or if you are building a web app that will interact with the Open edX platform then these are the api’s that you should use.
All of these API’s are secure, well-written, well-documented, and performant. The api’s are independently version stamped, which will protect you from risks of future deprecations. The underlying source code for these api’s is objectively well-tested as measured by Coverage.
The api’s are implemented using a consistent strategy that is widely accepted as best practice in the Python/Django developer community. The code to create each API relies on the Django REST Framework, an excellent independent open source project. The API’s are documented with Swagger for URL discovery as well as with Sphinx for the source code itself. You can leverage the Swagger documentation to learn what URL end points are published and what parameters are required for each.
Also if you’re interested, with modest effort you can explore the Open edX code base to learn more about the technical specifics of how the output for various URL end points is generated. There’s a coding exercise at the bottom of this article that you can use to get started.
Open edX API Configuration Procedure
- I. Discover what api’s are available
- II. LMS configuration settings
- III. Django admin console configuration
- IV. API credentials work flow
- V. Test connectivity using the Swagger page
- VI. Using Postman
- VII. Using the Swagger page
- VIII. Using curl on the command-line
- IX. Retrieving an end point using a browser
- X. Hacking Open edX api’s
I. Discover what api’s are available
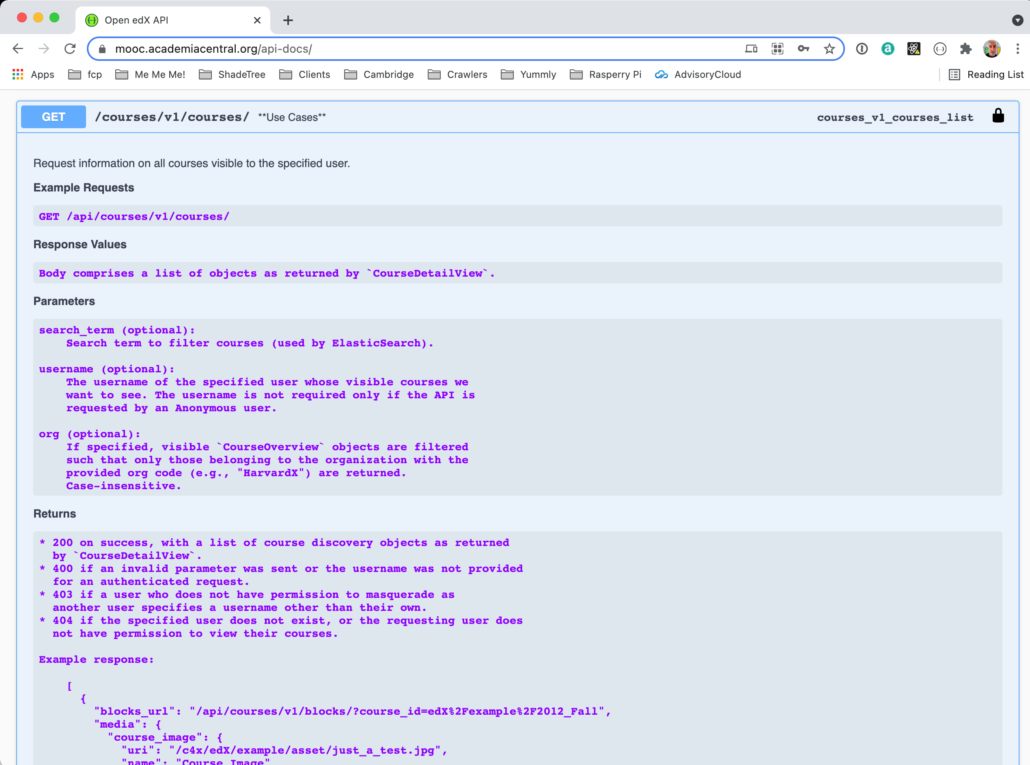
From the LMS of your own Open edX installation you can view a nicely organized, complete list of api url’s at the end point /api-docs/. So for example, here is the api-docs page for https://mooc.academiacentral.org/api-docs/. This page is published using Swagger. It is an interactive page that not only provides extensive information about each api url end point but also provides you with a way to authenticate and then to interact with the end points.
Swagger introspects Python source code and the Django REST Framework to generate a well-organized and intuitive web page representing all of the REST api’s in the code base. Later in this article we’ll review more of the features that are built-in to this page.

II. LMS application configuration settings
You can skip this step if you’re running a Tutor build of Open edX. For native builds you need to verify the following LMS application configuration settings, which are located in /edx/etc/lms.yml.
# You should edit the following default settings
#---------------------------------------------------
COURSE_CATALOG_API_URL: http://localhost:8008/api/v1
COURSE_CATALOG_URL_ROOT: http://localhost:8008
COURSE_CATALOG_VISIBILITY_PERMISSION: see_exists

# Here are the same settings, modified to work for mooc.academiacentral.org
#---------------------------------------------------
COURSE_CATALOG_API_URL: http://mooc.academiacentral.org/api/v1
COURSE_CATALOG_URL_ROOT: http://mooc.academiacentral.org
COURSE_CATALOG_VISIBILITY_PERMISSION: see_exists
Note that the default setting for COURSE_CATALOG_VISIBILITY_PERMISSION is fine in most cases.
III. Django admin console configuration
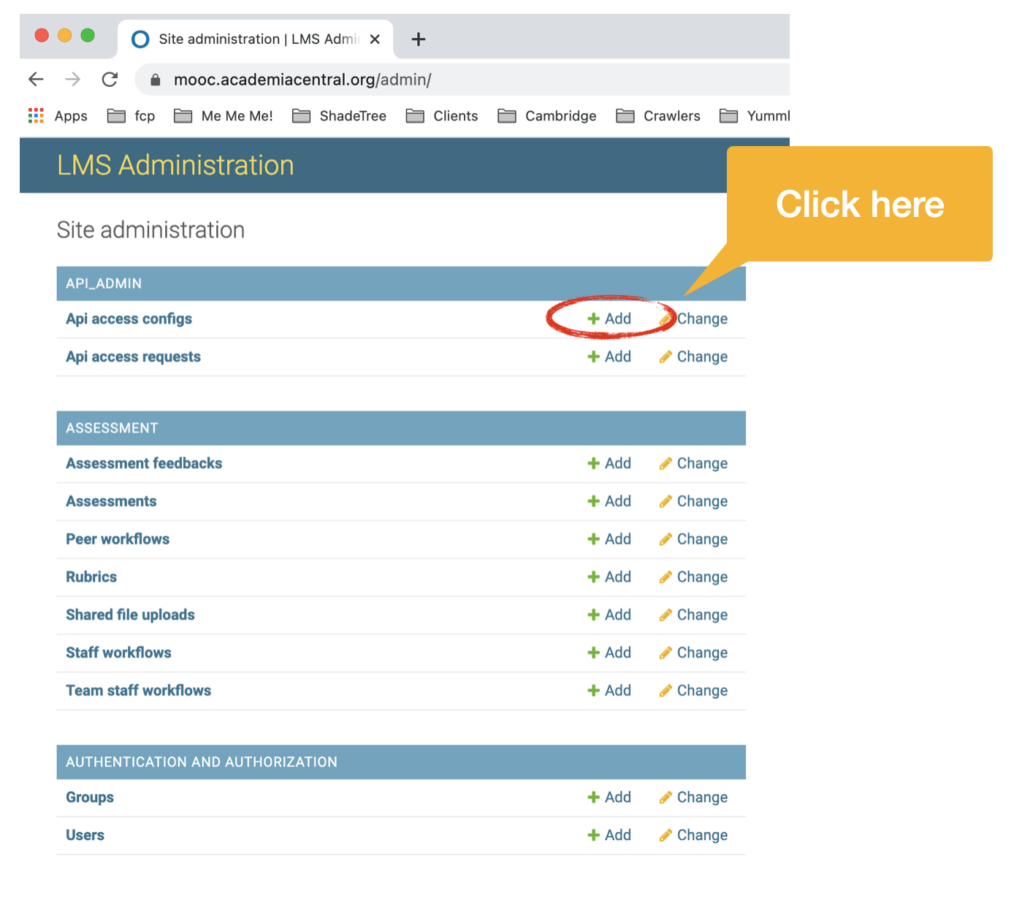
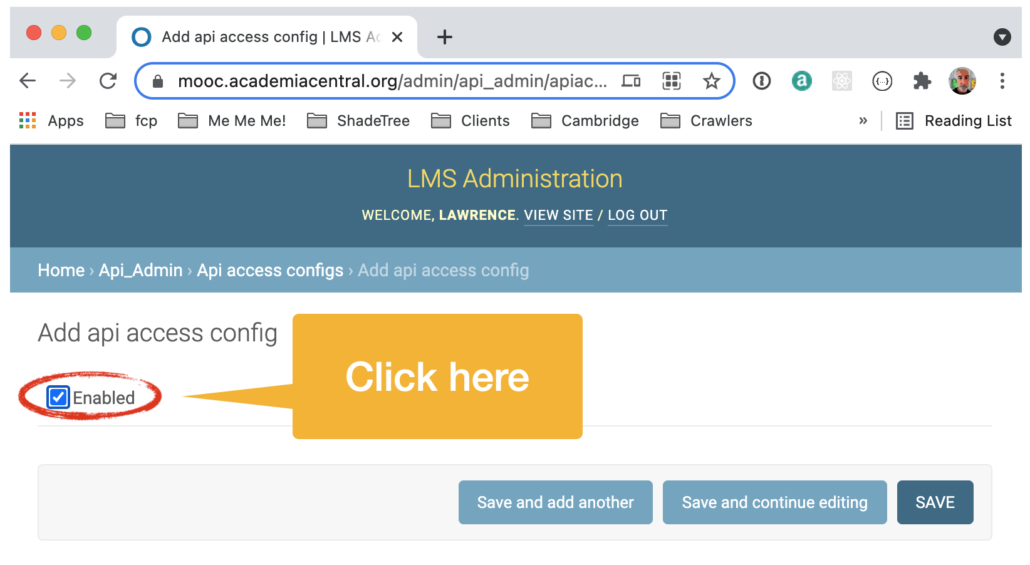
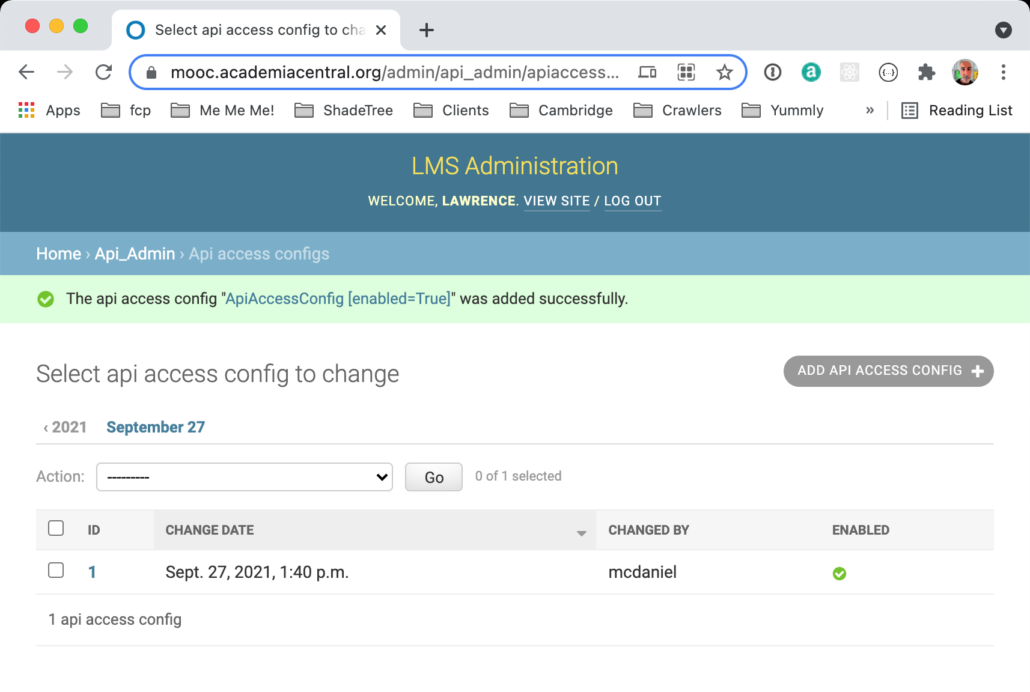
By default, all of the api’s are available using Basic Authentication with a Django user with superuser status. Thus, if you login to your Open edX LMS as a Django superuser then you should be able to connect and interact with all of the URL end points that you see on the /api-docs/ page. The instructions that follow are only necessary if, in addition to this basic level of api access, you also want to provide more controlled access to some of these end points using an api key. In this case you’ll need to do some minor additional configuration of your Open edX installation from the Django admin console located at the end point /admin.
IV. API credentials work flow
The Django admin console setting from step III above will expose the url end point/api-admin/. This url end point behaves like a single-page application, thus, you’ll see different page content depending the approval status of your api credentials request. Initially, you’ll see an API Access Request form like the following.
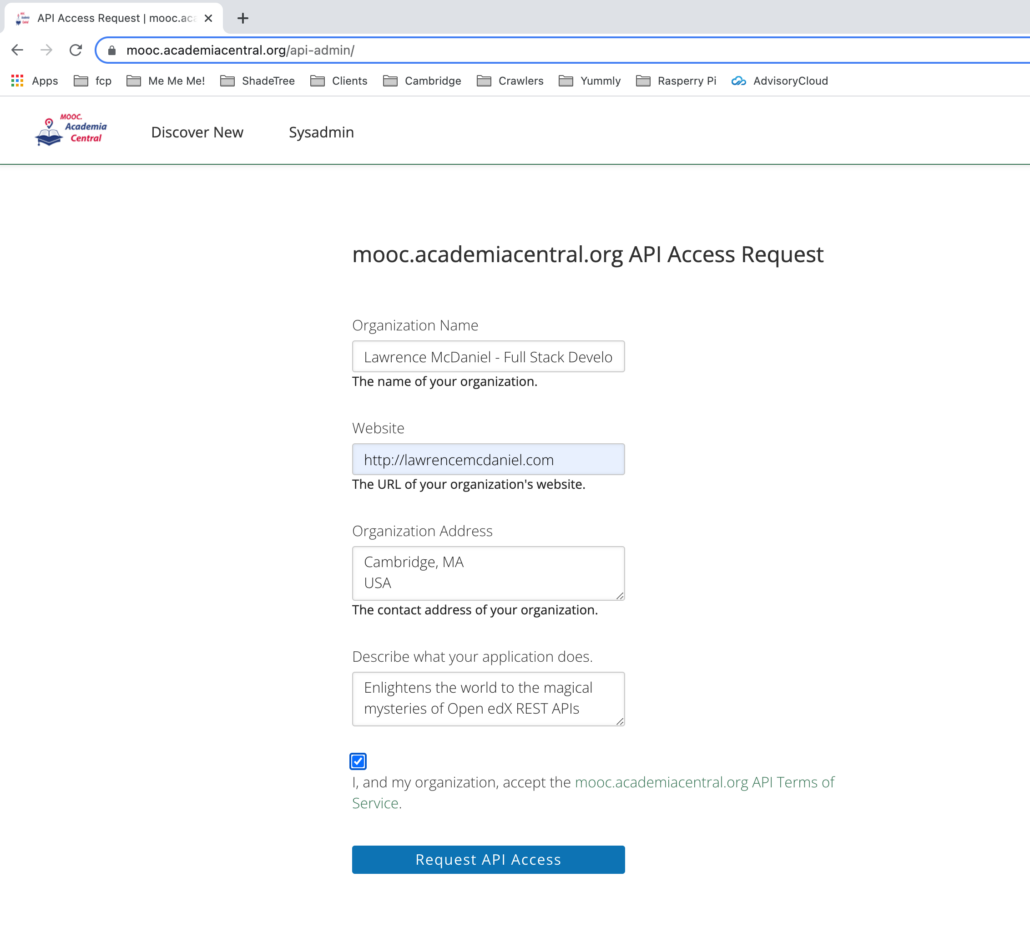
Completing the access request form and clicking the “Request API Access” button will advance you to a different page that looks like the following.
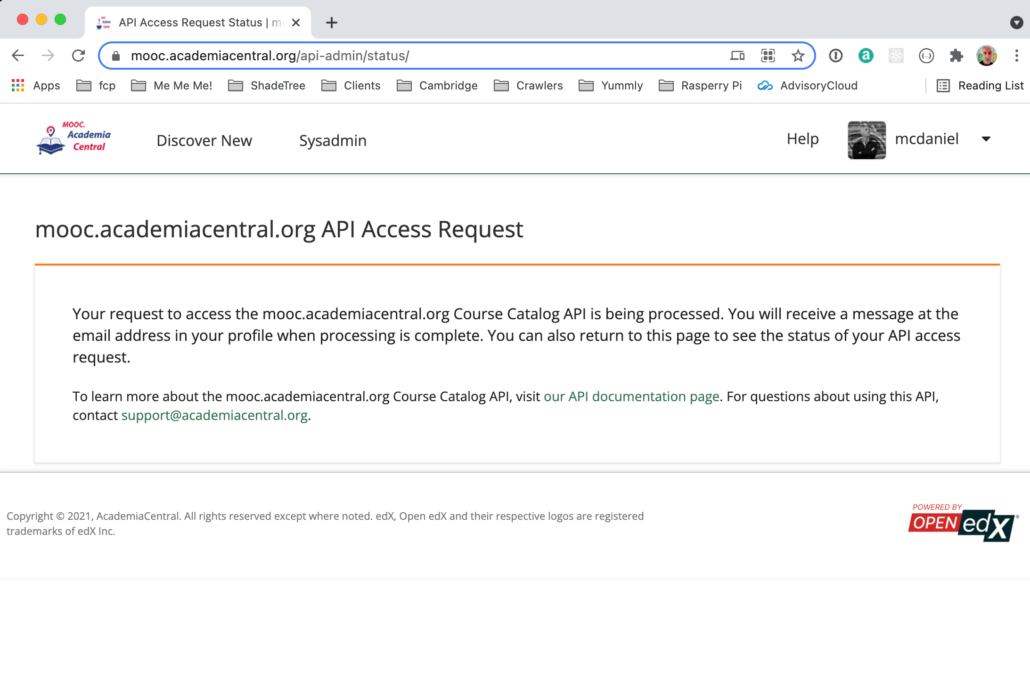
You’ll now need to return to the Django admin console to manually approve the api access request that you just created in the prior step.
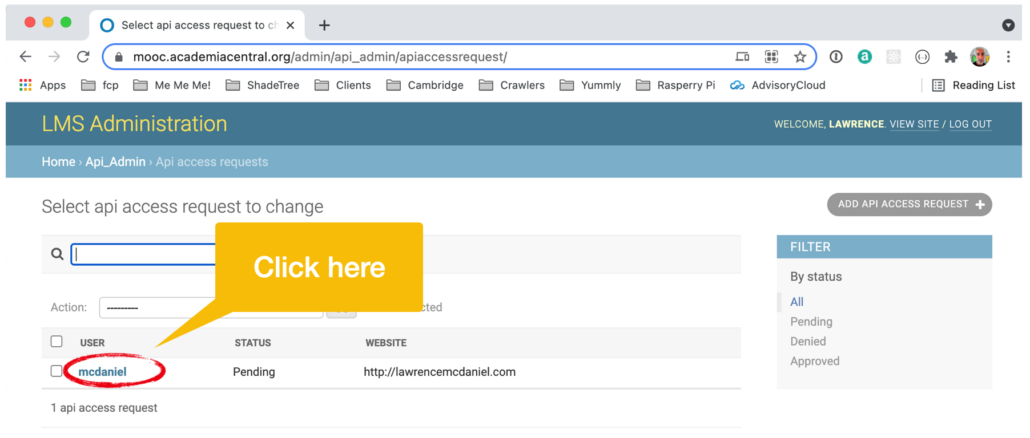
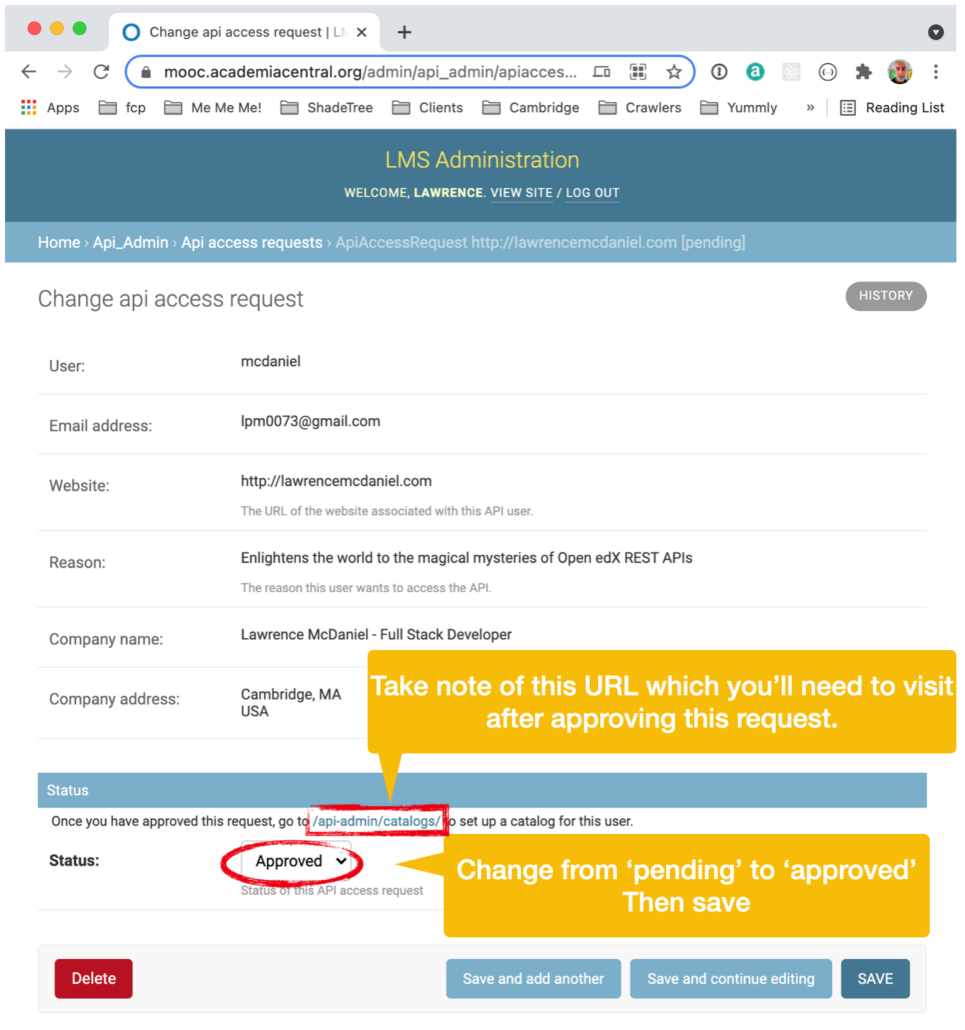
If you’ve enabled the SMTP email service on your Open edX installation then approving the api access request will trigger an email to be sent to the email address assigned to your Django user account.
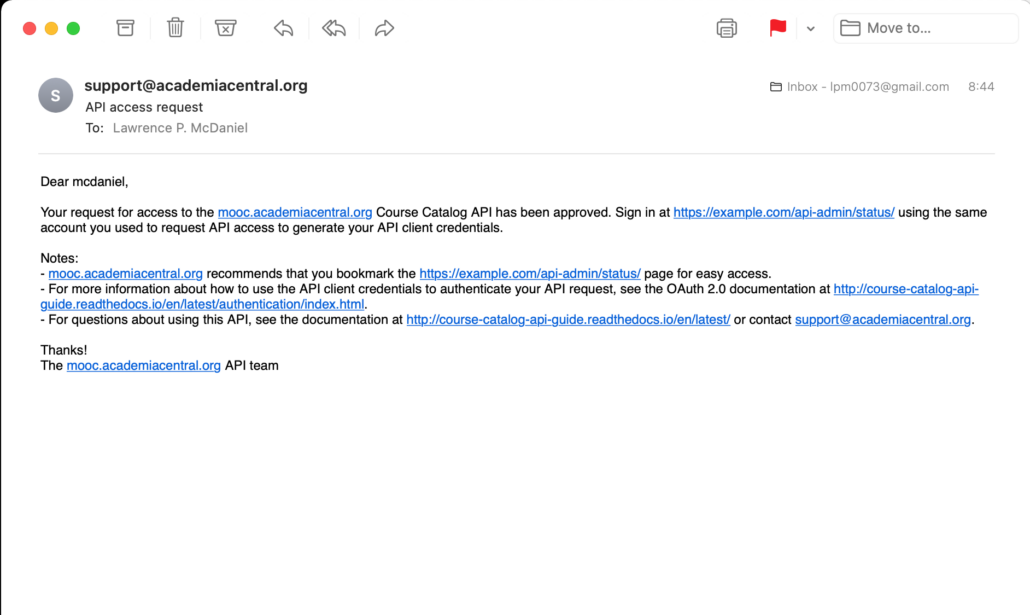
You might notice that the text body of the email above includes references to the url https://example.com/. This url appears rather than https://mooc.academiacentral.org because in reality the Open edX api’s are not configured on this platform to allow public access. That is, step II above has not actually been implemented on this Open edX installation.
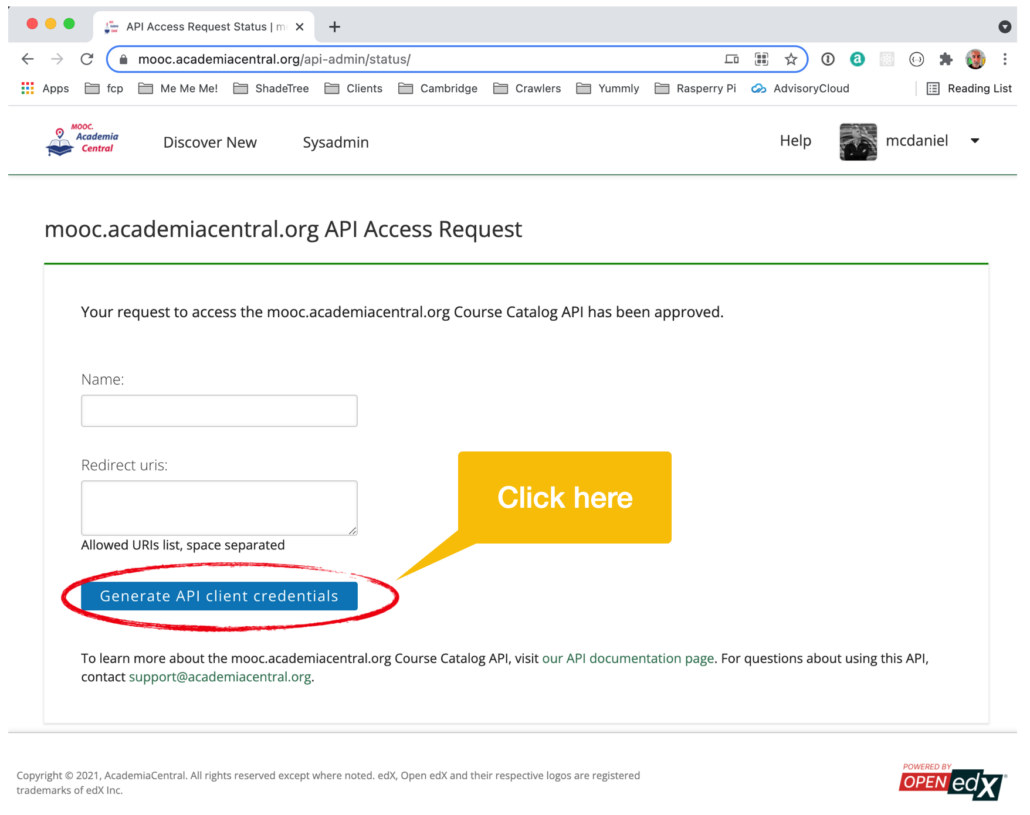
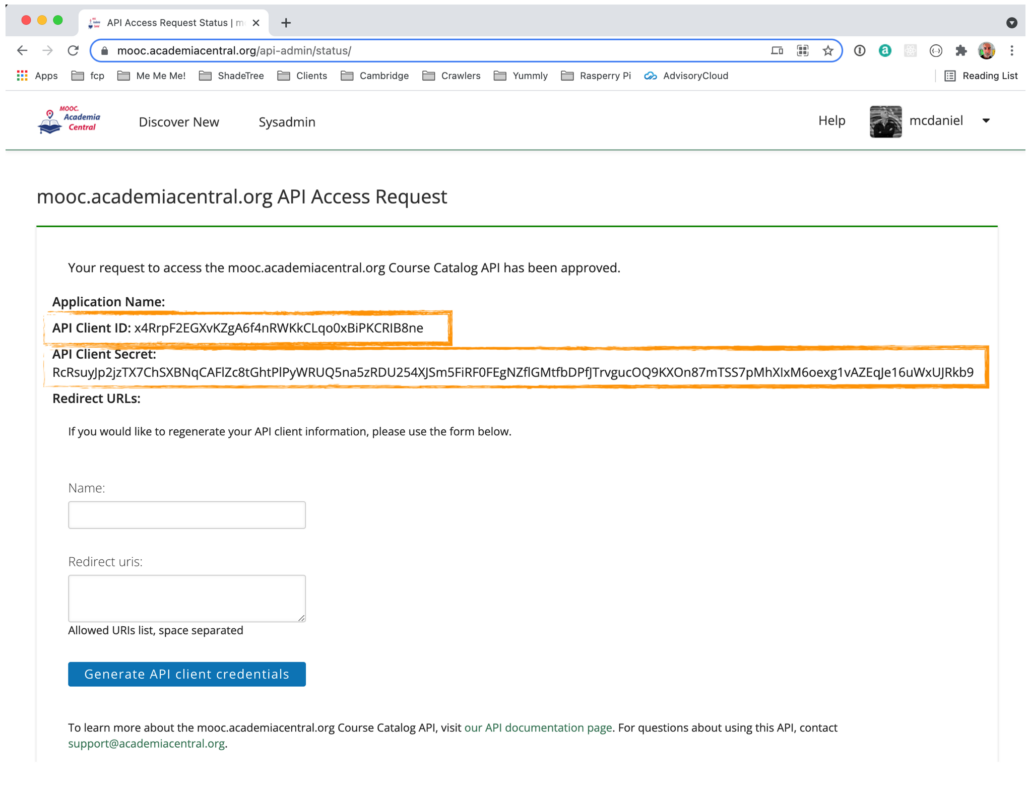
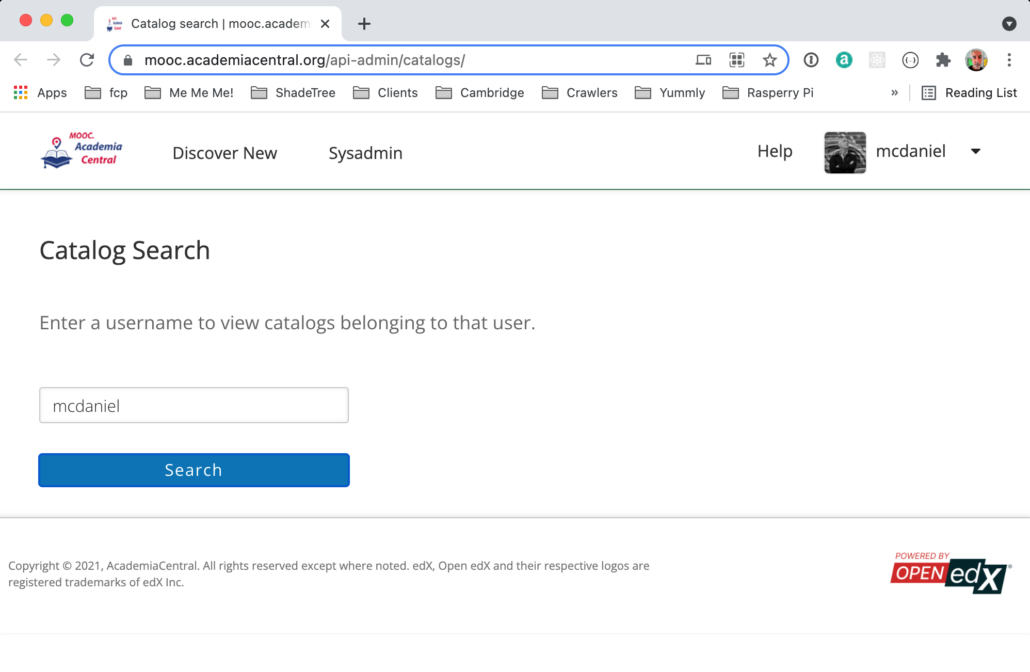
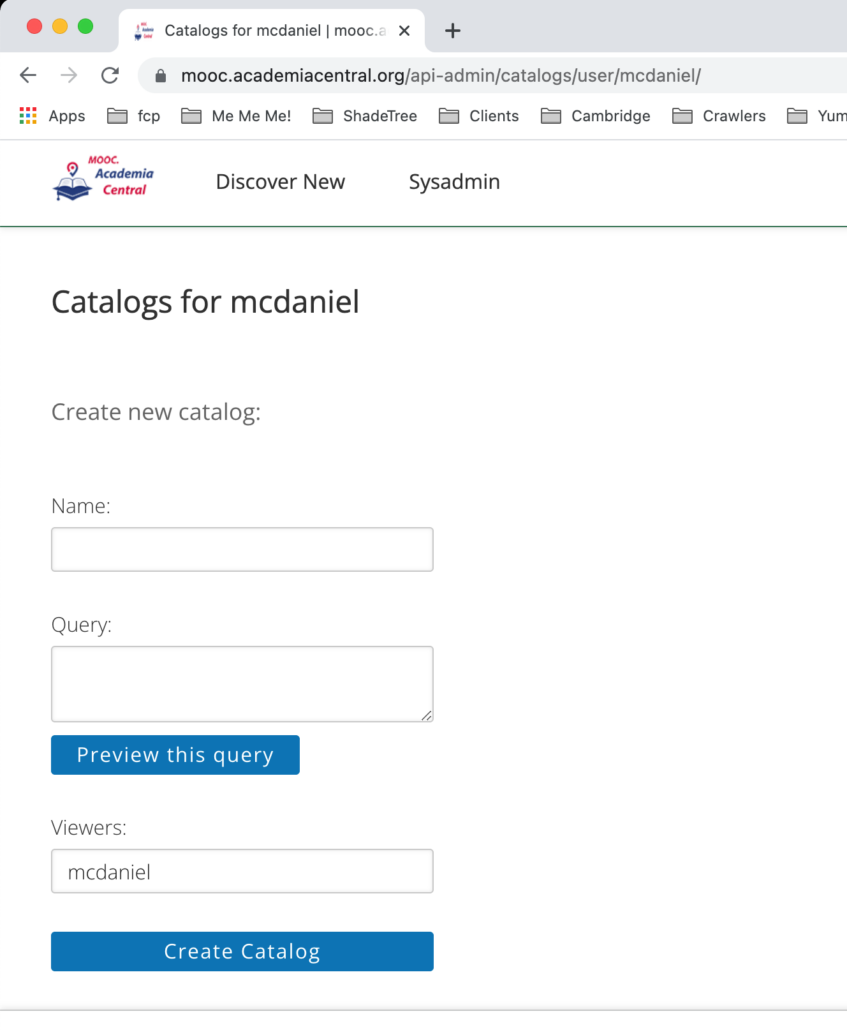
Approving the api access request will also change the state of the url end point /api-admin/ to the following, where you’re now able to actually generate a client key and secret that you can use in http requests to the api end points.
V. Test connectivity from the Swagger page
With all of the administrative access formalities out of the way, we can now focus our complete attention on what these api’s actually do. We’ll start by returning to your Open edX’s Swagger page located at /api-docs/. From this page we’ll authenticate and then test an api end point that returns a json list of your courses.
Note that this page only uses Basic Authentication, regardless of whether you followed the steps to create an api key/secret pair. You should provide the username and password of a Django user with superuser access.
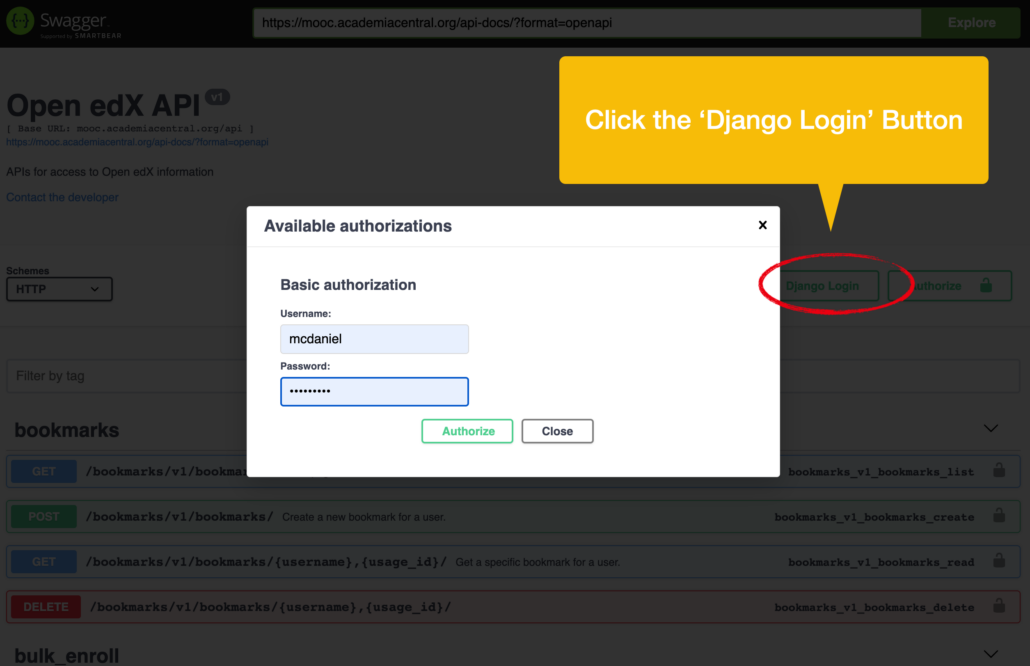
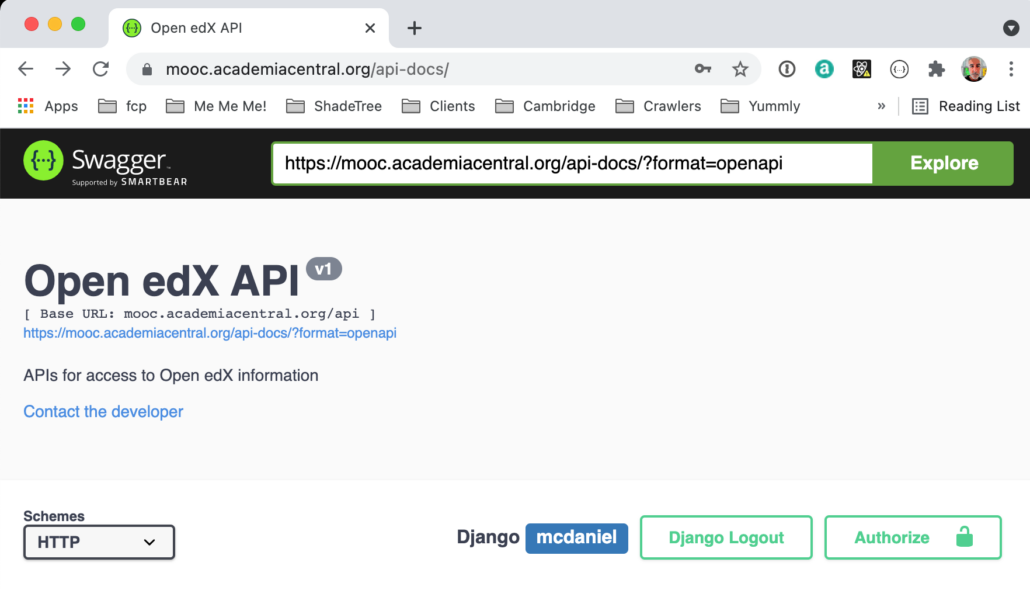
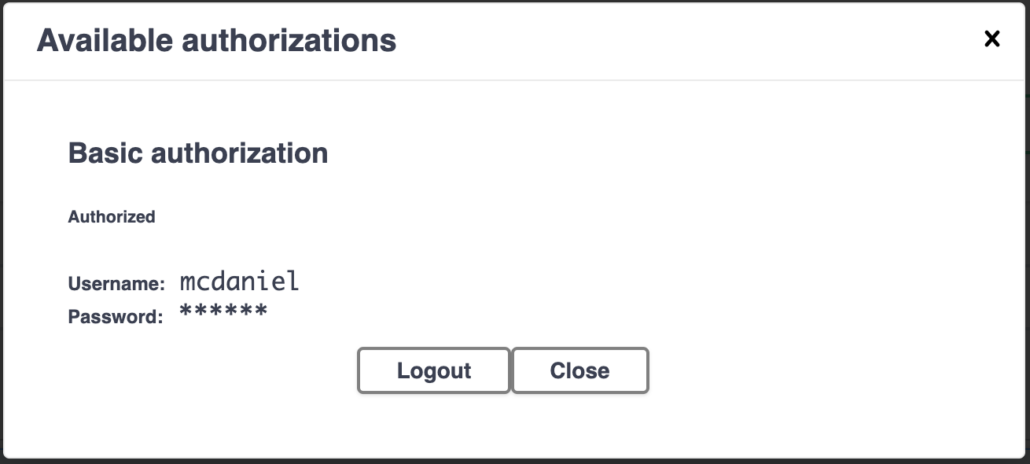
The two screen shots below indicate that I am successfully authenticated for purposes of interacting with any of the api end points available from the Swagger page. A word of caution: you should make extra certain that you are authenticated before delving further into the api end points themselves. The swagger UI for each end point will not provide much in the way of useful feedback in the event that you attempt to access any of the url end points without a valid authentication token in your http requests.
VI. Interact with an api end point using Postman
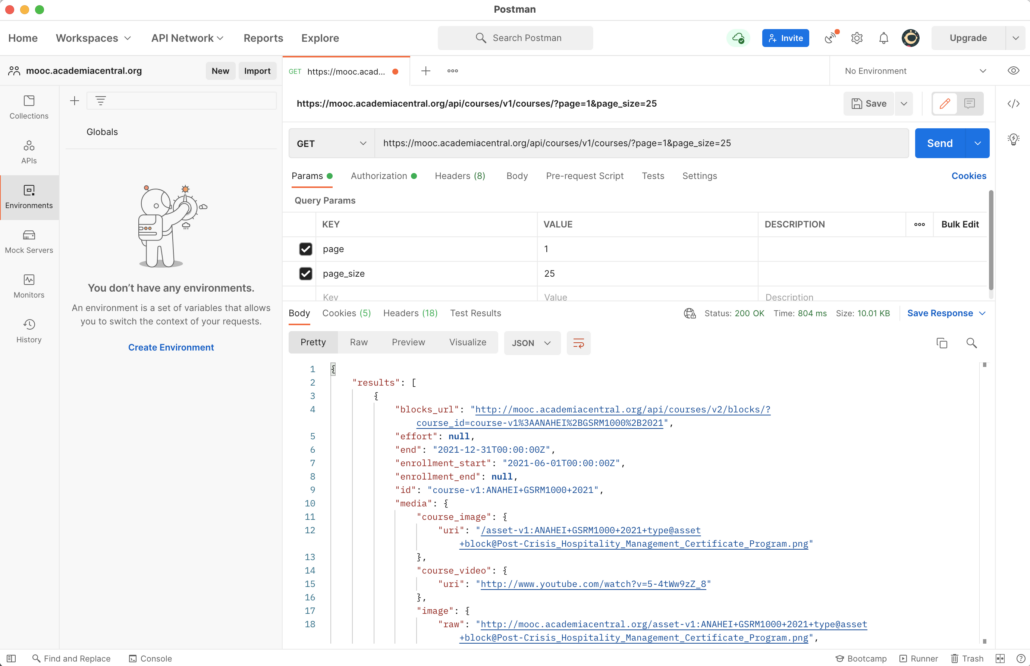
Postman is a popular desktop application that is the gold standard for working with REST api’s. I highly recommend it because of its great UI and its ease of use. The key difference between using Postman versus any other alternative is that Postman provides you with an easy way to see all elements of http requests and responses.
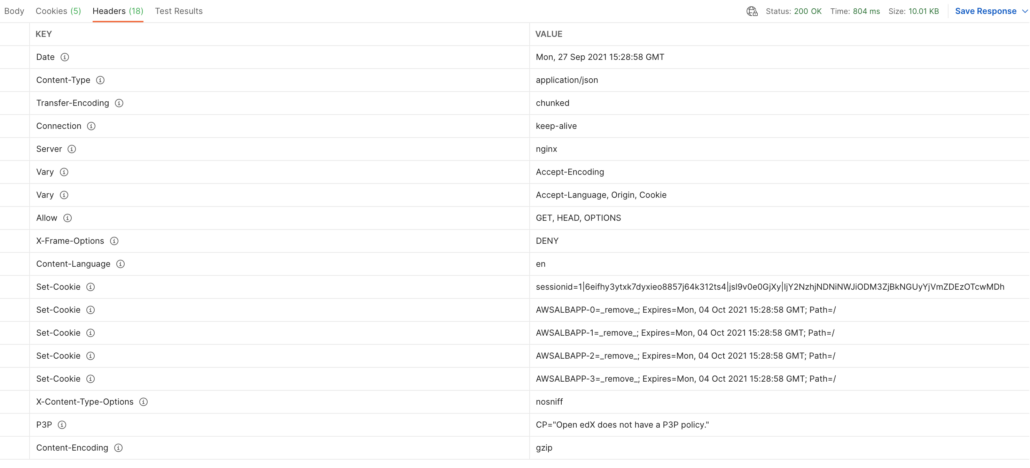
Following are, respectively, the fully-formatted (prettified) http response body, the http header values, and the cookies for an http request to the course list api end point: https://mooc.academiacentral.org/api/courses/v1/courses/

VII. Interact with an api end point using the Swagger page
The Swagger page is a one-size-fits-all solution for discovery and crude interaction with api end points. The real strength of the Swagger page is that it provides very detailed meta information about api end points, including the data definitions of each attribute contained in the json response object. This is an invaluable resource during early stages of your integration design.
While it’s technically possible to do everything from Swagger, including testing your http requests, I generally only use it as a documentation resource because the user experience in Postman is so much better for testing.
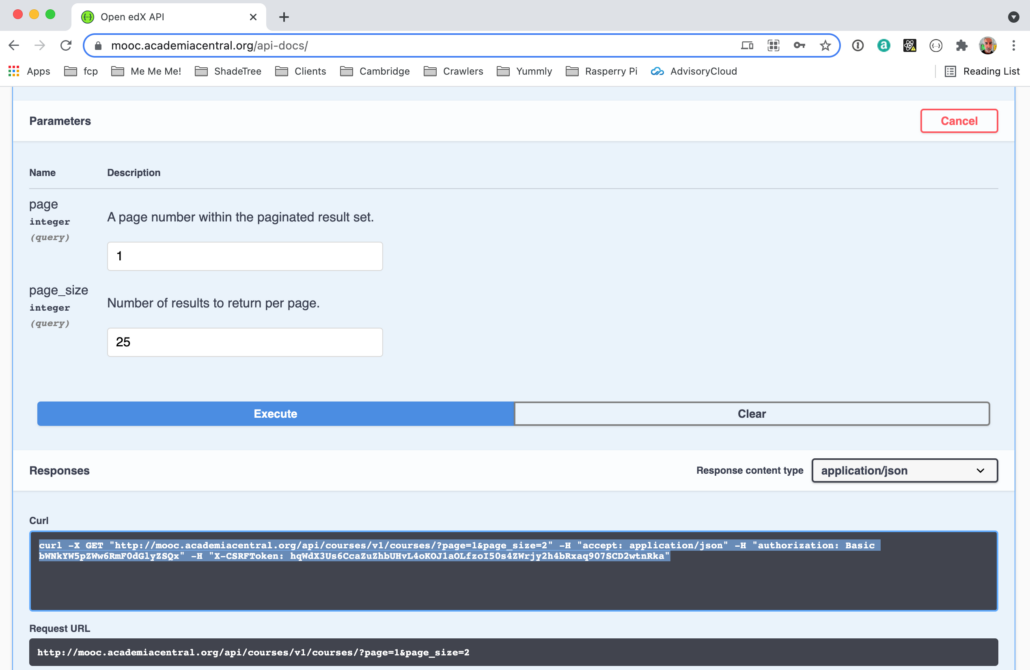
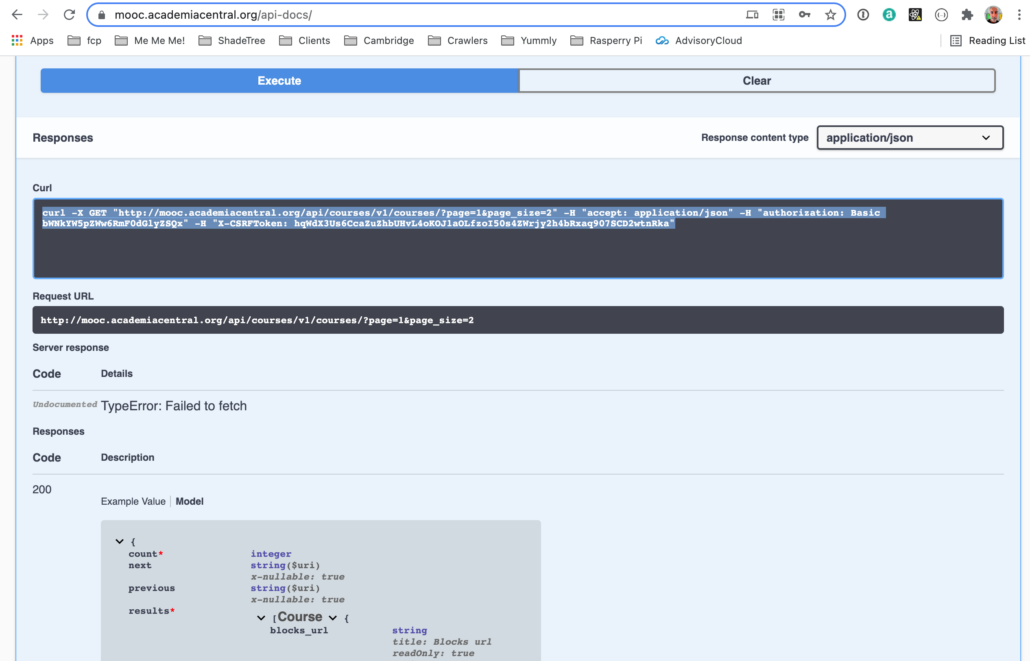
An example of the limitations of Swagger for testing purposes: the site that I’m using for the screen shots for this article, mooc.academiacentral.org, contains a 301 redirect from http to https which in point of fact is a common web hosting practice. Nonetheless, the 301 http response prevents Swagger from returning correct results for even the simplest url end points. Worse still, it doesn’t provide any meaningful error response that would help you to understand why you didn’t get results. Postman, and even a simple web browser for that matter, deal with this same situation as you’d expect.
VIII. Interact with an api end point on the Ubuntu command line
In some rare and quite isolated circumstances I (very occasionally) will use curl. curl is a Linux command-line tool that means “C url”, as in, “See url”. The only case where this ever makes any practical sense is for url end points that do not require any authentication, and, I intend to copy/paste the http response result back into the command line for something else. Other than that, I avoid using curl.


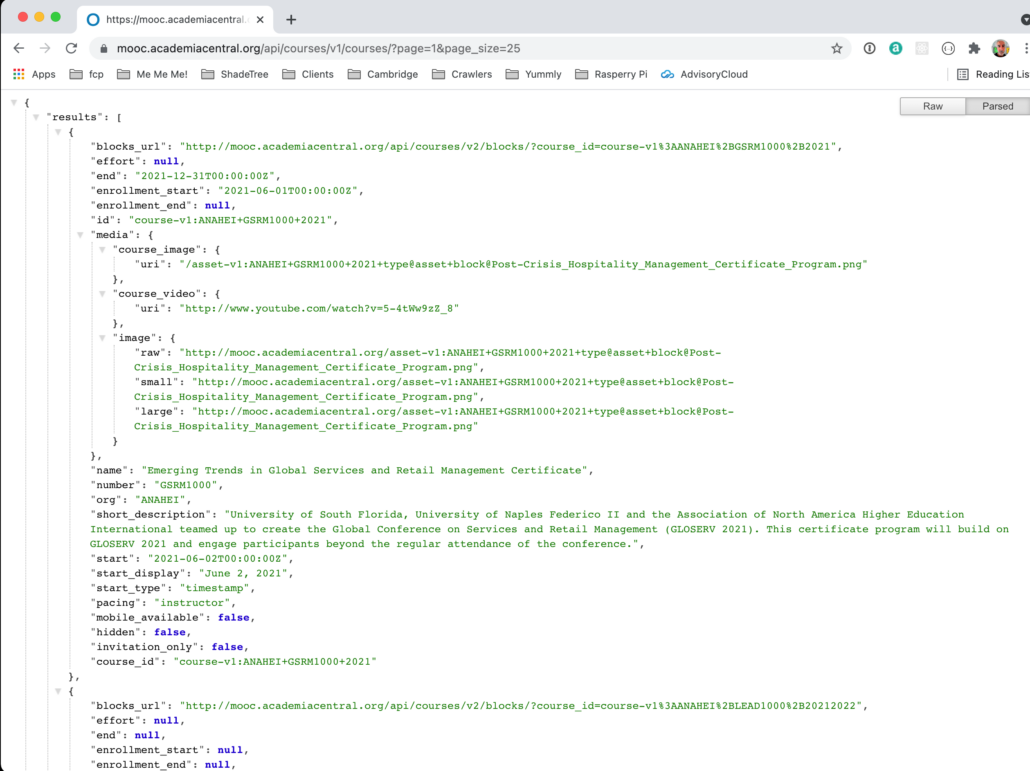
IX. Retrieve an api end point using a Browser
Last but not least, you can always use your web browser if you only need to test a “get” request. I’m using Chrome with a json-prettify extension for this screen shot. I prefer a browser solution like this when I intend to save the results to a json file.
X. Hacking Open edX api’s
The api’s in Open edX are implemented with Django REST Framework (DRF). The edX engineers have an excellent understanding of this framework and the edx-platform repo provides many fine textbook examples of the right way to maximize the many benefits of this technology. With a rudimentary understanding of Django and the DRF You can find and explore the source code behind these apis.
As a working example, let’s search the code base to locate the source that generates the json output of the api url end point https://mooc.academiacentral.org/api/courses/v1/courses/ that we’ve referenced throughout this article. You can follow these steps by cloning the edx-platform repository from Github and opening it with a code editor like VS Code.
Since our only known entry point is a url, to locate the underlying code block I’m going to parse and spelunker the slugs of the url, /api/courses/v1/courses/. Based on generally-accepted practices for Django projects I know to begin my search in /edx-platform/lms/urls.py whereupon I am able to find the following regex definition for the first two slugs

The include() reference include('lms.djangoapps.course_api.urls') in the url() definition tells me that the next slug or slugs are located in edx-platform/lms/djangoapps/course_api/urls.py whereupon I am able to find the remaining two slugs v1/courses

From this url() definition I can see that it references a Django view class named CourseListView that, via inspection of the import statement from .views import CourseDetailView, CourseIdListView, CourseListView at the top of the Python module, I can see comes from the views module of the same Django app.

From inspection of the class definition for CourseListView in this module I’m able to verify that this class is in fact derived from the DRF base class ListAPIView. As is commonly the case with the edx-platform repo, the source code of this class contains copious documentation in the docstring explaining its common use case, an example request, the structure of the request and response. And finally, within this class definition I find the def get_queryset() definition containing the underlying source code for the api end point.

For your convenience I’ve pasted the complete Python class definition here.
[sourcecode language=”python”]@view_auth_classes(is_authenticated=False)
class CourseListView(DeveloperErrorViewMixin, ListAPIView):
"""
**Use Cases**
Request information on all courses visible to the specified user.
**Example Requests**
GET /api/courses/v1/courses/
**Response Values**
Body comprises a list of objects as returned by `CourseDetailView`.
**Parameters**
search_term (optional):
Search term to filter courses (used by ElasticSearch).
username (optional):
The username of the specified user whose visible courses we
want to see. The username is not required only if the API is
requested by an Anonymous user.
org (optional):
If specified, visible `CourseOverview` objects are filtered
such that only those belonging to the organization with the
provided org code (e.g., "HarvardX") are returned.
Case-insensitive.
**Returns**
* 200 on success, with a list of course discovery objects as returned
by `CourseDetailView`.
* 400 if an invalid parameter was sent or the username was not provided
for an authenticated request.
* 403 if a user who does not have permission to masquerade as
another user specifies a username other than their own.
* 404 if the specified user does not exist, or the requesting user does
not have permission to view their courses.
Example response:
[
{
"blocks_url": "/api/courses/v1/blocks/?course_id=edX%2Fexample%2F2012_Fall",
"media": {
"course_image": {
"uri": "/c4x/edX/example/asset/just_a_test.jpg",
"name": "Course Image"
}
},
"description": "An example course.",
"end": "2015-09-19T18:00:00Z",
"enrollment_end": "2015-07-15T00:00:00Z",
"enrollment_start": "2015-06-15T00:00:00Z",
"course_id": "edX/example/2012_Fall",
"name": "Example Course",
"number": "example",
"org": "edX",
"start": "2015-07-17T12:00:00Z",
"start_display": "July 17, 2015",
"start_type": "timestamp"
}
]
"""
class CourseListPageNumberPagination(LazyPageNumberPagination):
max_page_size = 100
pagination_class = CourseListPageNumberPagination
serializer_class = CourseSerializer
throttle_classes = (CourseListUserThrottle,)
def get_queryset(self):
"""
Yield courses visible to the user.
"""
form = CourseListGetForm(self.request.query_params, initial={‘requesting_user’: self.request.user})
if not form.is_valid():
raise ValidationError(form.errors)
return list_courses(
self.request,
form.cleaned_data[‘username’],
org=form.cleaned_data[‘org’],
filter_=form.cleaned_data[‘filter_’],
search_term=form.cleaned_data[‘search_term’]
)[/sourcecode]
I hope you found this helpful. Contributors are welcome. My contact information is on my web site. Please help me improve this article by leaving a comment below. Thank you!


Thank you
Hi Lawrence
I get error “detail”: “Authentication credentials were not provided.”
from the API: /enrollment/v1/enrollment/{username},{course_id}
when I try it with postman.
Iam using the basic auth with the super user name. Any help on how to solve this?
Excellent document. One of the most useful blog. The details explained here is not part of the official documentation.
Thank you Lawrence