Get Ecommerce working on your Open edX native build. This post is a supplement to the official documentation, “How to Install and Start the E-Commerce Service in Native Installations“, covering installation and configuration, Django configuration, Nginx considerations, and PayPal integration.

Summary
The Open edX Ecommerce module is actually a 3rd party Django project named Oscar that the Open edX team fully integrated into the platform by fusing the user lists together with Oauth. While recently setting up the Ecommerce module on a Gingko.2 installation I found myself stumbling through some the steps in the official documentation while disagreeing entirely with others. What follows is a modified procedure that I followed to get Ecommerce running on a Ginkgo.2 installation. Hopefully this will save you some time.
Setup Procedure
1. Verify that the Ecommerce module is running
If you followed the documented instructions from “Native Open edX Ubuntu 16.04 64 bit Installation” for Gingko or later then the Ecommerce module is automatically installed and should be running on your instance. You can verify this by running the following command from a terminal window connected to your Ubuntu instance.
sudo /edx/bin/supervisorctl status
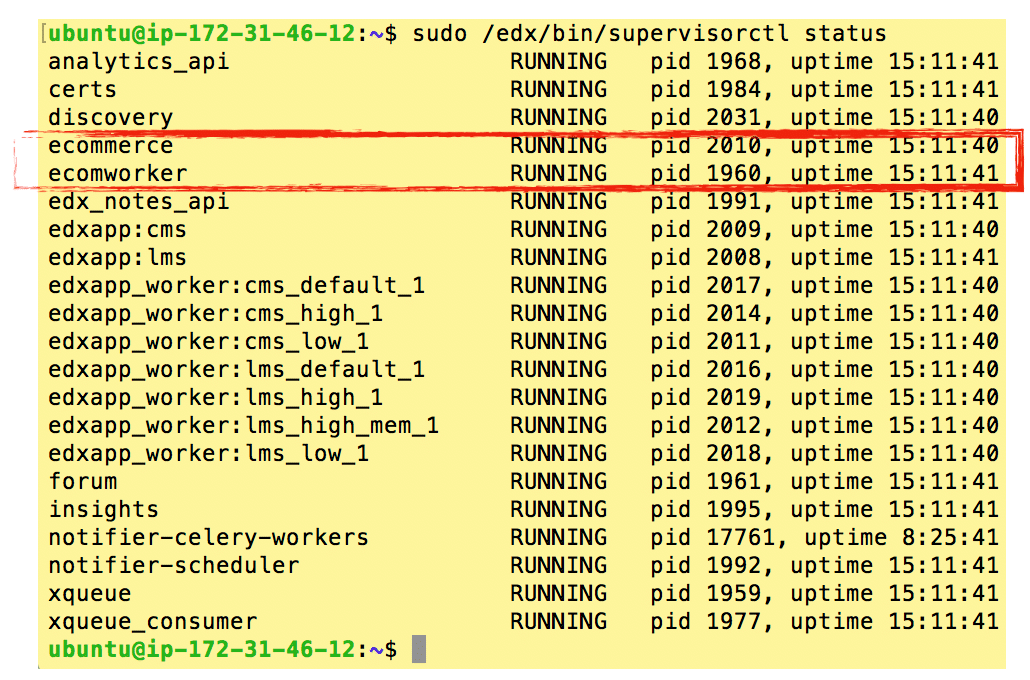
If you see the “Ecommerce” module in a running state then you can ignore the first two steps of the official documentation, or at least when running these you should notice that both steps are benign. If for any reason you decide to execute the first two steps of the official documentation then be forewarned that step #2 is tantamount to upgrading your entire platform and could thus bring unintended consequences beyond the scope of the Ecommerce module setup.
Moreover, if the Ecommerce module is not currently running then you should think carefully about your next steps. If your installation is not version Ginkgo or later then you should consider upgrading your entire platform before proceeding simply to ensure that your code base doesn’t venture too far into the unknown. You can read my blog post on Upgrading Open edX for more detail on what’s involved in upgrading and how to prepare.
2. Configure edX
There are a handful of things to configure in the LMS via the eponymous configuration file /edx/app/edxapp/lms.env.json. Refer to the screen shots below for guidance on the subject matter and approximate locations of each section. You’ll need to restart the LMS for these changes to take effect:
sudo /edx/bin/supervisorctl restart edxapp:
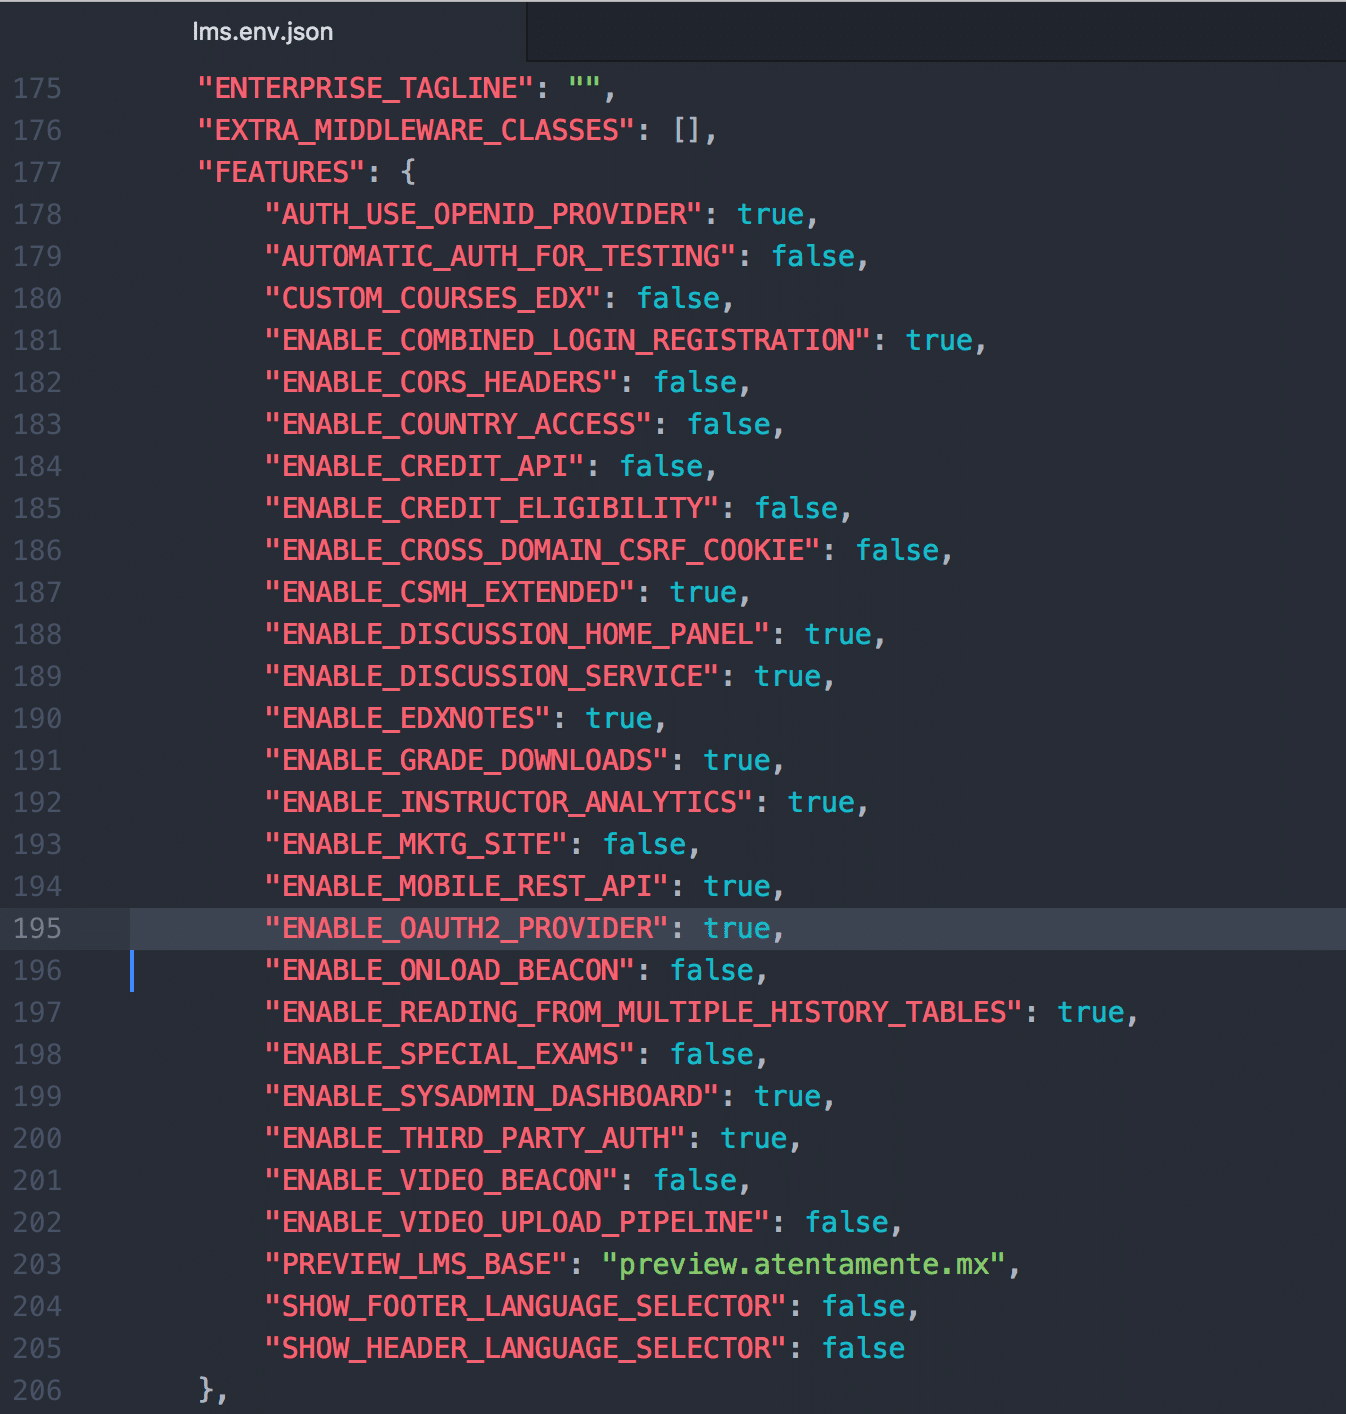

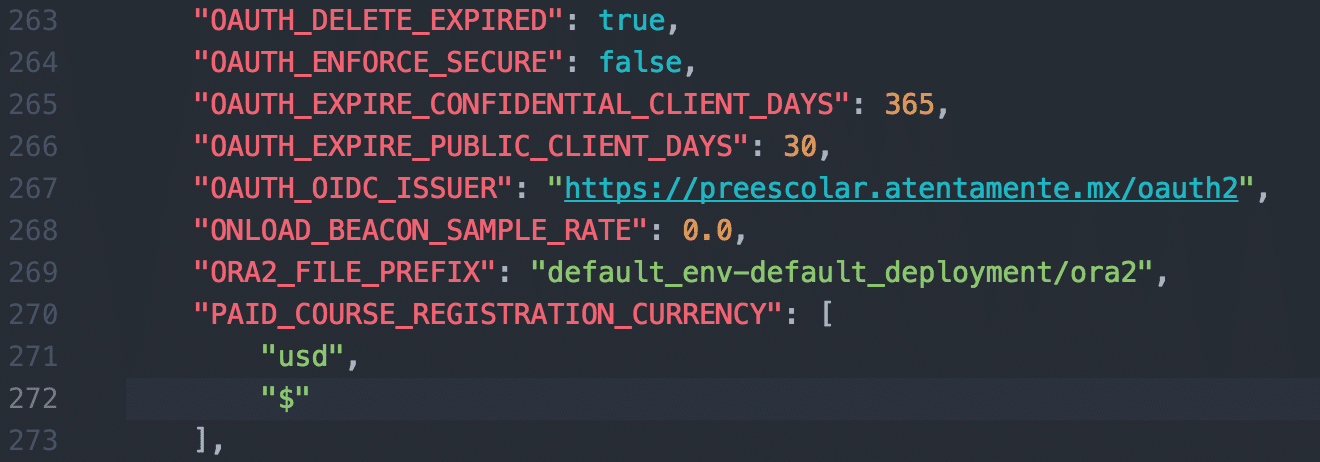

Briefly summarizing the purpose of each section:
- ENABLE_OAUTH2_PROVIDER – This enables the LMS as a provider of Oauth2 authentication services. The Ecommerce module will leverage Oauth2 rather than host its own user list and passwords. For example, as an end user if you’ve ever elected to “Login with Facebook” then this flag makes your LMS the “Facebook” of that proposition.
- JWT_AUTH – This is the URL of the JSON Web Token authorizer. In our case it’s exactly the same as the issuer.
- JWT_ISSUER – This is the URL of the JSON Web Token issuer
- OAUTH_OIDC_ISSUER – This is the URL of the Open ID issuer (eg your LMS platform)
- PAID_COURSE_REGISTRATION_CURRENCY – The Ecommerce module reads this value to determine which currency symbol to display along side products. This value is also passed to the payment gateway.
- PDF_RECEIPT_ – All of the salient text for customer receipts is stored in these fields.
3. Setup Oauth between the LMS and the Ecommerce module
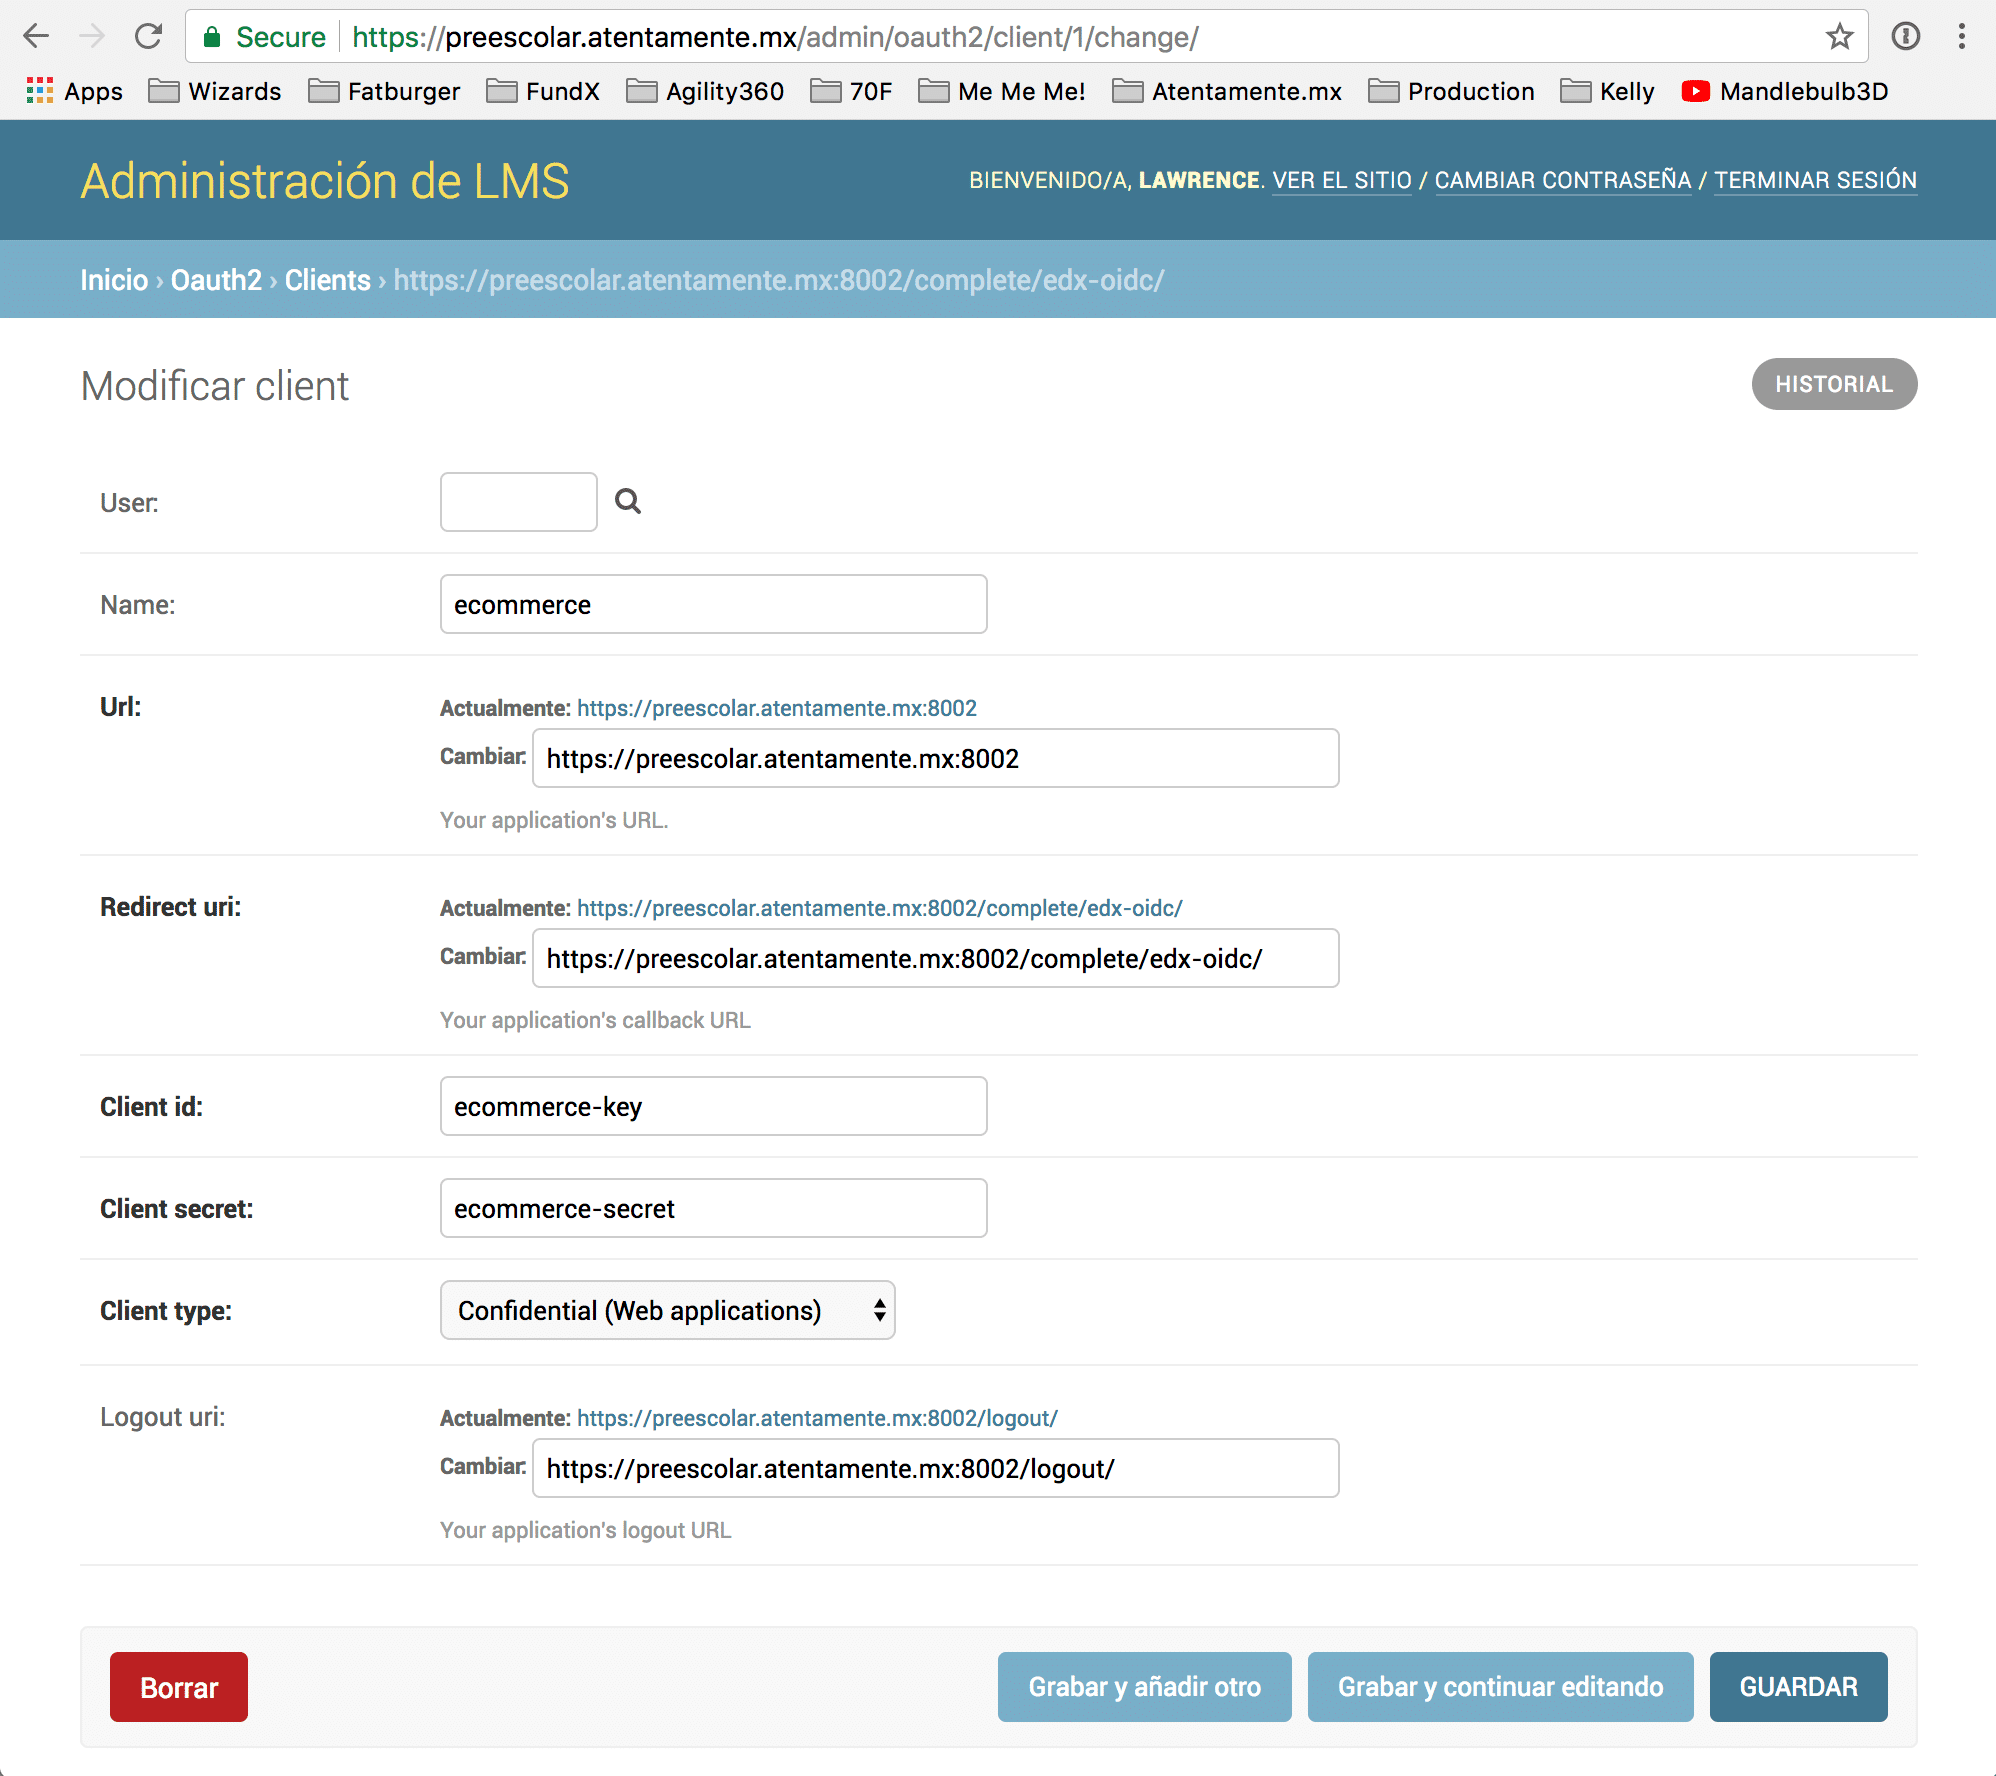
It wasn’t initially apparent to me but, setting configuration parameters in lms.env.json only indicates to the LMS that you want to use it as part of an Oauth authentication; you still have to setup Oauth itself. We’ll use the Django admin console for this. For the Python/Django uninitiated, Django apps like LMS and CMS come with a “back end” admin console where additional configuration parameters are available beyond what you’ll find in the four JSON files in /edx/app/edxapp/. Refer to this screen shot for the URL path and guidelines for creating an Oauth client.
Note: I’ve seen conflicting documentation regarding the proper port assignment for the Ecommerce module. Some suggest 8002 whereas others say it should be 18130. After some experimentation I’ve learned that either of these assignments will work, provided that you are consistent with your settings in /edx/app/edxapp/*.json and /edx/etc/ecommerce.yml and /etc/nginx/sites-enabled/ecommerce.
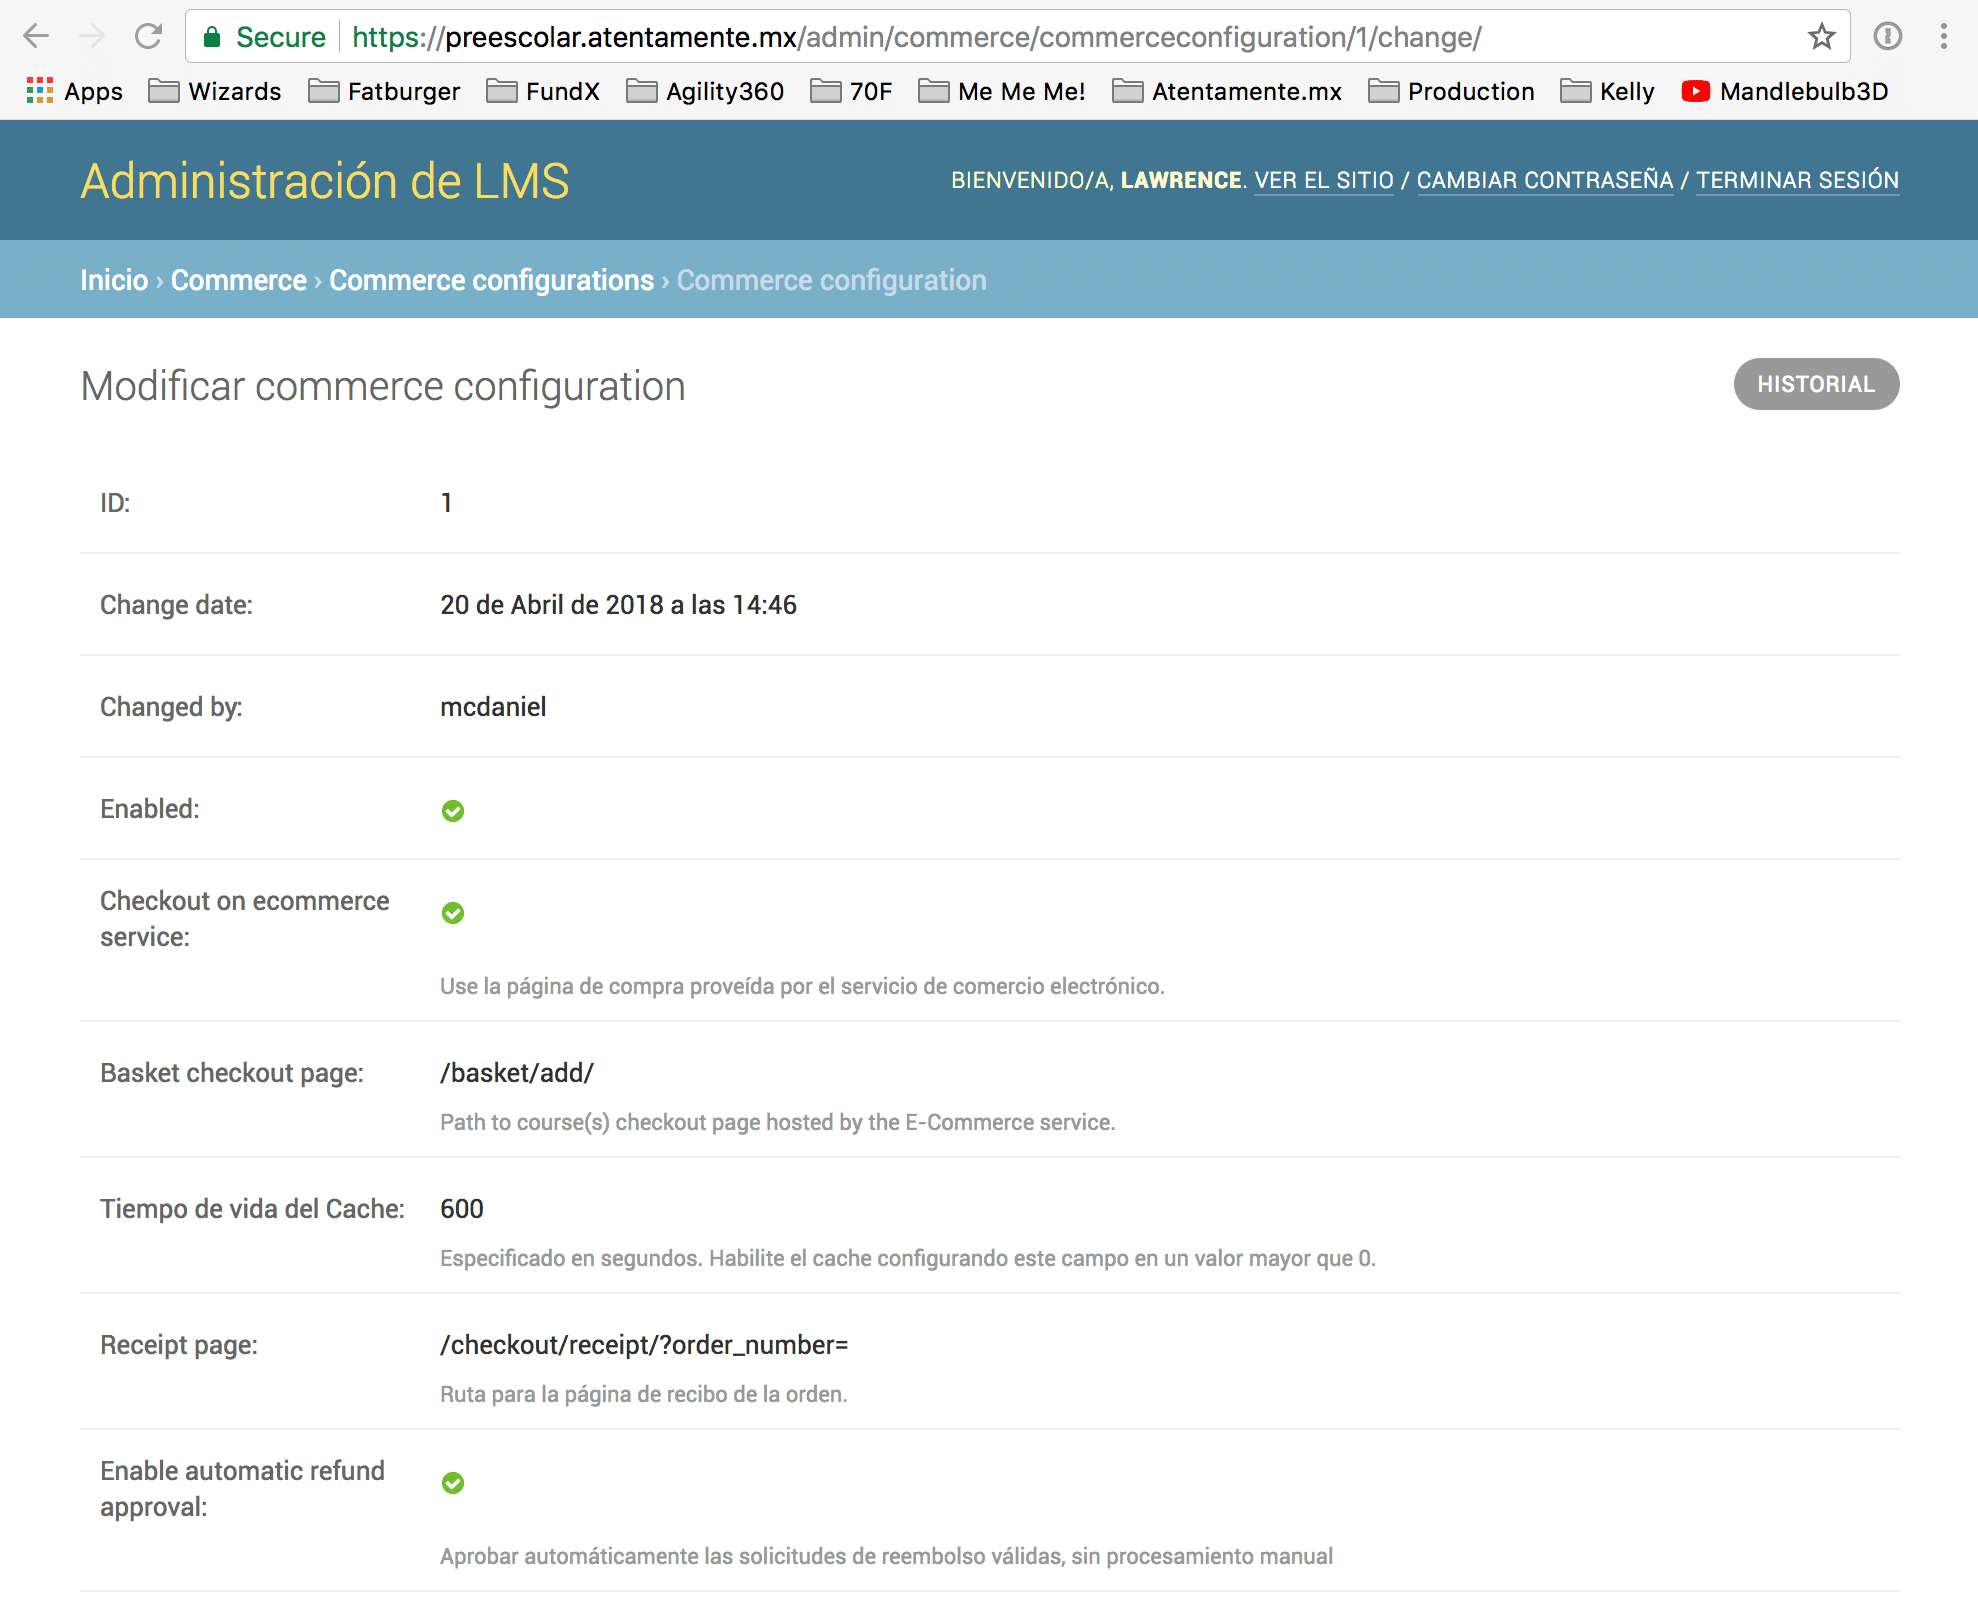
4. Configure Django to use Oscar Ecommerce
This is the definitive step in “activating” the Ecommerce module. Refer to the following screen shot for parameter values and the desired outcome.
5. Configure Oscar Ecommerce
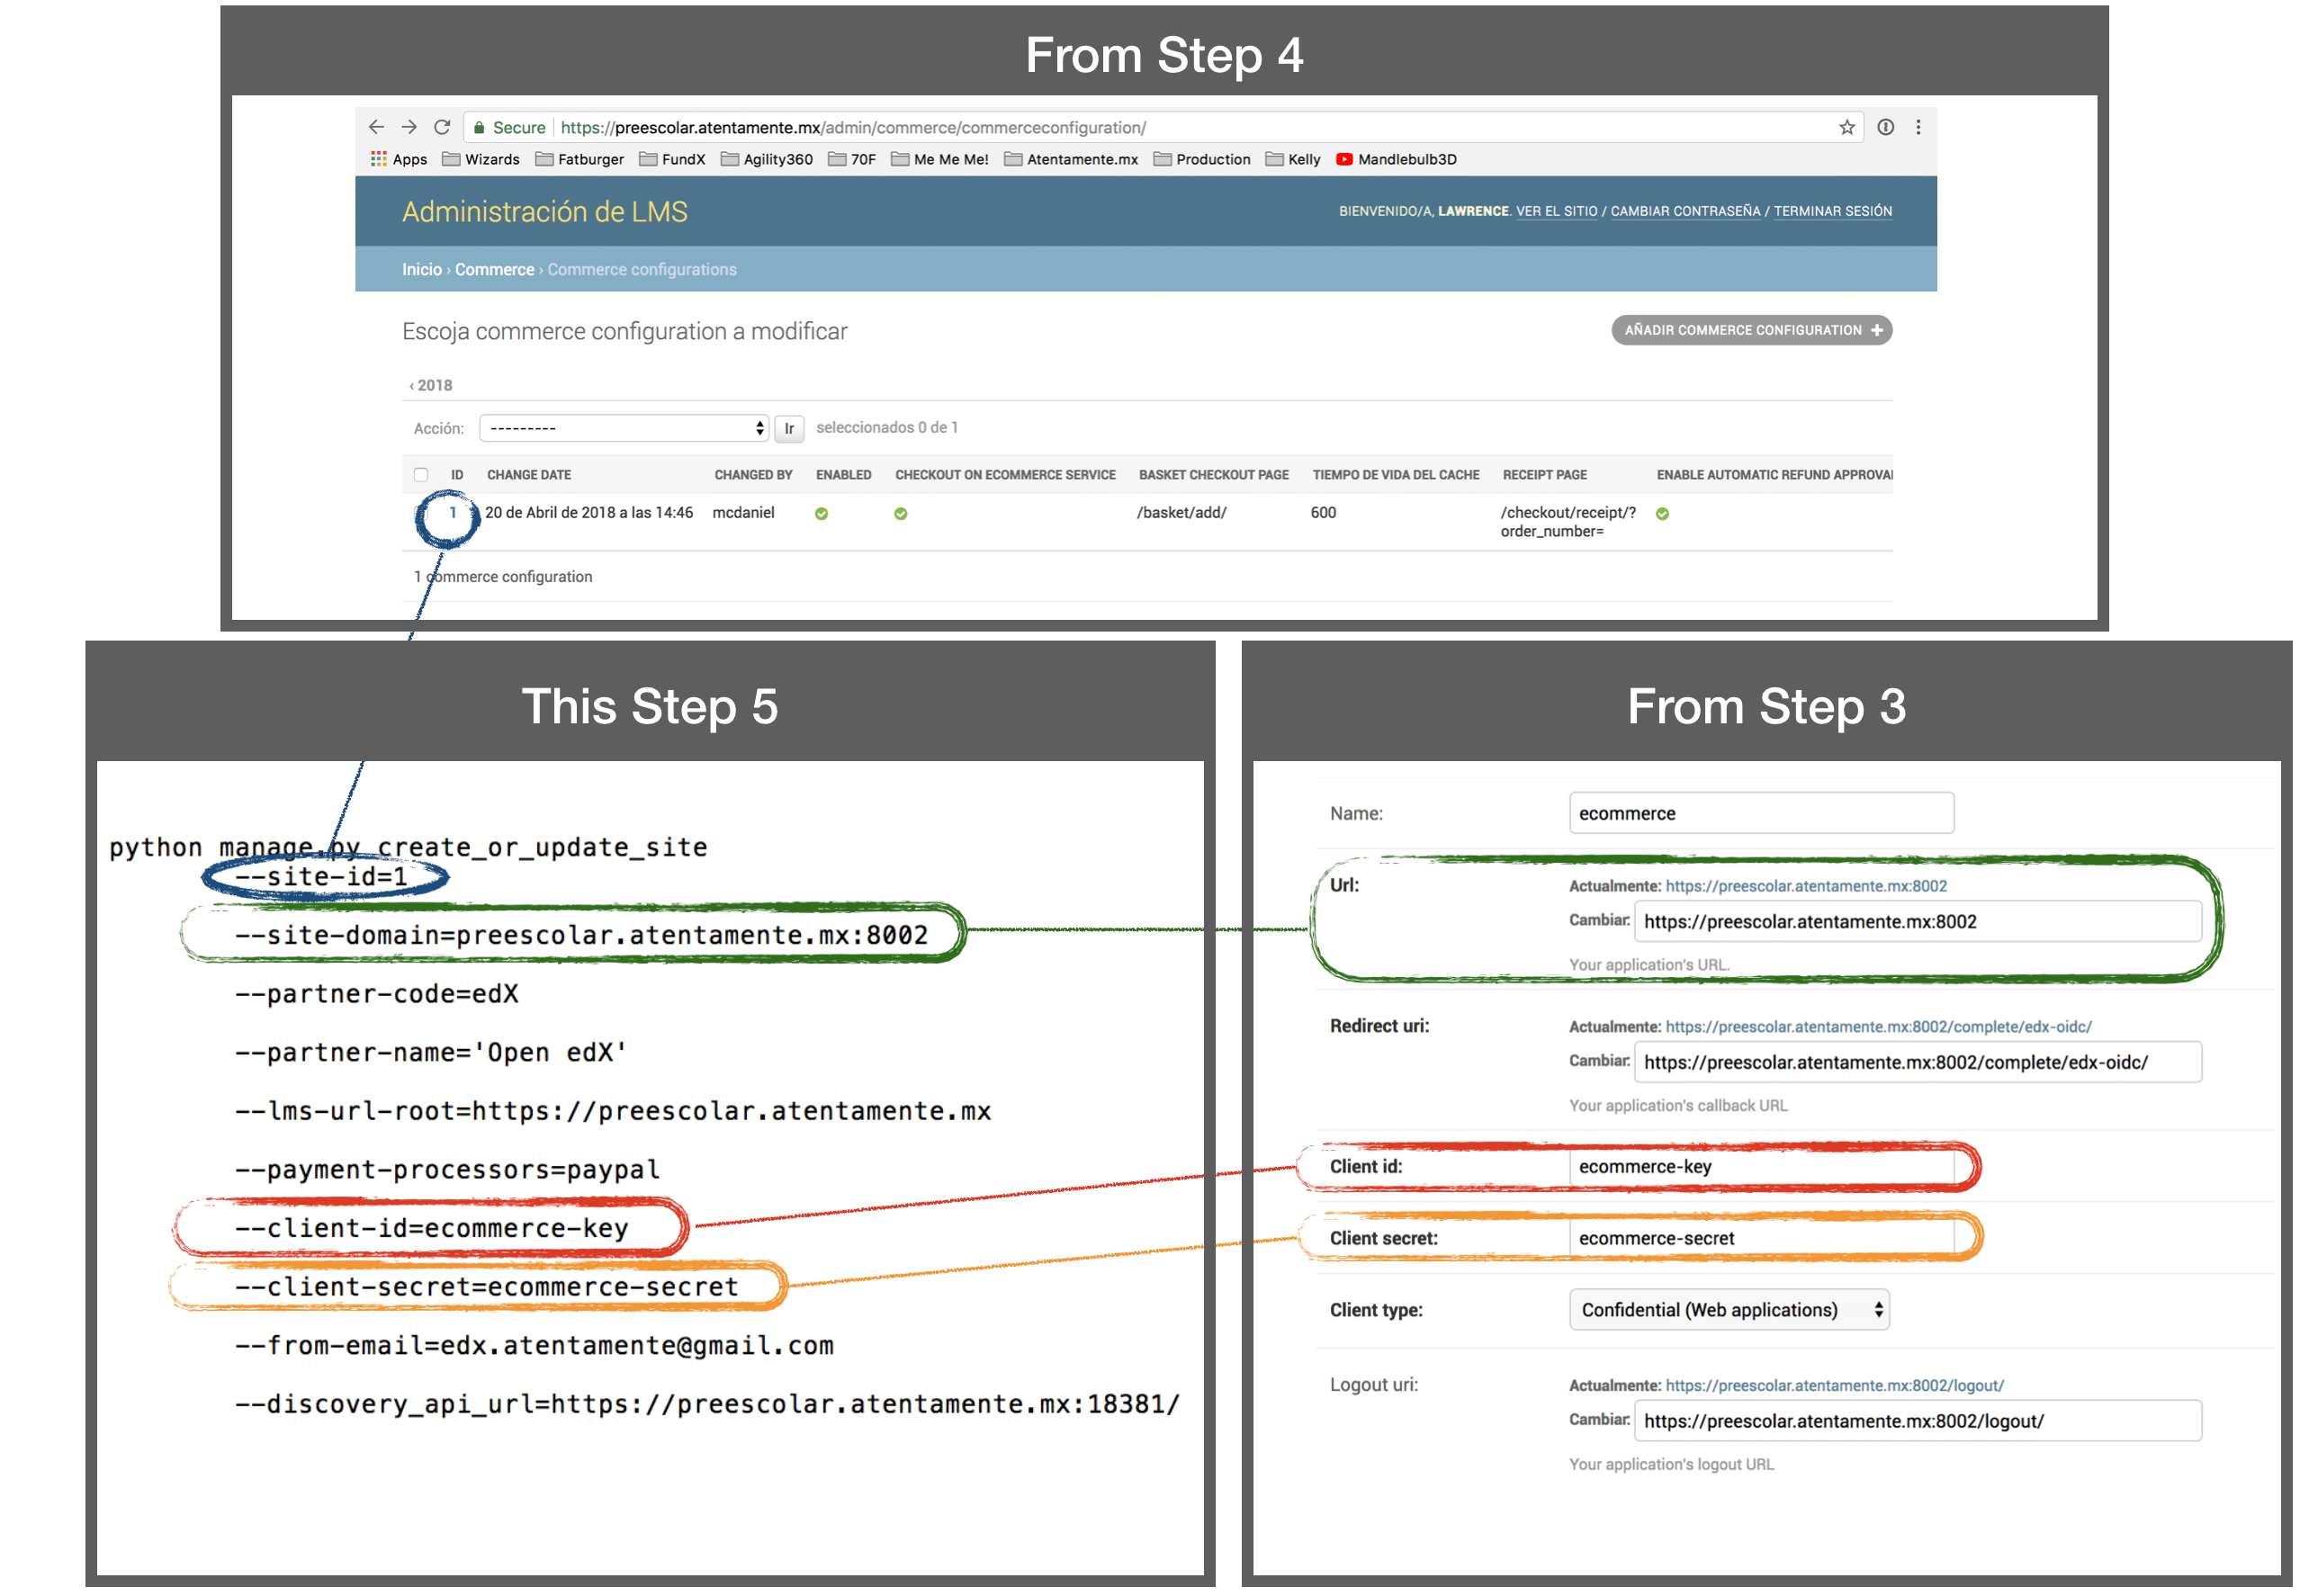
This step essentially binds together the Django configurations you created in the previous two steps 3 & 4 so that the Oscar Ecommerce module works seamlessly with our LMS.
sudo su ecommerce -s /bin/bash
cd ~/ecommerce
source ../ecommerce_env
python manage.py makemigrations
python manage.py migrate
python manage.py create_or_update_site \
	--site-id=1 \
	--site-domain=preescolar.atentamente.mx:8002 \
	--partner-code=edX \
	--partner-name='Open edX' \
	--lms-url-root=https://preescolar.atentamente.mx \
	--payment-processors=paypal \
	--client-id=ecommerce-key \
	--client-secret=ecommerce-secret \
	--from-email=edx.atentamente@gmail.com \
	--discovery_api_url=https://preescolar.atentamente.mx:18381/
Following is how these command line arguments map to the two Django configuration screens from the previous step.
6. Modify /edx/etc/ecommerce.yml
I don’t understand the technicalities behind how and why the Ecommerce module reads this file at run-time, but I assure you that it does. In this file you’ll find a half-dozen occurrences of the URL, “http://127.0.0.1:8000” which you should update to your instance’s domain name or IP address. Also, make sure that the port assignment that you choose is consistent with the value you used in /edx/app/edxapp and /etc/nginx/sites-enabled/ecommerce. You need to restart the Ecommerce service afterward in order for the new settings to take effect.
sudo /edx/bin/supervisorctl restart ecommerce
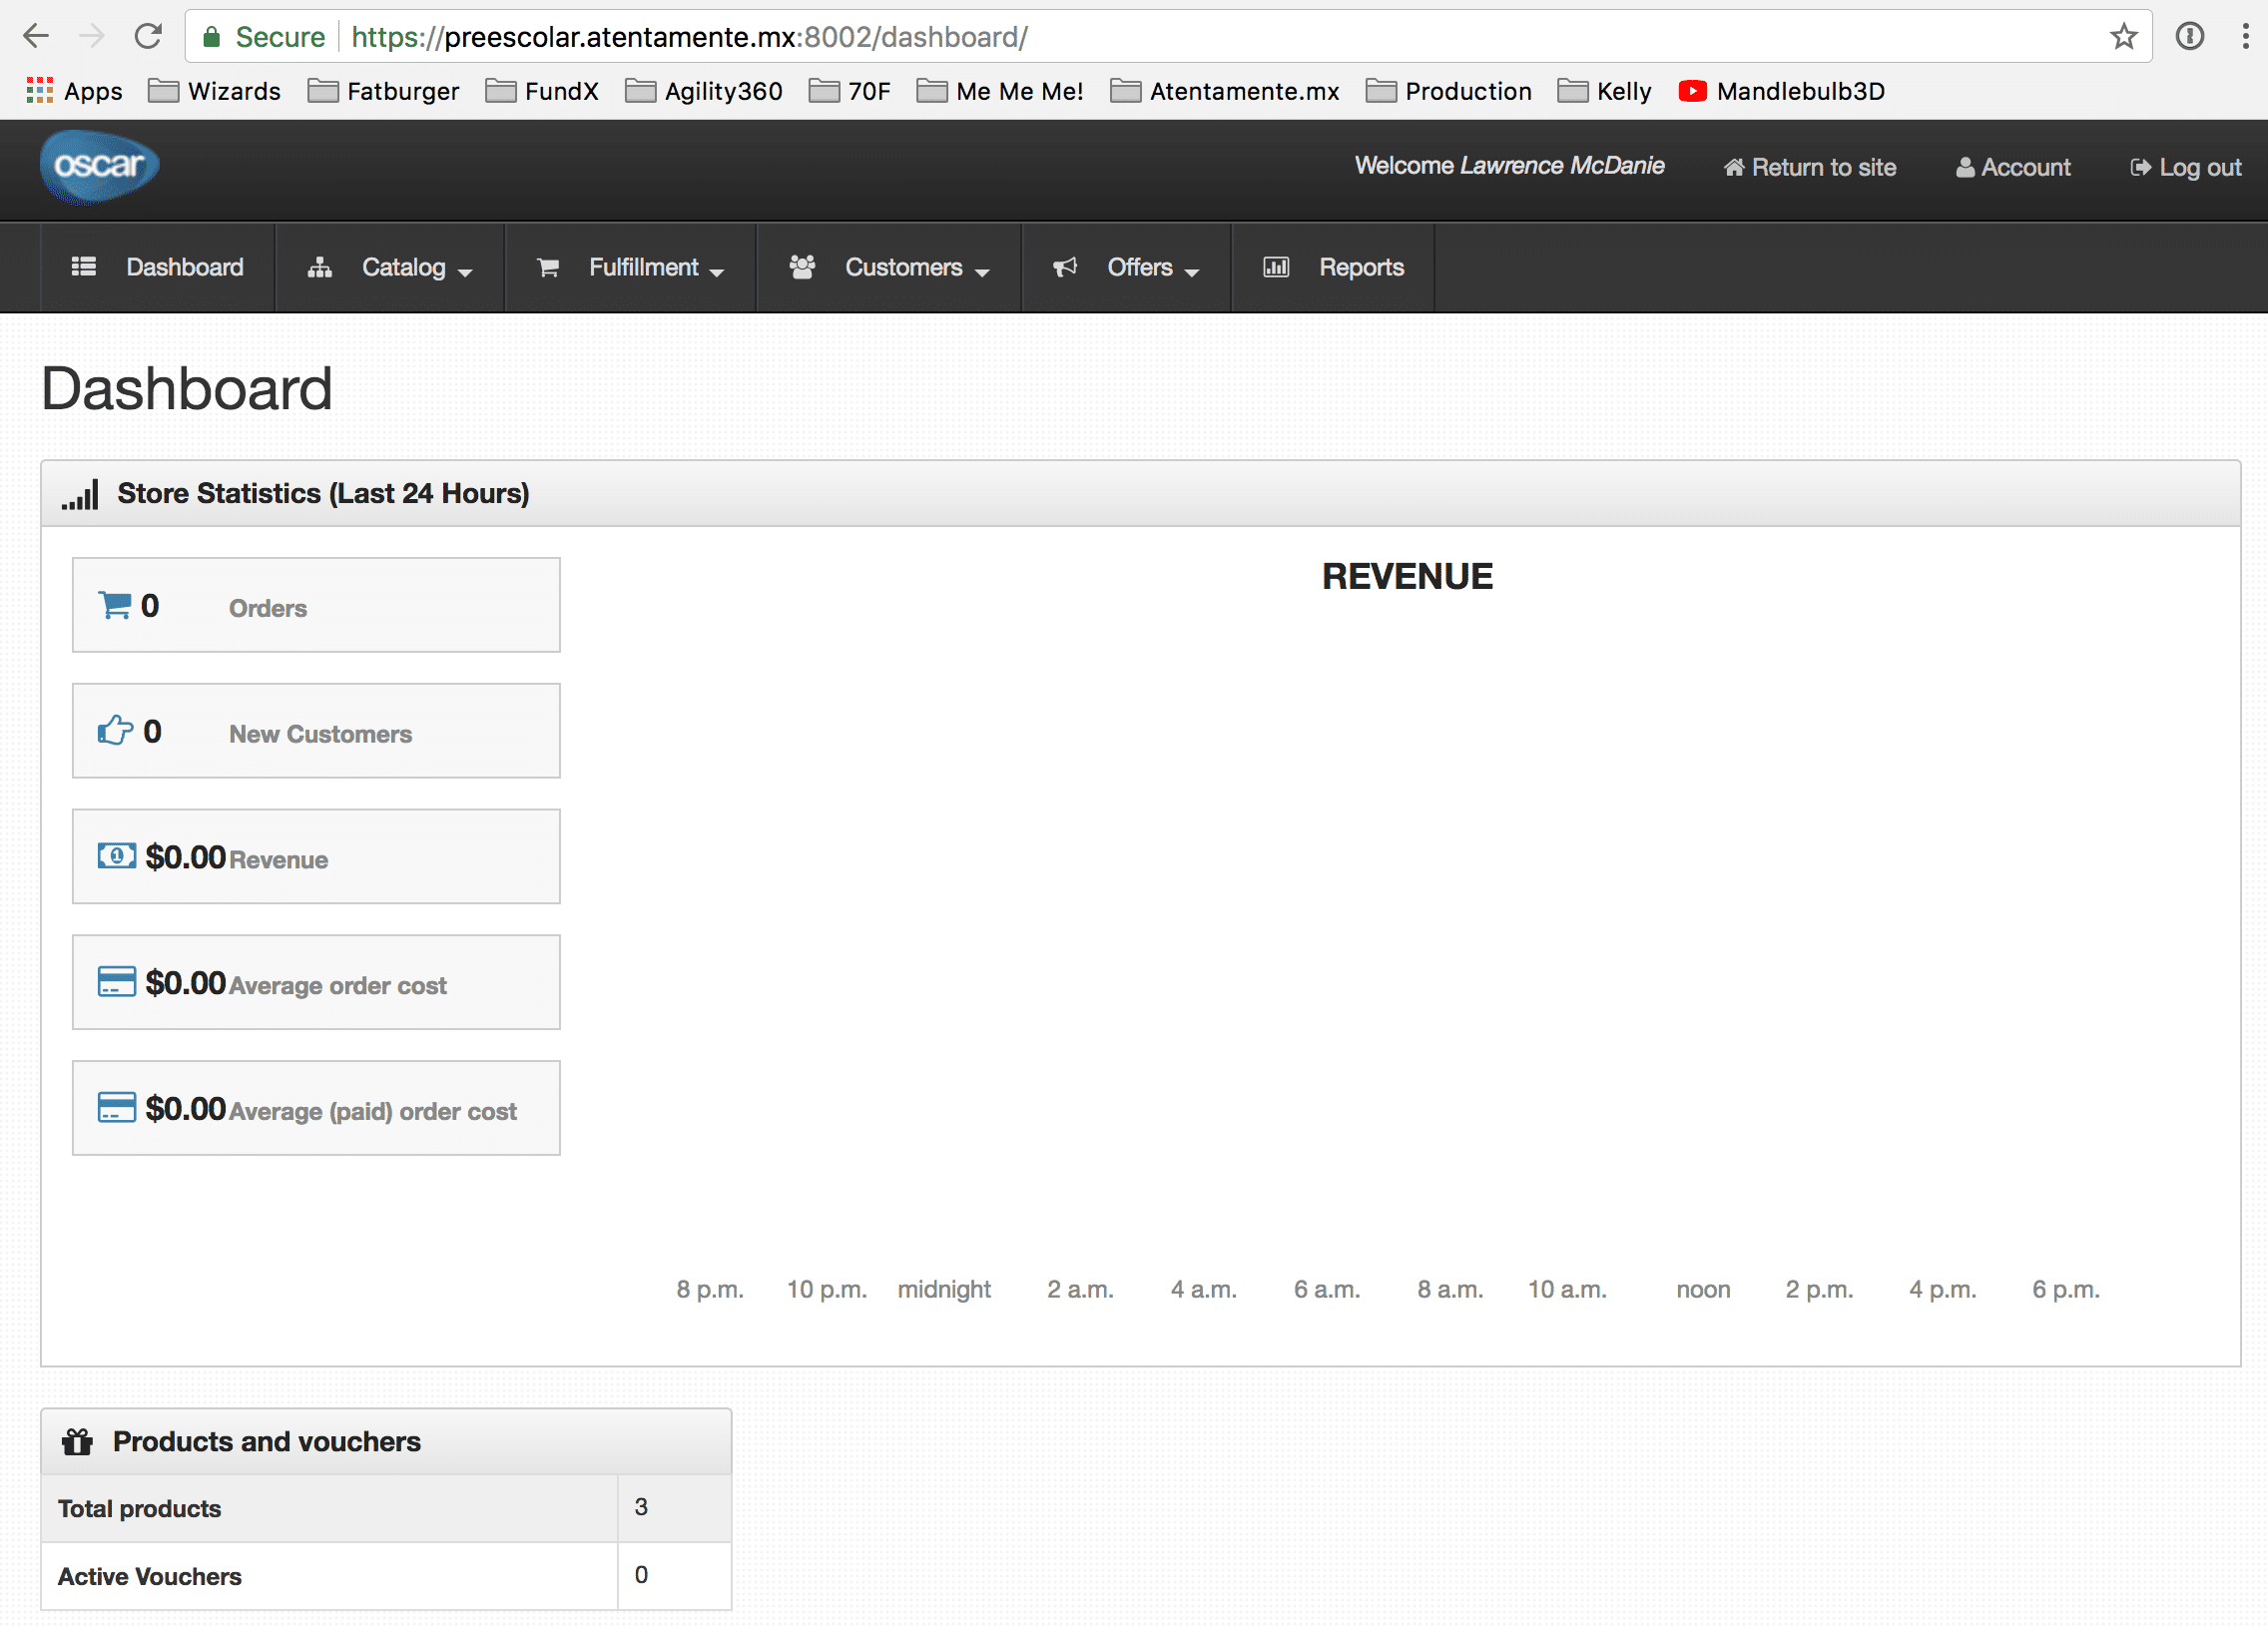
7. Navigate to Oscar Ecommerce Dashboard
If everything is working as it should then you’ll be able to navigate to the Ecommerce dashboard where you can begin setting up your products. You can refer to the Oscar Ecommerce Official Documentation for further instructions on setting up products, payment gateways, etcetera.
Trouble Shooting
- Firewall. You should pay close attention to the unorthodox port assignments used by the Ecommerce module. By default the Oscar Ecommerce module runs on port 8002 and the LMS “Course Discovery” API runs on port 18381. You might need to open these ports on your firewall.
- Port Settings. Take note that ports have changed over time. The official documentation makes multiple references to ports 18020 and 18130; neither of which seem to be in use on Ginkgo.
- Nginx. If you’re using SSL on your site then you might need to make adjustments to one or more of the Nginx virtual server configurations located in /edx/app/nginx/sites-available/.
- Additional Work Notes. You can reference these additional work notes from my colleague Eric Mensah and myself as he was trouble-shooting a couple of details related to ports and ssl.
If you see the screen below when you try to navigate to the Ecommerce site then be aware that this, believe it or not, is correct. This is what you’ll initially see prior to logging in to the Ecommerce back end administration console.
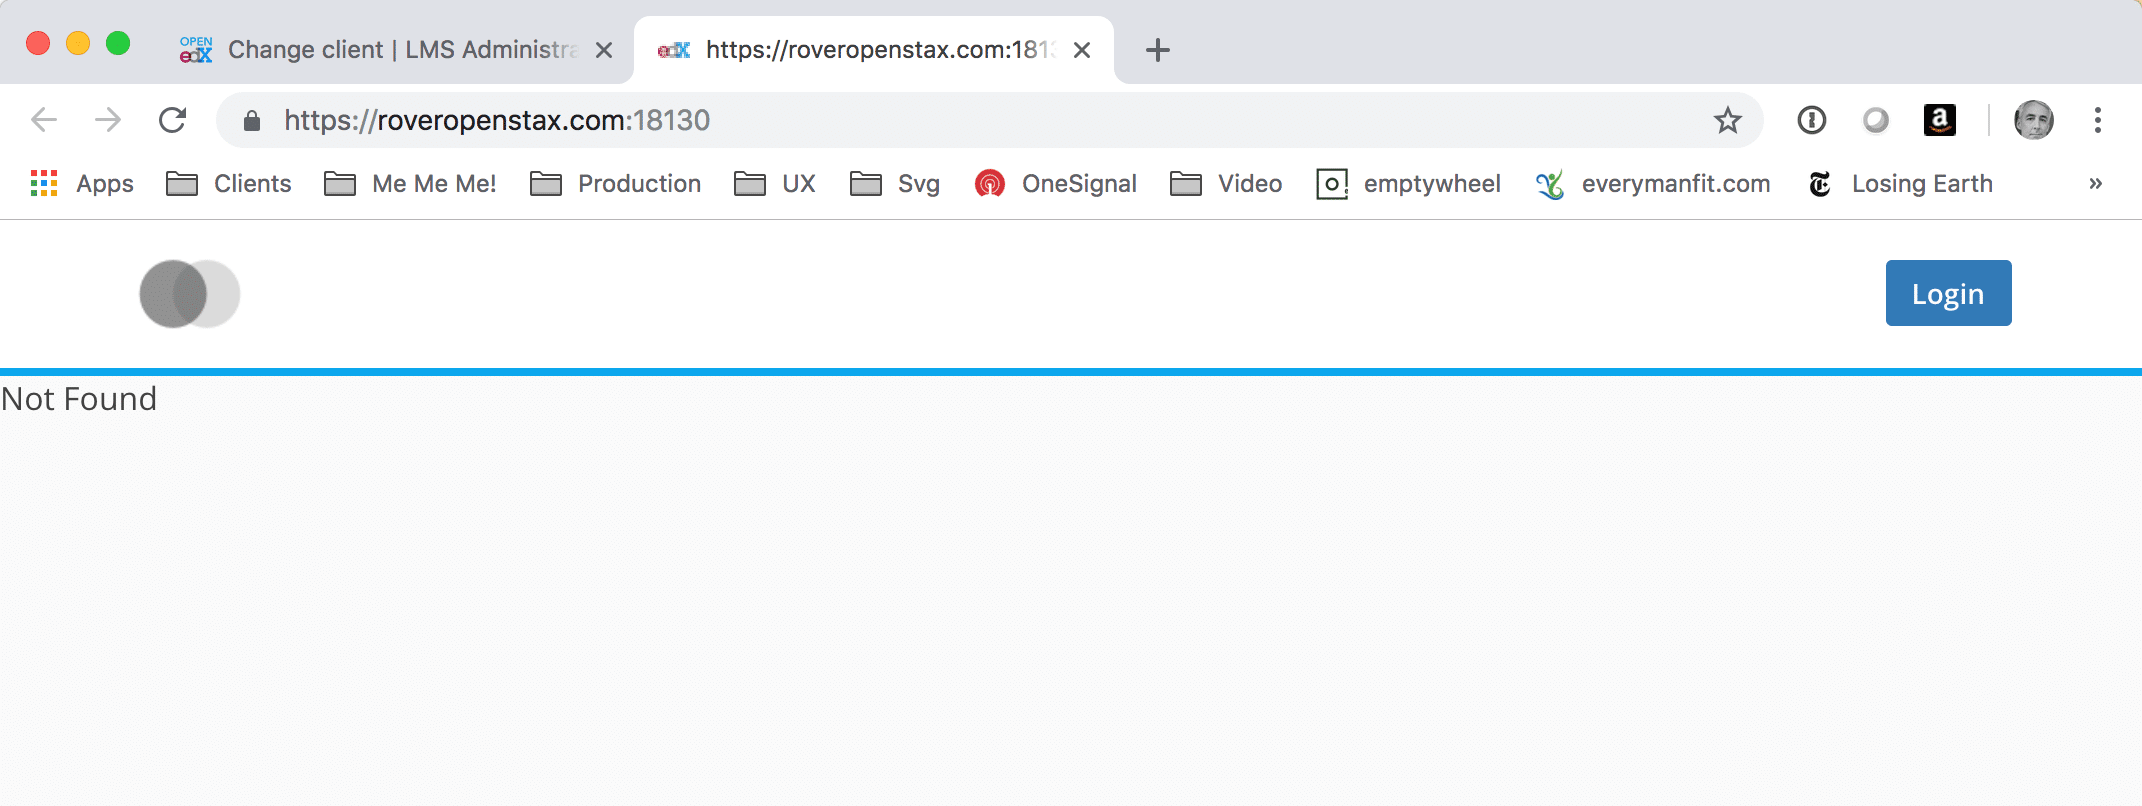
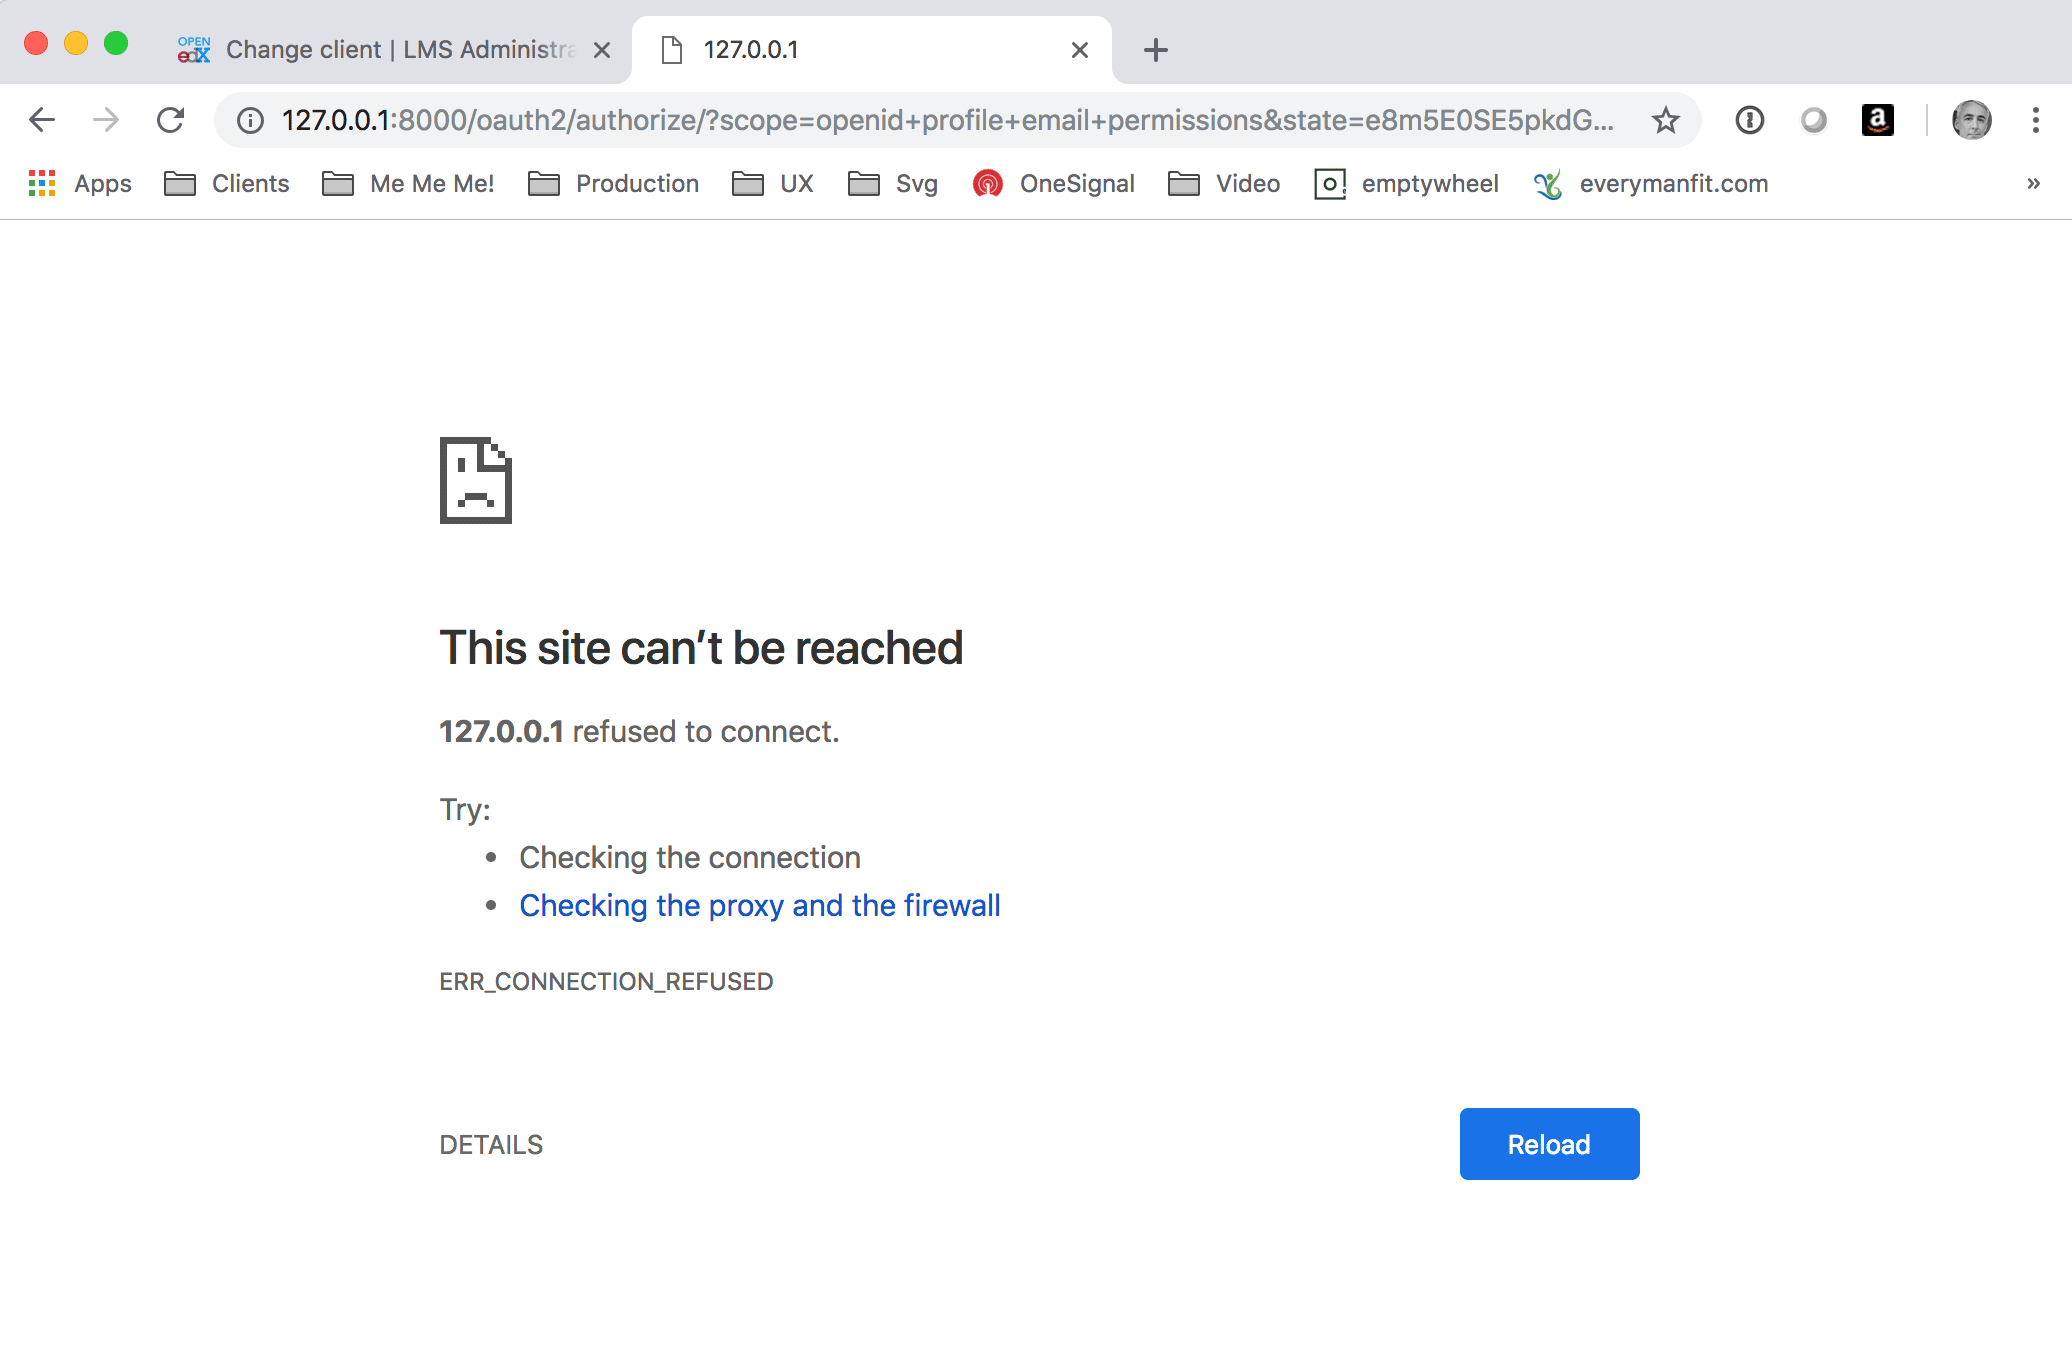
If you see this screen after clicking the “Login” button (note the http://127.0.0.1:8000 domain name) then you need to update /edx/etc/ecommerce.yml from Step 6.
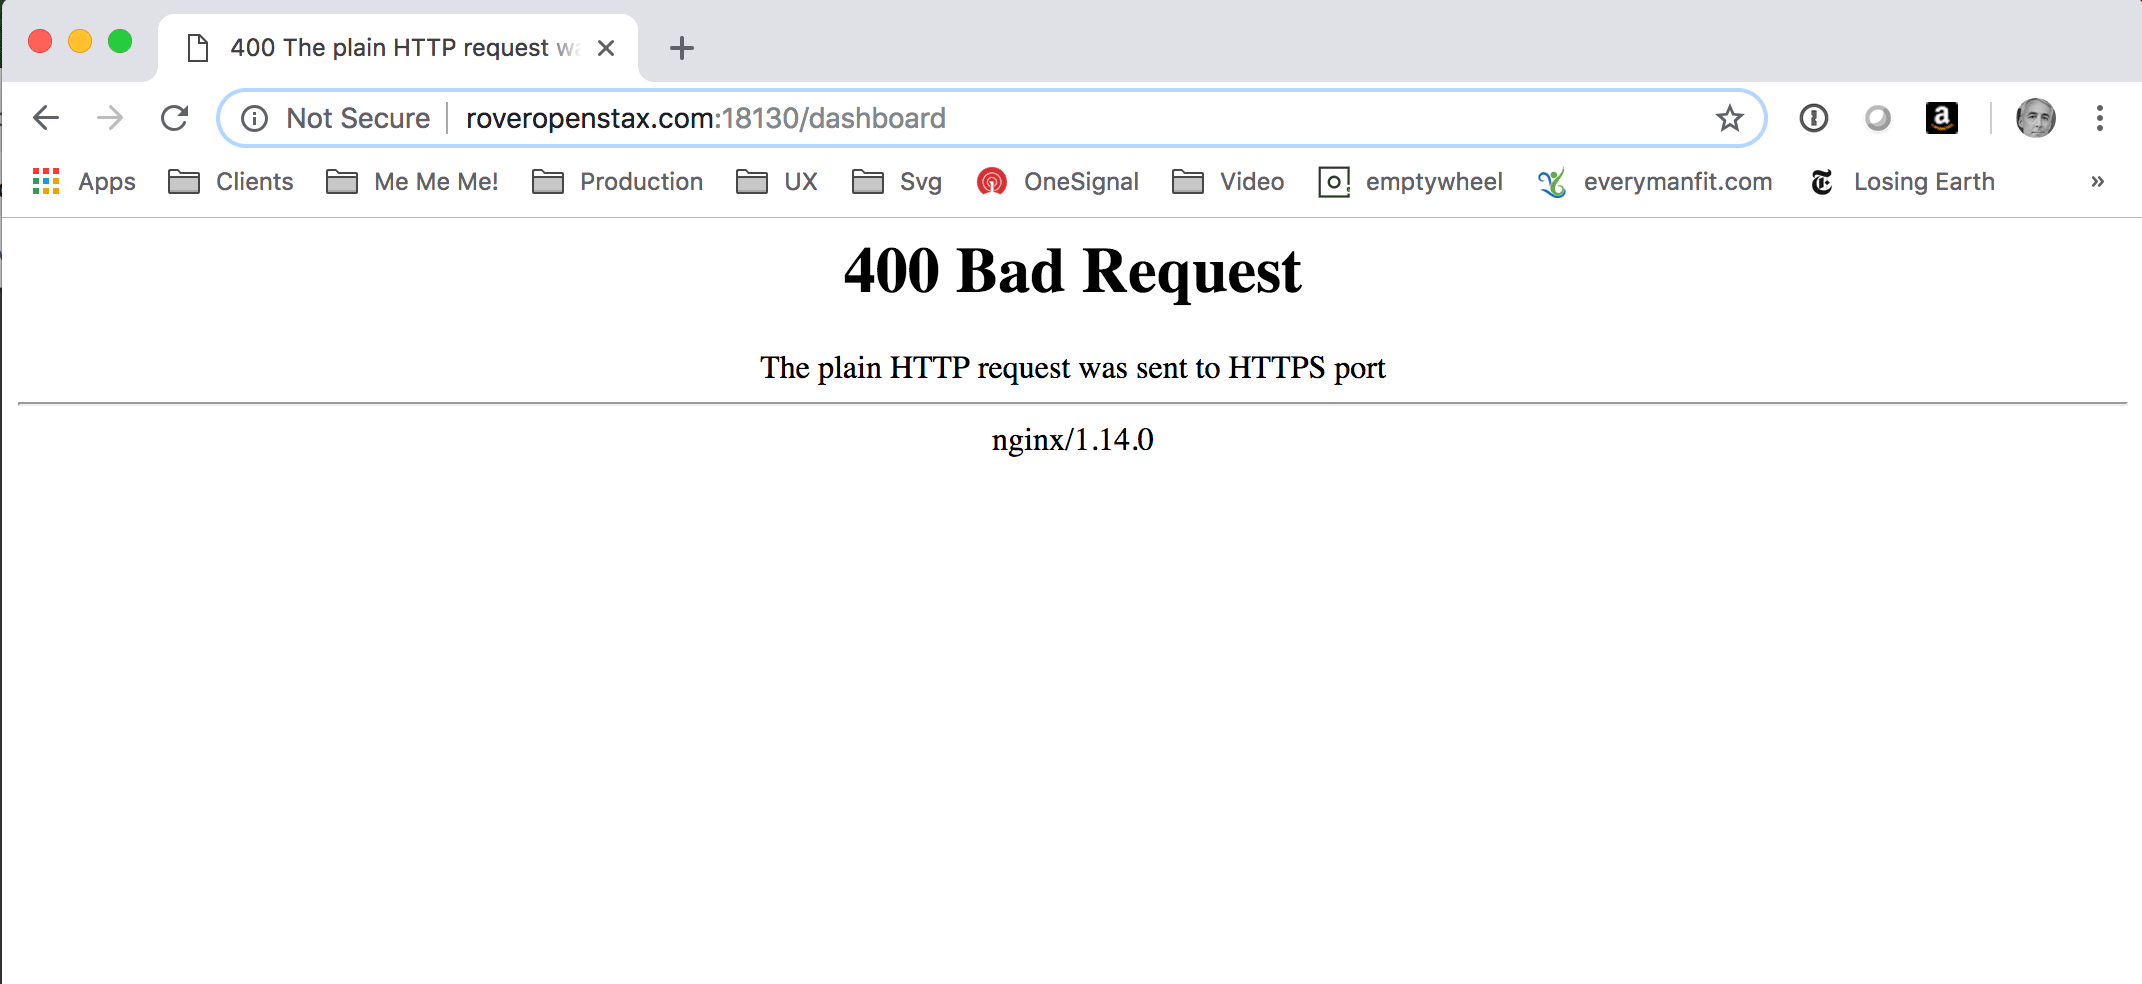
If you get a 404 error like the screen shot below then you need to modify the nginx configuration in /etc/nginx/sites-enabled/ecommerce. Most likely you need to modify the port assignment to match the port that you used in /edx/app/edxapp/*.json and /edx/etc/ecommerce.yml.
I hope you found this helpful. Please help me improve this article by leaving a comment below. Thank you!





Hey there @all,
I have been trying to setup django-oscar for edx-app on my local system but seems like there’s some problem I am always redirected to 404 request.
The link has two “//” which I dont know the reason of..
http://edx.devstack.lms:18000//oauth2/authorize?client_id=whatever_there_is
Can anyone direct me on what should I do ?
the complete url is created from a collection of concatenated string values stored in various settings that are accessible from django. it looks like you probably included a trailing “/” in your host name (ie “http://edx.devstack.lms:18000/”) which you should remove.
Hi Lawrence,
I am great fan of your blogs and resolved many issues via following them.
Now, I am trying to enable ecommerce for my site and followed all steps mentioned above but while doing, I am finding following error in my logs. Looking forward for your guidance.
/edx/var/log/ecommerce/edx.log
Sep 28 10:27:10 ip-172-31-20-199 [service_variant=ecommerce][django.request] ERROR [ip-172-31-20-199 2680] [/edx/app/ecommerce/venvs/ecommerce/local/lib/python2.7/site-packages/django/core/handlers/exception.py:135] – Internal Server Error: /complete/edx-oidc/
Traceback (most recent call last):
File “/edx/app/ecommerce/venvs/ecommerce/local/lib/python2.7/site-packages/django/core/handlers/exception.py”, line 41, in inner
response = get_response(request)
File “/edx/app/ecommerce/venvs/ecommerce/local/lib/python2.7/site-packages/django/core/handlers/base.py”, line 249, in _legacy_get_response
response = self._get_response(request)
File “/edx/app/ecommerce/venvs/ecommerce/local/lib/python2.7/site-packages/django/core/handlers/base.py”, line 187, in _get_response
response = self.process_exception_by_middleware(e, request)
File “/edx/app/ecommerce/venvs/ecommerce/local/lib/python2.7/site-packages/django/core/handlers/base.py”, line 185, in _get_response
response = wrapped_callback(request, *callback_args, **callback_kwargs)
File “/edx/app/ecommerce/venvs/ecommerce/local/lib/python2.7/site-packages/django/utils/decorators.py”, line 185, in inner
return func(*args, **kwargs)
File “/edx/app/ecommerce/venvs/ecommerce/local/lib/python2.7/site-packages/django/views/decorators/cache.py”, line 57, in _wrapped_view_func
response = view_func(request, *args, **kwargs)
File “/edx/app/ecommerce/venvs/ecommerce/local/lib/python2.7/site-packages/django/views/decorators/csrf.py”, line 58, in wrapped_view
return view_func(*args, **kwargs)
File “/edx/app/ecommerce/venvs/ecommerce/local/lib/python2.7/site-packages/social_django/utils.py”, line 50, in wrapper
return func(request, backend, *args, **kwargs)
File “/edx/app/ecommerce/venvs/ecommerce/local/lib/python2.7/site-packages/social_django/views.py”, line 32, in complete
redirect_name=REDIRECT_FIELD_NAME, *args, **kwargs)
File “/edx/app/ecommerce/venvs/ecommerce/local/lib/python2.7/site-packages/social_core/actions.py”, line 41, in do_complete
user = backend.complete(user=user, *args, **kwargs)
File “/edx/app/ecommerce/venvs/ecommerce/local/lib/python2.7/site-packages/social_core/backends/base.py”, line 40, in complete
return self.auth_complete(*args, **kwargs)
File “/edx/app/ecommerce/venvs/ecommerce/local/lib/python2.7/site-packages/auth_backends/backends.py”, line 163, in auth_complete
user = super(EdXOpenIdConnect, self).auth_complete(*args, **kwargs)
File “/edx/app/ecommerce/venvs/ecommerce/local/lib/python2.7/site-packages/social_core/utils.py”, line 255, in wrapper
raise AuthCanceled(args[0], response=err.response)
AuthCanceled: Authentication process canceled
/edx/var/log/tracking/tracking.log
{“username”: “admin”, “event_type”: “/oauth2/authorize/”, “ip”: “72.255.57.63”, “agent”: “Mozilla/5.0 (Windows NT 6.1; Win64; x64) AppleWebKit/537.36 (KHTML, like Gecko) Chrome/85.0.4183.121 Safari/537.36”, “host”: “openedx.techhivesolutions.com”, “referer”: “https://openedx.techhivesolutions.com:18130/”, “accept_language”: “en-US,en;q=0.9”, “event”: “{\”POST\”: {}, \”GET\”: {\”scope\”: [\”openid profile email permissions\”], \”state\”: [\”pyHG3JMSNIvwaKFHezozRpDXL3Krp79G\”], \”redirect_uri\”: [\”https://openedx.techhivesolutions.com:18130/complete/edx-oidc/\”], \”response_type\”: [\”code\”], \”client_id\”: [\”ecommerce-key\”]}}”, “event_source”: “server”, “context”: {“user_id”: 12, “org_id”: “”, “course_id”: “”, “path”: “/oauth2/authorize/”}, “time”: “2020-09-28T07:58:47.764538+00:00”, “page”: null}
{“username”: “admin”, “event_type”: “/oauth2/authorize/confirm”, “ip”: “72.255.57.63”, “agent”: “Mozilla/5.0 (Windows NT 6.1; Win64; x64) AppleWebKit/537.36 (KHTML, like Gecko) Chrome/85.0.4183.121 Safari/537.36”, “host”: “openedx.techhivesolutions.com”, “referer”: “https://openedx.techhivesolutions.com:18130/”, “accept_language”: “en-US,en;q=0.9”, “event”: “{\”POST\”: {}, \”GET\”: {}}”, “event_source”: “server”, “context”: {“user_id”: 12, “org_id”: “”, “course_id”: “”, “path”: “/oauth2/authorize/confirm”}, “time”: “2020-09-28T07:58:47.908380+00:00”, “page”: null}
{“username”: “admin”, “event_type”: “/oauth2/redirect”, “ip”: “72.255.57.63”, “agent”: “Mozilla/5.0 (Windows NT 6.1; Win64; x64) AppleWebKit/537.36 (KHTML, like Gecko) Chrome/85.0.4183.121 Safari/537.36”, “host”: “openedx.techhivesolutions.com”, “referer”: “https://openedx.techhivesolutions.com:18130/”, “accept_language”: “en-US,en;q=0.9”, “event”: “{\”POST\”: {}, \”GET\”: {}}”, “event_source”: “server”, “context”: {“user_id”: 12, “org_id”: “”, “course_id”: “”, “path”: “/oauth2/redirect”}, “time”: “2020-09-28T07:58:48.232899+00:00”, “page”: null}
{“username”: “”, “event_type”: “/oauth2/access_token/”, “ip”: “127.0.0.1”, “agent”: “python-requests/2.21.0”, “host”: “127.0.0.1:8000”, “referer”: “”, “accept_language”: “”, “event”: “{\”POST\”: {\”grant_type\”: [\”authorization_code\”], \”code\”: [\”e204577d3c4645ede5ad3f68d0a35365b5cd974d\”], \”client_id\”: [\”ecommerce-key\”], \”redirect_uri\”: [\”https://openedx.techhivesolutions.com:18130/complete/edx-oidc/\”], \”claims\”: [\”{\\\”id_token\\\”: {}}\”], \”client_secret\”: [\”ecommerce-secret\”]}, \”GET\”: {}}”, “event_source”: “server”, “context”: {“user_id”: null, “org_id”: “”, “course_id”: “”, “path”: “/oauth2/access_token/”}, “time”: “2020-09-28T07:58:48.377043+00:00”, “page”: null}
Just leaving a comment here after troubleshooting some of my errors that will hopefully save others some trouble. Also – thanks Lawrence for putting this up! It is a great start to getting Ecommerce up and working. I have the latest Ironwood install of open edx (March, 2020 install date).
– I had to use port 18130 and listen on 18130 for nginx
– I had to turn the OAUTH_ENFORCE_SECURE flag to “false” in lms.env.json, even after changing the nginx file to include the ssl path.
– I had to open the port 18130 with sudo ufw open 18130
I think there is an error in some of your configs, you have https://whateverdoman.com:8002, but the fact you have https means that will be redirected to 443 instead of 8002, so that will never work? I get an invalid_request The requested redirect didn’t match the client settings. when I tried exactly as above.
Seems the problem was not adding my certificates to the nginx Ecommerce file
helpful contents. i will like to keep getting more valuable content like this.
What a great article . thank’s
Very nice & helpful post . thank’s for sharing
Does anyone know how to change the currency associated with the cost of a course?
It is currently set to usd but I need it to be in euros.
I have changed the variable “PAID_COURSE_REGISTRATION_CURRENCY” in lms.env.json
and also the currency variable in the lms admin course modes to euros
But when i checkout using paypal i still see usd
There doesn’t seem to be an answer to this in the forums…
Does anyone know what we set the JWT_AUDIENCE to?
JWT_AUDIENCE is ignored by Open edX eCommerce.
Thank you
Does E-commerce / Oscar provide functionality where one can select the currency with which the course should be paid in? So, basically when a user sets the price for the course in the e-commerce platform can I make it so that the user can also select a preferred currency.
https://www.onewood.co/ecommerce
yes, however, you’d need to implement the additional UI controls yourself as these are not present in the Django Mako templates for the LMS. you can read more about the advanced configuration capabilities of the ecommerce module here: https://django-oscar.readthedocs.io/en/2.0.0/
how can i fix 502 bad gateway nginx
I got 504 Gateway Time-out
AuthFailed: Authentication failed: HTTPConnectionPool(host=’103.117.207.91′, port=18000): Max retries exceeded with url: /oauth2/access_token/ (Caused by NewConnectionError(‘: Failed to establish a new connection: [Errno 110] Connection timed out’,))
Can anyone help me, please?
FIXED!
I read all the comments and tried almost all of them. And then I read sergen solution, and somehow it works!
So here’s his comment, hope it can help:
{
Here’s my solution, I hope it helps.
sudo su ecommerce -s /bin/bash
cd ~/ecommerce
source ../ecommerce_env
./manage.py createsuperuser
/*create new user*/
http://mydomain.com:18130/admin/ (use new username and password)
Thank you again Lawrence…
}
Thanks sergen.
Anyway thank you Lawrence, your blog is really helpful. But I think it need more detail for every step. Good work anyway!
JSONDecodeError at /basket/
Expecting value: line 2 column 1 (char 1)
Request Method: GET
Request URL: http://172.10.29.80:18130/basket/
Django Version: 1.11.15
Exception Type: JSONDecodeError
Exception Value:
Expecting value: line 2 column 1 (char 1)
Exception Location: /edx/app/ecommerce/venvs/ecommerce/local/lib/python2.7/site-packages/simplejson/decoder.py in raw_decode, line 400
Python Executable: /edx/app/ecommerce/venvs/ecommerce/bin/python
Python Version: 2.7.12
Python Path:
[‘/edx/app/ecommerce/ecommerce’,
‘/edx/app/ecommerce/venvs/ecommerce/lib/python2.7’,
‘/edx/app/ecommerce/venvs/ecommerce/lib/python2.7/plat-x86_64-linux-gnu’,
‘/edx/app/ecommerce/venvs/ecommerce/lib/python2.7/lib-tk’,
‘/edx/app/ecommerce/venvs/ecommerce/lib/python2.7/lib-old’,
‘/edx/app/ecommerce/venvs/ecommerce/lib/python2.7/lib-dynload’,
‘/usr/lib/python2.7’,
‘/usr/lib/python2.7/plat-x86_64-linux-gnu’,
‘/usr/lib/python2.7/lib-tk’,
‘/edx/app/ecommerce/venvs/ecommerce/local/lib/python2.7/site-packages’,
‘/edx/app/ecommerce/venvs/ecommerce/src/analytics-python’,
‘/edx/app/ecommerce/venvs/ecommerce/lib/python2.7/site-packages’,
‘/edx/app/ecommerce/ecommerce/ecommerce’,
‘/edx/app/edx_ansible/edx_ansible/docker/plays’,
‘/edx/app/ecommerce/ecommerce’]
Server time: Wed, 5 Jun 2019 10:47:29 +0000
ecommerce is not running
Could not import ‘edx_rest_framework_extensions.authentication.JwtAuthentication’ for API setting ‘DEFAULT_AUTHENTICATION_CLASSES’. ImportError: No module named authentication.
when i run following command i am getting this error…
devstack-docker/ecommerce$ python manage.py runserver 0.0.0.0:18002
Unhandled exception in thread started by
Traceback (most recent call last):
File “/home/nandani/docker/docker/local/lib/python2.7/site-packages/django/utils/autoreload.py”, line 228, in wrapper
fn(*args, **kwargs)
File “/home/nandani/docker/docker/local/lib/python2.7/site-packages/django/core/management/commands/runserver.py”, line 116, in inner_run
autoreload.raise_last_exception()
File “/home/nandani/docker/docker/local/lib/python2.7/site-packages/django/utils/autoreload.py”, line 251, in raise_last_exception
six.reraise(*_exception)
File “/home/nandani/docker/docker/local/lib/python2.7/site-packages/django/utils/autoreload.py”, line 228, in wrapper
fn(*args, **kwargs)
File “/home/nandani/docker/docker/local/lib/python2.7/site-packages/django/__init__.py”, line 27, in setup
apps.populate(settings.INSTALLED_APPS)
File “/home/nandani/docker/docker/local/lib/python2.7/site-packages/django/apps/registry.py”, line 85, in populate
app_config = AppConfig.create(entry)
File “/home/nandani/docker/docker/local/lib/python2.7/site-packages/django/apps/config.py”, line 94, in create
module = import_module(entry)
File “/usr/lib/python2.7/importlib/__init__.py”, line 37, in import_module
__import__(name)
ImportError: No module named release_util
hello……it is giving me error when i try to run the following command
/docker/devstack-docker/ecommerce$ python manage.py runserver 18002
Traceback (most recent call last):
File “manage.py”, line 10, in
execute_from_command_line(sys.argv)
File “/home/nandani/docker/docker/local/lib/python2.7/site-packages/django/core/management/__init__.py”, line 364, in execute_from_command_line
utility.execute()
File “/home/nandani/docker/docker/local/lib/python2.7/site-packages/django/core/management/__init__.py”, line 308, in execute
settings.INSTALLED_APPS
File “/home/nandani/docker/docker/local/lib/python2.7/site-packages/django/conf/__init__.py”, line 56, in __getattr__
self._setup(name)
File “/home/nandani/docker/docker/local/lib/python2.7/site-packages/django/conf/__init__.py”, line 41, in _setup
self._wrapped = Settings(settings_module)
File “/home/nandani/docker/docker/local/lib/python2.7/site-packages/django/conf/__init__.py”, line 110, in __init__
mod = importlib.import_module(self.SETTINGS_MODULE)
File “/usr/lib/python2.7/importlib/__init__.py”, line 37, in import_module
__import__(name)
File “/home/nandani/docker/devstack-docker/ecommerce/ecommerce/settings/local.py”, line 6, in
from ecommerce.settings.base import *
File “/home/nandani/docker/devstack-docker/ecommerce/ecommerce/settings/base.py”, line 10, in
from oscar import OSCAR_MAIN_TEMPLATE_DIR
ImportError: No module named oscar
I have started ecommerce server but getting following error
Traceback (most recent call last):
edx.devstack.ecommerce | File “/edx/app/ecommerce/venvs/ecommerce/local/lib/python2.7/site-packages/django/core/handlers/base.py”, line 131, in get_response
edx.devstack.ecommerce | response = middleware_method(request, response)
edx.devstack.ecommerce | File “/edx/app/ecommerce/venvs/ecommerce/local/lib/python2.7/site-packages/django/contrib/flatpages/middleware.py”, line 12, in process_response
edx.devstack.ecommerce | return flatpage(request, request.path_info)
edx.devstack.ecommerce | File “/edx/app/ecommerce/venvs/ecommerce/local/lib/python2.7/site-packages/django/contrib/flatpages/views.py”, line 35, in flatpage
edx.devstack.ecommerce | site_id = get_current_site(request).id
edx.devstack.ecommerce | File “/edx/app/ecommerce/venvs/ecommerce/local/lib/python2.7/site-packages/django/contrib/sites/shortcuts.py”, line 15, in get_current_site
edx.devstack.ecommerce | return Site.objects.get_current(request)
edx.devstack.ecommerce | File “/edx/app/ecommerce/venvs/ecommerce/local/lib/python2.7/site-packages/django/contrib/sites/models.py”, line 65, in get_current
edx.devstack.ecommerce | return self._get_site_by_request(request)
edx.devstack.ecommerce | File “/edx/app/ecommerce/venvs/ecommerce/local/lib/python2.7/site-packages/django/contrib/sites/models.py”, line 50, in _get_site_by_request
edx.devstack.ecommerce | SITE_CACHE[domain] = self.get(domain__iexact=domain)
edx.devstack.ecommerce | File “/edx/app/ecommerce/venvs/ecommerce/local/lib/python2.7/site-packages/django/db/models/manager.py”, line 85, in manager_method
edx.devstack.ecommerce | return getattr(self.get_queryset(), name)(*args, **kwargs)
edx.devstack.ecommerce | File “/edx/app/ecommerce/venvs/ecommerce/local/lib/python2.7/site-packages/django/db/models/query.py”, line 380, in get
edx.devstack.ecommerce | self.model._meta.object_name
edx.devstack.ecommerce | DoesNotExist: Site matching query does not exist.
Hello everyone,
I have tried to use “paypal” for e-commerce part. Payment process is okay but after that when I return to “/dashboard”, I only see the following error. I have check every part of configuration files (/edx/etc/ecommerce.yml / lms.env.json / cms.env.json / lms.auth.json / cms.auth.json ). If you have any idea where is the problem, could you help me?
May 7 11:10:35 ip-172-31-39-168 [service_variant=lms][django.request][env:sandbox] ERROR [ip-172-31-39-168 11396] [base.py:256] – Internal Server Error: /dashboard
Traceback (most recent call last):
File “/edx/app/edxapp/venvs/edxapp/local/lib/python2.7/site-packages/django/core/handlers/base.py”, line 132, in get_response
response = wrapped_callback(request, *callback_args, **callback_kwargs)
File “/edx/app/edxapp/venvs/edxapp/local/lib/python2.7/site-packages/django/utils/decorators.py”, line 145, in inner
return func(*args, **kwargs)
File “/edx/app/edxapp/venvs/edxapp/local/lib/python2.7/site-packages/django/contrib/auth/decorators.py”, line 22, in _wrapped_view
return view_func(request, *args, **kwargs)
File “/edx/app/edxapp/venvs/edxapp/local/lib/python2.7/site-packages/django/utils/decorators.py”, line 110, in _wrapped_view
response = view_func(request, *args, **kwargs)
File “/edx/app/edxapp/edx-platform/common/djangoapps/student/views.py”, line 922, in dashboard
enrollment.course_id for enrollment in course_enrollments
File “/edx/app/edxapp/edx-platform/common/djangoapps/student/views.py”, line 924, in
user_already_has_certs_for=user_already_has_certs_for
File “/edx/app/edxapp/edx-platform/common/djangoapps/student/models.py”, line 1591, in refundable
log.info(self.refund_cutoff_date())
File “/edx/app/edxapp/edx-platform/common/djangoapps/student/models.py”, line 1631, in refund_cutoff_date
order = ecommerce_api_client(self.user).orders(order_number).get()
File “/edx/app/edxapp/venvs/edxapp/local/lib/python2.7/site-packages/slumber/__init__.py”, line 175, in get
resp = self._request(“GET”, params=kwargs)
File “/edx/app/edxapp/venvs/edxapp/local/lib/python2.7/site-packages/slumber/__init__.py”, line 121, in _request
raise exception_class(“Client Error %s: %s” % (resp.status_code, url), response=resp, content=resp.content)
HttpClientError: Client Error 401: https://mydomain_name:18130/api/v2/orders/EDX-100055/
By the way I use ginkgo. I have checked everything about here. I have no idea where is the problem.
Hi Lawrence,
When I open https://mysite:18130/admin
I actually see a login screen, titled “E-Commerce Service Administration” but my superuser cannot get in, eventhough I have no problems getting into :18010. Should I be able to get in from this logon? Or should login into the E-Commerce 100% be handled via OAuth2 (which I am having problems with)
Thanks!
all ecommerce authentication is managed via oauth2
it’s entirely oauth2.
Thanks, make sense. I’m getting hung up on mysite:18130/complete/edx-oidc/?state=94hOnNSabkNGCh3ZWEEQx4yM… and I’m looking at https://edx.readthedocs.io/projects/edx-installing-configuring-and-running/en/latest/ecommerce/install_ecommerce.html
6.1.3.2. Designate the Client as Trusted
Is this step missing from the tutorial?
Thanks
NEVERMIND! Got it working. Issue was with my SSL certificate. I did not bundle my CA w/ my certificate.
Hi Lawrence,
How important is it to change SET-ME-PLEASE to something? Or is that for security purposes only and OK to leave for testing?
TIA
Hi Lawrence,
I find your blog very useful. Thanks for all the work.
I am trying to setup ecommerce.
After I am able to login to http::18130 I am getting “Not Found” page which is as expected as you mentioned in your blog. I also completed setting up OAUTH2 related config on django admin console.
When I try to click on login screen I get error “AuthStateMissing: Session value state missing”.
– – 75.68.91.191 – – – [21/Apr/2019:19:08:41 +0000] “GET /oauth2/authorize/?scope=openid+profile+email+permissions&state=O2UMhjkN78xnp2dRNiqZQaupPm2n57ZM&redirect_uri=http://top-rank.in:18130/complete/edx-oidc/&response_type=code&client_id=ecommerce-key HTTP/1.1” 302 0 5.798 “http://top-rank.in:18130/” “Mozilla/5.0 (Windows NT 10.0; Win64; x64) AppleWebKit/537.36 (KHTML, like Gecko) Chrome/73.0.3683.103 Safari/537.36”
– – 127.0.0.1 – HX6Vm36g5PyROrXz0AG08yLsgep0IlDRrkZ – [21/Apr/2019:19:08:42 +0000] “GET /xqueue/get_queuelen/?queue_name=certificates HTTP/1.1” 200 61 0.019 “-” “python-requests/2.3.0 CPython/2.7.12 Linux/4.4.0-1079-aws”
– – 127.0.0.1 – HX6Vm36g5PyROrXz0AG08yLsgep0IlDRrkZ – [21/Apr/2019:19:08:47 +0000] “GET /xqueue/get_queuelen/?queue_name=certificates HTTP/1.1” 200 61 0.016 “-” “python-requests/2.3.0 CPython/2.7.12 Linux/4.4.0-1079-aws”
– – 75.68.91.191 – – – [21/Apr/2019:19:08:47 +0000] “GET /oauth2/authorize/confirm HTTP/1.1” 302 0 5.967 “http://top-rank.in:18130/” “Mozilla/5.0 (Windows NT 10.0; Win64; x64) AppleWebKit/537.36 (KHTML, like Gecko) Chrome/73.0.3683.103 Safari/537.36”
– – 75.68.91.191 – – – [21/Apr/2019:19:08:47 +0000] “GET /oauth2/redirect HTTP/1.1” 302 0 0.020 “http://top-rank.in:18130/” “Mozilla/5.0 (Windows NT 10.0; Win64; x64) AppleWebKit/537.36 (KHTML, like Gecko) Chrome/73.0.3683.103 Safari/537.36”
==> /edx/var/log/ecommerce/edx.log /edx/var/log/nginx/access.log <==
– – 75.68.91.191 – – – [21/Apr/2019:19:08:47 +0000] "GET /complete/edx-oidc/?state=O2UMhjkN78xnp2dRNiqZQaupPm2n57ZM&code=3bb0fae41441a28944af7fac6f407ded72fb1a33 HTTP/1.1" 500 1988 0.037 "http://top-rank.in:18130/" "Mozilla/5.0 (Windows NT 10.0; Win64; x64) AppleWebKit/537.36 (KHTML, like Gecko) Chrome/73.0.3683.103 Safari/537.36"
– – 75.68.91.191 – – – [21/Apr/2019:19:08:48 +0000] "GET /jsi18n/ HTTP/1.1" 200 922 0.020 "http://top-rank.in:18130/complete/edx-oidc/?state=O2UMhjkN78xnp2dRNiqZQaupPm2n57ZM&code=3bb0fae41441a28944af7fac6f407ded72fb1a33" "Mozilla/5.0 (Windows NT 10.0; Win64; x64) AppleWebKit/537.36 (KHTML, like Gecko) Chrome/73.0.3683.103 Safari/537.36"
– – 127.0.0.1 – HX6Vm36g5PyROrXz0AG08y
I will really appreciate if you can help me out.
Thanks In Advance.
Regrads
Hi Lawrence,
Thanks for the great post. I have configured ecommerce, and when I navigate to the dashboard, I get the Login button with the “Not Found” error. When I click the Login button, it just loops me back to the same page. I checked the /edx/var/log/ecommerce/edx.log and saw the below entries:
[service_variant=ecommerce][django.request] WARNING [15333] [/edx/app/ecommerce/venvs/ecommerce/local/lib/python2.7/site-packages/django/core/handlers/base.py:152] – Not Found: /oauth2/authorize/
[service_variant=ecommerce][django.request] WARNING [15333] [/edx/app/ecommerce/venvs/ecommerce/local/lib/python2.7/site-packages/django/core/handlers/base.py:152] – Not Found: /oauth2/authorize/
[service_variant=ecommerce][django.request] WARNING [15333] [/edx/app/ecommerce/venvs/ecommerce/local/lib/python2.7/site-packages/django/core/handlers/base.py:152] – Not Found: /oauth2/authorize/
[service_variant=ecommerce][django.request] WARNING [15333] [/edx/app/ecommerce/venvs/ecommerce/local/lib/python2.7/site-packages/django/core/handlers/base.py:152] – Not Found: /oauth2/authorize/
[service_variant=ecommerce][django.request] WARNING [15333] [/edx/app/ecommerce/venvs/ecommerce/local/lib/python2.7/site-packages/django/core/handlers/base.py:152] – Not Found: /oauth2/authorize/
[service_variant=ecommerce][django.request] WARNING [15333] [/edx/app/ecommerce/venvs/ecommerce/local/lib/python2.7/site-packages/django/core/handlers/base.py:152] – Not Found: /oauth2/authorize/
Kindly advice, what could I be getting wrong here.
the log entries indicate that your internal oauth configuration is not quite right suggest you have a close look at those steps in the article. but otherwise looks like you’re almost ready to go. good luck!
I had exactly the same issue…
slightly fixed it – you should look at ecommerce nginx setup and add ssl to it – but now I have this issue and cannot yet figure it out:
AuthFailed: Authentication failed: HTTPSConnectionPool(host=’learn.domain.com’, port=443): Max retries exceeded with url: /oauth2/access_token/ (Caused by SSLError(SSLError(“bad handshake: Error([(‘SSL routines’, ‘tls_process_server_certificate’, ‘certificate verify failed’)],)”,),))
Hi Lawrence,
Thanks for the articles, help me lots.
I’ve used paypal for payment for now. I have the problem with the checkout. When I pressed on checkout with Paypal button on basket page, there’s shown the error on console log when I’m inspected the browser
“https://url.com/api/v2/checkout/ 500 (Internal Server Error)”
and when I check ecommerce log – /edx/var/log/ecommerce/edx.log
it’s shown as below
—
Apr 1 10:47:16 ip-172-31-24-41 [service_variant=ecommerce][django.request] ERROR [ip-172-31-24-41 32287] [/edx/app/ecommerce/venvs/ecommerce/local/lib/python2.7/site-packages/django/core/handlers/exception.py:135] – Internal Server Error: /api/v2/checkout/
Traceback (most recent call last):
File “/edx/app/ecommerce/venvs/ecommerce/local/lib/python2.7/site-packages/django/core/handlers/exception.py”, line 41, in inner
response = get_response(request)
File “/edx/app/ecommerce/venvs/ecommerce/local/lib/python2.7/site-packages/django/core/handlers/base.py”, line 249, in _legacy_get_response
response = self._get_response(request)
File “/edx/app/ecommerce/venvs/ecommerce/local/lib/python2.7/site-packages/django/core/handlers/base.py”, line 187, in _get_response
response = self.process_exception_by_middleware(e, request)
File “/edx/app/ecommerce/venvs/ecommerce/local/lib/python2.7/site-packages/django/core/handlers/base.py”, line 185, in _get_response
response = wrapped_callback(request, *callback_args, **callback_kwargs)
File “/edx/app/ecommerce/venvs/ecommerce/local/lib/python2.7/site-packages/django/utils/decorators.py”, line 185, in inner
return func(*args, **kwargs)
File “/edx/app/ecommerce/venvs/ecommerce/local/lib/python2.7/site-packages/django/views/decorators/csrf.py”, line 58, in wrapped_view
return view_func(*args, **kwargs)
File “/edx/app/ecommerce/venvs/ecommerce/local/lib/python2.7/site-packages/django/views/generic/base.py”, line 68, in view
return self.dispatch(request, *args, **kwargs)
File “/edx/app/ecommerce/venvs/ecommerce/local/lib/python2.7/site-packages/rest_framework/views.py”, line 489, in dispatch
response = self.handle_exception(exc)
File “/edx/app/ecommerce/venvs/ecommerce/local/lib/python2.7/site-packages/rest_framework/views.py”, line 449, in handle_exception
self.raise_uncaught_exception(exc)
File “/edx/app/ecommerce/venvs/ecommerce/local/lib/python2.7/site-packages/rest_framework/views.py”, line 486, in dispatch
response = handler(request, *args, **kwargs)
File “/edx/app/ecommerce/ecommerce/ecommerce/extensions/api/v2/views/checkout.py”, line 55, in post
parameters = payment_processor.get_transaction_parameters(basket, request=request)
File “/edx/app/ecommerce/ecommerce/ecommerce/extensions/payment/processors/paypal.py”, line 176, in get_transaction_parameters
payment.create()
File “/edx/app/ecommerce/venvs/ecommerce/local/lib/python2.7/site-packages/paypalrestsdk/resource.py”, line 163, in create
new_attributes = self.api.post(self.path, self.to_dict(), headers, refresh_token)
File “/edx/app/ecommerce/venvs/ecommerce/local/lib/python2.7/site-packages/paypalrestsdk/api.py”, line 272, in post
return self.request(util.join_url(self.endpoint, action), ‘POST’, body=params or {}, headers=headers or {}, refresh_token=refresh_token)
File “/edx/app/ecommerce/venvs/ecommerce/local/lib/python2.7/site-packages/paypalrestsdk/api.py”, line 155, in request
self.headers(refresh_token=refresh_token), headers or {})
File “/edx/app/ecommerce/venvs/ecommerce/local/lib/python2.7/site-packages/paypalrestsdk/api.py”, line 244, in headers
token_hash = self.get_token_hash(refresh_token=refresh_token)
File “/edx/app/ecommerce/venvs/ecommerce/local/lib/python2.7/site-packages/paypalrestsdk/api.py”, line 106, in get_token_hash
“Accept”: “application/json”, “User-Agent”: self.user_agent
File “/edx/app/ecommerce/venvs/ecommerce/local/lib/python2.7/site-packages/paypalrestsdk/api.py”, line 207, in http_call
return self.handle_response(response, response.content.decode(‘utf-8’))
File “/edx/app/ecommerce/venvs/ecommerce/local/lib/python2.7/site-packages/paypalrestsdk/api.py”, line 220, in handle_response
raise exceptions.UnauthorizedAccess(response, content)
UnauthorizedAccess: Failed. Response status: 401. Response message: Unauthorized. Error message: {“error”:”invalid_client”,”error_description”:”Client Authentication failed”}
—
Could give me some advice, please? Thank you.
access to the ecommerce module happens via internal oauth2 protocol. the details of my blog article cover the basics on getting this setup. in the error stack trace above, the client (paypal?) is not providing a client_id, presumably meaning the client_id for client/secret authentication.
First, congratulations on your tips Lawrence!
I followed all the steps of the configuration and installation of ecommerce, but it is giving error when trying to create a new course in ecommerce.
File “/edx/app/edxapp/venvs/edxapp/local/lib/python2.7/site-packages/provider/views.py”, line 136, in dispatch
response = super(OAuthView, self).dispatch(request, *args, **kwargs)
File “/edx/app/edxapp/venvs/edxapp/local/lib/python2.7/site-packages/django/views/generic/base.py”, line 88, in dispatch
return handler(request, *args, **kwargs)
File “/edx/app/edxapp/venvs/edxapp/local/lib/python2.7/site-packages/provider/views.py”, line 716, in post
return handler(request, request.POST, client)
File “/edx/app/edxapp/venvs/edxapp/local/lib/python2.7/site-packages/provider/views.py”, line 660, in client_credentials
at, rt = self.get_access_and_refresh_tokens(**kwargs)
File “/edx/app/edxapp/venvs/edxapp/local/lib/python2.7/site-packages/provider/views.py”, line 119, in get_access_and_refresh_tokens
at = self.create_access_token(request, user, scope, client)
File “/edx/app/edxapp/venvs/edxapp/local/lib/python2.7/site-packages/provider/oauth2/views.py”, line 33, in create_access_token
scope=scope
File “/edx/app/edxapp/venvs/edxapp/local/lib/python2.7/site-packages/django/db/models/manager.py”, line 85, in manager_method
return getattr(self.get_queryset(), name)(*args, **kwargs)
File “/edx/app/edxapp/venvs/edxapp/local/lib/python2.7/site-packages/django/db/models/query.py”, line 394, in create
obj.save(force_insert=True, using=self.db)
File “/edx/app/edxapp/venvs/edxapp/local/lib/python2.7/site-packages/provider/oauth2/models.py”, line 162, in save
super(AccessToken, self).save(*args, **kwargs)
File “/edx/app/edxapp/venvs/edxapp/local/lib/python2.7/site-packages/django/db/models/base.py”, line 808, in save
force_update=force_update, update_fields=update_fields)
File “/edx/app/edxapp/venvs/edxapp/local/lib/python2.7/site-packages/django/db/models/base.py”, line 838, in save_base
updated = self._save_table(raw, cls, force_insert, force_update, using, update_fields)
File “/edx/app/edxapp/venvs/edxapp/local/lib/python2.7/site-packages/django/db/models/base.py”, line 924, in _save_table
result = self._do_insert(cls._base_manager, using, fields, update_pk, raw)
File “/edx/app/edxapp/venvs/edxapp/local/lib/python2.7/site-packages/django/db/models/base.py”, line 963, in _do_insert
using=using, raw=raw)
File “/edx/app/edxapp/venvs/edxapp/local/lib/python2.7/site-packages/django/db/models/manager.py”, line 85, in manager_method
return getattr(self.get_queryset(), name)(*args, **kwargs)
File “/edx/app/edxapp/venvs/edxapp/local/lib/python2.7/site-packages/django/db/models/query.py”, line 1079, in _insert
return query.get_compiler(using=using).execute_sql(return_id)
File “/edx/app/edxapp/venvs/edxapp/local/lib/python2.7/site-packages/django/db/models/sql/compiler.py”, line 1112, in execute_sql
cursor.execute(sql, params)
File “/edx/app/edxapp/venvs/edxapp/local/lib/python2.7/site-packages/django/db/backends/utils.py”, line 64, in execute
return self.cursor.execute(sql, params)
File “/edx/app/edxapp/venvs/edxapp/local/lib/python2.7/site-packages/django/db/backends/mysql/base.py”, line 106, in execute
six.reraise(utils.IntegrityError, utils.IntegrityError(*tuple(e.args)), sys.exc_info()[2])
File “/edx/app/edxapp/venvs/edxapp/local/lib/python2.7/site-packages/django/db/backends/mysql/base.py”, line 101, in execute
return self.cursor.execute(query, args)
File “/edx/app/edxapp/venvs/edxapp/local/lib/python2.7/site-packages/MySQLdb/cursors.py”, line 205, in execute
self.errorhandler(self, exc, value)
File “/edx/app/edxapp/venvs/edxapp/local/lib/python2.7/site-packages/MySQLdb/connections.py”, line 36, in defaulterrorhandler
raise errorclass, errorvalue
IntegrityError: (1048, “Column ‘user_id’ cannot be null”)
Hello Bruno;
I’m facing with this problem too. Did you solve it?
I got the same issue
“Error! Failed to publish commerce data for course-v1:edX+DemoX+Demo_Course to LMS.
“
Very helpful tutorial!!!
we need people like you my friend!!
And I’m stuck and I’m pretty sure that is related to the SSL
And i get something like the “Not Found”, just like the screenshoot you share
This is from /edx/app/nginx/sites-available/ecommerce
server {
server_name ~^((stage|prod)-)?ecommerce.*;
listen 18130;
server_name ecommerce.mydomain.com;
So when the tutorial says
sample.com:18130 or sample.com:8002
I put ecommerce.mydomain.com
In all places
/edx/app/edxapp/lms.env.json
——————————–
ENABLE_OAUTH2_PROVIDER: “ecommerce.mydomain.com/oauth2”
JWT_AUTH: “ecommerce.mydomain.com/oauth2”
JWT_ISSUER: “ecommerce.mydomain.com/oauth2”
OAUTH_OIDC_ISSUER: “ecommerce.mydomain.com/oauth2”
STEP 3 https://mysite.com/admin/oauth2/client/1/change/
——————————–
Url:https://ecommerce.mysite.com
Redirect uri: https://ecommerce.mysite.com/complete/edx-oidc/
Logout uri: https://ecommerce.mysite.com/logout/
STEP 5
——————————–
sudo su ecommerce -s /bin/bash
cd ~/ecommerce
source ../ecommerce_env
python manage.py makemigrations
python manage.py migrate
python manage.py create_or_update_site \
–site-id=1 \
–site-domain=ecommerce.mysite.com \
–partner-code=edX \
–partner-name=’Open edX’ \
–lms-url-root=https://mysite.com \
–payment-processors=paypal \
–client-id=ecommerce-key \
–client-secret=ecommerce-secret \
–from-email=mail@gmail.com \
–discovery_api_url=https://discovery.mysite.com/
Any suggestion where the error might be?
Hi Lawrence. I have some problems about paypal. I am using SSL and actually everything works very well. But the problem is when I paid the money and ‘Go to The Dashboard’. When I go to dashboard, I have problems. I have no idea how could be possible but products that I bought from e-commerce part has got a problem. I use COURSE_CATALOG_API_URL= None because of 8008 doesn’t have in my server. Do you have any idea what is the problem here?
Jan 9 07:37:33 ip-172-31-39-168 [service_variant=lms][django.request][env:sandbox] ERROR [ip-172-31-39-168 27929] [base.py:256] – Internal Server Error: /dashboard
Traceback (most recent call last):
File “/edx/app/edxapp/venvs/edxapp/local/lib/python2.7/site-packages/django/core/handlers/base.py”, line 132, in get_response
response = wrapped_callback(request, *callback_args, **callback_kwargs)
File “/edx/app/edxapp/venvs/edxapp/local/lib/python2.7/site-packages/django/utils/decorators.py”, line 145, in inner
return func(*args, **kwargs)
File “/edx/app/edxapp/venvs/edxapp/local/lib/python2.7/site-packages/django/contrib/auth/decorators.py”, line 22, in _wrapped_view
return view_func(request, *args, **kwargs)
File “/edx/app/edxapp/venvs/edxapp/local/lib/python2.7/site-packages/django/utils/decorators.py”, line 110, in _wrapped_view
response = view_func(request, *args, **kwargs)
File “/edx/app/edxapp/edx-platform/common/djangoapps/student/views.py”, line 803, in dashboard
enrollment.course_id for enrollment in course_enrollments
File “/edx/app/edxapp/edx-platform/common/djangoapps/student/views.py”, line 805, in
user_already_has_certs_for=user_already_has_certs_for
File “/edx/app/edxapp/edx-platform/common/djangoapps/student/models.py”, line 1590, in refundable
refund_cutoff_date = self.refund_cutoff_date()
File “/edx/app/edxapp/edx-platform/common/djangoapps/student/models.py”, line 1623, in refund_cutoff_date
order = ecommerce_api_client(self.user).orders(order_number).get()
File “/edx/app/edxapp/venvs/edxapp/local/lib/python2.7/site-packages/slumber/__init__.py”, line 164, in get
resp = self._request(“GET”, params=kwargs)
File “/edx/app/edxapp/venvs/edxapp/local/lib/python2.7/site-packages/slumber/__init__.py”, line 110, in _request
raise exception_class(“Client Error %s: %s” % (resp.status_code, url), response=resp, content=resp.content)
HttpClientError: Client Error 401: https://ta3leemdev.pop-soft.com:18130/api/v2/orders/EDX-100028/
Dear Lawrence,
Thank you so much for these useful posts on Open Edx. I followed your most of the posts and its of great help 🙂
I am stuck on the same “Not Found” page as you have shown in your “troubleshooting” section. Even if I clicked on the “Login” button I get the same “Not Found” text.
I am using SSL. LMS/CMS/eCommerce/Discovery all has SSL certificates successfully installed.
You have mentioned that some modification needs to be made in “Nginx virtual server configurations”. Could you please guide me on which code exactly needs to be modified to fix ecommerce with SSL. I have tried a lot but can’t find a way out.
Thanks!
hi Jaleel, the modifications are limited to two things: a) adding SSL/TLS information, and b) changing the port on which to listen from 18130 to some other port. if you’ve installed Letsencrypt certificates on your server already then you can view the nginx configuration of your lms to locate the four rows of ssl certificate path information that letsencrypt added, such as:
ssl_certificate /etc/letsencrypt/live/yourdomain.com/fullchain.pem; # managed by Certbot
ssl_certificate_key /etc/letsencrypt/live/yourdomain.com/privkey.pem; # managed by Certbot
include /etc/letsencrypt/options-ssl-nginx.conf; # managed by Certbot
ssl_dhparam /etc/letsencrypt/ssl-dhparams.pem; # managed by Certbot
the port assignment would customarily only change is, for example, you’d decided to create a custom subdomain for the admin console of the store which, in my opinion, is not a good idea since its likely that you’ll be the only person who access the store’s admin console. but if you do, then you’ll need to find and edit the line “listen 18130;” on or around row 21 to an alternative port like say, 80 or 443.
Hi Lawrence, your blog posts are a great help. I am running a native Hawthorn instance and cannot get the image and description to appear on the basket page, I have uploaded descriptions and images everywhere I could find. Ecommerce dashboard, cms, and django admin… not luck.
Any ideas? Thanks again
hi ronald, thank you for the nice complement! i’m glad you’ve found my articles helpful. noting that the Ecommerce module is itself an independent community-supported django project (http://oscarcommerce.com/) the answer to your question lies more with Oscar than with Open edX. That is, you can refer to the Oscar documentation for specifics on setting and/or adjusting the product imagery.
Hi Lawrence,
I have the same issue that Sergen has. When I try to log in to commerce I neither get to the IP 127.0.0.1 page nor to the error 404
I end up at https://[DOMAIN]:18130/complete/edx-oidc/?state=%5BSTATE%5D&code=%5BCODE%5D, but I don’t get to the Dashboard and in the log I see “AuthTokenError: Token error: Invalid issuer”
I checked step 3 and the trouble shooting section however everything seems to be right over there
Hi Lawrence,
I had problem about firewall and then I saw your page. Firstly, thank you very much about it. I have question sitename:18130. When I go to the site, I see one text and header. “Not Found’ is written in body. Do you have any idea about it?
hi sergen, that means that the Ecommerce service is running. you’re looking at the login screen (it’s ugly). click the “Login” button to test whether or not oauth2 is working.
Hi Lawrence,
When I used the link http://sitename:18130/dashboard/ , it was working. I have changed some information but now I take some errors. “AuthTokenError: Token error: Invalid issuer”. I haven’t changed anything but I started to take this error.
That means you have a configuration error in section 3: django admin / oauth2 configuration.
I have checked section 3 and now I take another error. “invalid_request The requested redirect didn’t match the client settings.”. I checked my client id and client secret in ecommerce.yml . I did them same with https://mydomain.com/admin/oauth2/client/1/ . But I still have problem.
When I try to be login in ”http://mydomain.com:18130/complete/edx-oidc/?state=SET_STATE&code=SET_CODE’. I take error again. I checked ”https://mydomain.com/admin/oauth2/grant/” that I have user which I use but I checked ”https://mydomain.com/admin/oauth2/accesstoken/” I don’t have. It is empty. Then I tried curl https://mydomain.com/oauth2/v1/access_token -d ‘grant_type=client_credentials&client_id=SET_CLIENT&client_secret=SET_SECRET&token_type=jwt’ but it doesn’t work.
Hi Lawrence,
First thank you very much for all information which you gave me. It was a good experience for me. Your document, it helped me. My problem, it was password. I have an user admin but I didn’t have password. I created new superuser now I can see http://mydomain.com:18130/dashboard/.
Here’s my solution, I hope it helps.
sudo su ecommerce -s /bin/bash
cd ~/ecommerce
source ../ecommerce_env
./manage.py createsuperuser
/*create new user*/
http://mydomain.com:18130/admin/ (use new username and password)
Thank you again Lawrence…
very good, thanks!!
when I tried to log in Oscar dashboradI got the folowing error:
File “/edx/app/ecommerce/venvs/ecommerce/local/lib/python2.7/site-packages/django/core/handlers/exception.py”, line 41, in inner
response = get_response(request)
File “/edx/app/ecommerce/venvs/ecommerce/local/lib/python2.7/site-packages/django/core/handlers/base.py”, line 249, in _legacy_get_response
response = self._get_response(request)
File “/edx/app/ecommerce/venvs/ecommerce/local/lib/python2.7/site-packages/django/core/handlers/base.py”, line 187, in _get_response
response = self.process_exception_by_middleware(e, request)
File “/edx/app/ecommerce/venvs/ecommerce/local/lib/python2.7/site-packages/django/core/handlers/base.py”, line 185, in _get_response
response = wrapped_callback(request, *callback_args, **callback_kwargs)
File “/edx/app/ecommerce/venvs/ecommerce/local/lib/python2.7/site-packages/django/utils/decorators.py”, line 185, in inner
return func(*args, **kwargs)
File “/edx/app/ecommerce/venvs/ecommerce/local/lib/python2.7/site-packages/django/views/decorators/cache.py”, line 57, in _wrapped_view_func
response = view_func(request, *args, **kwargs)
File “/edx/app/ecommerce/venvs/ecommerce/local/lib/python2.7/site-packages/django/views/decorators/csrf.py”, line 58, in wrapped_view
return view_func(*args, **kwargs)
File “/edx/app/ecommerce/venvs/ecommerce/local/lib/python2.7/site-packages/social_django/utils.py”, line 50, in wrapper
return func(request, backend, *args, **kwargs)
File “/edx/app/ecommerce/venvs/ecommerce/local/lib/python2.7/site-packages/social_django/views.py”, line 32, in complete
redirect_name=REDIRECT_FIELD_NAME, *args, **kwargs)
File “/edx/app/ecommerce/venvs/ecommerce/local/lib/python2.7/site-packages/social_core/actions.py”, line 41, in do_complete
user = backend.complete(user=user, *args, **kwargs)
File “/edx/app/ecommerce/venvs/ecommerce/local/lib/python2.7/site-packages/social_core/backends/base.py”, line 40, in complete
return self.auth_complete(*args, **kwargs)
File “/edx/app/ecommerce/venvs/ecommerce/local/lib/python2.7/site-packages/auth_backends/backends.py”, line 164, in auth_complete
user = super(EdXOpenIdConnect, self).auth_complete(*args, **kwargs)
File “/edx/app/ecommerce/venvs/ecommerce/local/lib/python2.7/site-packages/social_core/utils.py”, line 252, in wrapper
return func(*args, **kwargs)
File “/edx/app/ecommerce/venvs/ecommerce/local/lib/python2.7/site-packages/social_core/backends/oauth.py”, line 388, in auth_complete
state = self.validate_state()
File “/edx/app/ecommerce/venvs/ecommerce/local/lib/python2.7/site-packages/social_core/backends/oauth.py”, line 90, in validate_state
raise AuthStateMissing(self, ‘state’)
AuthStateMissing: Session value state missing.
Finally I solved the problem by adding this line:
SESSION_COOKIE_SECURE: false
to ecommerce.yml.
This is a security configuration. According to the django docs:
;;;;;;;;;;;;;;;;;;;;;;;;;;;;;;;;;;;;;;;;;;;;;;;;;;;;;;;;;;;;;;;;;;;;;;;;;;;;;;;;;;;
If this is set to True, the cookie will be marked as “secure”, which means browsers may ensure that the cookie is only sent under an HTTPS connection.
———————————————————————
and as my instance is not work under HTTPS I faced this problem.
Hope this helps.
Thanks. This was helpful.
Hi Lawrence,
Does E-commerce / Oscar provide functionality where one can select the currency with which the course should be paid in? So, basically when a user sets the price for the course in the e-commerce platform can I make it so that the user can also select a preferred currency. It doesn’t have to be on Oscar, can be anywhere really, just need that choice, maybe a drop down menu of currencies. Thanks
hi yafet. no, i not in the use case you’re describing. keep in mind that E-commerce is only the point-of-sale software. you still need a way to settle transactions; and in each currency that you want to accept. let say for example that you want to offer a course in $USD and €Euros paid by Visa/MC/Amex. you’ll need a distinct payment settlement system for each currency, and a bank account in each currency to where the payments deposit.
Oh, okay, I understand that I need different payment processors for each currency/payment method. Let’s say I have set up two payment systems one for Euro and another for USD, can an instructor or someone with sales/finance role then select which currency to offer the course in? Or do I have to implement that functionality manually? Maybe I didn’t phrase my question right the first time. Thank you very much, your help is very appreciated.
Open edX’s ecommerce module is actually the Django project, “Oscar”. here’s a link to Oscar system documentation for setup and configuration: https://django-oscar.readthedocs.io/en/releases-1.6/. you’ll find detailed explanations of various use cases here.
Hi.
I call below url and get internal error.
https://lms.example.com/verify_student/start-flow/course-v1:edx+test+test/?purchase_workflow=single
Any ideas what I am missing? Thanks for any help.
/edx/var/log/lms/edx.log
Sep 25 12:16:37 medxj [service_variant=lms][django.request][env:sandbox] ERROR [medxj 30642] [exception.py:135] – Internal Server Error: /verify_student/start-flow/course-v1:q+q+q/
Traceback (most recent call last):
File “/edx/app/edxapp/venvs/edxapp/local/lib/python2.7/site-packages/django/core/handlers/exception.py”, line 41, in inner
response = get_response(request)
File “/edx/app/edxapp/venvs/edxapp/local/lib/python2.7/site-packages/django/core/handlers/base.py”, line 249, in _legacy_get_response
response = self._get_response(request)
File “/edx/app/edxapp/venvs/edxapp/local/lib/python2.7/site-packages/django/core/handlers/base.py”, line 187, in _get_response
response = self.process_exception_by_middleware(e, request)
File “/edx/app/edxapp/venvs/edxapp/local/lib/python2.7/site-packages/django/core/handlers/base.py”, line 185, in _get_response
response = wrapped_callback(request, *callback_args, **callback_kwargs)
File “/edx/app/edxapp/venvs/edxapp/local/lib/python2.7/site-packages/django/utils/decorators.py”, line 185, in inner
return func(*args, **kwargs)
File “/edx/app/edxapp/venvs/edxapp/local/lib/python2.7/site-packages/django/views/generic/base.py”, line 68, in view
return self.dispatch(request, *args, **kwargs)
File “/edx/app/edxapp/venvs/edxapp/local/lib/python2.7/site-packages/django/views/generic/base.py”, line 88, in dispatch
return handler(request, *args, **kwargs)
File “/edx/app/edxapp/venvs/edxapp/local/lib/python2.7/site-packages/django/utils/decorators.py”, line 67, in _wrapper
return bound_func(*args, **kwargs)
File “/edx/app/edxapp/venvs/edxapp/local/lib/python2.7/site-packages/django/contrib/auth/decorators.py”, line 23, in _wrapped_view
return view_func(request, *args, **kwargs)
File “/edx/app/edxapp/venvs/edxapp/local/lib/python2.7/site-packages/django/utils/decorators.py”, line 63, in bound_func
return func.__get__(self, type(self))(*args2, **kwargs2)
File “/edx/app/edxapp/edx-platform/lms/djangoapps/verify_student/views.py”, line 407, in get
processors = ecommerce_api_client(request.user).payment.processors.get()
File “/edx/app/edxapp/venvs/edxapp/local/lib/python2.7/site-packages/slumber/__init__.py”, line 155, in get
resp = self._request(“GET”, params=kwargs)
File “/edx/app/edxapp/venvs/edxapp/local/lib/python2.7/site-packages/slumber/__init__.py”, line 101, in _request
raise exception_class(“Client Error %s: %s” % (resp.status_code, url), response=resp, content=resp.content)
HttpClientError: Client Error 401: http://localhost:8002/api/v2/payment/processors/
yes, the problem is that your hostname is still “localhost”. the URL http://localhost:8002/api/v2/payment/processors/ should instead be referencing your fully-qualified domain name.
great work!
i definitely follow the instruction, but I cannot get commerce running, and btw, for hawthorn.1, the ssl configuration should be work after run certbot, and it is not necessary to modify the config file
This page really helps. thanks. And, there’re still some problems. in the step 4. when enable the commerce site, the 2 urls ( /basket/add/, /checkout/receipt/ ) are not found in the project : github.com/edx/ecommerce ?
hi robin, if you haven’t already done so i’d suggest joining the Open edX Slack channel, https://openedx.slack.com/. there’s a dedicated Ecommerce channel there where you’ll find more help.
Hi Lawrence, I was able to get ecommerce up and running but whenever I try to add a course in the ECAT, i get this
Error! Failed to publish commerce data for course-v1:Business+BLDEN360LD+2018_Q3 to LMS. Authentication credentials were not provided.
hi mark, i also got that error on my first couple of attempts. in my case it was related to settings in Step 5, which are easy to confuse.
Hmm, checked step 5 and doesnt seem like I made a mistake. I do know though that I don’t have discovery installed so I’m not sure what should be the value in discovery-api-url, is that necessary?
the Ecommerce module uses the discovery service, so therein lies your current problem. more broadly, these instructions assume that you followed the community documentation to install the Native build, which would have installed discovery. if you’ve taken a different installation approach then you might be in for a bumpy road.
Hi lawrence, I was able to make workarounds to get past the discovery service and use api calls instead.
Now I’ve been able to purchase courses in my tests and I do end up being enrolled afterwards but I dont seem to get the receipts. Does the ecommerce send receipts/bills?
hi mark. yes, it does. have you setup an SMTP mail provider for your instance? if not then the messages are probably being sent but going directly to a spam folder on the receiving end.
Hi lawrence, I think we do have an SMTP mail provider setup since we do get activation emails when we register but so far when I purchase a course I don’t get a receipt mailed to me.
Hi Lawrence,
Could you check out my question in the google grps?
https://groups.google.com/forum/#!topic/openedx-ops/Et_tDKZkgfc
It’s regarding switching from paypal sandbox to live in the ecommerce.
Thanks a lot,
Mark
hi mark, typically, yml files need to be executed by ansible in order for parameter value modifications to take effect. having said that, i’m not 100% certain that this would be the case in your google forum question given that the yml file is located in /edx/etc/ whereas playbooks are usually located in a different folder within /edx/. i don’t have access to a non-production machine in which i’d be able to experiment, so i’d encourage you to review your ecommerce install notes and look for any opportunity to re-run any of the playbooks that were part of the installation procedure.
when I try to restart the ecommerce process it asks for a password, I can’t seem to find it
can you please help with it
Same problem for me. I cannot get commerce running.
Thanks in advance, great work.
For some unknown reason, the ecommerce configuration is not working for me. I’m spent about 2 weeks trying to get it to work but nothing seems to work even though, I followed the intructions.
Could you elaborate a bit more on the nginx and port configuration for the ecommerce?
Thanks!
do you have any official information about configuring ssl on opedx?
posted today: https://blog.lawrencemcdaniel.com/open-edx-ssl-encryption/
Very well explained, thanks!!