Add a free Let’s Encrypt SSL/TLS certificate to your Open edX installation in just a few minutes using this step-by-step how-to guide.

Summary
Let’s Encrypt is a free, automated, and open Certificate Authority that is sponsored by Internet Security Research Group (ISRG) which itself is a venerable who’s who of silicon valley Internet companies. Let’s Encrypt has made it much easier to request, install and maintain SSL/TLS certificates on your web servers. For Ubuntu/Nginx web apps like Open edX, Let’s Encrypt uses a platform named Certbot that provides a simple installation process that MOSTLY works, barring a couple of minor hiccups. By following these instructions you should be able to get HTTPS working on your server in less than an hour.
If you’re already familiar with Nginx then you can probably jump over to Certbot’s installation guide for Ubuntu 16.04 / Nginx, and if so then god speed. Otherwise by all means, please read on.
Now, about those hiccups. First, as of the date of publication of this post at least, Certbot’s instructions required a minor modification. Second, some of the Open edX virtual server configurations are too complex for certbot to understand, causing it to make minor though correctable mistakes when configuring HTTP redirections to HTTPS. Fortunately, both of these are minor problems which we’ll easily avert in the procedure that follows.
Setup Procedure
1. Prepare Your Nginx Virtual Server Configuration Files
Open edx runs on Nginx, a fast, bare-bones web server alternative to Apache, and like Apache, Nginx can host multiple virtual web servers on the same Ubuntu server instance. In the case of the Open edX software suite there are nearly a dozen such web servers — two of them being your LMS and Course Management Studio — which you can view from either of the following two paths:
/etc/nginx/sites-enabled/
or
/edx/app/nginx/sites-available/
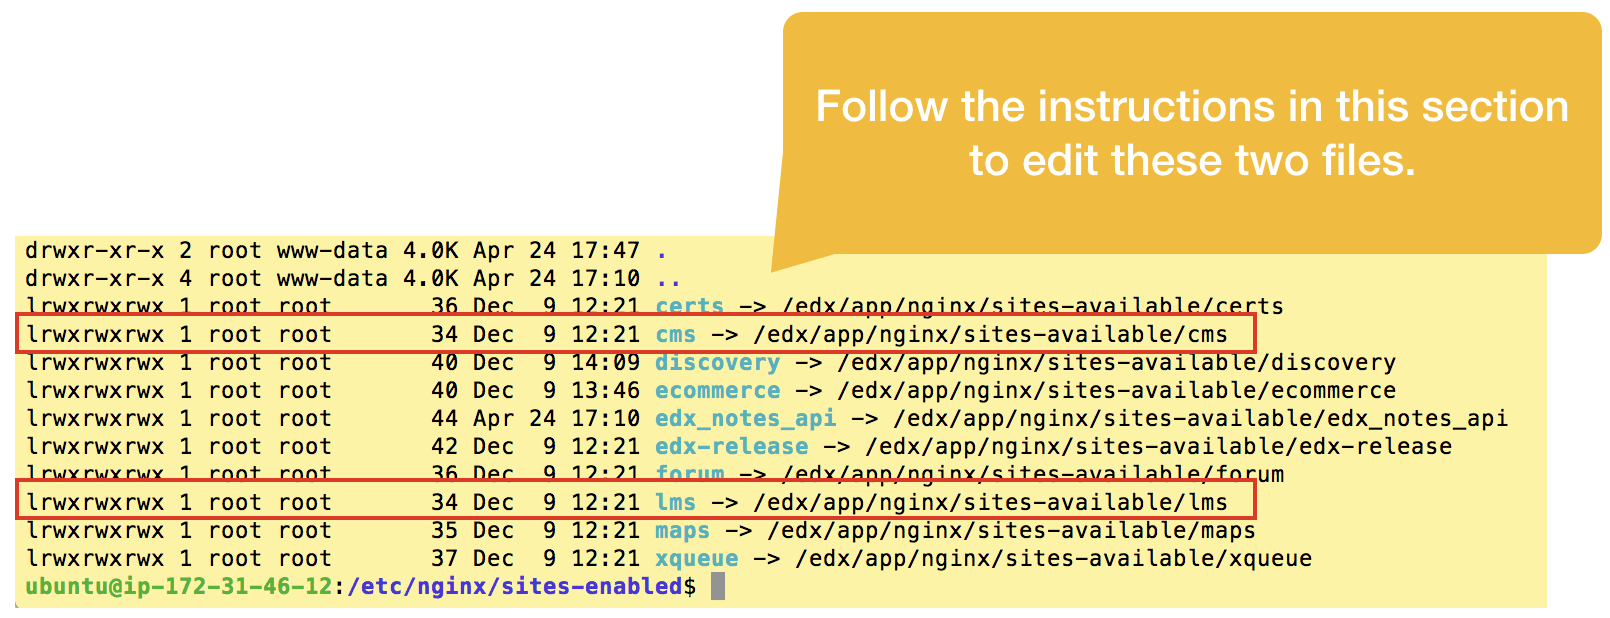
Explicitly name each server. Open edx native build configuration, by design, automagically infers the fully-qualified domain name of your LMS, elminating any need on your part to explicitly name the virtual server. Unfortunately, this convenience strategy undermines Certbot’s ability to read your virtual server configuration files to determine the names of the SSL certificates you need to request. You’ll therefore need to edit the LMS and CMS files, adding a line near the top of each file to explicitly name each server.
sudo vim /etc/nginx/sites-enabled/lms
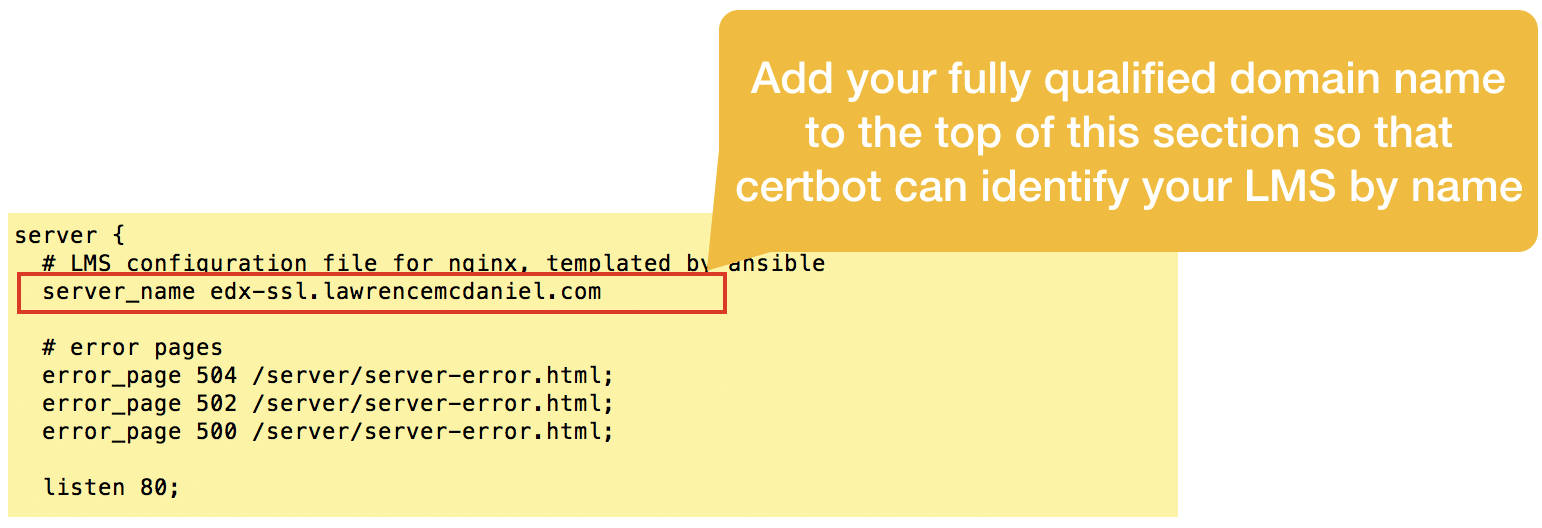
This post only covers setting up SSL/TLS for the LMS and CMS, however, if you analyze the other virtual server configuration files in this folder you’ll probably be able to apply these same procedures to other sites in your Open edX software suite like for example, the Ecommerce module.
On an aside, you should note that many of the virtual server configurations in this folder make use of unorthodox http port assignments. For example, Studio is assigned to port 18010. For the avoidance of any doubts, the Open edX design team deliberately took this approach so that you’d only need one fully-qualified domain name (eg edx.org) to access the entire suite of software. However, you can easily set one or more of the applications to it’s own fully-qualified domain name in order to make it more accessible and user friendly for your users. For example, for obsessive-compulsive dev ops types (like me) you could create an entire series of subdomains such as:
For example, for the demo server that I built for this article I created a primary domain for the LMS (edx-ssl.lawrencemcdaniel.com) and a subdomain for Studio (edx-ssl-studio.lawrencemcdaniel.com).
In general, all that’s required is that the DNS record for each sub domain points to the same server IP address, and that you edit each virtual server configuration to explicitly name each virtual server and change the “Listen” port back to the default 80 (or 443 for SSL). Lastly, you’d also need to do a search & replace of the server name(s) in the two edX Platform configuration files /edx/app/edxapp/lms.env.json and /edx/app/edxapp/cms.env.json.
2. Install Certbot
The published installation procedure on the official Certbot site changed in late 2020. The good news is that the new installation procedure is very simple to follow assuming that you are running Ubuntu 20.04 LTS or later:
sudo apt-get update
sudo snap install core; sudo snap refresh core
sudo snap install --classic certbot
sudo ln -s /snap/bin/certbot /usr/bin/certbot
sudo certbot --nginx
After re-running the install procedure with these modified instructions you should see screen output substantially resembling the following.
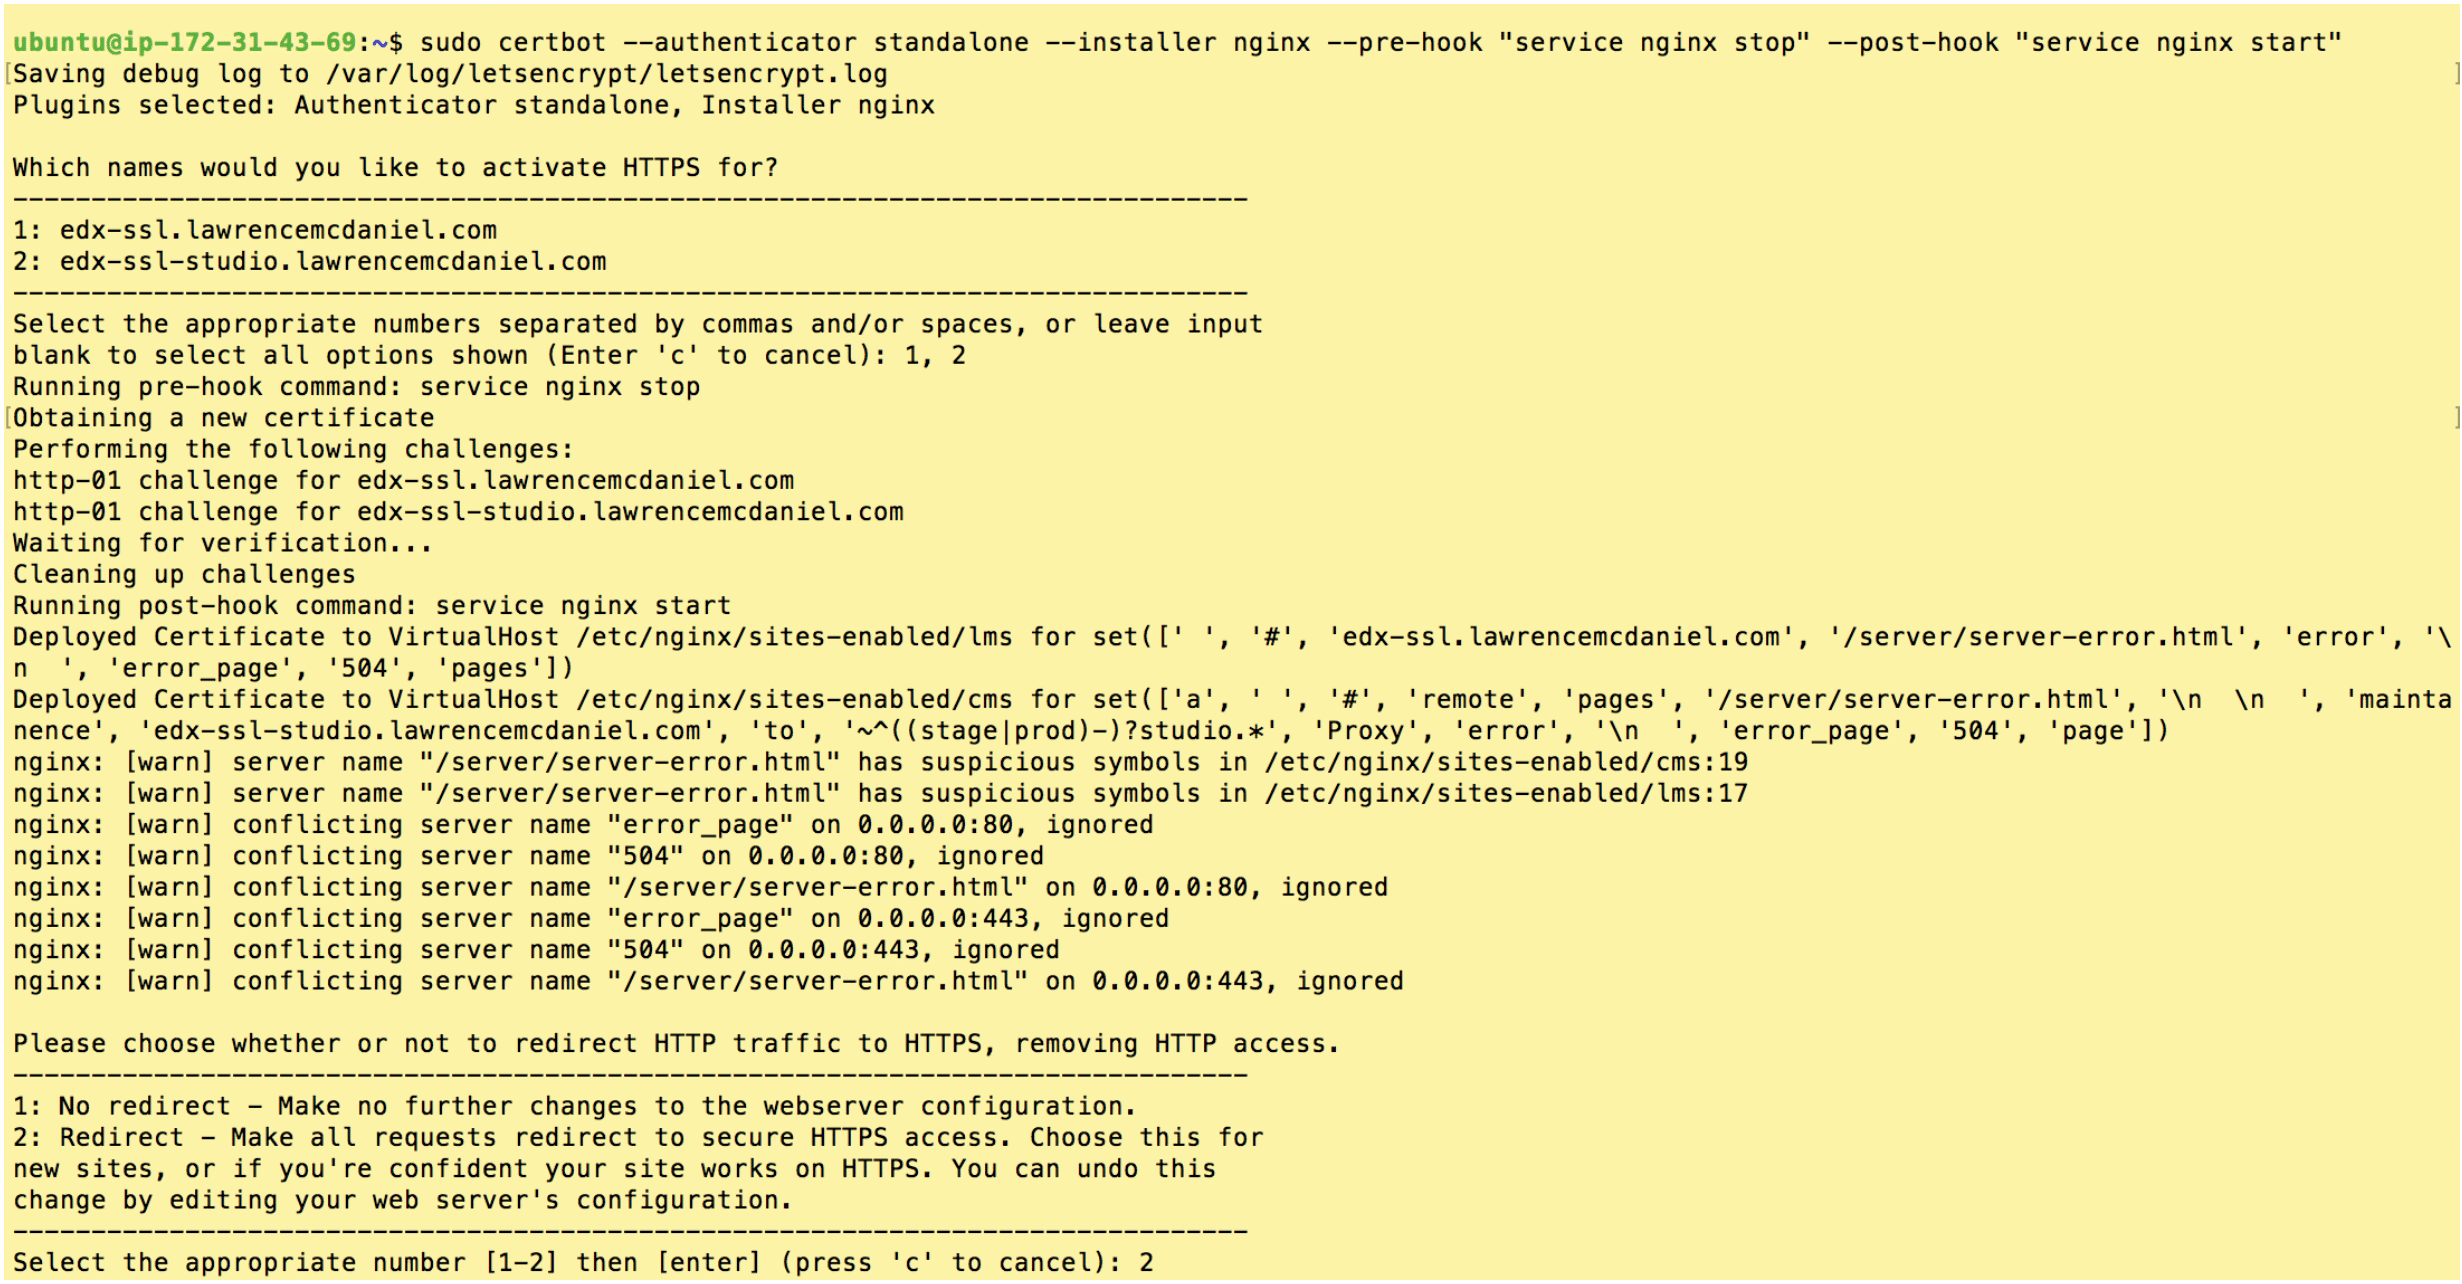
Choose “2: Redirect” and hit enter.
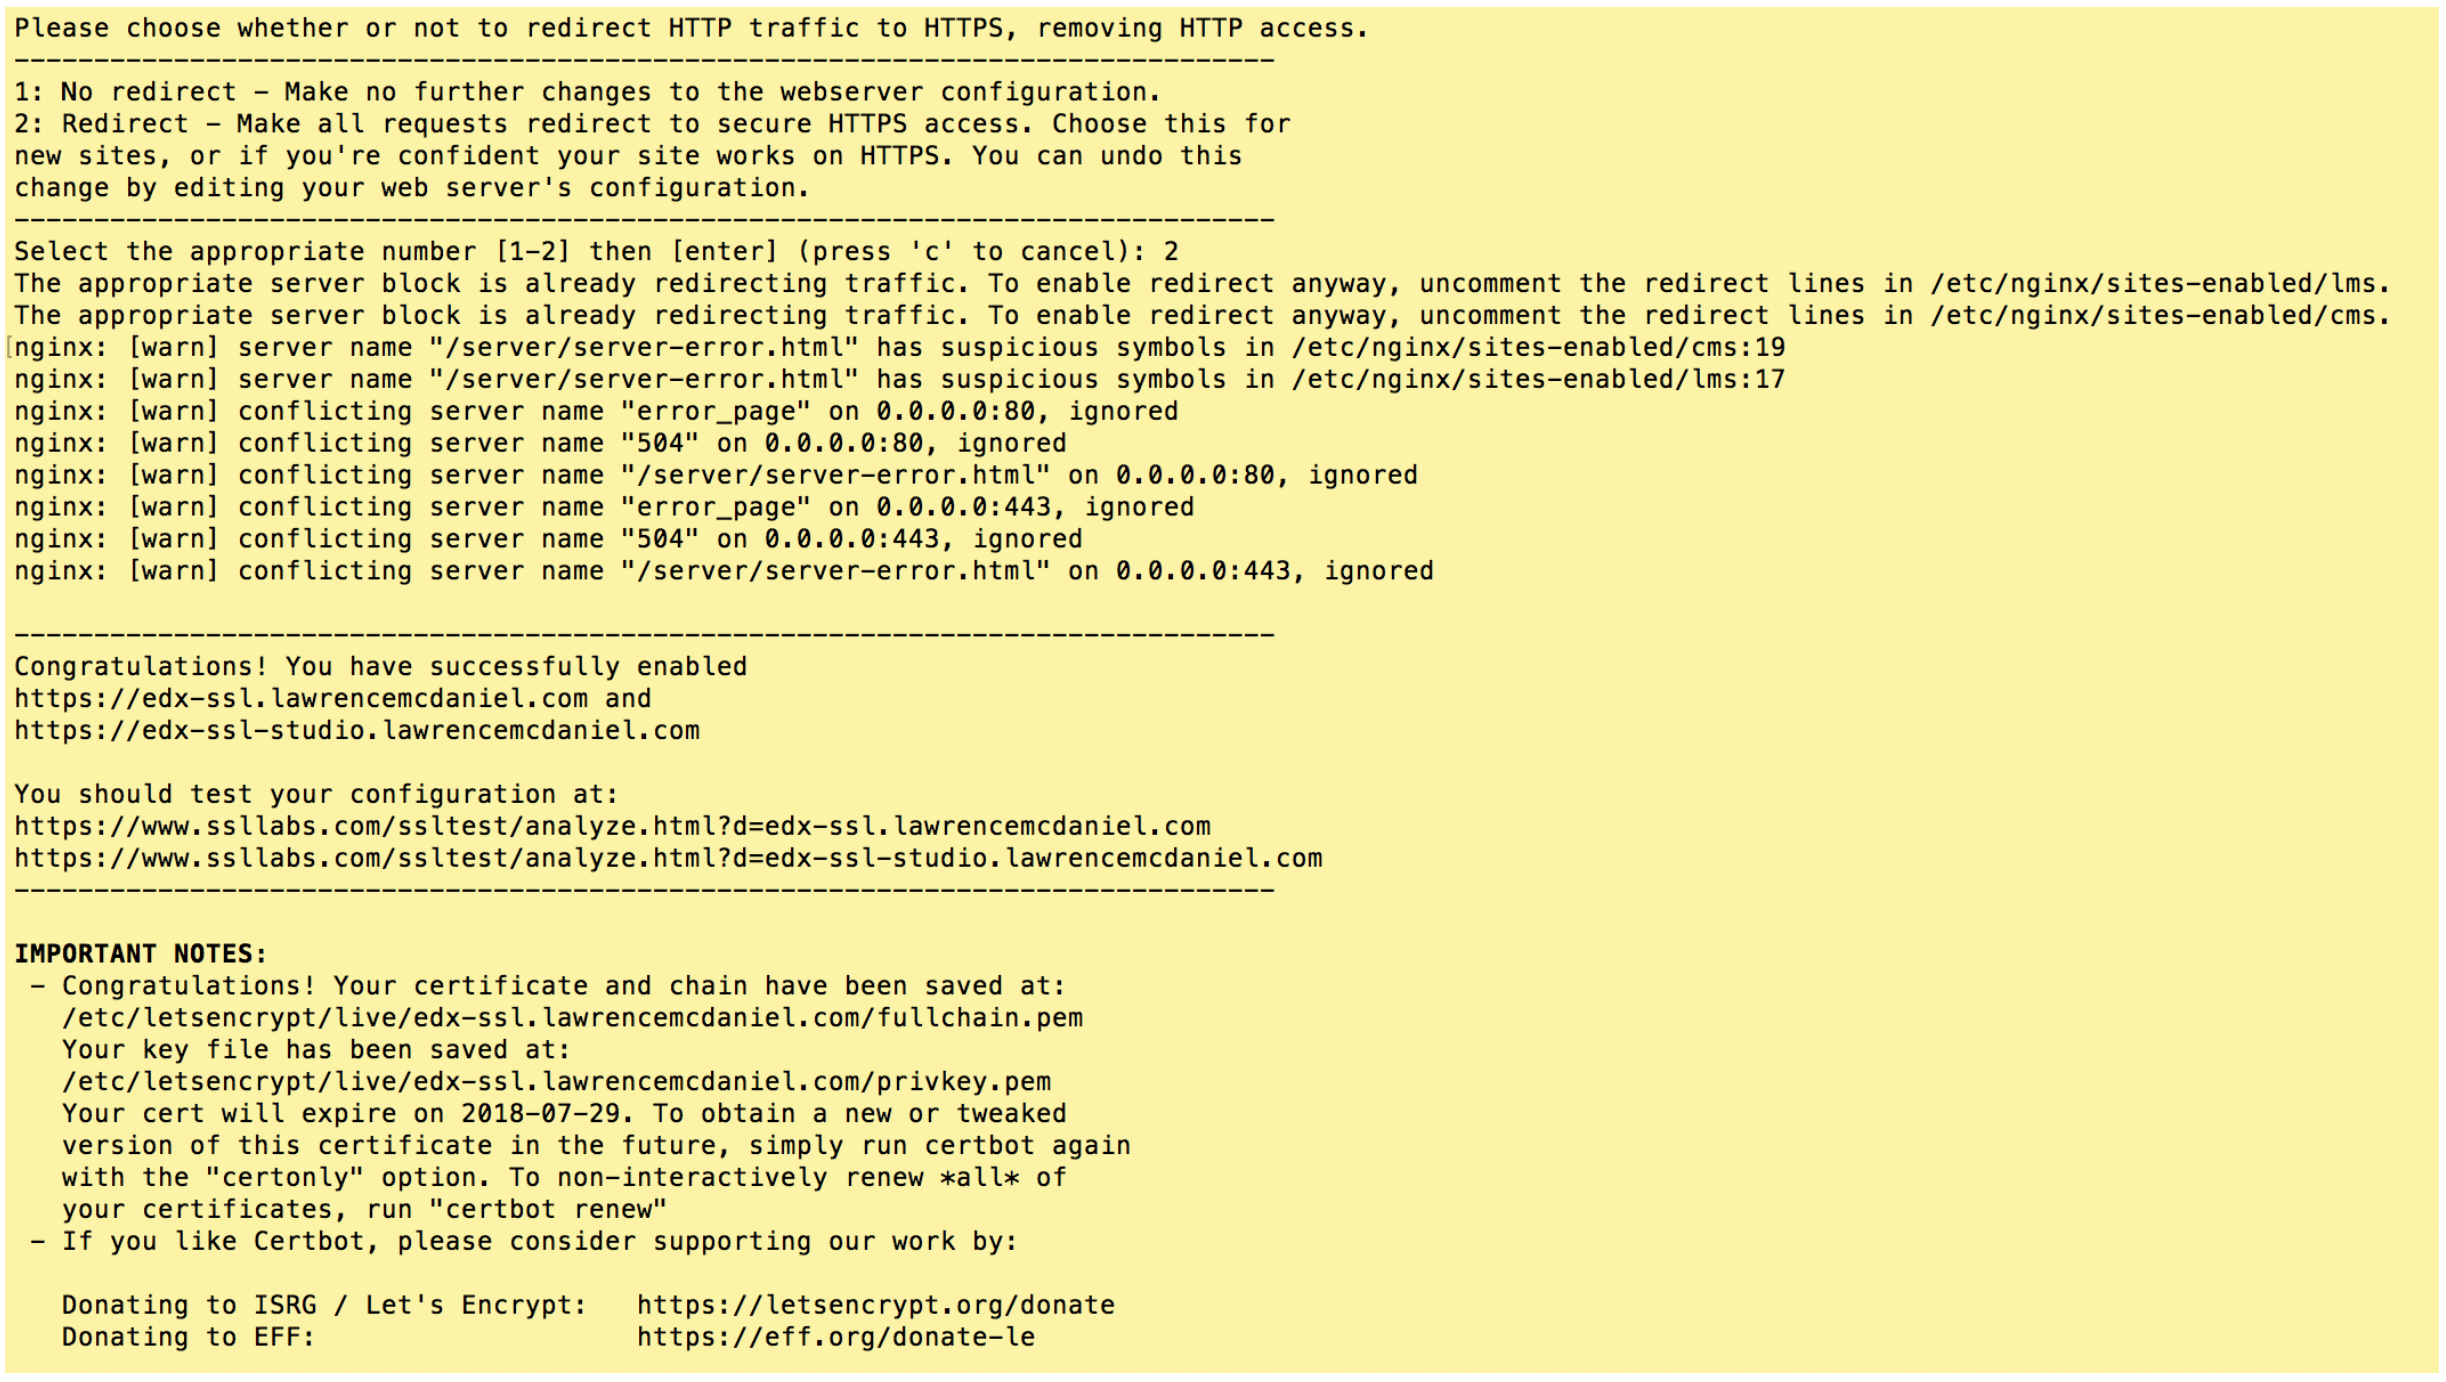
If you got similar results then CONGRATULATIONS, you are now the proud owner of your very own SSL/TLS certificates! Certbot only does two things during its installation procedure. First, it saves sets of files in /etc/letsencrypt/live/. And second, it modifies your Nginx virtual server configurations located in /etc/nginx/sites-enabled/. Using sudo you can inspect both of these to learn more about the specifics of what it did.
3. Edit Nginx Virtual Server Config Files
The Open edX virtual server configuration files for the LMS and CMS are a little too complex for Certbot to analyze, causing it make a couple of minor mistakes. First, it correctly adds a new listener on port 443 but incorrectly neglects to un-assign the existing listener on port 80. Second, it incorrectly places the SSL certificate files paths and listener directive at the bottom of the virtual server config file. Fortunately, these are easy to remedy.
First, open the lms config file and look for the new configuration code snippets that Certbot added near the bottom of the file.
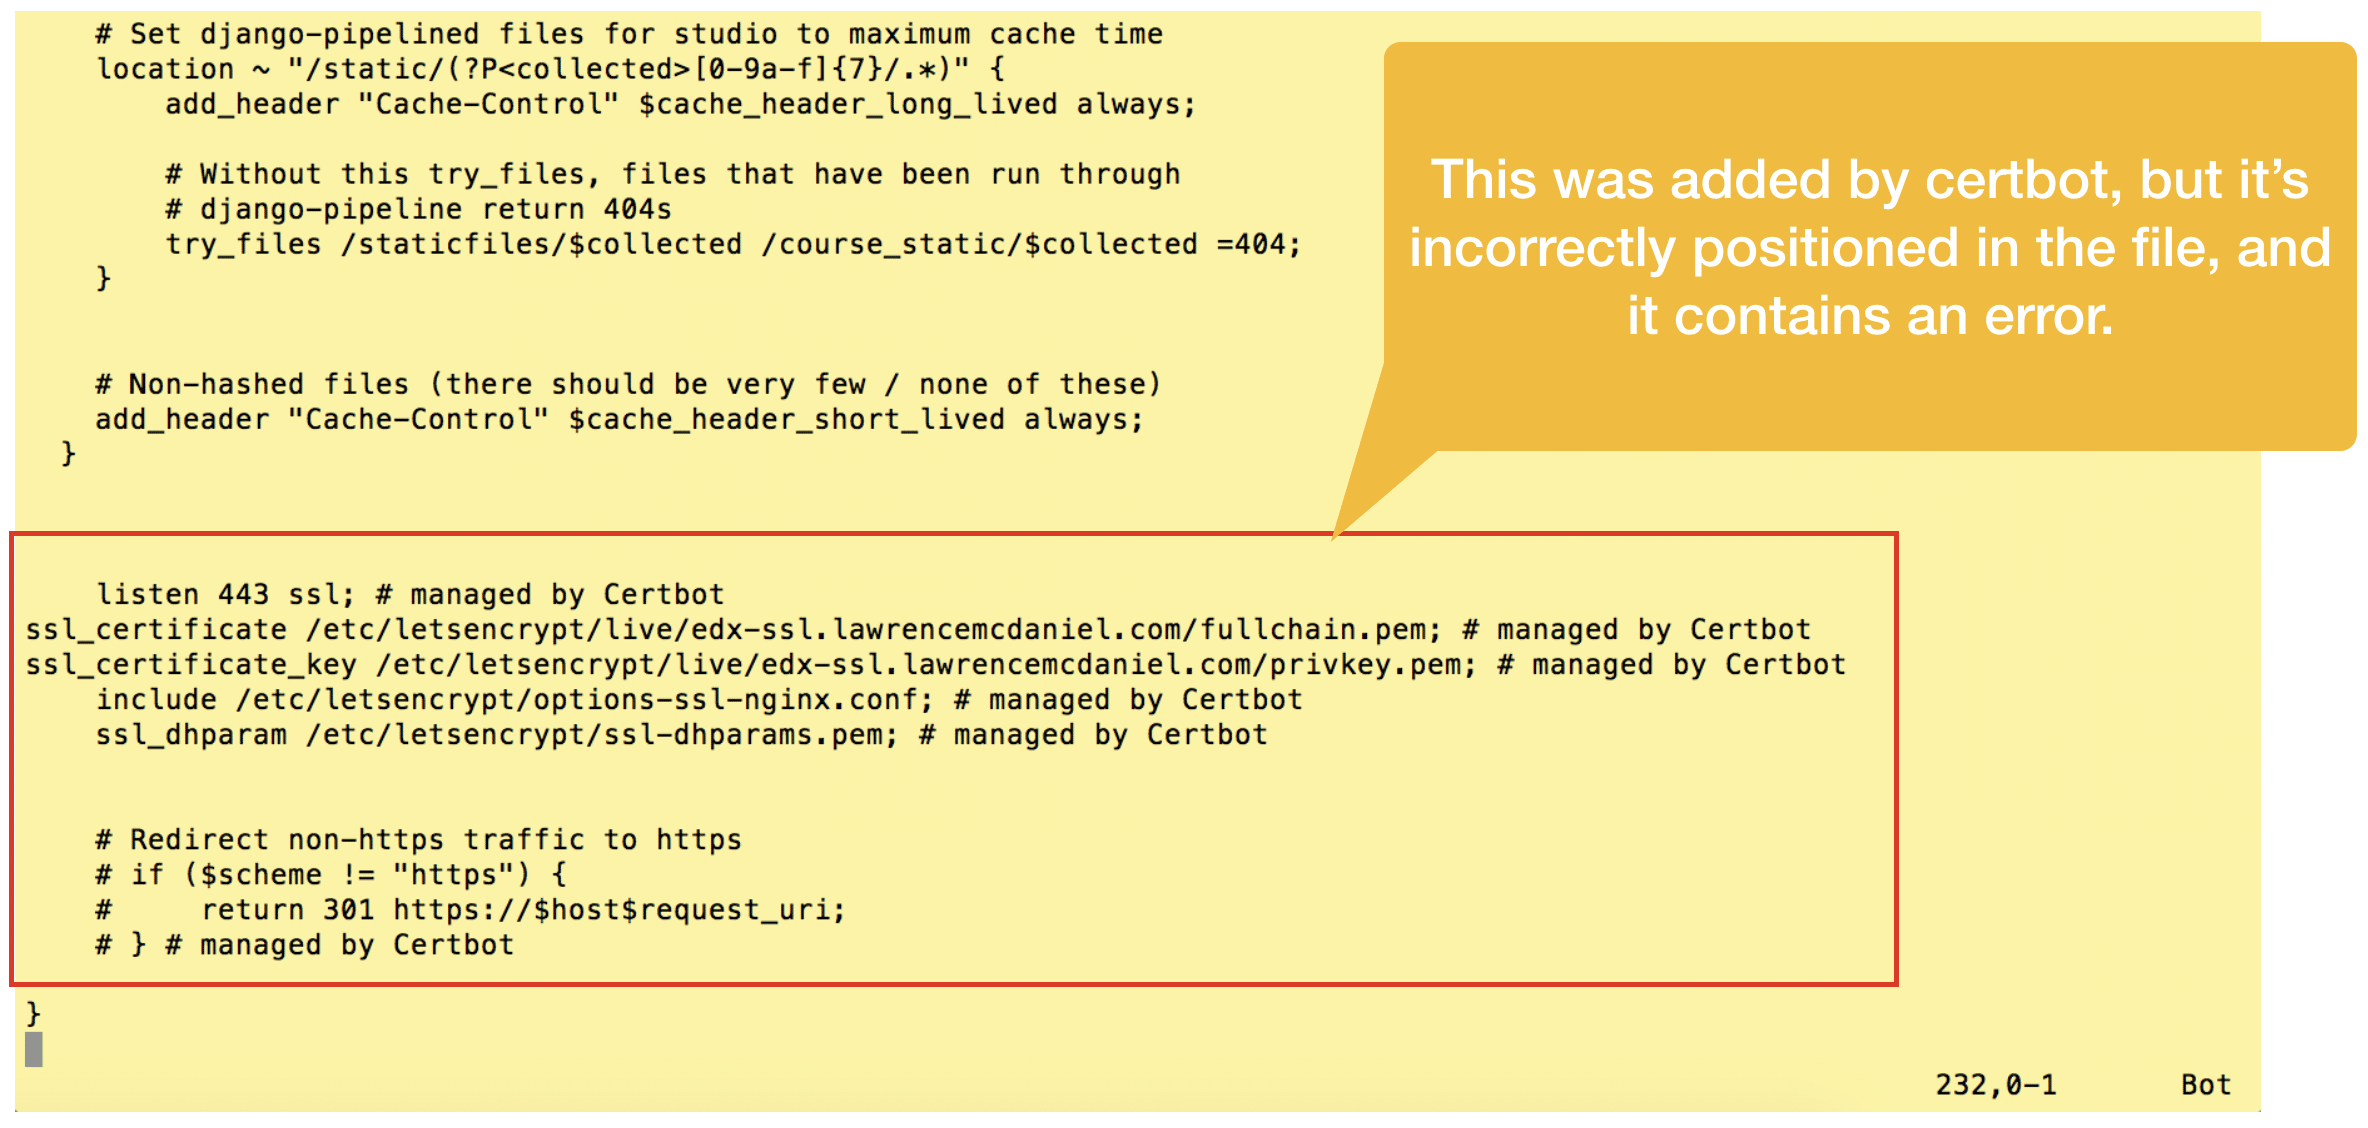
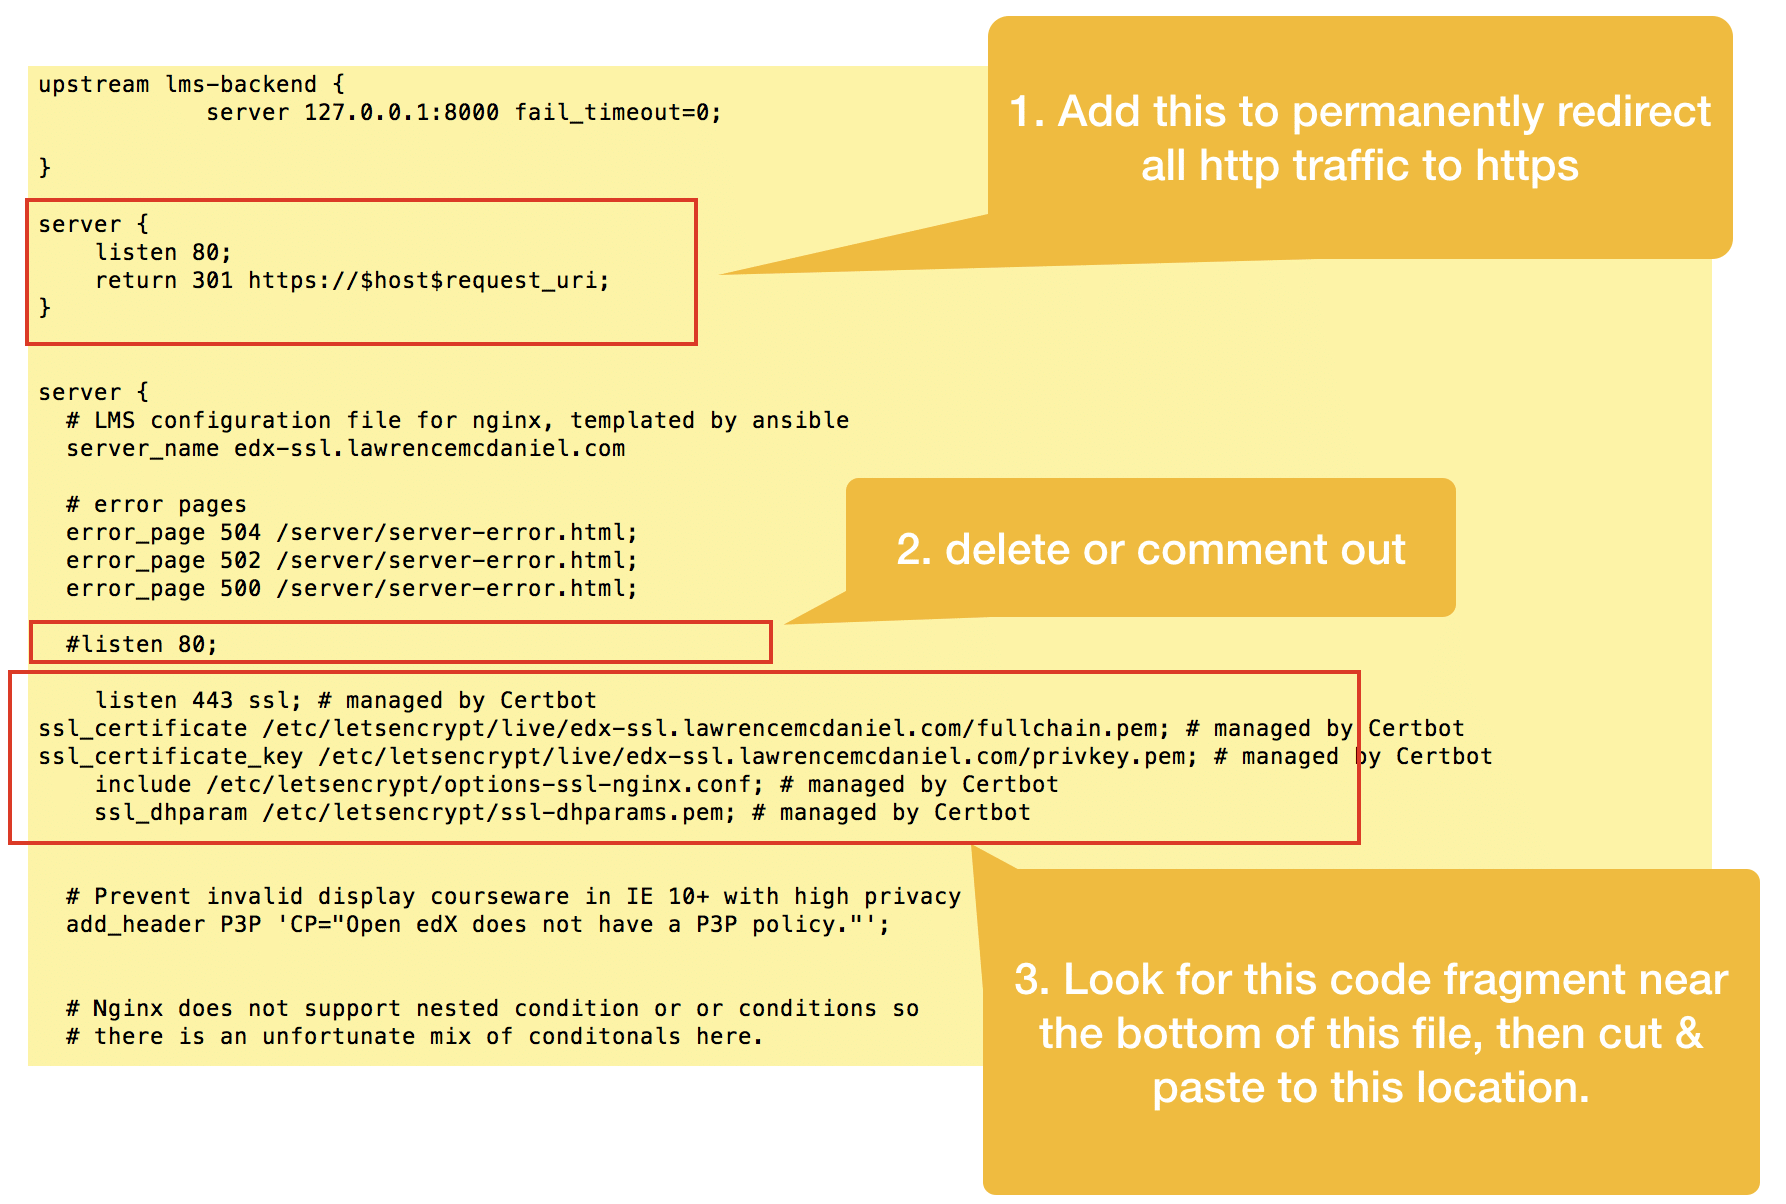
Cut and re-paste this configuration code snippet towards the top of the same file as per the screen shot below. Summarizing what we’re doing:
- Add a new virtual server that listens on port 80, and redirects all traffic to https
- In the original virtual server declaration, remove the directive to listen on port 80
- Paste the Certbot code snippet immediately below the server_name directive
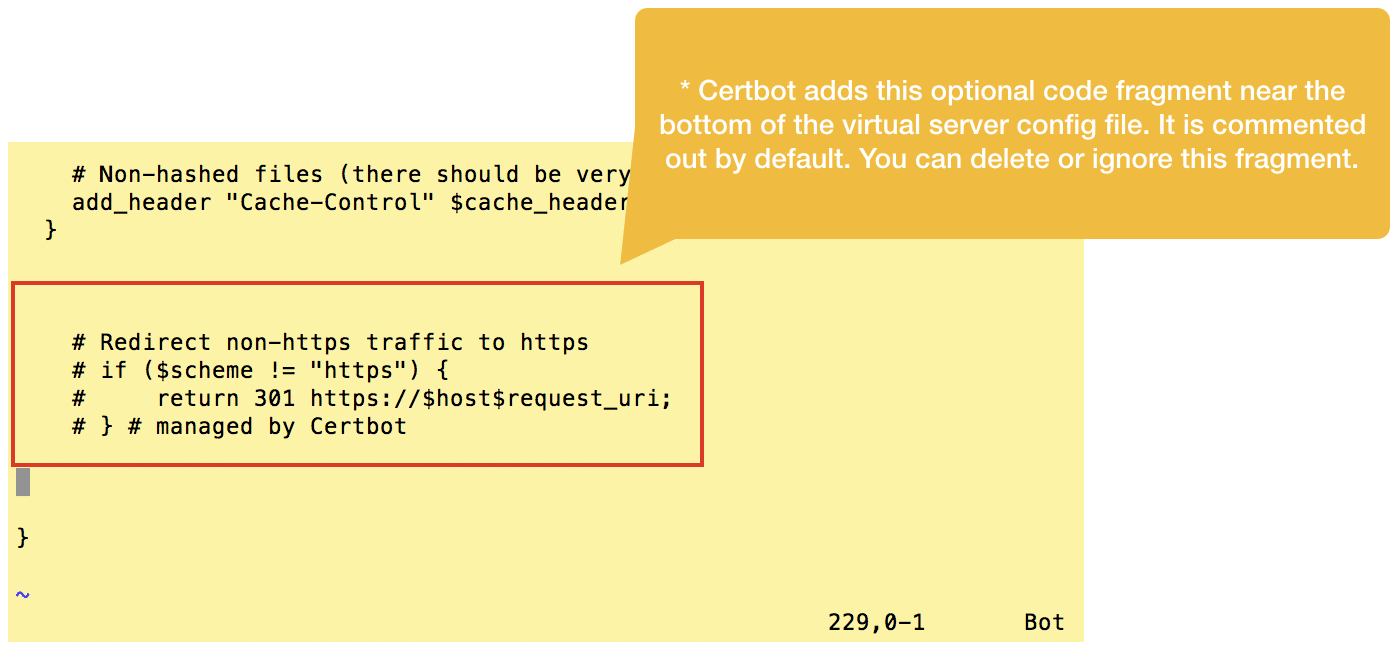
Certbot additionally pastes a commented-out snippet for handling redirection from http to https, however, we’ll ignore this snippet entirely since we’ve already taken care of this in the previous step.
After you finish all edits you’ll need to restart Nginx:
sudo systemctl restart nginx
To verify that your configuration edits are correct you should check the server status after restarting:
sudo systemctl status nginx
4. Test Your Platform
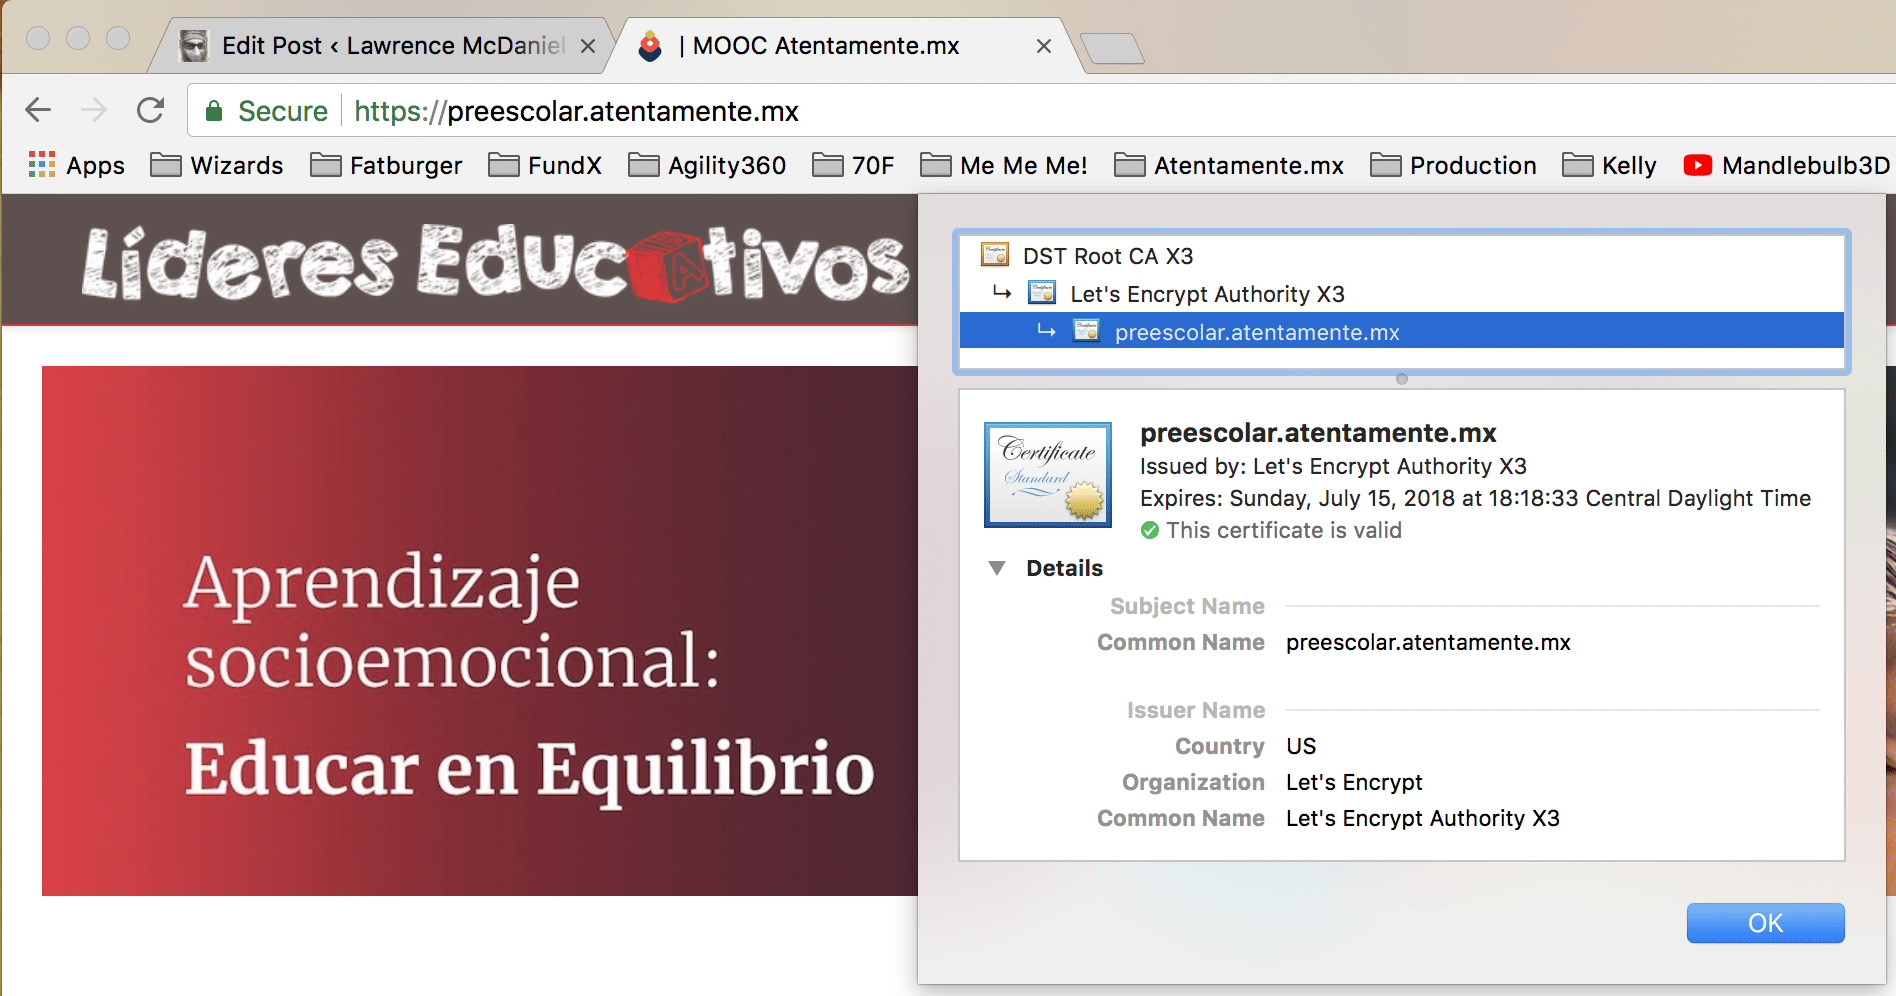
If everything works then your Open edX LMS and CMS should automatically redirect to https.
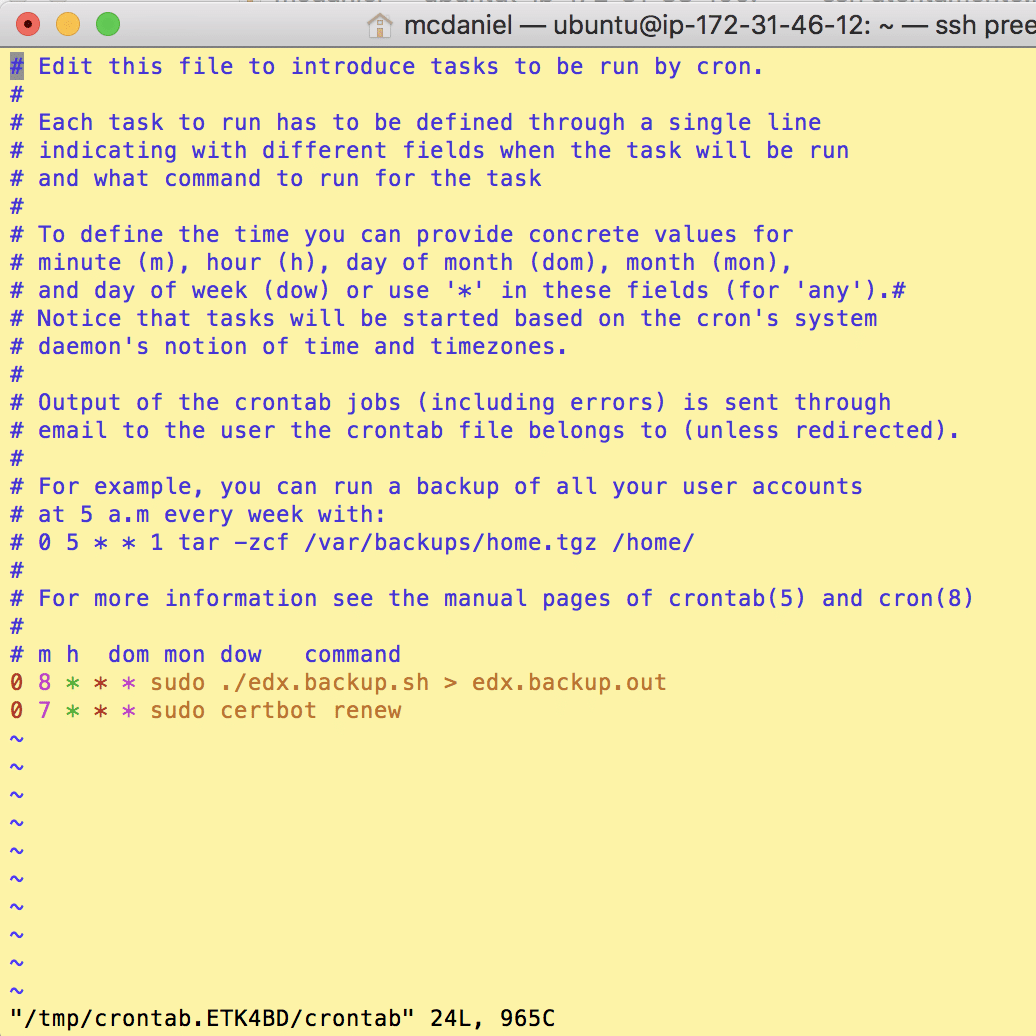
5. Setup A Cron Job To Auto-Renew Your Certificate(s)
The Certbot packages on your system come with a cron job that will renew your certificates automatically before they expire. Since Let’s Encrypt certificates expire after only 90 days, it’s highly advisable to take advantage of this feature. You can test automatic renewal for your certificates by running this command:
sudo certbot renew --dry-run
If that appears to be working correctly, you can arrange for automatic renewal by adding a cron job which runs the following command on a recurring basis:
certbot renew
The screen shot below shows a cron job that runs once a day to check for and renew any expiring certificates.
I hope you found this helpful. Please help me improve this article by leaving a comment below. Thank you!


To install certbot (KOA install) as of March 3, 2021
sudo apt-get install certbot
sudo apt-get install certbot python3-certbot-nginx
found at https://certbot.eff.org/docs/install.html
Sir,
My studio login performs perfectly well with ssl if I keep default port 18010
{listen 18010 ;
listen 48010 ssl;}.
Is there a way I can use only port 80 and 443 for all lms, cms, preview, ecommerce.
In order to have both lms and studio work on same ports with https://—– i performed two steps
Step 1.
I have added to /edx/app/nginx/sites-available/lms
server {
# LMS configuration file for nginx, templated by ansible
# error pages
error_page 504 /server/server-error.html;
error_page 502 /server/server-error.html;
error_page 500 /server/server-error.html;
listen 443 ssl;
server_name mydomain.com;
ssl_certificate /etc/letsencrypt/live/mydomain.com/fullchain.pem;
ssl_certificate_key /etc/letsencrypt/live/mydomain.com/privkey.pem;
include /etc/letsencrypt/options-ssl-nginx.conf; # managed by Certbot
ssl_dhparam /etc/letsencrypt/ssl-dhparams.pem; # managed by Certbot
I have added to /edx/app/nginx/sites-available/cms
listen 443 ssl;
server_name stmydomain.com;
ssl_certificate /etc/letsencrypt/live/feezix.com/fullchain.pem;
ssl_certificate_key /etc/letsencrypt/live/feezix.com/privkey.pem;
include /etc/letsencrypt/options-ssl-nginx.conf; # managed by Certbot
ssl_dhparam /etc/letsencrypt/ssl-dhparams.pem; # managed by Certbot
Step 2:
in lms.env.json and cms.env.json
I have replaced all mydomain.com , studio.mydomain.com from http to https.
http://127.0.0.1:8000/oauth2 to https://mydomain.com:8000/oauth2
“SESSION_COOKIE_DOMAIN”: “.mydomain.com”
As a result when I sign into studio.mydomain.com, i am redirected to mydomain.com login form. After signing In I am returned back to studio but i have not been logged in.
Thanks and regards.
I was having some issues with ngninx when I ran “sudo certbot renew –dry-run.” I went down a rabbit hole. I ended up modifying my /etc/letsencrypt/renewal/domain.com.conf file and changing the post_hook to:
post_hook = killall nginx && service nginx start
Hope that can save someone else some time.
Hi Lawrence !
I installed Richie along with the Open edX-tutor on an aws instance and it’s now available at http://domain.com:8070. open edX lms and cms are available respectively at https://domain.com and https://studio.domain.com. Now I want to route a subdomain http://catalogue.domain.com to the port 8070. I plan to try using the instruction provided here, but I don’t see a /etc/nginx/sites-enabled/ or /edx/app/nginx/sites-available/ folders in my server. Would you please help me to figure this out ?
Hi Lawrence,
This is all amazing, thank you so much, I’ve learned a ton through your blog and exploring some unique errors. I have managed to fix everything on my own up until this point, but now I am having issues with the Discussion Forum breaking after the SSL encryption. I have been reading through error logs for a while now and can’t seem to find what is up. Nothing on any of the online forums fixes the problem, but I have narrowed it down to a courseware issue. Maybe you have experienced this in the past and have a solution?
Thanks,
Brenton
Hello Brenton,
I’ve run into the same problem with the discussion forum.Did you fix this issue?
Hi Lawrence,
First and foremost, I’ve been following your blog and it is perfect. Thank you so much for all you’ve done so far!
I am running into a problem with the discussion forum after I complete the SSL encryption steps above. I can’t find any documentation for it, is there any chance you have some insight or a direction to point me to begin learning?
Thanks,
Brenton
you need to add the ssl settings to /edx/app/nginx/sites-available/discussion. use your modifications to lms and cms as a guide.
Hi Lawrence!
I want to Prevent caching of SSL pages by adding “Cache-Control: no-store” and
“Pragma: no-cache” headers to their responses.
Thank you
How can I Prevent caching of SSL pages by adding “Cache-Control: no-store” and “Pragma: no-cache” headers to their responses in Open edx.
What are the cons of using AWS loadbalancer and Amazon certificate manager to provide the SSL encryption?
Has anyone tried both methodologies?
Thanks,
Bob
Hello, I’m trying to configure an open edx instance, but when I add SSL encryption with a domain, and subdomain for the studio, I get the same page in both domain names. What needs to add in ngixn config for fix this situation. Thanks, this documentation is useful…
which version of open edx did you install?
Hi Lawrence,
Thanks for the tutorials on open edx, really helpful!
I’m stuck on this open edx ssl encryption..
My site is now on https but I can’t access studio (port 18010). In addition, my cms file is EMPTY! 🙁
I see on some comments and online people have a cms file filled with code but mine for some reason is empty by default. What’s going on here?
Thanks
Just got that resolved but I have a new problem – ‘the connection is not private’ – Chrome tells me the site this message sometimes. When I try to get to the site via hyperlink from, for example a word doc, it says ‘the name on the security certificate is invalid or does not match the name of the site’.
clear cookies in your browser.
step to resolve depend on the version of open edx you’ve installed. prior to Ironwood you should change the port from 18010 to 443, plus, you should create a sub-domain for CMS in your dns settings like for example, “studio.domainname.com” and then assign this name in your cms nginx config file using the directive “server_name”. On the other hand, if you’ve installed Ironwood then you’ll probably want to keep the original port setting and simply add the directive “ssl” to the port assignment.
Dear Laurence, I just did all the process and it works basically right, but I have a problem when setting the cron renewal.
Can you give more details on WHERE to find the place to add the cron job, or if there is a command line?
it’s a command line: crontab -e
this will open a text editor like vi or vim where you can add a new line with the autorenewal command.
Hello,
thanks for your tutorial!
I have a problem (native Ironwood1.rc1): if I try to put cms on a different subdomain (eg studio.example.com) from lms (eg example.com), then I’m not able to sign-in in studio… I see studio uses lms for authentication, but it seems non able to keep the authentication across different domains.
No problem if I use same domain on different ports, either on SSL (es lms on example.com:443 and cmd on example.com:18010)
Thank you
Edo
hi enrico, i can confirm that it is possible to share both authentication and session across the LMS and CMS, on http as well as https. the particular problem you are having might be due to settings in lms.env.json and cms.env.json related to the names and/or cookies. i’d recommend systematically eliminating as much as possible from both files until you resolved your problem. keep in mind that you can delete entire sections of parameters and the platform will still run. you can use this example lms.env.json file as a quasi-example of the bare minimum settings you need.
Lawrence Hi!
Disregard my previous message.
I deleted from CMS only the line “listen 443;” and that did resolve the problem.
PS. Add to your blog that the lines:
listen 443 ssl; # managed by Certbot
ssl_certificate /etc/letsencrypt/live/greekmoocs.gr/fullchain.pem; # managed by Certbot
ssl_certificate_key /etc/letsencrypt/live/greekmoocs.gr/privkey.pem; # managed by Certbot
include /etc/letsencrypt/options-ssl-nginx.conf; # managed by Certbot
ssl_dhparam /etc/letsencrypt/ssl-dhparams.pem; # managed by Certbot
do not exist in LMS and users need to add them manually.
you should only change the port assignment in CMS if (and only if) you prefer to access studio from a custom subdomain which you would setup at your internet domain registrar (ie studio.greekmoocs.gr). if on the other hand you prefer to continue to access studio via the custom port assignment 18010 then you should still add your TLS/SSL keys AND you should still redirect traffic from http to https.
Lawrence sorry but I didn’t understand what you propose here.
I restarted the AWS instance (stop and then start again) and I cannot access either LMS and CMS.
I am a little bit lost!
I added to CMS:
server_name greekmoocs.gr;
listen 18010 ssl;
ssl_certificate /etc/letsencrypt/live/greekmoocs.gr/fullchain.pem; # managed by Certbot
ssl_certificate_key /etc/letsencrypt/live/greekmoocs.gr/privkey.pem; # managed by Certbot
include /etc/letsencrypt/options-ssl-nginx.conf; # managed by Certbot
ssl_dhparam /etc/letsencrypt/ssl-dhparams.pem; # managed by Certbot
But I receive an error “duplicate upstream “cms-backend” in etc/nginx/sites-enabled/cms.save:1″
On the lms side I added:
server {
listen 80;
return 301 https://$host$request_uri;
}
server_name greekmoocs.gr
listen 443 ssl; # managed by Certbot
ssl_certificate /etc/letsencrypt/live/greekmoocs.gr/fullchain.pem; # managed by Certbot
ssl_certificate_key /etc/letsencrypt/live/greekmoocs.gr/privkey.pem; # managed by Certbot
include /etc/letsencrypt/options-ssl-nginx.conf; # managed by Certbot
ssl_dhparam /etc/letsencrypt/ssl-dhparams.pem; # managed by Certbot
in your CMS configuration you need to remove the line you added, “server_name greekmoocs.gr;”. then it should work.
First of all I would like to thank you for your time to solve my problem.
Unfortunately, I receive the error: “nginx: [emerg] duplicate upstream “cms-backend” in /etc/nginx/sites-enabled/cms.save:1″.
Lawrence Hi again.
Disregard my previous message. I launched a brand new instance and followed all the steps again and all that did work.
I haven’t made any changes to CMS. What changes do I need to make if I want to put it under SSL? I mean to access studio through https://mydomain.com:18010 ?
Lawrence Hi.
I tried to follow the steps you provided. I used the domain greekmoocs.gr
I ended up https://greekmoocs.gr to show my the cms panel (studio).
Following your steps, up until step 2 went perfect.
When I opened lms to make the requested changes on step 3, I commented out line “listen 80” and inside server I put the “listen 80;” and “return 301 https://$host$request_uri;” commands.
BUT, trying to find the “listen 443 ssl;” block of commands you referred that exist near the bottom, I couldn’t find such entry! The entry was inside the cms settings from which I cut the code and then paste it in LMS.
That did resolve the problem meaning that https://greekmoocs.gr redirects to LMS home page.
But now I have the problem that I cannot access the cms https://greekmoocs.gr:18010
It show the error:
Secure Connection Failed
The connection to greekmoocs.gr:18010 was interrupted while the page was loading.
The page you are trying to view cannot be shown because the authenticity of the received data could not be verified.
Please contact the website owners to inform them of this problem.
When I put the “listen 443 ssl;” block of commands inside LMS, I can access the lms through https://greekmoocs.gr
When I put the “listen 443 ssl;” block of commands inside CMS, I can access the cms through https://greekmoocs.gr !!!
Dear Lawrence,
As of 15th October, 2018 – I think step 3 is not needed as certbot does the needful.
Yesterday, I tried with step 3, but couldnt get it work.
Today, I realised that certbot’s changes have changed indeed and works after step 2.
You may kindly review and update the blog appropriately.
Thanks!!
thanks Spurgeon. this step is still necessary for Course Management Studio because Certbot incorrectly adds the line “listen 443;”, and, the line “Listen 18010;” needs to become “Listen 18010 ssl;”. But you are correct regarding the LMS — step 3 is just a vanity procedure for this configuration.
Thanks a ton for the kind clarification!
Yes! I forgot about CMS part…
Thank you! God bless you!!
Hi Lawrence!
Thank you for you post. It helps a lot.
But when I try to renewal the certificate it doesn’t work.
I have the error :
Jul 24 11:54:23 dev-openedx-ubu nginx[5389]: nginx: [emerg] bind() to 0.0.0.0:18130 failed (98: Address already in use)
Jul 24 11:54:23 dev-openedx-ubu nginx[5389]: nginx: [emerg] bind() to 0.0.0.0:18080 failed (98: Address already in use)
Jul 24 11:54:23 dev-openedx-ubu nginx[5389]: nginx: [emerg] bind() to 0.0.0.0:80 failed (98: Address already in use)
Jul 24 11:54:23 dev-openedx-ubu nginx[5389]: nginx: [emerg] bind() to 0.0.0.0:443 failed (98: Address already in use)
Jul 24 11:54:23 dev-openedx-ubu nginx[5389]: nginx: [emerg] bind() to 0.0.0.0:18040 failed (98: Address already in use)
Jul 24 11:54:24 dev-openedx-ubu nginx[5389]: nginx: [emerg] still could not bind()
Jul 24 11:54:24 dev-openedx-ubu systemd[1]: nginx.service: Control process exited, code=exited status=1
Jul 24 11:54:24 dev-openedx-ubu systemd[1]: Failed to start nginx – high performance web server.
Jul 24 11:54:24 dev-openedx-ubu systemd[1]: nginx.service: Unit entered failed state.
Jul 24 11:54:24 dev-openedx-ubu systemd[1]: nginx.service: Failed with result ‘exit-code’.
That’s odd. i found this article with a google search: https://easyengine.io/tutorials/nginx/troubleshooting/emerg-bind-failed-98-address-already-in-use/